この記事はうるる Advent Calendar 2022の1日目の記事です。
はじめに
今回は自分が担当しているプロジェクトのバックエンドで,
GraphQLサーバーとして利用している,
Lighthouse の具体的な利用法について記事を書いていきます!
下記のような方にささればいいな〜と思ってます.
- これからLighthouseを導入するための材料を集めている
- Lighthouseを具体的にどう利用しているのか知りたい
Lighthouse公式ドキュメント
https://lighthouse-php.com/
GraphQLの基本は下記で学びました.
https://www.oreilly.co.jp/books/9784873118932/
各種バージョン
- PHP:8.1
- Laravel:9.0
- lighthouse:5.55
- dd-trace:0.74.0
Lighthouseの導入
下記を参照にどうぞ.
https://lighthouse-php.com/master/getting-started/installation.html#install-via-composer
詳細は割愛します.
スキーマの分割
全てschema.graphqlに記載をまとめることもできますが,
かなり分かりにくくなるので分割します.
ディレクトリ構成
下記のような構成にしてます.
基本modelごとにファイルを分けてます.
src/
  ├ graphql/
  │ ├ models/
  │ │   ├ user.graphql
  │ │   ├ company.graphql
  │ │   ├ ...
  │ │   └ prefecture.graphql
  │ └ schema.graphql
  ...
スキーマの書き方
schema.graphql
models配下にあるファイル達を読み込めるようにします.
type Query

type Mutation

#import **/*.graphql
model配下にあるファイル達
extend type Query, extend type Mutationと定義する
extend type Query {
  "hugahuga"
  hoge: Hoge! @paginate(defaultCount: 10)
}

extend type Mutation {
  "hugehuge"
  update(id: Int!, input: HugeInput @spread): Huge @update
}

...
クエリ名の枯渇を防ぐ
all や find などの汎用的に使いたいクエリ名ですが,
何も工夫せずにスキーマを組み立てると一度きりしか使えなくなってしまいます.
名前を変えて回避するにも,
userAll や companyAll などになってしまうのでいまいちです.
userのallクエリ, companyのallクエリといった感じの方が使いやすいです.
なので typeにクエリを指定できるようにして 業務ごとのクエリをまとめていくことで回避します.
何もしないリゾルバを用意
空配列を返すNoopリゾルバを用意します
<?php
namespace Modules\GraphQL\Queries;

/**
 * Class NoopResolver
 */
class NoopResolver
{
    /**
     *
     * @param null $_
     * @param array<string, mixed> $args
     */
    public function __invoke($_, array $args): array
    {
        return [];
    }
}
NoopResolverを用いてスキーマの定義を行う
- @field関数にて定義したNoopResolverを利用.
- クエリをまとめるtypeを用意する
- フィールド定義するtypeを定義する
extend type Query {
  "【Query】ユーザー"
  user: UserQuery! @field(resolver: "NoopResolver")
}

"【Type】ユーザー"
type User {
  "ID"
  id: Int!
  "名前"
  name: String!
  "有効フラグ"
  active: Boolean!
  "作成日時"
  createdAt: DateTime @rename(attribute: "created_at")
  "更新日時"
  updatedAt: DateTime @rename(attribute: "updated_at")
}

"【Query】ユーザー"
type UserQuery {
  "ユーザー全件取得"
  all: [User!]! @paginate(defaultCount: 10)
}
extend type Query {
  "【Query】会社"
  company: CompanyQuery! @field(resolver: "NoopResolver")
}

"【Type】会社"
type Company {
  "ID"
  id: Int!
  "名前"
  name: String!
  "住所"
  address: String!
  "作成日時"
  createdAt: DateTime @rename(attribute: "created_at")
  "更新日時"
  updatedAt: DateTime @rename(attribute: "updated_at")
}

"【Query】会社"
type CompanyQuery {
  "会社全件取得"
  all: [Company!]! @paginate(defaultCount: 10)
}
これにより下記のようにallクエリが衝突せずに呼べるようになります.
{
  user {
    all {
      data {
        id
        name
      }
    }
  }
  company {
    all {
      data {
        id
        name
      }
    }
  }
}
よく使うDirectiveや記述方法3選
頻繁に利用する3選をお送りします.
Local Scopes
公式は下記.
https://lighthouse-php.com/5/eloquent/getting-started.html#local-scopes
対象モデルで特定データの絞り込みを行いたい時に利用する.
リレーション先のデータを絞り込んで抽出する時に重宝する.
使い方
ユーザーの中でもアクティブなユーザーとアクティブでないユーザーで出しわけしたいケースで使ってみる.
modelにscopeから始まる関数を定義し, 中の処理でクエリを書く.
<?php
...省略

class User
{
    ...省略
    /**
     * @param Builder $query
     *
     * @return Builder
     */
    public function scopeActive(Builder $query): Builder
    {
        return $query->where('active', true);
    }

    /**
     * @param Builder $query
     *
     * @return Builder
     */
    public function scopeInActive(Builder $query): Builder
    {
        return $query->where('active', false);
    }
}
スキーマで利用しているallディレクティブにscopesを定義する.
extend type Query {
  "【Query】ユーザー"
  user: UserQuery! @field(resolver: "NoopResolver")
}

"【Type】ユーザー"
type User {
  "ID"
  id: Int!
  "アクティブフラグ"
  active: Boolean!
  "名前"
  name: String!

}

"【Query】ユーザー"
type UserQuery {
  "アクティブユーザー取得"
  allActiveUser: [User!]! @all(scopes: ["active"])
  "非アクティブユーザー取得"
  allInActiveUser: [User!]! @all(scopes: ["inActive"])
}
下記クエリで各種データを取得できる
{
  user {
    allActiveUser {
      data {
        id
        active
        name
      }
    }
    allInActiveUser {
      data {
        id
        active
        name
      }
    }
  }
}
@method
抽出するデータ毎に,
計算結果などのフィールドを追加したい場合に利用.
公式ドキュメント
https://lighthouse-php.com/5/api-reference/directives.html#method
使い方
簡単な例として,
アクティブ状態によって返す文言が変わるフィールドを追加してみる.
modelに関数を定義する
    ... 省略
    /**
     * @return string
     */
    public function isActive(): string
    {
        if ($this->active) {
            return 'アクティブ';
        }

        return '非アクティブ';
    }
フィールドに追加する
extend type Query {
  "【Query】ユーザー"
  user: UserQuery! @field(resolver: "NoopResolver")
}

"【Type】ユーザー"
type User {
  "ID"
  id: Int!
  "アクティブ文言"
  isActive: String! @method(name: "isActive")
  "名前"
  name: String!


}

"【Query】ユーザー"
type UserQuery {
  "ユーザー全件取得"
  all: [User!]! @all
}
@hasManyディレクティブのrelationを活用
ケースとして,
リレーション先のデータをscopesで絞り込みつつ,
フィールド名を変えていきたい場合に利用する.
使い方
companyが保持するuserで,
アクティブなuserと非アクティブなユーザーで出し分けてみる.
companyのmodelにリレーションを定義する.
    ... 省略
    /**
     * @return HasMany
     */
    public function users(): HasMany
    {
        return $this->hasMany(User::class);
    }
usrのmodelにscopeを定義する.(前の章で定義した内容と同じです)
    ...省略
    /**
     * @param Builder $query
     *
     * @return Builder
     */
    public function scopeActive(Builder $query): Builder
    {
        return $query->where('active', true);
    }

    /**
     * @param Builder $query
     *
     * @return Builder
     */
    public function scopeInActive(Builder $query): Builder
    {
        return $query->where('active', false);
    }
}
フィールドを定義する.
Lighthouseの特性上,
フィールド名がリレーションの関数名と等しいとみなすので,
relationオプションを用いて, 直接関数名を指定する必要がある.
extend type Query {
  "【Query】会社"
  company: CompanyQuery! @field(resolver: "NoopResolver")
}

"【Type】会社"
type Company {
  "ID"
  id: Int!
  "名前"
  name: String!
  "住所"
  address: String!
  "作成日時"
  createdAt: DateTime @rename(attribute: "created_at")
  "更新日時"
  updatedAt: DateTime @rename(attribute: "updated_at")

  "アクティブなユーザー"
  activeUsers: [User!]! @hasMany(scopes: ["active"], relation: "users")
  "非アクティブなユーザー"
  inActiveUsers: [User!]! @hasMany(scopes: ["inActive"], relation: "users")
}

"【Query】会社"
type CompanyQuery {
  "会社全件取得"
  all: [Company!]! @paginate(defaultCount: 10)
}
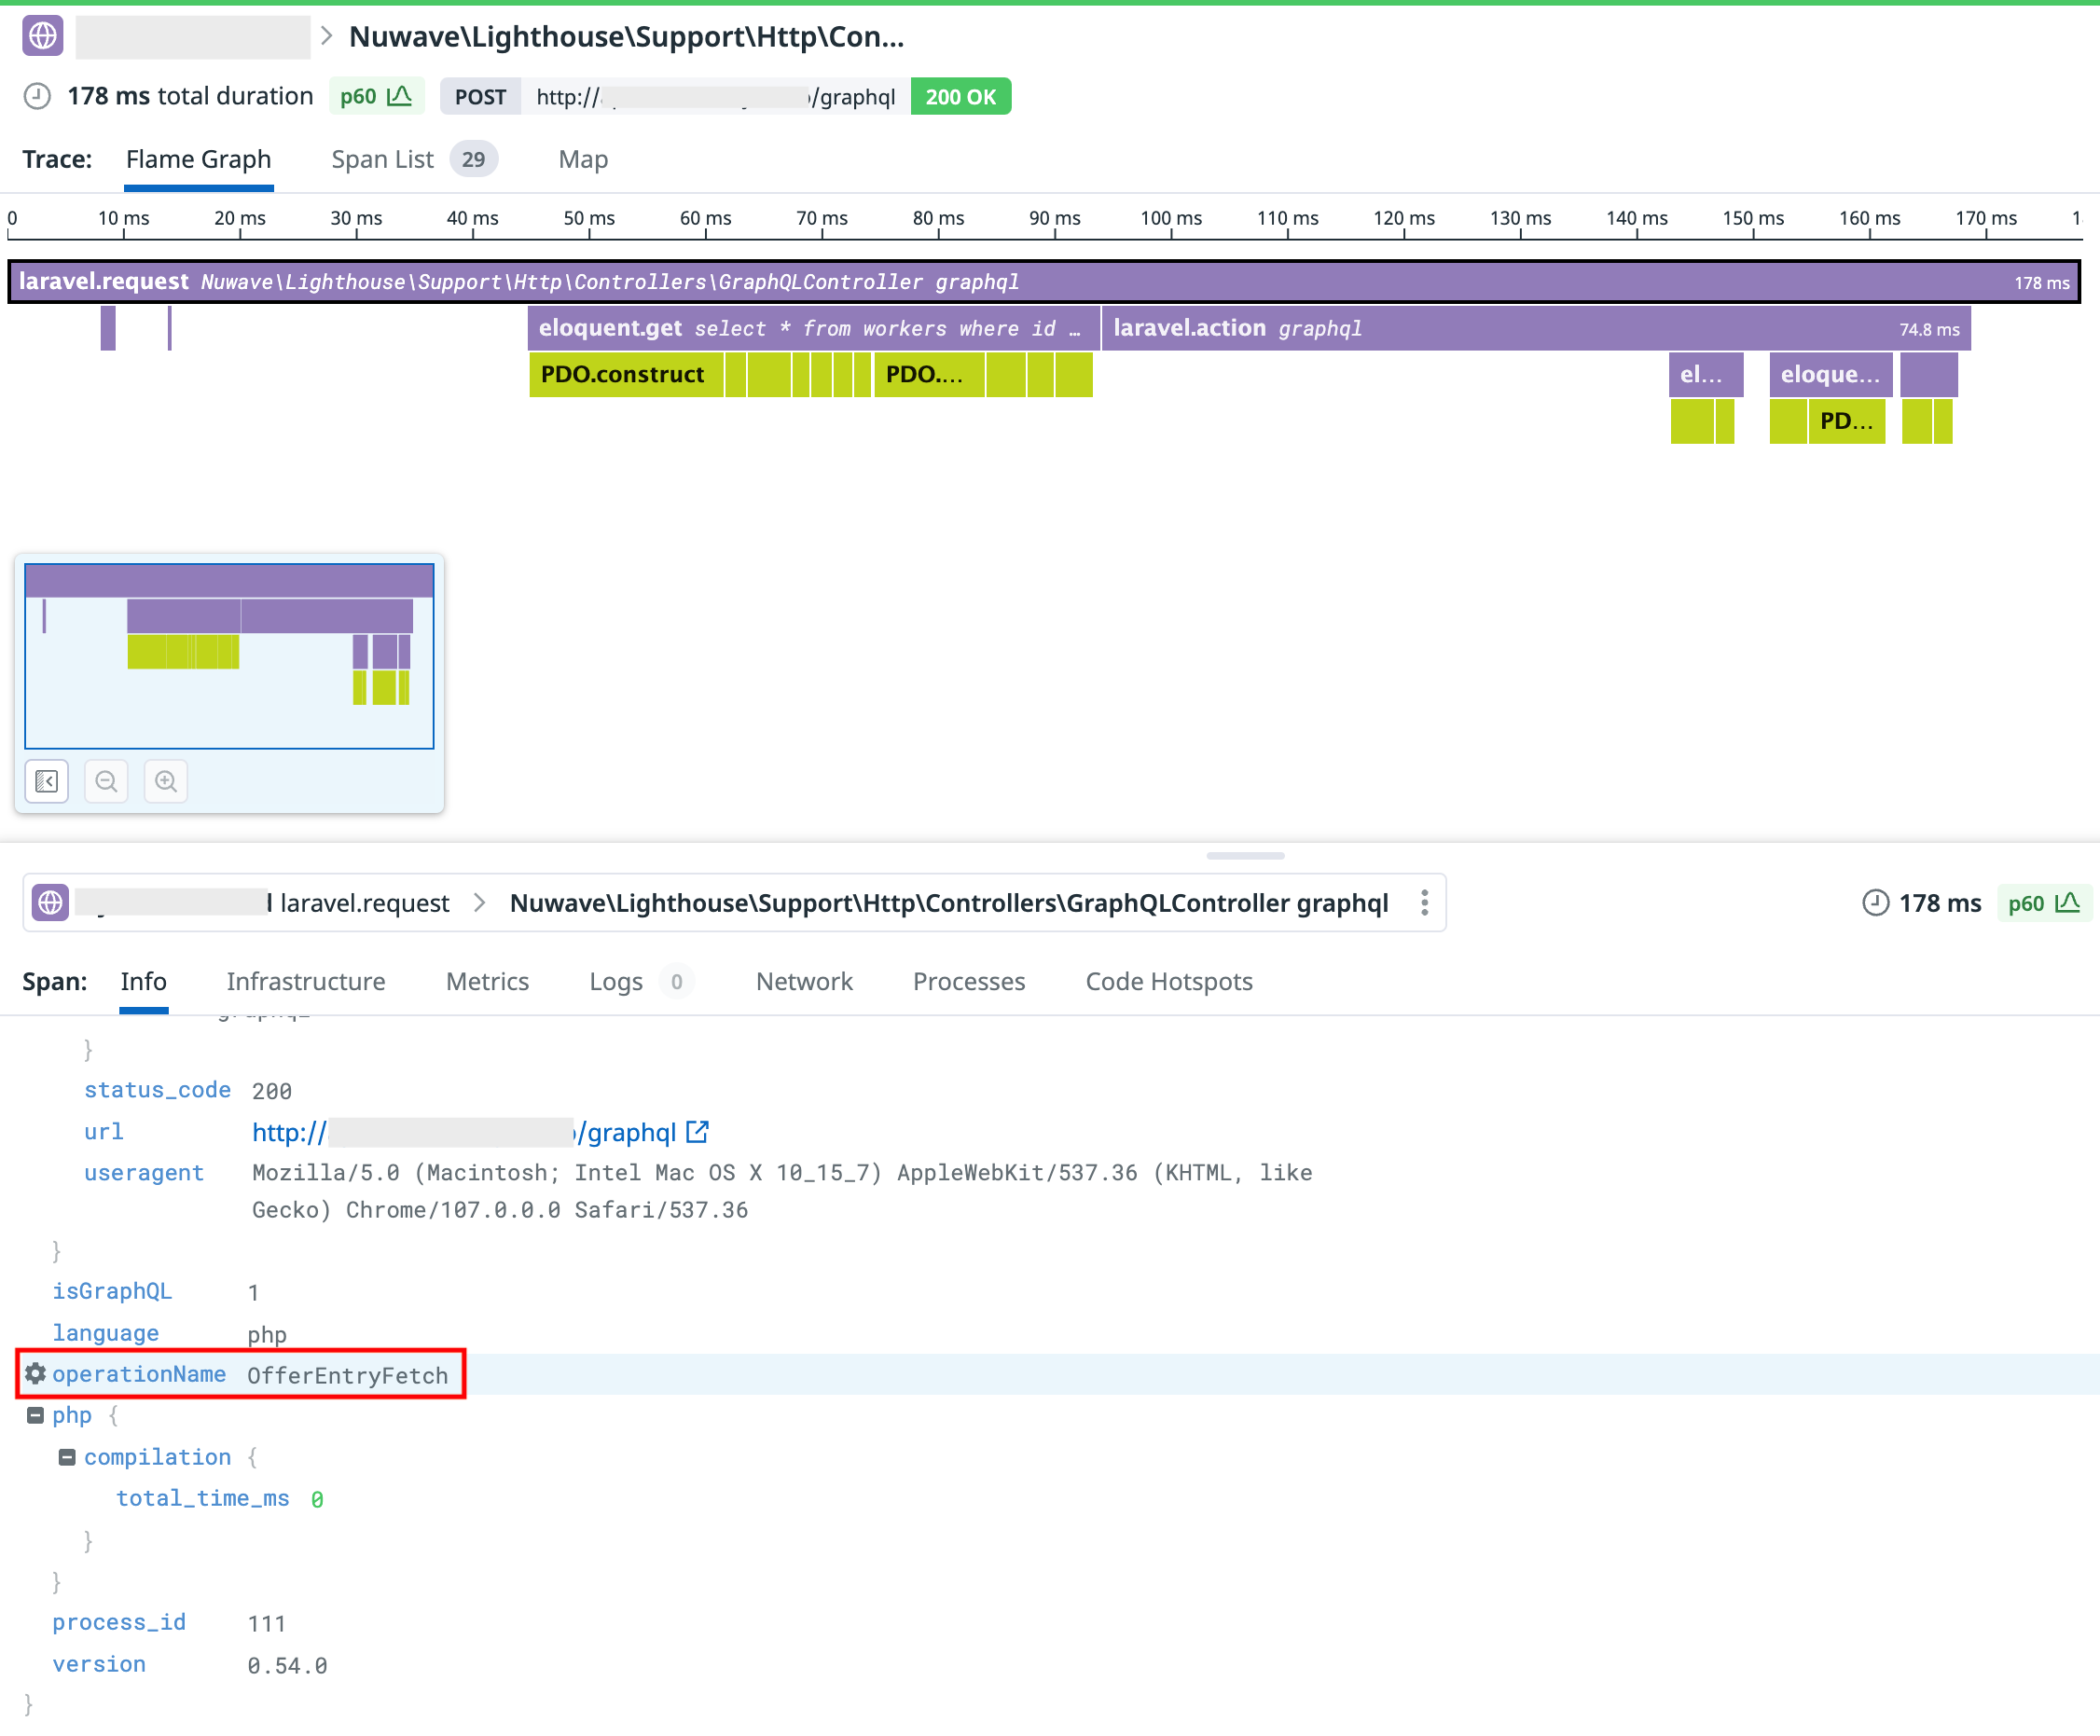
クエリのパフォーマンスを計測したい
GraphQLはエンドポイントが1つになるため,
パフォーマンスが計測しにくい.
私たちはDatadogのAPMにタグ付けして連携することで,
クエリごとに集計ができるようにしています.
やりかた
DatadogAPMの連携については下記を参照.
詳細は割愛します.
https://docs.datadoghq.com/ja/tracing/trace_collection/dd_libraries/php/?tab=%E3%82%B3%E3%83%B3%E3%83%86%E3%83%8A
src/app/Http/Middleware に Datadog.php を作成.
クエリを叩いた時のRequestからoperationNameを取得し, タグ付けする.
<?php

namespace App\Http\Middleware;

use Closure;
use Illuminate\Http\Request;
use DDTrace\GlobalTracer;

class Datadog
{
    /**
     * @return mixed
     */
    public function handle(Request $request, Closure $next)
    {
            $response = $next($request);

            $span = GlobalTracer::get()->getActiveSpan();
            if ($span === null) {
                return $response;
            }
            $operationName = $request->toArray();
            if ($operationName) {
                $span->setTag('operationName', $operationName["operationName"]);
            }

            return $response;
    }
}
src/config/lighthouse.php の$middlewareに上記で作成したClassを突っ込む.
<?php

$middleware = [
    ...省略
    \App\Http\Middleware\Datadog::class
];
OperationNameを付与し, クエリを叩くとDatadogAPMにデータが連携される.
さいごに
Lighthouseかなりいいです...!
チームでかなり検証しましたが,
便利なディレクティブも豊富で, 読み込みでやりたいことはほとんどできました.
N+1問題もよしなに解決してくれますし.
https://lighthouse-php.com/master/performance/n-plus-one.html#the-n-1-query-problem
紹介できていない部分もかなりありますが,
LaravelでGraphQLサーバーかまえたい方にはおすすめです!
明日は, kurifumi さんによる記事です!
ご期待ください!