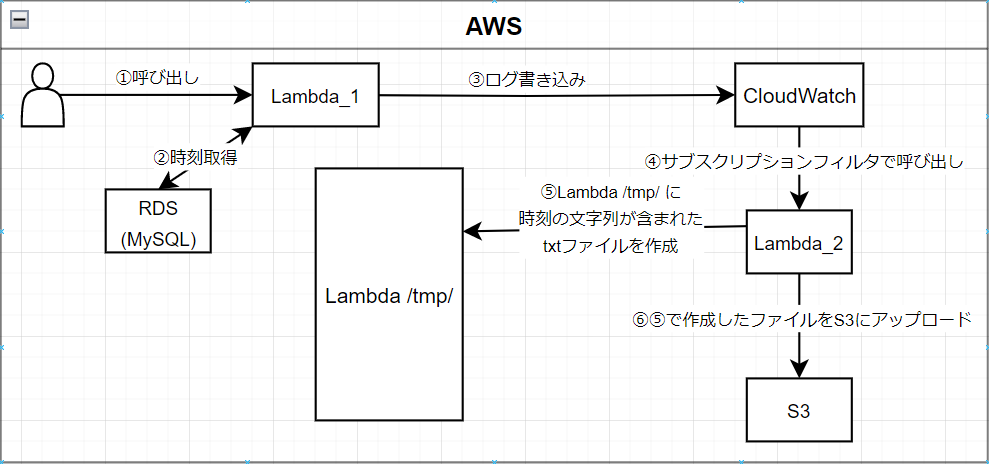
- AWS CLI を使った VPC、RDS、S3、Lambda、サブスクリプションフィルタの作成をまとめました。
- AWS コンソールを使った作成はこちら
- IAM ユーザの設定
- CLI を実行する IAM ユーザを事前に作成して、下記権限を付けます。
https://docs.aws.amazon.com/ja_jp/IAM/latest/UserGuide/id_users_create.html#id_users_create_console- CloudWatchFullAccess
- IAMFullAccess
- AmazonRDSFullAccess
- AmazonS3FullAccess
- AmazonVPCFullAccess
- AWSLambda_FullAccess
- AWSCloudShellFullAccess
- IAM ユーザのアクセスキー、シークレットアクセスキーを生成します。
https://docs.aws.amazon.com/ja_jp/IAM/latest/UserGuide/id_credentials_access-keys.html#Using_CreateAccessKey - キーを生成後 aws configure を使用して aws cli を実行可能な状態にします。
https://docs.aws.amazon.com/ja_jp/cli/latest/userguide/cli-configure-files.html#cli-configure-files-methods
- CLI を実行する IAM ユーザを事前に作成して、下記権限を付けます。
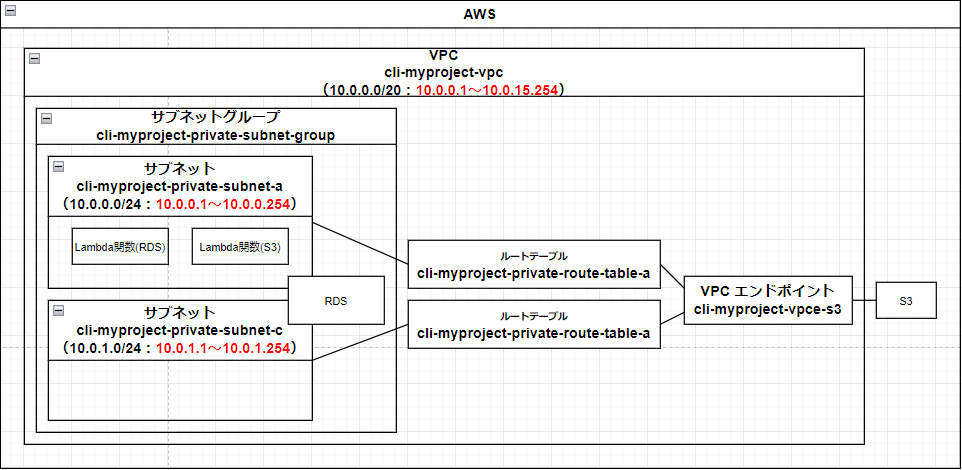
- システムの構成
Lambda と RSD はVPC、セキュリティグループどちらも同じものに所属させています。

- VPC 設定
VPCの作成
サブネットとサブネットグループの作成
ルートテーブルの作成とサブネットとの関連付け
エンドポイントの作成
セキュリティグループの作成
データベースの作成
S3の作成
Lambdaの作成(ライブラリの作成、レイヤーの作成)
Lambda実行ロールの作成
Lambdaの作成(関数ファイルの作成、Lambda関数の作成)
Lambdaの設定
サブスクリプションフィルタの設定
実行と確認
VPCの作成
- VPC「cli-myproject-vpc」の作成をします。
- powershell で実行します。
# デフォルトのリージョンを設定します。
$AWS_DEFAULT_REGION="ap-southeast-1"

# VPC タグの設定
$EC2_VPC_TAG_NAME="cli-myproject-vpc"
$STRING_EC2_VPC_TAG="ResourceType=vpc,Tags=[{Key=Name,Value=$EC2_VPC_TAG_NAME}]"
# VPC CIDR の設定
# 使用可能なホストアドレス範囲「10. 0. 0. 1~10. 0. 15.254」
# 参考 https://hogehoge.tk/ip/
$EC2_VPC_CIDR="10.0.0.0/20"
# VPC の作成
aws ec2 create-vpc `
  --cidr-block $EC2_VPC_CIDR `
  --tag-specifications $STRING_EC2_VPC_TAG
# 作成した VPC の確認
aws ec2 describe-vpcs `
  --filters Name=tag:Name,Values=$EC2_VPC_TAG_NAME `
  --query 'Vpcs[].Tags[?Key==`Name`].Value' `
  --output text
サブネットとサブネットグループの作成
- サブネット「cli-myproject-private-subnet-a」「cli-myproject-private-subnet-b」の作成をします。
# サブネットタグの設定
$EC2_AZ_CODE_A="a"
$EC2_AZ_CODE_C="c"
$EC2_SUBNET_TYPE="private"
$EC2_SUBNET_TAG_NAME_A="cli-myproject-$EC2_SUBNET_TYPE-subnet-$EC2_AZ_CODE_A"
$EC2_SUBNET_TAG_NAME_C="cli-myproject-$EC2_SUBNET_TYPE-subnet-$EC2_AZ_CODE_C"
$STRING_EC2_SUBNET_A_TAG="ResourceType=subnet,Tags=[{Key=Name,Value=$EC2_SUBNET_TAG_NAME_A}]"
$STRING_EC2_SUBNET_C_TAG="ResourceType=subnet,Tags=[{Key=Name,Value=$EC2_SUBNET_TAG_NAME_C}]"
# サブネット CIDR の設定
# 10. 0. 0. 1~10. 0. 0.254
$EC2_SUBNET_A_CIDR="10.0.0.0/24"
# 10. 0. 1. 1~10. 0. 1.254
$EC2_SUBNET_C_CIDR="10.0.1.0/24"
# availability-zone の設定
$EC2_AZ_NAME_A="$AWS_DEFAULT_REGION$EC2_AZ_CODE_A"
$EC2_AZ_NAME_C="$AWS_DEFAULT_REGION$EC2_AZ_CODE_C"
# VPCID の取得
$EC2_VPC_ID=aws ec2 describe-vpcs `
    --filters "Name=tag:Name,Values=$EC2_VPC_TAG_NAME" `
    --query 'Vpcs[].VpcId' `
    --output text
# サブネットの作成(A)
aws ec2 create-subnet `
  --vpc-id $EC2_VPC_ID `
  --cidr-block $EC2_SUBNET_A_CIDR `
  --availability-zone $EC2_AZ_NAME_A `
  --tag-specifications $STRING_EC2_SUBNET_A_TAG
# サブネットの作成(C)
aws ec2 create-subnet `
  --vpc-id $EC2_VPC_ID `
  --cidr-block $EC2_SUBNET_C_CIDR `
  --availability-zone $EC2_AZ_NAME_C `
  --tag-specifications $STRING_EC2_SUBNET_C_TAG
# 作成したサブネットの確認
aws ec2 describe-subnets `
  --filters Name=vpc-id,Values=$EC2_VPC_ID `
            Name=tag:Name,Values=$EC2_SUBNET_TAG_NAME_A `
  --query 'Subnets[].[Tags[?Key==`Name`].Value]' `
  --output text
aws ec2 describe-subnets `
  --filters Name=vpc-id,Values=$EC2_VPC_ID `
            Name=tag:Name,Values=$EC2_SUBNET_TAG_NAME_C `
  --query 'Subnets[].[Tags[?Key==`Name`].Value]' `
  --output text
- サブネットグループの作成(RDS用)
# サブネット ID の設定(A)
$EC2_SUBNET_A_ID=aws ec2 describe-subnets `
  --filters Name=vpc-id,Values=$EC2_VPC_ID `
            Name=tag:Name,Values=$EC2_SUBNET_TAG_NAME_A `
  --query 'Subnets[].SubnetId' `
  --output text
# サブネット ID の設定(C)
$EC2_SUBNET_C_ID=aws ec2 describe-subnets `
  --filters Name=vpc-id,Values=$EC2_VPC_ID `
            Name=tag:Name,Values=$EC2_SUBNET_TAG_NAME_C `
  --query 'Subnets[].SubnetId' `
  --output text
$EC2_SUBNET_GROUP_TAG_NAME="cli-myproject-$EC2_SUBNET_TYPE-subnet-group"
$STRING_EC2_SUBNET_GROUP_TAG="Key=Name,Value=$EC2_SUBNET_GROUP_TAG_NAME"
# サブネットグループの作成
aws rds create-db-subnet-group `
  --db-subnet-group-name $EC2_SUBNET_GROUP_TAG_NAME `
  --db-subnet-group-description "subnet group description" `
  --subnet-ids $EC2_SUBNET_A_ID $EC2_SUBNET_C_ID `
  --tags $STRING_EC2_SUBNET_GROUP_TAG
# 作成したサブネットグループの確認
aws rds describe-db-subnet-groups `
  --db-subnet-group-name $EC2_SUBNET_GROUP_TAG_NAME `
  --query 'DBSubnetGroups[].DBSubnetGroupName' `
  --output text
ルートテーブルの作成とサブネットとの関連付け
ルートテーブル「cli-myproject-private-route-table」を作成します。
# ルートテーブルタグの設定
$EC2_ROUTE_TABLE_TAG_NAME_A="cli-myproject-private-route-table-a"
$EC2_ROUTE_TABLE_TAG_NAME_C="cli-myproject-private-route-table-c"
$STRING_EC2_ROUTE_TABLE_A_TAG="ResourceType=route-table,Tags=[{Key=Name,Value=$EC2_ROUTE_TABLE_TAG_NAME_A}]"
$STRING_EC2_ROUTE_TABLE_C_TAG="ResourceType=route-table,Tags=[{Key=Name,Value=$EC2_ROUTE_TABLE_TAG_NAME_C}]"
# ルートテーブルの作成(A)
aws ec2 create-route-table `
  --vpc-id $EC2_VPC_ID `
  --tag-specifications $STRING_EC2_ROUTE_TABLE_A_TAG
# ルートテーブルの作成(C)
aws ec2 create-route-table `
  --vpc-id $EC2_VPC_ID `
  --tag-specifications $STRING_EC2_ROUTE_TABLE_C_TAG
# 作成したルートテーブルの確認
aws ec2 describe-route-tables `
  --filters Name=vpc-id,Values=$EC2_VPC_ID `
            Name=tag:Name,Values=$EC2_ROUTE_TABLE_TAG_NAME_A `
  --query 'RouteTables[].Tags[?Key==`Name`].Value' `
  --output text
aws ec2 describe-route-tables `
  --filters Name=vpc-id,Values=$EC2_VPC_ID `
            Name=tag:Name,Values=$EC2_ROUTE_TABLE_TAG_NAME_C `
  --query 'RouteTables[].Tags[?Key==`Name`].Value' `
  --output text
- サブネットとルートテーブルの関連付けを行う。
# ルートテーブル ID の設定(A)
$EC2_ROUTE_TABLE_A_ID=aws ec2 describe-route-tables `
  --filters Name=vpc-id,Values=$EC2_VPC_ID `
            Name=tag:Name,Values=$EC2_ROUTE_TABLE_TAG_NAME_A `
  --query 'RouteTables[].RouteTableId' `
  --output text
# ルートテーブル ID の設定(C)
$EC2_ROUTE_TABLE_C_ID=aws ec2 describe-route-tables `
  --filters Name=vpc-id,Values=$EC2_VPC_ID `
            Name=tag:Name,Values=$EC2_ROUTE_TABLE_TAG_NAME_C `
  --query 'RouteTables[].RouteTableId' `
  --output text
# サブネットとルートテーブルの関連付け(A)
aws ec2 associate-route-table `
  --subnet-id $EC2_SUBNET_A_ID `
  --route-table-id $EC2_ROUTE_TABLE_A_ID
# サブネットとルートテーブルの関連付け(C)
aws ec2 associate-route-table `
  --subnet-id $EC2_SUBNET_C_ID `
  --route-table-id $EC2_ROUTE_TABLE_C_ID
# ルートテーブルに関連付いているサブネットの確認
aws ec2 describe-route-tables `
  --route-table-ids $EC2_ROUTE_TABLE_A_ID `
  --query 'RouteTables[].Associations[].SubnetId' `
  --output text
aws ec2 describe-route-tables `
  --route-table-ids $EC2_ROUTE_TABLE_C_ID `
  --query 'RouteTables[].Associations[].SubnetId' `
  --output text
エンドポイントの作成
- S3 と接続するためのエンドポイント「cli-myproject-vpce-s3」を作成します。
# エンドポイントタグの設定
$EC2_ENDPOINT_TAG_NAME="cli-myproject-vpce-s3"
$STRING_EC2_ENDPOINT_TAG="ResourceType=vpc-endpoint,Tags=[{Key=Name,Value=$EC2_ENDPOINT_TAG_NAME}]"
# エンドポイントの作成
aws ec2 create-vpc-endpoint `
  --vpc-id $EC2_VPC_ID `
  --service-name com.amazonaws.ap-southeast-1.s3 `
  --route-table-ids $EC2_ROUTE_TABLE_A_ID $EC2_ROUTE_TABLE_C_ID `
  --tag-specifications $STRING_EC2_ENDPOINT_TAG
# 作成したエンドポイントの確認
aws ec2 describe-vpc-endpoints `
  --filters Name=tag:Name,Values=$EC2_ENDPOINT_TAG_NAME `
  --query 'VpcEndpoints[].Tags[?Key==`Name`].Value' `
  --output text
セキュリティグループの作成
- セキュリティグループ「cli-myproject-security-group」を作成します。
# セキュリティグループタグの設定
$EC2_SECURITY_GROUP_NAME="cli-myproject-security-group"
$STRING_EC2_ENDPOINT_TAG="ResourceType=security-group,Tags=[{Key=Name,Value=$EC2_SECURITY_GROUP_NAME}]"
# セキュリティグループの作成
aws ec2 create-security-group `
  --group-name $EC2_SECURITY_GROUP_NAME `
  --description $EC2_SECURITY_GROUP_NAME `
  --vpc-id $EC2_VPC_ID `
  --tag-specifications $STRING_EC2_ENDPOINT_TAG
# 作成したセキュリティグループの確認
aws ec2 describe-security-groups `
  --filters Name=tag:Name,Values=$EC2_SECURITY_GROUP_NAME `
  --query 'SecurityGroups[].Tags[?Key==`Name`].Value' `
  --output text
- セキュリティグループにインバウンドルール、アウトバウンドルールの設定
# セキュリティグループ ID の設定
$SECURITY_GROUP_ID=aws ec2 describe-security-groups `
  --filters Name=tag:Name,Values=$EC2_SECURITY_GROUP_NAME `
  --query 'SecurityGroups[].GroupId' `
  --output text
# セキュリティグループRULEの設定
$STRING_SECURITY_GROUP_RULE="IpProtocol=-1,FromPort=-1,ToPort=-1,UserIdGroupPairs=[{GroupId=$SECURITY_GROUP_ID,Description='security_group'}]"
# インバウンドルールを作成する。
aws ec2 authorize-security-group-ingress `
  --group-id $SECURITY_GROUP_ID `
  --ip-permissions $STRING_SECURITY_GROUP_RULE
# アウトバウンドルールを作成する。
aws ec2 authorize-security-group-egress `
  --group-id $SECURITY_GROUP_ID `
  --ip-permissions $STRING_SECURITY_GROUP_RULE
データベースの作成
- RDS「cli-myproject-rds」を作成します。
# RDS タグの設定
$RDS_NAME="cli-myproject-rds"
$STRING_RDS_TAG="Key=Name,Value=$RDS_NAME"
# RDS の作成
aws rds create-db-instance `
  --db-instance-identifier $RDS_NAME `
  --db-instance-class db.t2.micro `
  --engine mysql `
  --engine-version 8.0.32 `
  --db-name mysql_db `
  --master-username admin `
  --master-user-password adminadmin `
  --port 3306 `
  --allocated-storage 20 `
  --no-publicly-accessible `
  --vpc-security-group-ids $SECURITY_GROUP_ID `
  --db-subnet-group-name $EC2_SUBNET_GROUP_TAG_NAME `
  --no-copy-tags-to-snapshot `
  --backup-retention-period 0 `
  --tags $STRING_RDS_TAG
# 作成した RDS の確認
aws rds describe-db-instances `
  --db-instance-identifier $RDS_NAME `
  --query 'DBInstances[].[DBInstanceIdentifier,DBInstanceStatus]' `
  --output text
S3の作成
# ユニークな名前を設定
$S3_NAME="my-bucket-12312309809813579"
aws s3 mb "s3://$S3_NAME"
Lambda実行ロールの作成
- policy.json を作成します。
policy.json
{
    "Version": "2012-10-17",
    "Statement": [
        {
        "Effect": "Allow",
        "Principal": {
            "Service": "lambda.amazonaws.com"
        },
        "Action": "sts:AssumeRole"
        }
    ]
}
- Lambda 実行ロール(cli-lambda-role)を作成します。
# 新しいロールを作成
$LAMBDA_ROLE_NAME="cli-lambda-role"
aws iam create-role `
  --role-name $LAMBDA_ROLE_NAME `
  --assume-role-policy-document file://policy.json
# 作成したロールに権限の付与
aws iam attach-role-policy `
  --role-name $LAMBDA_ROLE_NAME `
  --policy-arn arn:aws:iam::aws:policy/AmazonEC2FullAccess
aws iam attach-role-policy `
  --role-name $LAMBDA_ROLE_NAME `
  --policy-arn arn:aws:iam::aws:policy/AmazonS3FullAccess
aws iam attach-role-policy `
  --role-name $LAMBDA_ROLE_NAME `
  --policy-arn arn:aws:iam::aws:policy/service-role/AWSLambdaBasicExecutionRole
# 作成したロールの確認
aws iam get-role `
  --role-name $LAMBDA_ROLE_NAME `
  --query "[Role.RoleName]" `
  --output text
# 作成したロールのポリシーの確認
aws iam list-attached-role-policies `
  --role-name $LAMBDA_ROLE_NAME `
  --query "[AttachedPolicies][][PolicyArn]" `
  --output text
Lambdaの作成(ライブラリの作成、レイヤーの作成)
- ライブラリ「mysql.zip」「boto3.zip」を作成する。
- pip や zip などは事前に使用可能な状態にしておく。
- zip 化の参考URL
https://qiita.com/KUROMAGOORO/private/fa2610f734fce8b27497#%E3%83%AC%E3%82%A4%E3%83%A4%E3%83%BC%E3%81%AE%E4%BD%9C%E6%88%90
# MySQL のライブラリの作成
pip install -t python/lib/python3.8/site-packages mysql.connector
zip -r mysql.zip python
rm -r python
# boto3 のライブラリの作成
pip install -t python/lib/python3.8/site-packages boto3
zip -r boto3.zip python
- レイヤー「cli-mysql-layer」「cli-boto3-layer」を作成する。
# レイヤー名の設定
$LAYER_NAME_MYSQL="cli-mysql-layer"
$LAYER_NAME_boto3="cli-boto3-layer"
# レイヤー(MySQL)の作成
aws lambda publish-layer-version `
    --layer-name $LAYER_NAME_MYSQL `
    --description "layer description MySQL" `
    --zip-file "fileb://mysql.zip" `
    --compatible-runtimes "python3.8" `
    --compatible-architectures "x86_64"
# レイヤー(boto3)の作成
aws lambda publish-layer-version `
    --layer-name $LAYER_NAME_boto3 `
    --description "layer description boto3" `
    --zip-file "fileb://boto3.zip" `
    --compatible-runtimes "python3.8" `
    --compatible-architectures "x86_64"
# 作成したレイヤーの確認
aws lambda list-layers `
  --query "Layers[?LayerName==``$LAYER_NAME_MYSQL``].[LayerName]" `
  --output text
aws lambda list-layers `
  --query "Layers[?LayerName==``$LAYER_NAME_boto3``].[LayerName]" `
  --output text
Lambdaの作成(関数ファイルの作成、Lambda関数の作成)
- Lambda 関数ファイルを作成・zip にして、アップロードして Lambda 関数を作成します。
- 1つ目の Lambda 関数ファイル(ファイル名は「lambda_01.py」としました。)
import mysql.connector
import json
import os
import logging
logger = logging.getLogger()
logger.setLevel(logging.INFO)

host = os.environ['RDS_HOST_NAME']
user = os.environ['USER_NAME']
password = os.environ['PASSWORD']
db = os.environ['DB_NAME']

def lambda_handler(event, context):
    conn = None
    date_time = None
    message = None
    try:
        # MySQL の接続
        conn = mysql.connector.connect(
            user=user,
            password=password,
            database=db,
            host=host
        )
        cur = conn.cursor()
        # 日時の取得
        cur.execute(f"SELECT NOW();")
        results = cur.fetchall()
        message = f"{results[0][0]}"
        logger.info("取得した時刻:" + message)
        status_code = 200
    except Exception as e:
        logger.info(f"Error Occurred: {e}")
        status_code = 500
        message = "error"
    finally:
        if conn is not None and conn.is_connected():
            conn.close()
    return {
        "statusCode": status_code,
        "body": json.dumps({
            "res": message,
            "event": event
            })
    }
- 2つ目の Lambda 関数ファイル(ファイル名は「lambda_02.py」としました。)
import json
import base64
import gzip
import re
import boto3
import tempfile
import os
import glob
from datetime import datetime, timedelta, timezone
from boto3.session import Session

import logging
logger = logging.getLogger()
logger.setLevel(logging.INFO)

JST = timezone(timedelta(hours=+9), 'JST')

BUCKET_NAME = os.environ['BUCKET_NAME']

def lambda_handler(event, context):
    try:
        # base64 デコード
        decoded_data = base64.b64decode(event["awslogs"]["data"])
        # gzip 解凍
        decompressed_data = gzip.decompress(decoded_data)
        #decompressed_data = '{"test": "test1", "logEvents": [{"message":"aaa取得した時刻:aaa", "test3": "eee"}]}'
        json_data = json.loads(decompressed_data)
        logger.info(json_data)

        # 取得した時刻:が書かれているログの一部を抜き出します。
        for logEvent in json_data["logEvents"]:
            log = re.search(r"取得した時刻:.*", logEvent["message"])
            if log != None:
                message = log.group()
                logger.info("イベント:{0}".format(message))
                break
        # 一時ファイルへの書き込み
        with tempfile.TemporaryDirectory() as tmpdir_name:
            tmpfile_name = "temp.txt"
            tmpfile_path = os.path.join(tmpdir_name, tmpfile_name)
            # tmpファイルの作成
            with open(tmpfile_path, "w", encoding='UTF-8') as f:
                f.write(message)
            logger.info("一時ファイル:{0}".format(glob.glob(tmpfile_path, recursive=True)))
            # tmpファイルの中身を確認
            with open(tmpfile_path, encoding='UTF-8') as f:
                logger.info("一時ファイルの中身:{0}".format(f.read()))

            # tmpファイルを S3 へアップロード
            s3 = boto3.resource("s3")
            bucket = s3.Bucket(BUCKET_NAME)
            date_time = datetime.now(JST).strftime('%Y%m%d_%H%M%S_%f')
            logger.info("現在時刻:{0}".format(date_time))
            s3file_path = os.path.join(date_time, tmpfile_name)
            bucket.upload_file(tmpfile_path, s3file_path)

        # 一時ファイルの削除を確認
        logger.info("削除後の一時ファイル:{0}".format(glob.glob(tmpfile_path, recursive=True)))
        # s3ファイルの確認
        for obj in bucket.objects.all():
            logger.info("S3削除対象:{0}".format(obj.key))
            # s3ファイルの削除
            res = bucket.objects.filter(Prefix=obj.key).delete()
            logger.info("削除したS3ファイル:HTTPStatusCode:{0}, Deleted:{1}".format(res[0]["ResponseMetadata"]["HTTPStatusCode"], res[0]["Deleted"][0]["Key"]))
    except Exception as e:
        logger.info(f"Error Occurred: {e}")
    return {
        "statusCode": 200,
        "body": json.dumps({
            "res": "S3TEST",
            "event": event
            }),
    }
- Lambda 関数「cli_rds_lambda」「cli_s3_lambda」を作成します。
# Lambda 関数名の設定
$LAMBDA_FUNCTION_NAME_RDS="cli_rds_lambda"
$LAMBDA_FUNCTION_NAME_S3="cli_s3_lambda"
# ロール ARN の設定
$LAMBDA_ROLE=aws iam get-role `
  --role-name $LAMBDA_ROLE_NAME `
  --query "[Role.Arn]" `
  --output text
# RDS に接続する Lambda 関数の作成
aws lambda create-function `
  --function-name $LAMBDA_FUNCTION_NAME_RDS `
  --timeout 10 `
  --runtime python3.8 `
  --zip-file fileb://lambda_01.zip `
  --handle lambda_01.lambda_handler `
  --role $LAMBDA_ROLE
# S3 に接続する Lambda 関数の作成
aws lambda create-function `
  --function-name $LAMBDA_FUNCTION_NAME_S3 `
  --timeout 10 `
  --runtime python3.8 `
  --zip-file fileb://lambda_02.zip `
  --handle lambda_02.lambda_handler `
  --role $LAMBDA_ROLE
# 作成した Lambda 関数の確認
aws lambda list-functions `
  --query "Functions[?FunctionName==``$LAMBDA_FUNCTION_NAME_RDS``].FunctionName" `
  --output text
aws lambda list-functions `
  --query "Functions[?FunctionName==``$LAMBDA_FUNCTION_NAME_S3``].FunctionName" `
  --output text
Lambdaの設定
- Lambda 関数に環境変数、VPC、レイヤーを設定します。
# レイヤーの「LayerVersionArn」を設定します。
$MYSQL_LAYER_ARN=aws lambda list-layers `
  --query Layers[?LayerName==``$LAYER_NAME_MYSQL``].LatestMatchingVersion[].LayerVersionArn[] `
  --output text
$BOTO3_LAYER_ARN=aws lambda list-layers `
  --query Layers[?LayerName==``$LAYER_NAME_boto3``].LatestMatchingVersion[].LayerVersionArn[] `
  --output text
# Lambda 関数に環境変数、VPC、レイヤーを設定
# RDS 情報の設定
$RDS_HOST_NAME=aws rds describe-db-instances `
  --db-instance-identifier $RDS_NAME `
  --query DBInstances[].Endpoint[].Address `
  --output text
# Lambda 関数の更新
aws lambda update-function-configuration `
  --function-name $LAMBDA_FUNCTION_NAME_RDS `
  --environment "Variables={ `
      DB_NAME=mysql_db, `
      PASSWORD=adminadmin, `
      RDS_HOST_NAME=$RDS_HOST_NAME, `
      USER_NAME=admin
  }" `
  --vpc-config "SubnetIds=$EC2_SUBNET_A_ID,SecurityGroupIds=$SECURITY_GROUP_ID" `
  --layers $MYSQL_LAYER_ARN
aws lambda update-function-configuration `
  --function-name $LAMBDA_FUNCTION_NAME_S3 `
  --environment "Variables={ `
      BUCKET_NAME=my-bucket-12312309809813579 `
  }" `
  --vpc-config "SubnetIds=$EC2_SUBNET_A_ID,SecurityGroupIds=$SECURITY_GROUP_ID" `
  --layers $BOTO3_LAYER_ARN
サブスクリプションフィルタの設定
- ロググループを作成します。
# ロググループ名の設定
$RDS_LOG_GROUP_NAME="/aws/lambda/$LAMBDA_FUNCTION_NAME_RDS"
$S3_LOG_GROUP_NAME="/aws/lambda/$LAMBDA_FUNCTION_NAME_S3"
# ロググループの作成
aws logs create-log-group `
    --log-group-name $RDS_LOG_GROUP_NAME
aws logs create-log-group `
    --log-group-name $S3_LOG_GROUP_NAME
# 作成したロググループの確認
aws logs describe-log-groups `
  --query logGroups[?logGroupName==``$RDS_LOG_GROUP_NAME``].logGroupName `
  --output text
aws logs describe-log-groups `
  --query logGroups[?logGroupName==``$S3_LOG_GROUP_NAME``].logGroupName `
  --output text
- サブスクリプションフィルタで呼び出す Lambda に log-group(サブスクリプションフィルタ) からのアクセスを許可します。
# Lambda 関数を呼び出すロググループの ARN を設定
$LOG_GROUP_RDS_ARN=aws logs describe-log-groups `
  --query logGroups[?logGroupName==``/aws/lambda/$LAMBDA_FUNCTION_NAME_RDS``].arn `
  --output text
# アカウント ID を設定(IAMログインする時のID)
$ACCOUNT_ID="123456789012"
# Lambda 関数に権限を追加
aws lambda add-permission `
  --function-name $LAMBDA_FUNCTION_NAME_S3 `
  --statement-id cli-subscriptionfilter-event `
  --action lambda:InvokeFunction `
  --principal logs.amazonaws.com `
  --source-arn $LOG_GROUP_RDS_ARN `
  --source-account $ACCOUNT_ID
- サブスクリプションフィルタを作成します。
# サブスクリプションフィルタ名を設定
$SUBSCRIPTION_FILTER_NAME="cli_myproject_subscriptionfilter"
# 呼び出す Lambda 関数の ARN を設定
$CALLEE_LAMBDA_ARN=aws lambda list-functions `
  --query "Functions[?FunctionName==``$LAMBDA_FUNCTION_NAME_S3``].FunctionArn" `
  --output text
# サブスクリプションフィルタを作成する。
aws logs put-subscription-filter `
  --log-group-name $RDS_LOG_GROUP_NAME `
  --filter-name $SUBSCRIPTION_FILTER_NAME `
  --filter-pattern "取得した時刻" `
  --destination-arn $CALLEE_LAMBDA_ARN
実行と確認
- 以下コマンドで Lambda 関数(RDS)を実行します。
# $LAMBDA_FUNCTION_NAME_RDS を実行します。
aws lambda invoke `
  --function-name $LAMBDA_FUNCTION_NAME_RDS `
  result.log
- 実行後 CloudWatch のログを確認します。
# ログストリーム名を設定
$LOG_STREAM_NAME_RDS=aws logs describe-log-streams `
  --log-group-name $RDS_LOG_GROUP_NAME `
  --query "logStreams[].logStreamName" `
  --order-by LastEventTime `
  --descending `
  --max-items 1 `
  --output text
$LOG_STREAM_NAME_S3=aws logs describe-log-streams `
  --log-group-name $S3_LOG_GROUP_NAME `
  --query "logStreams[].logStreamName" `
  --order-by LastEventTime `
  --descending `
  --max-items 1 `
  --output text
# ログイベントを表示
# CloudWatch のサブスクリプションフィルタで Lambda 関数(S3) が呼び出されている事を確認出来ます。
aws logs get-log-events `
  --log-stream-name $LOG_STREAM_NAME_RDS[0] `
  --log-group-name $RDS_LOG_GROUP_NAME `
  --query "events[].message" `
  --output text
aws logs get-log-events `
  --log-stream-name $LOG_STREAM_NAME_S3[0] `
  --log-group-name $S3_LOG_GROUP_NAME `
  --query "events[].message" `
  --output text
