先日のre:InventでSageMakerのアップデートが大量に公開されました。
その中の一つ、Amazon SageMaker Processingについてを紹介しようと思います。
Amazon SageMaker Processing ってなんぞや
では、このAmazon SageMaker Processingってそもそもなにものなのかを見ていきましょう。
公式ブログでは、
Amazon SageMaker の新しい機能であり、データの前処理や後処理、モデルの評価といったワークロードをフルマネージドなインフラストラクチャの上で簡単に実行する機能
というように書かれています。
SageMaker上で利用できる簡易前処理機能、ということですね。
どのように使えるのか、公式のデモを一通り実行してみようと思います。
実際に利用してみる
まずはS3から利用するデータを読み込みます。
今回使うデータは、アヤメのデータにIDカラムと適当にデータに欠損をつけたものです。
import pandas as pd

prefix = 's3://sagemaker-first-tests/data'
data_dir=f'{prefix}/iris.csv'

df=pd.read_csv(data_dir)
df.to_csv('dataset.csv', index=False)
読み込んだら、前処理を行うジョブを作成します。
import sagemaker
from sagemaker.sklearn.processing import SKLearnProcessor

sklearn_processor = SKLearnProcessor(
    framework_version='0.20.0',
    role=sagemaker.get_execution_role(),
    instance_count=1,
    instance_type='ml.m5.xlarge'
    )
ジョブが作成できたので、前処理スクリプトを実行します。
from sagemaker.processing import ProcessingInput, ProcessingOutput

sklearn_processor.run(
    code='preprocessing.py',
    inputs=[ProcessingInput(
        source='dataset.csv',
        destination='/opt/ml/processing/input'
    )],
    outputs=[ProcessingOutput(source='/opt/ml/processing/output/prepro_file')]
    )
codeで、前処理スクリプトを指定します。今回はjupyterのHome直下に作成したpreprocessing.pyを指定しています。
inputsでは、前処理を行うデータを指定します。
outputsでは、前処理が終了したファイルの出力先を指定します。
また、出力されたデータはデフォルトのS3ファイルに出力されるようです。
今回の前処理スクリプトでは、欠損値のカラムが数値データの場合は0、文字データの場合はNaNで補完して、データを分割するようにします。
コードは以下になります。
import pandas as pd
import numpy as np
import os
from sklearn.model_selection import train_test_split

df = pd.read_csv('/opt/ml/processing/input/dataset.csv')

# 欠損値を0かNaNで埋める
for col_name in df:
    if df[col_name].dtypes == 'object':
        df[col_name] = df[col_name].fillna('NaN')
    else:
        df[col_name] = df[col_name].fillna(0)

# データ分割
train, test = train_test_split(df, test_size=0.2)
train, validation = train_test_split(train, test_size=0.2)

# outputファイルを作成
os.makedirs('/opt/ml/processing/output/prepro_file', exist_ok=True)

# データを保存
train.to_csv("/opt/ml/processing/output/prepro_file/train.csv", index=False)
validation.to_csv("/opt/ml/processing/output/prepro_file/validation.csv", index=False)
test.to_csv("/opt/ml/processing/output/prepro_file/test.csv", index=False)
以上が前処理の実行までの流れになります。
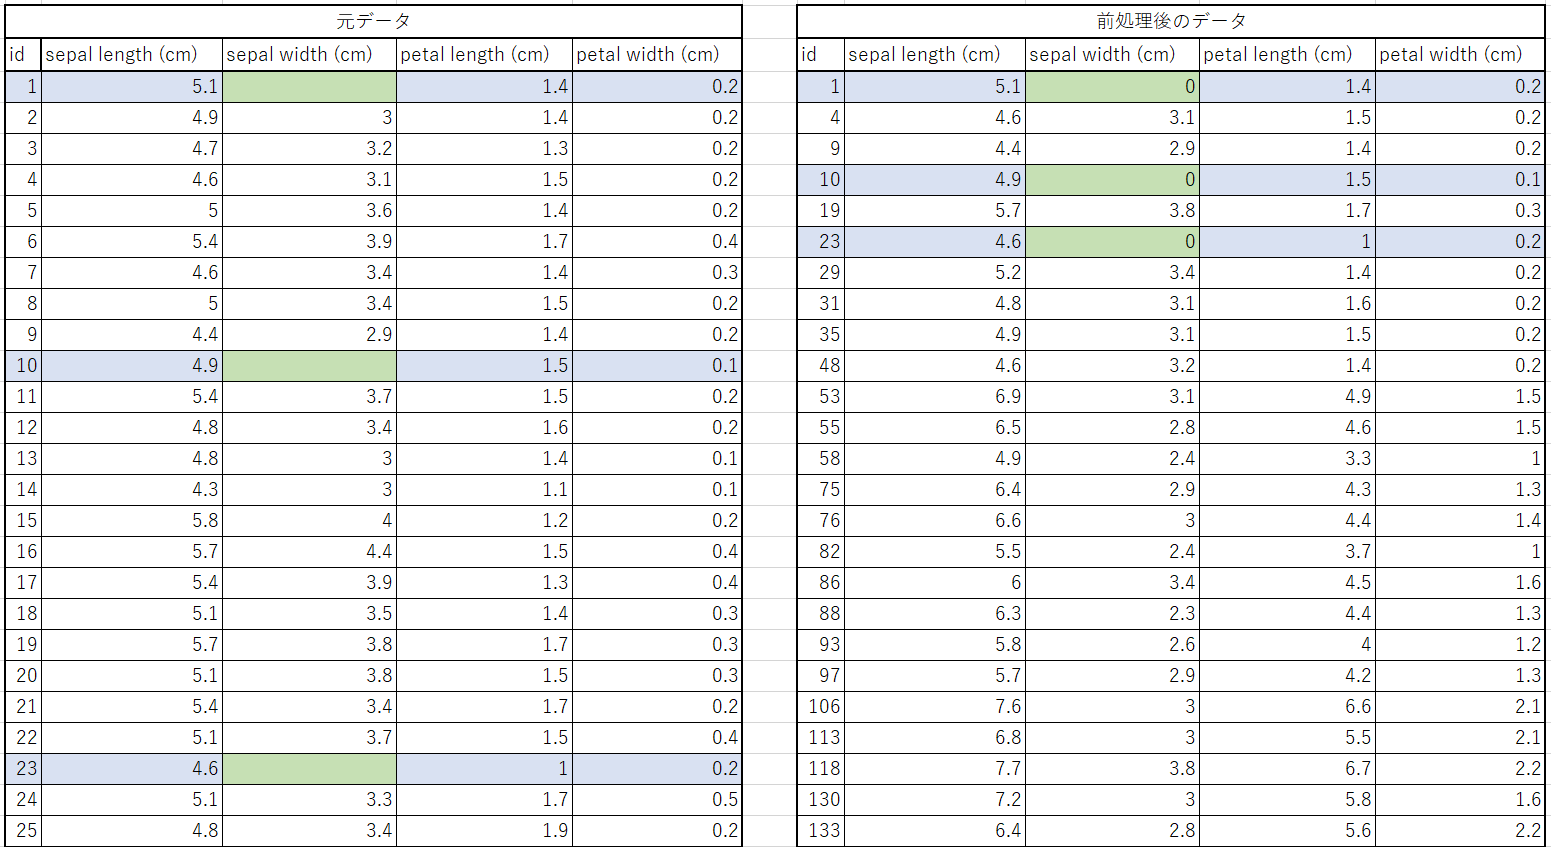
実際にデータを流してみたところ、以下のような結果になりました。
欠損のある行が青色になっており、対応する箇所が任意の値に埋められてることがわかります。
(前処理後のデータはわかりやすいようにID順でソートしてありますが、実際はランダムにばらけていました。)
まとめ
今回は Amazon SageMaker Processing を使って前処理をやってみました。
データの分割や欠損処理がとても簡単に行えるので、積極的に利用していきたいですね!
参考サイト
