前回まででAutoMLをコード上から実行することが確認できています。
今回はこれをAzureFunction上から実行してみたいと思います。
この記事では細かい実行内容にはあまり触れず、実装方法をメインに解説していきたいと思います。
実行内容につては前回の記事を参考にしてみてください。
実行環境
| バージョン | |
|---|---|
| windows | 10 |
| python | Python 3.7.9 |
リソース作成
まずはリソースを作成していきます。AzureMLのワークスペースの作成については終わっているものとして考えます。
こちらについてはこの記事で記載しているので参考にしてみてください。
最初にFunctionsのリソースを作成します。
ローカルからライブラリをアップロードしたいので、今回はVSCodeの拡張機能を利用してリソースの作成を行っていきます。
VSCodeにこちらをインストールしてください。
インストールが終わるとツールバーにアイコンが表示されるのでクリックしてウィンドウを開きます。

開いたら画像右上にある+をクリックします。
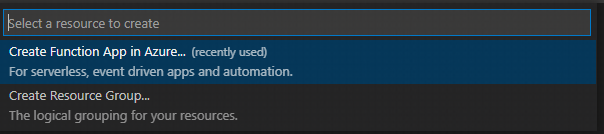
すると画面上部にCreate FunctionApp in Azure...という項目が出るので選択しましょう。
次に利用するサブスクリプションを選択します。
続いて関数名を作成します。これは一意の名前である必要がある点に注意しましょう。
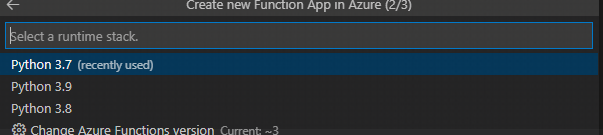
次にpythonのバージョン選択です今回は3.7を利用します。

最後にリソースのロケーションを選択します。今回はEastUSにしてます。
こちらで関数の作成は完了です。
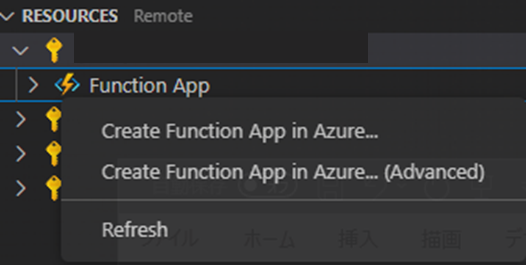
また、RESOURCEタブの特定リソースの中にあるFunctionAppを右クリックして(Advanced)のついている項目を選択することで、詳細設定を行いつつリソースを作成できます。
権限の設定
次にAutoMLを実行させるための権限設定を行っていきます。
まず作成した関数に権限を設定したいので、関数アプリの項目を開きタブ内のIDを開きます。
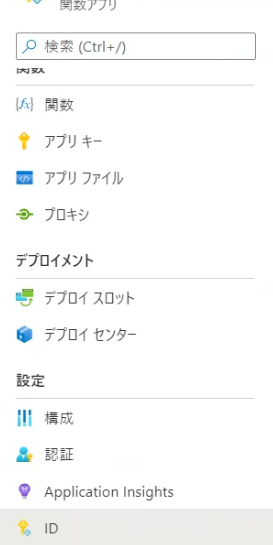
開いたページの状態の項目がオフになっているのでオンにします。
これでマネージド ID に対して権限を付与できるようになります。
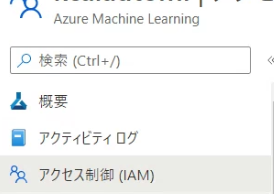
それではワークスペースの権限を付与しましょう。
AzureMLを開き、IAMの項目を開きます。
画面上部の+追加をクリックし、ロールの割り当ての追加を開きます。
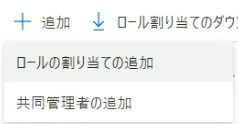
開いたら、所有者を選択し、メンバーを開きます。
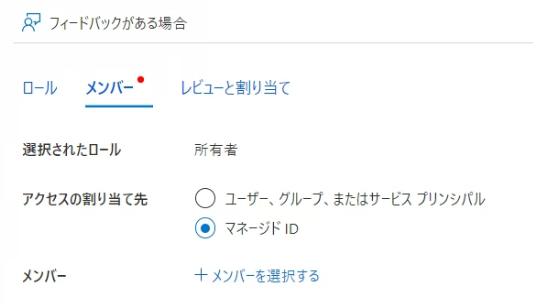
マネージドIDを選択してメンバーを選択するをクリックします。
画面右にタブが出てくるので、マネージドIDの項目ですべてのシステム割り当てマネージドIDを選びます。
ここで出てくるAzureMLとFunctionsを選択し、下部の選択ボタンをクリックします。
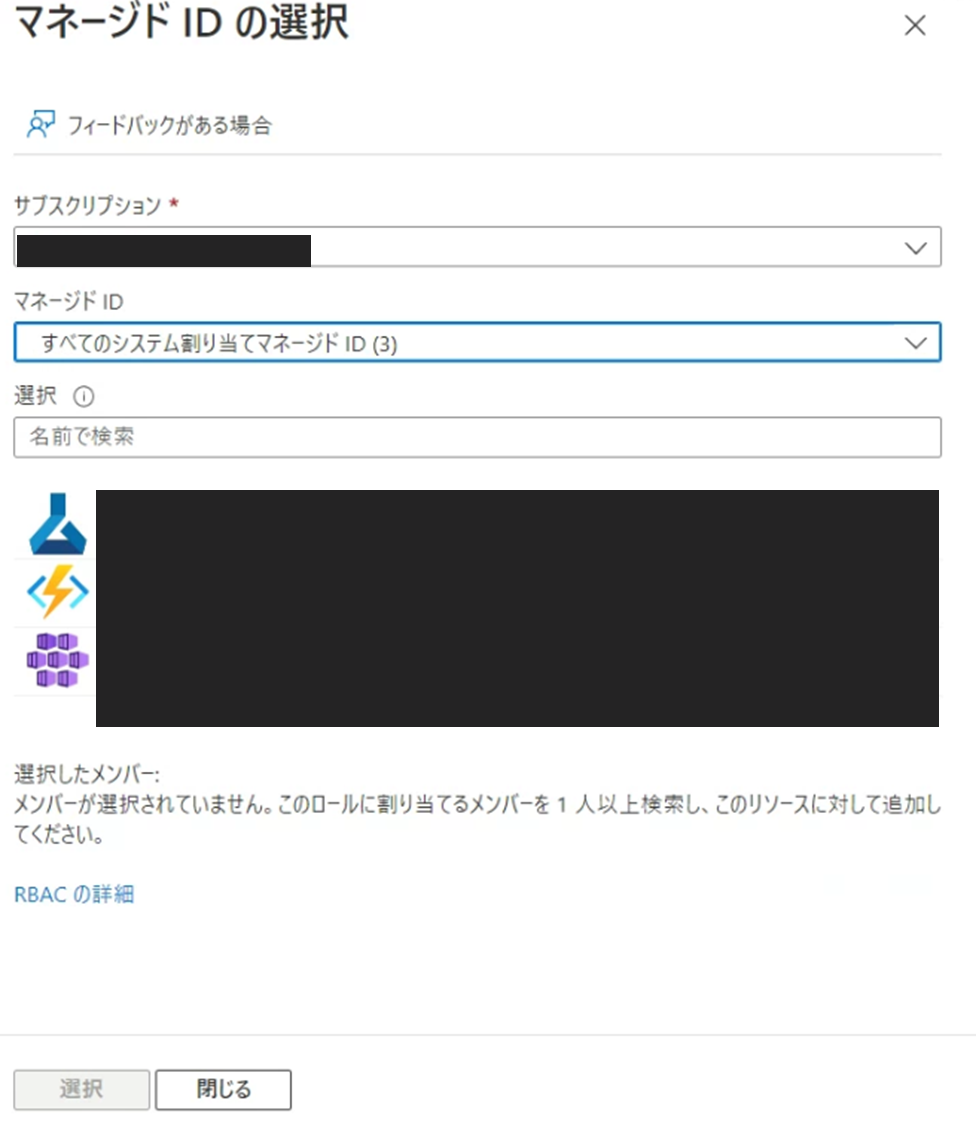
その後レビューと割り当てをクリックして設定を終わります。
同様にリソースグループとFunciotnsにも権限の設定をします。
こちらは同様の操作になるため割愛します。
ローカルに関数を作成
デプロイをする関数をローカルに作成していきます。
AzureタブのWORKSPACEの右にある+をクリックしてCreateFunctionを選びます。

画面上部に設定が出てくるのでこれらを設定します。
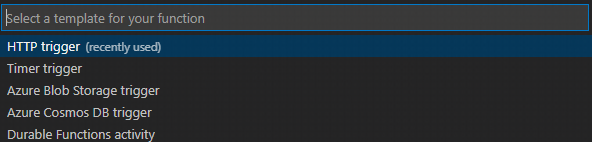
まずトリガーの設定です。今回はHTTPtrigerを使います。
次に関数名を付けます。
最後に権限のレベルです。今回はAnonymousを設定しました。

作成が終わるとフォルダ内にファイルがいくつか生成されています。この中の__init__.pyが実行される関数になります。
利用するライブラリの設定
今回で一番詰まったところです。
まず、windowsマシンを利用している場合、モジュールのインストールはlinuxの仮想環境等を作成して行うようにしましょう。
私はVagrantでUbuntを立ててライブラリを入れました。
次に、フォルダに対してライブラリをインストールします。
インストール先は.python_packages\lib\site-packagesにしましょう。
pip install azure-functions azureml-core azureml-sdk[automl] -t .python_packages\lib\site-packages
続いて一部のモジュールを削除していきます。
これはバージョンの問題やPython3.7では必要ないものがありエラーになってしまうために行います。
-
dataclassesとついているフォルダ、およびdataclasses.pyの削除 -
cryptographyとついているフォルダの削除
また、cryptographyのインストールについてはローカルでのインストールではだめでしたが、デプロイによるインストールだと問題がなかったため、requirements.txtに入れておきましょう。
cryptography
AzureFunctionsでは一時ファイルは/tmp/フォルダにのみ作成可能で、それ以外のディレクトリはReadOnryとなりエラーになってしまいます。
AutoMLの関数では一時ファイルやLogの出力を行っているのでこれらを修正していきます。
まずset_log_fileと記述されている個所を修正していきます。
logについては出力しなくていいと思ったのでコメントアウトで対応しました。
.python_packages\lib\site-packages\azureml\automl\core\automl_base_settings.py 756行目
.python_packages\lib\site-packages\azureml\automl\core\_logging\log_server.py 267,8行目
.python_packages\lib\site-packages\azureml\automl\core\shared\log_server.py 12行
次に一時ファイルの出力先です。こちらは生成する必要があるのでパスを変更しました。
76行目付近
# FILE LOCATIONS
if 'win32' in sys.platform:
    # USER_PATH = os.path.expanduser('~')
    # TODO Rename CREDENTIALS_PATH since there aren't credentials there anymore.
    # CREDENTIALS_PATH = os.path.join(USER_PATH, ".azureml")
    CREDENTIALS_PATH = "/tmp/.azureml"
else:
    # USER_PATH = os.path.join(os.getenv('HOME'), '.config')
    # CREDENTIALS_PATH = os.path.join(os.getenv('HOME'), '.azureml')
    CREDENTIALS_PATH = "/tmp/.azureml"
56行目付近
# Expand out the path because os.makedirs can't handle '..' properly
# aml_config_path = os.path.abspath(os.path.join(self.experiment_state.automl_settings.path, '.azureml'))
aml_config_path = "/tmp/.azureml"
os.makedirs(aml_config_path, exist_ok=True)
これでライブラリについては一通り完了です。
関数の設定
関数のランタイムのバージョンを変更する必要があったので修正します。
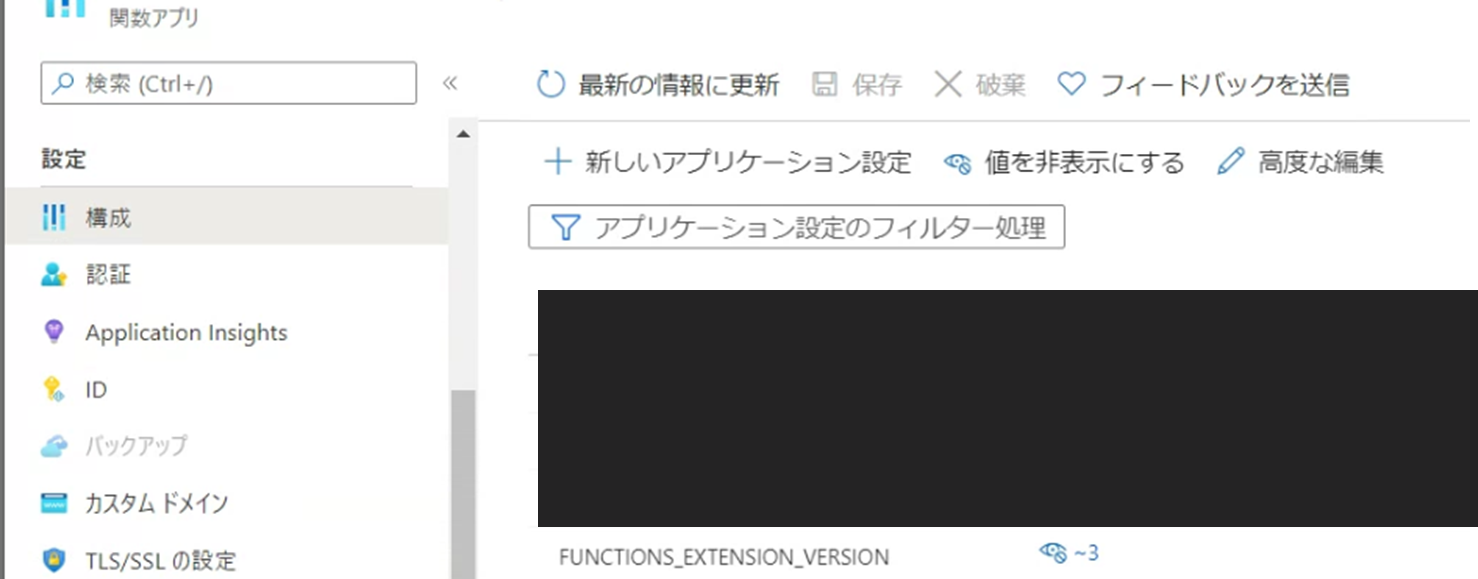
関数の「構成」タブにあるFUNCTIONS_EXTENSION_VERSIONの値を~3に変更します。
また、vscodeからデプロイする場合は.vscode/settings.jsonにあるazureFunctions.projectRuntimeの値も~3にしておきましょう。
{
    "azureFunctions.deploySubpath": ".",
    "azureFunctions.scmDoBuildDuringDeployment": true,
    "azureFunctions.pythonVenv": "venv",
    "azureFunctions.projectLanguage": "Python",
    "azureFunctions.projectRuntime": "~3",
    "debug.internalConsoleOptions": "neverOpen"
}
デプロイするコード
実際にモデルを作成するコードになります。
__init__.pyに記述することで動作します。
いくつかコードを紹介するので、それぞれ別の関数に設定したり、組み合わせて利用することをお勧めします。
モデル作成
一つ目はモデルの作成を開始するコードになります。
クラスタやデータストアの作成、データの配置はすでにできていると想定しています。
import json
import logging
import azure.functions as func
from azureml.core import VERSION
from azureml.core.experiment import Experiment
from azureml.core import Workspace, Datastore, Dataset
from azureml.core.compute import ComputeTarget
from azureml.train.automl import AutoMLConfig

def main(req: func.HttpRequest) -> func.HttpResponse:
    logging.basicConfig(level=logging.ERROR)
    ws = Workspace(
        subscription_id="<サブスクリプションID>",
        resource_group="<リソースグループ名>",
        workspace_name="<ワークスペース名>"
    )

    # 使用するクラスターの準備
    cluster_name = "<作成済みクラスター名>"
    cluster = ComputeTarget(workspace=ws, name=cluster_name)
    # データの登録
    datastore_name = '<登録済みデータストア名>'
    datastore = Datastore.get(ws, datastore_name)
    datastore_paths = [(datastore, '<データストア内のファイルパス>')]
    titanic_dataset = Dataset.Tabular.from_delimited_files(path=datastore_paths)


    # AutoMLの実行準備
    automl_classifier=AutoMLConfig(
        task='classification',
        iterations=5,
        compute_target=cluster,
        primary_metric='AUC_weighted',
        experiment_timeout_minutes=60,
        blocked_models=['XGBoostClassifier'],
        training_data=titanic_dataset,
        test_size=0.3,
        label_column_name="Survived",
        n_cross_validations=2)


    # AutoMLの実行
    experiment_name = '<実験名>'
    experiment = Experiment(ws, experiment_name)
    run = experiment.submit(automl_classifier)

    return func.HttpResponse(json.dumps({"job_id": run.id}))
モデル作成の実行状況の取得
モデル作成の実行状況を取得します。
これを利用することでモデルの作成終了まで待機したりできると思います。
POSTのときに受け取るデータとしてjobのIDと実験名を受け取るようにしてます。
import json
import logging
import azure.functions as func
from azureml.core.experiment import Experiment
from azureml.core import Workspace, Run

def main(req: func.HttpRequest) -> func.HttpResponse:
    logging.basicConfig(level=logging.INFO)

    job_id = req.get_json()['job_id']
    experiment_name = req.get_json()['experiment_name']

    ws = Workspace(
        subscription_id="<サブスクリプションID>",
        resource_group="<リソースグループ名>",
        workspace_name="<ワークスペース名>"
    )

    experiment = Experiment(ws, experiment_name)

    return func.HttpResponse(json.dumps({"job_status": Run(experiment, job_id).get_status()}))
テスト結果の取得
一つ目に提示したモデルではテストを行うように設定をしています。
なのでテスト結果を受け取る関数を用意しました。
先ほどと同様に、POSTでjobIDと実験名を取得します。
import logging
import json

import azure.functions as func
import pandas as pd
from azureml.core import Workspace
from azureml.train.automl.run import AutoMLRun

def main(req: func.HttpRequest) -> func.HttpResponse:

    job_id = req.get_json()['job_id']
    experiment_name = req.get_json()['experiment_name']

    ws = Workspace(
        subscription_id="<サブスクリプションID>",
        resource_group="<リソースグループ名>",
        workspace_name="<ワークスペース名>"
    )

    experiment = ws.experiments[experiment_name]
    automl_run = AutoMLRun(experiment, run_id = job_id)

    # テスト結果の取得
    best_model, _ = automl_run.get_output()

    testexe = best_model.get_children(tags={"mlflow.source.name" : "model_test.py"})
    rundata = list(testexe)[0]
    rundata.download_file("predictions/predictions.csv", output_file_path="/tmp/predictions.csv")
    return func.HttpResponse(json.dumps({"testdata": pd.read_csv("/tmp/predictions.csv").to_csv(index=False)}))
特定の実行データを取得後、最高値のモデルを取得します。その後、そのモデルの子実行のうち、特定のタグを持つ実行を取得します。
これがテストを行ってる実行になるので、その実行データからテスト結果をダウンロードする、といった流れになります。
モデルの登録
作成したモデルを登録するための関数を作成します。
デプロイ時に登録が必要になるので、デプロイの準備として用意しました。
POSTの入力データには先ほどのものに加えてモデル名を追加しました。
import logging
import json

import azure.functions as func
from azureml.core import Workspace
from azureml.train.automl.run import AutoMLRun

def main(req: func.HttpRequest) -> func.HttpResponse:

    job_id = req.get_json()['job_id']
    experiment_name = req.get_json()['experiment_name']
    model_name = req.get_json()['model_name']

    ws = Workspace(
        subscription_id="<サブスクリプションID>",
        resource_group="<リソースグループ名>",
        workspace_name="<ワークスペース名>"
    )

    experiment = ws.experiments[experiment_name]
    automl_run = AutoMLRun(experiment, run_id=job_id)

    model = automl_run.register_model(model_name=model_name)
    return func.HttpResponse(json.dumps({"status": "success"}))
モデルのデプロイ
登録したモデルをデプロイします。
エントリポイントに利用するpythonファイルが必要なのでコード上で生成し、それを設定しています。
また、POST入力には上記に加え予測対象のカラム名を追加しています。
from html import entities
import logging
import json
import io

import azure.functions as func
from azureml.core import Workspace
from azureml.core.model import Model
from azureml.core.webservice import AciWebservice
from azureml.core.model import InferenceConfig


def main(req: func.HttpRequest) -> func.HttpResponse:
    job_id = req.get_json()['job_id']
    experiment_name = req.get_json()['experiment_name']
    model_name = req.get_json()['model_name']
    target = req.get_json()['target']

    ws = Workspace(
        subscription_id="<サブスクリプションID>",
        resource_group="<リソースグループ名>",
        workspace_name="<ワークスペース名>"
    )

    entry_pint = f"""
import io
import json
import joblib
import pandas as pd
from azureml.core.model import Model

def init():
    global model
    model_path = Model.get_model_path('{model_name}')
    model = joblib.load(model_path)

def run(raw_data):
    df = pd.read_csv(io.StringIO(json.loads(raw_data)['data']))
    predictions = model.predict(df)
    df["{target}"] = predictions
    return df.to_csv(index=False)
    """
    with open("/tmp/score.py", "w") as f:
        f.write(entry_pint)
    model = ws.models[model_name]
    inference_config = InferenceConfig(entry_script="/tmp/score.py")
    deployment_config = AciWebservice.deploy_configuration(cpu_cores = 1, memory_gb = 1)
    service_name = f"{model_name}service"
    service = Model.deploy(ws, service_name, [model], inference_config, deployment_config)
    return func.HttpResponse(json.dumps({"status": "success", "service_state":service.state}))
また、デプロイ完了したモデルのエンドポイントがコードから取得したいこともあるとおもいます。
そちらについてのコードも併せて載せておきます。
Functionsの形式にはなっていないのでここを参考に利用するようにしてください。
from azureml.core import Workspace, Webservice
from azureml.train.automl.run import AutoMLRun

ws = Workspace(
    subscription_id="<サブスクリプションID>",
    resource_group="<リソースグループ名>",
    workspace_name="<ワークスペース名>"
)


service = Webservice(ws, "<サービス名>")
print(service.serialize()["scoringUri"])
service.serialize()によってデプロイした情報を取得し、その中にあるエンドポイントのデータを持ってきている形になります。
エンドポイントから予測を行う
こちらはAutoMLを実行するわけではありませんが、一連の流れとして載せておこうと思います。
発行したエンドポイントを利用して予測を行う関数になります。
内容のほとんどはAzureML上にあるサンプルコードと同様です。Functionsの形式に合わせて修正した形になります。
また、POSTの入力としてエンドポイントと予測用データ(CSV)を受け取ります。
これにより汎用的に利用できるようになっています。
import logging

import azure.functions as func
import urllib.request
import json
import os
import ssl

def allowSelfSignedHttps(allowed):
    # bypass the server certificate verification on client side
    if allowed and not os.environ.get('PYTHONHTTPSVERIFY', '') and getattr(ssl, '_create_unverified_context', None):
        ssl._create_default_https_context = ssl._create_unverified_context


def main(req: func.HttpRequest) -> func.HttpResponse:
    predict_data = req.get_json()['predict_data']
    endpoint = req.get_json()['endpoint']

    allowSelfSignedHttps(True)
    data = {
        "data": predict_data
    }
    body = str.encode(json.dumps(data))

    url = endpoint
    api_key = ''
    headers = {'Content-Type':'application/json', 'Authorization':('Bearer '+ api_key)}
    req = urllib.request.Request(url, body, headers)
    try:
        response = urllib.request.urlopen(req)
        result = response.read().decode()
        return func.HttpResponse(json.dumps({"status": "success", "predict_data":result}))
    except urllib.error.HTTPError as error:
        return func.HttpResponse(json.dumps({"status": "error", "errorcode":error.code, "error_info":error.info()}))
まとめ
今回はAzureFunctionsからAutoMLを実行してみました。
モジュール関係でかなりてこずってしまったのでもしかすると断念した方もいるかもしれません。
モジュールに手を加えることでFunctionsから実行でき、これにより様々なところでモデル作成を行えるようになると思います。
AutoML自体とても簡単に良いモデルを作成できるので、FuncionsでAPIを作成しモデルと共存した開発を行っていきたいですね。