AWS SAMとは
AWS SAM(Serverless Application Model)とは、サーバレス構成のシステムを、より簡単に構築するためのフレームワークとツール群の総称です。
CloudFormationをベースとしてより簡単にAPI GatewayやLambdaをデプロイできるようになっています。
YAMLの記述量も直接CloudFormationを記載するよりも抑えることができます。
SAMの説明については、tech4anyoneさんが記載されているこちらの記事などが参考になると思います。
ちなみに前回の検証でKiroの無料枠を使い切ったので、
今回はChatGPTさんのお世話になりながら作成しました。
今回の目的
X-RayやApplication Signalsなどシステムのオブザーバビリティの検証をしようと思ったのですが、
元々インフラ家なので、あんまり凝ったアプリが作成できません。
簡単に検証環境を作ることを目的として、AWS SAMを採用しました。
最終目標は自動計装の検証となります。
今回はその前段となるサンプルアプリケーションを構築したいと思います。
X-RayやAppication Signalsについて追々記事にしたいと思います。
※ 現時点でX-RayやApplication SignalsとAWS SAMの親和性・統合する難易度などは、何も考えていません。。。
とりあえずSAMのお勉強も兼ねてサンプルアプリを構築します。
サンプルアプリの構成
上述した通り、複数のLambdaやそのバックエンドのサービスを横断的に自動計装できるか?を後々確かめたいので、下記の構成としました。
- 作成するLambdaは下記の3つ
-
- クライアントからのリクエストを受け取って、SQSにメッセージを格納するAPI
-
- SQSからメッセージを取り出してDynamoDBに格納するLambda
-
- クライアントからのリクエストにより、DynamoDBをスキャンして返却するAPI
AWS 開発環境の構築
あまり詳しくは解説しません。前提ツールの確認と、AWS SAMのインストール手順になります。
Python3
Python3が必要です。インストールされているか下記コマンドで確認してください。
% python3 --version
Python 3.9.6
バージョンが表示されない場合は、下記サイトからインストーラをダウンロードインストールしてください。
(homebrewからインストールする方法もありますが、筆者環境にhomebrewがセットアップされていないため)
AWS CLI
AWS CLI V2以降が推奨です。こちらも下記コマンドで確認。
% aws --version
aws-cli/2.27.50 Python/3.13.4 Darwin/25.0.0 exe/x86_64
AWS公式サイトをご参考にセットアップしてください。
aws configureの設定などもお忘れなく。
Docker Desktop
Docker環境が必要になります。
筆者はMac上のDocker Desktopを利用しています。
% docker --version
Docker version 28.4.0, build d8eb465
こちらも公式サイトからダウンロードしてインストール。
AWS SAM
いよいよAWS SAMのセットアップです。
AWS公式からインストーラをダウンロードします。
こちらも一般的なpkgファイルを用いたインストール方法のため説明は省きます。
下記コマンドを実行してバージョンが表示されれば成功です。
% sam --version
SAM CLI, version 1.144.0
サンプルアプリの作成
サンプルアプリを配置していきます。
ディレクトリ構成
下記ディレクトリを作成し、各ファイルを格納していきます。
全体図
sam-test/
├── template.yaml
├── package.json
├── package-lock.json
├── node_modules/
└── src/
    ├── enqueue/index.js
    ├── worker/index.js
    └── query/index.js
各要素の説明
template.yaml
SAM本体。SQS・DynamoDB・HttpApi・Lambdaオーソライザーのすべてを定義。
node_modules
npmで依存コンポーネントをルート直下にインストール。
src/enqueue/index.js
API Gateway経由でリクエストを受け、SQSにメッセージを格納するLambdaの本体。
src/worker/index.js
SQSイベントをトリガーにDynamoDBへメッセージを保存するLambdaの本体。
src/query/index.js
DynamoDBをスキャンしてHTTPレスポンスで返却するLambdaの本体。
ディレクトリ作成
下記のコマンドで、必要なディレクトリを作成します。
% mkdir sam-test
% cd sam-test
% mkdir -p src/enqueue src/worker src/query
プロジェクトの初期化と依存パッケージのインストール
cd ..
npm init -y
npm i @aws-sdk/client-sqs @aws-sdk/client-dynamodb @aws-sdk/lib-dynamodb
ソース配置
ディレクトリ構成に従って、ファイルを格納します。
template.yaml
AWSTemplateFormatVersion: '2010-09-09'
Transform: AWS::Serverless-2016-10-31
Description: SQS -> Lambda -> DynamoDB (no authorizer, public API)

Globals:
  Function:
    Runtime: nodejs20.x
    Timeout: 10
    MemorySize: 128
    Architectures: [x86_64]
    Tracing: Active
    CodeUri: .
    Environment:
      Variables:
        TABLE_NAME: !Ref MessagesTable
        QUEUE_URL: !Ref InboundQueue

Resources:
  # ---------- SQS ----------
  InboundDLQ:
    Type: AWS::SQS::Queue
    Properties:
      QueueName: !Sub '${AWS::StackName}-dlq'
      MessageRetentionPeriod: 1209600

  InboundQueue:
    Type: AWS::SQS::Queue
    Properties:
      QueueName: !Sub '${AWS::StackName}-queue'
      VisibilityTimeout: 30
      RedrivePolicy:
        deadLetterTargetArn: !GetAtt InboundDLQ.Arn
        maxReceiveCount: 3

  # ---------- DynamoDB ----------
  MessagesTable:
    Type: AWS::DynamoDB::Table
    Properties:
      TableName: !Sub '${AWS::StackName}-messages'
      BillingMode: PAY_PER_REQUEST
      AttributeDefinitions:
        - AttributeName: id
          AttributeType: S
        - AttributeName: createdAt
          AttributeType: S
      KeySchema:
        - AttributeName: id
          KeyType: HASH
      GlobalSecondaryIndexes:
        - IndexName: createdAt-index
          KeySchema:
            - AttributeName: createdAt
              KeyType: HASH
          Projection:
            ProjectionType: ALL

  # ---------- HTTP API ----------
  HttpApi:
    Type: AWS::Serverless::HttpApi
    Properties:
      StageName: prod
      CorsConfiguration:
        AllowOrigins: ['*']
        AllowMethods: ['GET']
        AllowHeaders: ['*']

  # ---------- ① Enqueue ----------
  EnqueueFunction:
    Type: AWS::Serverless::Function
    Properties:
      Handler: src/enqueue/index.handler
      Policies:
        - AWSLambdaBasicExecutionRole
        - SQSSendMessagePolicy:
            QueueName: !GetAtt InboundQueue.QueueName
      Events:
        EnqueueGet:
          Type: HttpApi
          Properties:
            ApiId: !Ref HttpApi
            Path: /enqueue
            Method: GET

  # ---------- ② Worker ----------
  WorkerFunction:
    Type: AWS::Serverless::Function
    Properties:
      Handler: src/worker/index.handler
      Policies:
        - AWSLambdaBasicExecutionRole
        - DynamoDBCrudPolicy:
            TableName: !Ref MessagesTable
      Events:
        FromSqs:
          Type: SQS
          Properties:
            Queue: !GetAtt InboundQueue.Arn
            BatchSize: 10
            MaximumBatchingWindowInSeconds: 5

  # ---------- ③ Query ----------
  QueryFunction:
    Type: AWS::Serverless::Function
    Properties:
      Handler: src/query/index.handler
      Policies:
        - AWSLambdaBasicExecutionRole
        - DynamoDBReadPolicy:
            TableName: !Ref MessagesTable
      Events:
        ListItems:
          Type: HttpApi
          Properties:
            ApiId: !Ref HttpApi
            Path: /items
            Method: GET

Outputs:
  HttpApiUrl:
    Value: !Sub 'https://${HttpApi}.execute-api.${AWS::Region}.amazonaws.com/prod'
    Description: Base URL of the HttpApi
  QueueUrl:
    Value: !Ref InboundQueue
  TableName:
    Value: !Ref MessagesTable
src/enqueue/index.js
const { SQSClient, SendMessageCommand } = require("@aws-sdk/client-sqs");
const sqs = new SQSClient();

exports.handler = async (event) => {
  try {
    const qs = event.queryStringParameters || {};
    const msg = qs.msg ?? "";
    const payload = {
      id: `${Date.now()}-${Math.random().toString(36).slice(2, 8)}`,
      message: msg,
      query: qs,
      createdAt: new Date().toISOString(),
    };

    await sqs.send(new SendMessageCommand({
      QueueUrl: process.env.QUEUE_URL,
      MessageBody: JSON.stringify(payload),
    }));

    return {
      statusCode: 200,
      headers: { "Content-Type": "application/json" },
      body: JSON.stringify({ status: "enqueued", queueUrl: process.env.QUEUE_URL, item: payload }),
    };
  } catch (err) {
    console.error("Enqueue error:", err);
    return { statusCode: 500, body: JSON.stringify({ error: "Failed to enqueue" }) };
  }
};
src/worker/index.js
const { DynamoDBClient } = require("@aws-sdk/client-dynamodb");
const { DynamoDBDocumentClient, PutCommand } = require("@aws-sdk/lib-dynamodb");

const ddbDoc = DynamoDBDocumentClient.from(new DynamoDBClient());

exports.handler = async (event) => {
  try {
    const puts = [];
    for (const record of event.Records ?? []) {
      const body = JSON.parse(record.body || "{}");
      const item = {
        id: body.id,
        message: body.message ?? null,
        query: body.query ?? {},
        createdAt: body.createdAt ?? new Date().toISOString(),
      };
      puts.push(ddbDoc.send(new PutCommand({ TableName: process.env.TABLE_NAME, Item: item })));
    }
    await Promise.all(puts);
    return { ok: true, stored: puts.length };
  } catch (err) {
    console.error("Worker error:", err);
    throw err; // SQSの再試行/ DLQへ
  }
};
src/query/index.js
const { DynamoDBClient } = require("@aws-sdk/client-dynamodb");
const { DynamoDBDocumentClient, ScanCommand } = require("@aws-sdk/lib-dynamodb");

const ddbDoc = DynamoDBDocumentClient.from(new DynamoDBClient());

exports.handler = async (event) => {
  try {
    const qs = event.queryStringParameters || {};
    const limit = Math.min(parseInt(qs.limit || "25", 10), 100);

    const data = await ddbDoc.send(new ScanCommand({
      TableName: process.env.TABLE_NAME,
      Limit: limit,
    }));

    return {
      statusCode: 200,
      headers: { "Content-Type": "application/json" },
      body: JSON.stringify({
        count: data.Items?.length || 0,
        items: data.Items || [],
        lastEvaluatedKey: data.LastEvaluatedKey || null,
      }),
    };
  } catch (err) {
    console.error("Query error:", err);
    return { statusCode: 500, body: JSON.stringify({ error: "Failed to scan DynamoDB" }) };
  }
};
buildしてみる
ソースの配置が完了したら、buildしてみましょう。
% sam build
Building codeuri: sam-test runtime: nodejs20.x architecture: x86_64 functions: EnqueueFunction, WorkerFunction, QueryFunction
 Running NodejsNpmBuilder:NpmPack
 Running NodejsNpmBuilder:CopyNpmrcAndLockfile
 Running NodejsNpmBuilder:CopySource
 Running NodejsNpmBuilder:NpmInstall
 Running NodejsNpmBuilder:NpmTest
 Running NodejsNpmBuilder:CleanUpNpmrc
 Running NodejsNpmBuilder:LockfileCleanUp

Build Succeeded

Built Artifacts  : .aws-sam/build
Built Template   : .aws-sam/build/template.yaml

Commands you can use next
=========================
[*] Validate SAM template: sam validate
[*] Invoke Function: sam local invoke
[*] Test Function in the Cloud: sam sync --stack-name {{stack-name}} --watch
[*] Deploy: sam deploy --guided
成功したようです。
いざ!デプロイ!
下記コマンドでAWS環境にデプロイします。
sam deploy \
  --stack-name sam-test-stack \
  --region ap-northeast-1 \
  --capabilities CAPABILITY_IAM \
  --no-confirm-changeset \
  --resolve-s3
途中省略しますが、下記の通り成功したっぽい。
CloudFormation outputs from deployed stack
----------------------------------------------------------------------------------------------------------------------------------------------------------------------
Outputs
----------------------------------------------------------------------------------------------------------------------------------------------------------------------
Key                 TableName
Description         -
Value               sam-test-stack-messages

Key                 HttpApiUrl
Description         Base URL of the HttpApi
Value               https://**********.execute-api.ap-northeast-1.amazonaws.com/prod

Key                 QueueUrl
Description         -
Value               https://sqs.ap-northeast-1.amazonaws.com/************/sam-test-stack-queue
----------------------------------------------------------------------------------------------------------------------------------------------------------------------


Successfully created/updated stack - sam-test-stack in ap-northeast-1
テスト
実際に叩いてみます。
キューに突っ込む
curl -sS "APIのURL/enqueue?msg=test"
結果は下記の通り登録されたようです。
{"status":"enqueued","queueUrl":"https://sqs.ap-northeast-1.amazonaws.com/************/sam-test-stack-queue","item":{"id":"*************-264b8p","message":"test","query":{"msg":"test"},"createdAt":"2025-10-07T10:36:03.312Z"}}%
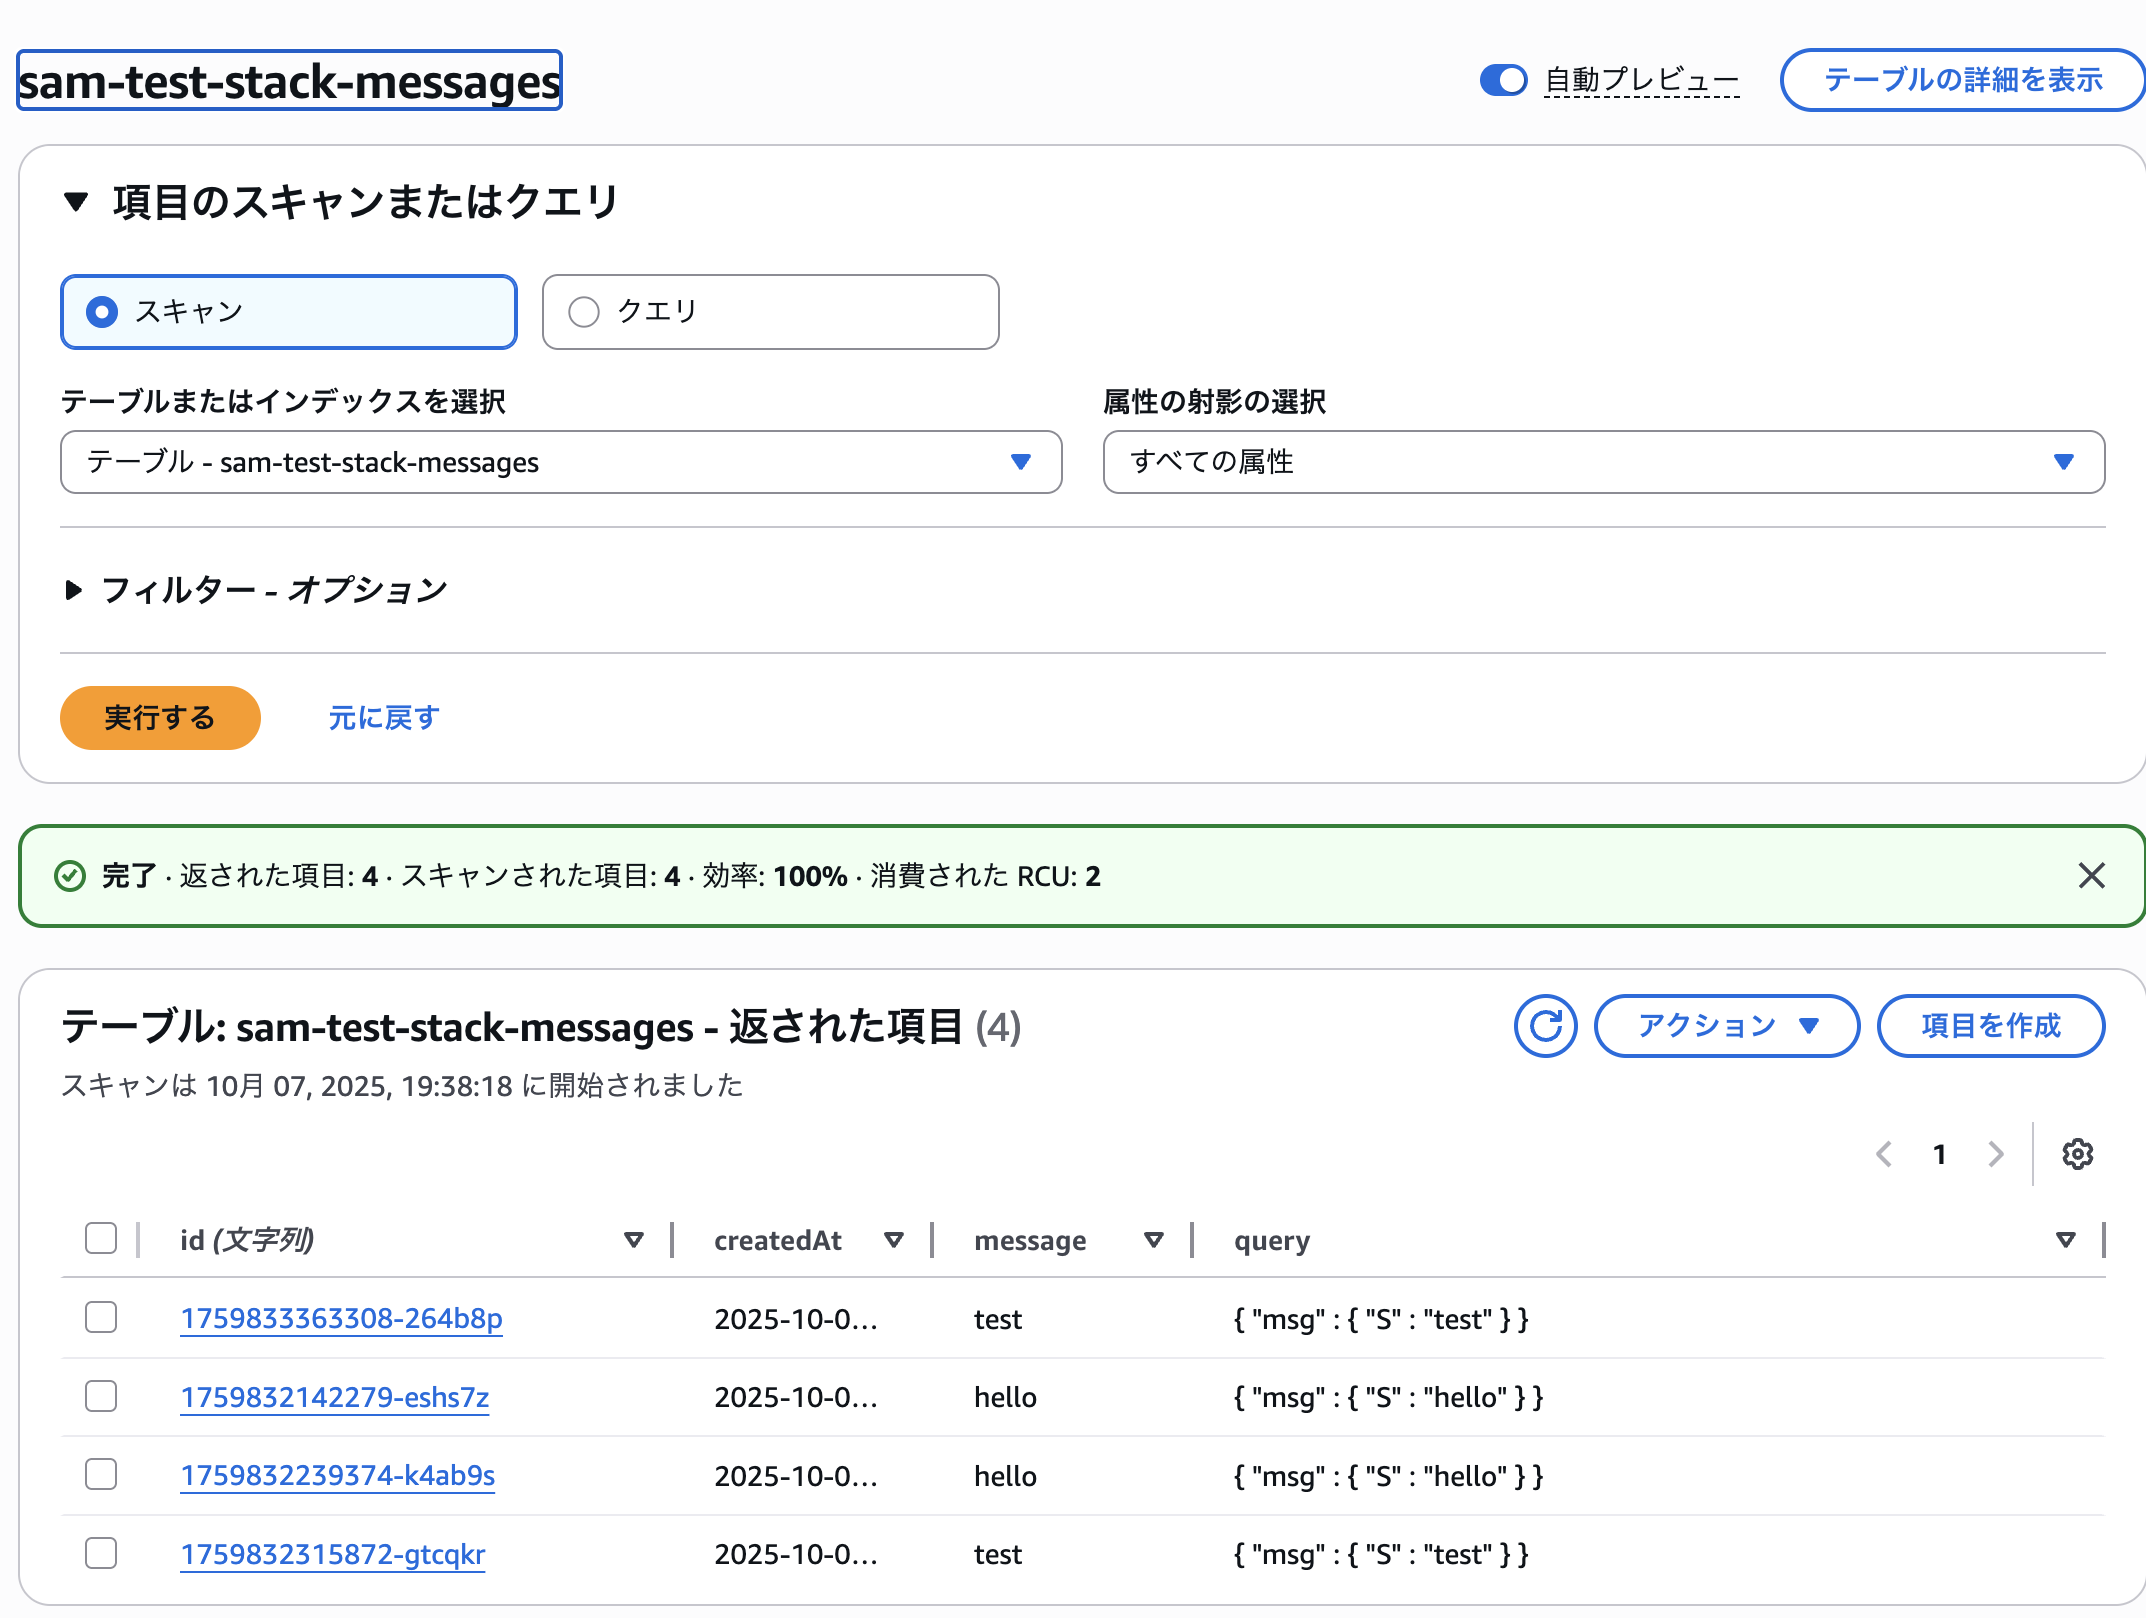
SQSからDynamoDBに登録
数秒まつとDynamoDBに登録されました。
アイテム検索
DynamoDBをスキャンした結果を表示してみます。
curl -sS "APIのURL/items?limit=10" | jq .
何度かテストしたので複数メッセージ表示されます。
 {
  "count": 4,
  "items": [
    {
      "createdAt": "2025-10-07T10:36:03.312Z",
      "message": "test",
      "id": "*************-264b8p",
      "query": {
        "msg": "test"
      }
    },
    {
      "createdAt": "2025-10-07T10:15:42.291Z",
      "message": "hello",
      "id": "*************-eshs7z",
      "query": {
        "msg": "hello"
      }
    },
    {
      "createdAt": "2025-10-07T10:17:19.374Z",
      "message": "hello",
      "id": "*************-k4ab9s",
      "query": {
        "msg": "hello"
      }
    },
    {
      "createdAt": "2025-10-07T10:18:35.872Z",
      "message": "test",
      "id": "*************-gtcqkr",
      "query": {
        "msg": "test"
      }
    }
  ],
  "lastEvaluatedKey": null
}
お掃除
検証が終わったので下記コマンドで全てのリソースを削除します。
sam delete
Stack名を聞かれるので、sam-test-stackと入力
まとめ
とりあえずSAMの概要の検証はできました。