VR空間で実際に腕を振って移動してみたいですよね?
本記事ではMeta Quest(Oculus)コントローラーを振ることで、VR空間内を移動できるロコモーションシステムを作る方法を紹介します!
VRにおけるロコモーションとは、 「仮想空間(VR空間)の中を移動する方法」 のことです。
両手のコントローラーを上下に振る動作を検出し、その速度に応じてキャラクターが前進するシステムを作成してみましょう!
- 自然な移動感: コントローラーを振る動作で移動するため、実際に歩いているような感覚を体験できます
- CharacterController対応: Unity標準のCharacterControllerを使用し、重力処理や地形との衝突判定に対応
- 視線方向への移動: HMD(ヘッドマウントディスプレイ)が向いている方向に移動します
- カスタマイズ可能: 移動速度、感度の閾値、重力の強さを調整できます
ShakingMoveForCC スクリプト
using UnityEngine;

// このスクリプトは CharacterController がアタッチされていることを前提とします
[RequireComponent(typeof(CharacterController))]
public class ShakingMoveForCC : MonoBehaviour
{
    [Header("移動速度")]
    [Tooltip("コントローラーを振った際の移動速度の倍率")]
    [SerializeField] private float moveSpeed = 2.0f;

    [Header("速度の閾値")]
    [Tooltip("このY軸速度を超えたら移動として判定")]
    [SerializeField] private float speedThreshold = 0.1f;

    [Header("重力")]
    [Tooltip("キャラクターにかかる重力")]
    [SerializeField] private float gravity = -9.81f;

    [Header("カメラ参照")]
    [Tooltip("CenterEyeAnchorなどのカメラTransformを設定")]
    [SerializeField] private Transform playerCamera;

    private CharacterController characterController;
    private Vector3 verticalVelocity; // 重力計算用の速度

    private void Start()
    {
        characterController = GetComponent<CharacterController>();

        // 必須項目が設定されているかチェック
        if (playerCamera == null)
        {
            Debug.LogError("Player Camera(CenterEyeAnchorなど)が設定されていません。インスペクターから設定してください。", this);
        }
    }

    private void Update()
    {
        // 必須項目がなければ処理を中断
        if (playerCamera == null) return; // ← OVRCameraRigのチェックを削除


        // ---1. 重力処理 ---
        if (characterController.isGrounded)
        {
            // 地面にいる時は重力速度をリセット(蓄積させない)
            verticalVelocity.y = -2f; // わずかに下向きの力をかけておくと安定します
        }
        else
        {
            // 空中にいる時は重力を加算
            verticalVelocity.y += gravity * Time.deltaTime;
        }

        // --- 2. 移動入力の計算 ---
        Vector3 moveDirection = Vector3.zero;

        // 右手と左手の(ローカル座標系での)Y軸速度を取得
        Vector3 velocityR = OVRInput.GetLocalControllerVelocity(OVRInput.Controller.RTouch);
        Vector3 velocityL = OVRInput.GetLocalControllerVelocity(OVRInput.Controller.LTouch);

        // Y軸方向の速度の絶対値を取得(上下に振る動きを検出)
        float speedR = Mathf.Abs(velocityR.y);
        float speedL = Mathf.Abs(velocityL.y);

        // どちらかの手の速度が閾値を超えた場合のみ
        if (speedR > speedThreshold || speedL > speedThreshold)
        {
            // 両手の速度を合計して移動速度を計算
            float totalSpeed = (speedR + speedL) * moveSpeed;

            // 頭(カメラ)の向いている正面方向を取得
            Transform headTransform = playerCamera.transform;
            Vector3 forwardDirection = headTransform.forward;

            forwardDirection.y = 0; // 水平移動のみ(上下を向いても前進する)
            forwardDirection.Normalize();

            // 移動ベクトルを計算
            moveDirection = forwardDirection * totalSpeed;
        }

        // --- 3. 移動の実行 (CharacterController.Move) ---
        // 水平移動(moveDirection) と 垂直移動(verticalVelocity) を合算してMoveに渡します
        // Time.deltaTimeを掛けてフレームレートに依存しない移動にします
        characterController.Move((moveDirection + verticalVelocity) * Time.deltaTime);
    }
}
-
コントローラー速度検出
-
OVRInput.GetLocalControllerVelocity()を使用して、左右のコントローラーのローカル座標系でのY軸速度を取得 - 上下に振る動作を検出し、その速度の絶対値を計算
-
-
移動方向の決定
- HMDのカメラ(CenterEyeAnchor)の正面方向を取得
- Y軸成分を0にして水平方向のみに正規化
- これにより、上下を向いても水平移動のみが行われます
-
重力処理
- CharacterControllerの
isGroundedプロパティで接地判定 - 空中では重力加速度を加算し、自然な落下を実現
- 地面にいる時は重力速度をリセット
- CharacterControllerの
-
移動の実行
- 水平移動ベクトルと垂直移動ベクトル(重力)を合算
-
CharacterController.Move()で移動を実行 -
Time.deltaTimeを使用してフレームレート非依存
Unity エディタでのセットアップ方法
(前提条件)
- Unity 2021.3以降(推奨)
ステップ1: プロジェクトの準備
Package Managerから以下のパッケージをインストール:
- XR Plugin Management
- Meta All in One SDK
ステップ2: OVRCameraRig の設置
初めに既存のMainCameraは削除する!
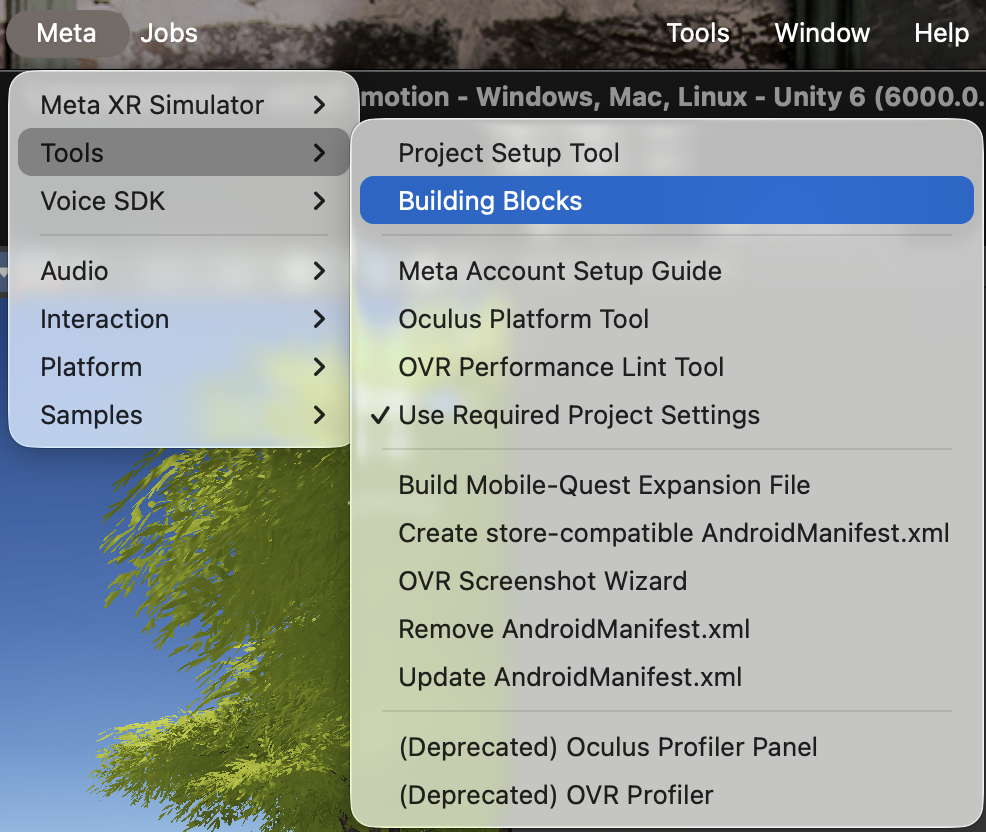
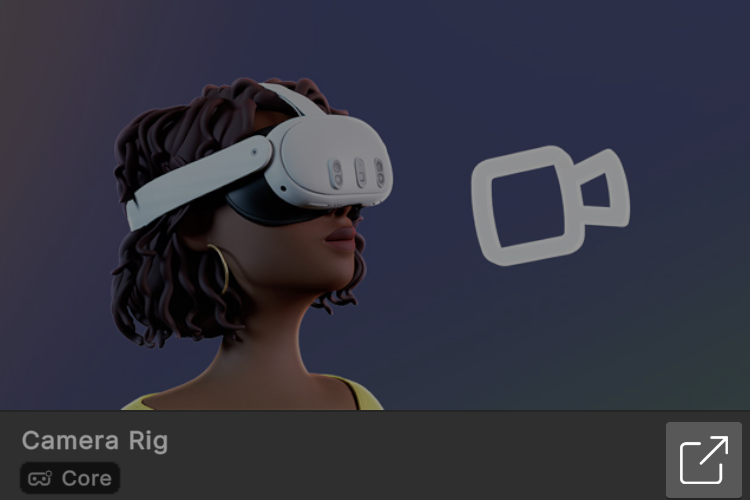
MetaメニューのTools > Building BlocksからCameraRigをインポート
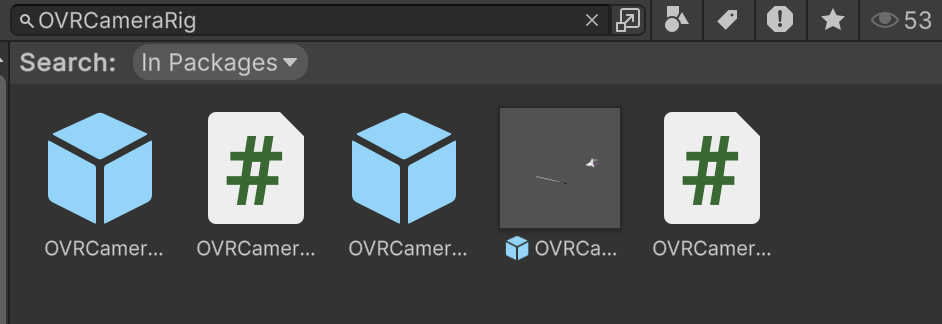
(上記の方法でCameraRigを取得できない場合)
ProjectビューでOVRCameraRigと検索してOVRCameraRigのPrefabをシーンにドラッグ&ドロップをする
ここでSearch対象は
In Packagesにしましょう
ステップ3: プレイヤーオブジェクトの作成
- Hierarchyで空のGameObjectを作成(右クリック → Create Empty)
- 名前を「VRPlayer」などに変更
- OVRCameraRigを「VRPlayer」の子オブジェクトにドラッグ
ステップ4: CharacterController の追加
- VRPlayerオブジェクトを選択
- Inspectorウィンドウで Add Component をクリック
- 「Character Controller」と入力して、Character Controllerコンポーネントを追加
- CharacterControllerのパラメータを調整:
- 例:
- Center: (0, 1, 0) - キャラクターの中心位置
- Radius: 0.3 - カプセルの半径
- Height: 1.8 - キャラクターの高さ
- Skin Width: 0.08 - 衝突判定の余白
- 例:
ステップ5: ShakingMoveForCC スクリプトの追加
- VRPlayerオブジェクトを選択(CharacterControllerと同じオブジェクト)
- Inspectorで Add Component をクリック
- 「ShakingMoveForCC」と入力して、スクリプトを追加
ステップ6: Meta Controllerの設定
-
ShakingMoveForCCコンポーネントのインスペクターを確認
-
パラメータを調整:
- Move Speed: 2.0〜5.0(お好みで調整)
- Speed Threshold: 0.1〜0.5(感度の調整)
- Gravity: -9.81(通常の重力)
-
重要: スクリプト内の
playerCameraフィールドに参照を設定する必要があります- Hierarchyで OVRCameraRig/TrackingSpace/CenterEyeAnchor を探します
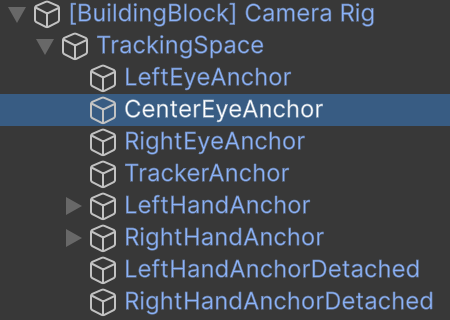
- ShakingMoveForCCコンポーネントに上記の
CenterEyeAnchorをアタッチ

- Hierarchyで OVRCameraRig/TrackingSpace/CenterEyeAnchor を探します
-
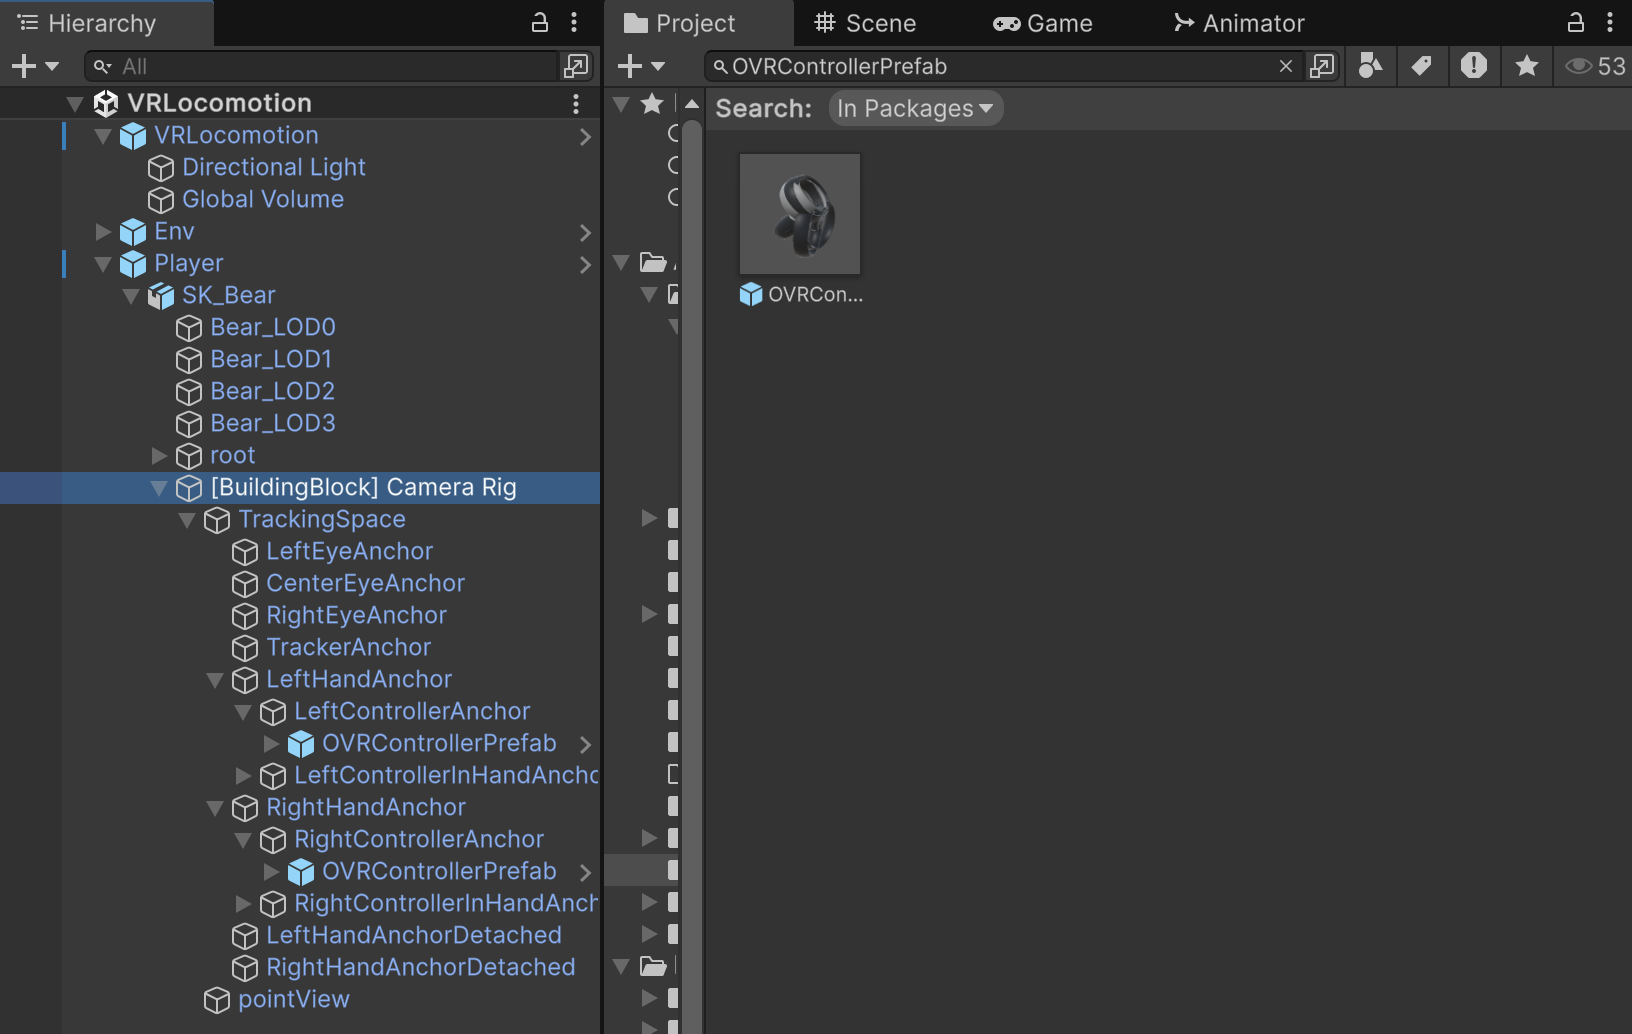
Camera Rigの
LeftControllerAnchorとRightControllerAnchorの下にOVRControllerPrefabを設置する
OVRControllerPrefabはProjectビューでOVRControllerPrefabと検索して取得する
ステップ7: 動作確認用の地面を作成
- Hierarchyで右クリック → 3D Object → Plane を作成
- Planeの位置を(0, 0, 0)に設定
- スケールを(10, 1, 10)などに設定して広い床を作成
ステップ8: ビルド設定
- File → Build Settings を開く
- PlatformをAndroidに変更(Meta Questの場合)
- Switch Platformをクリック
-
Player Settingsを開き、以下を設定:
-
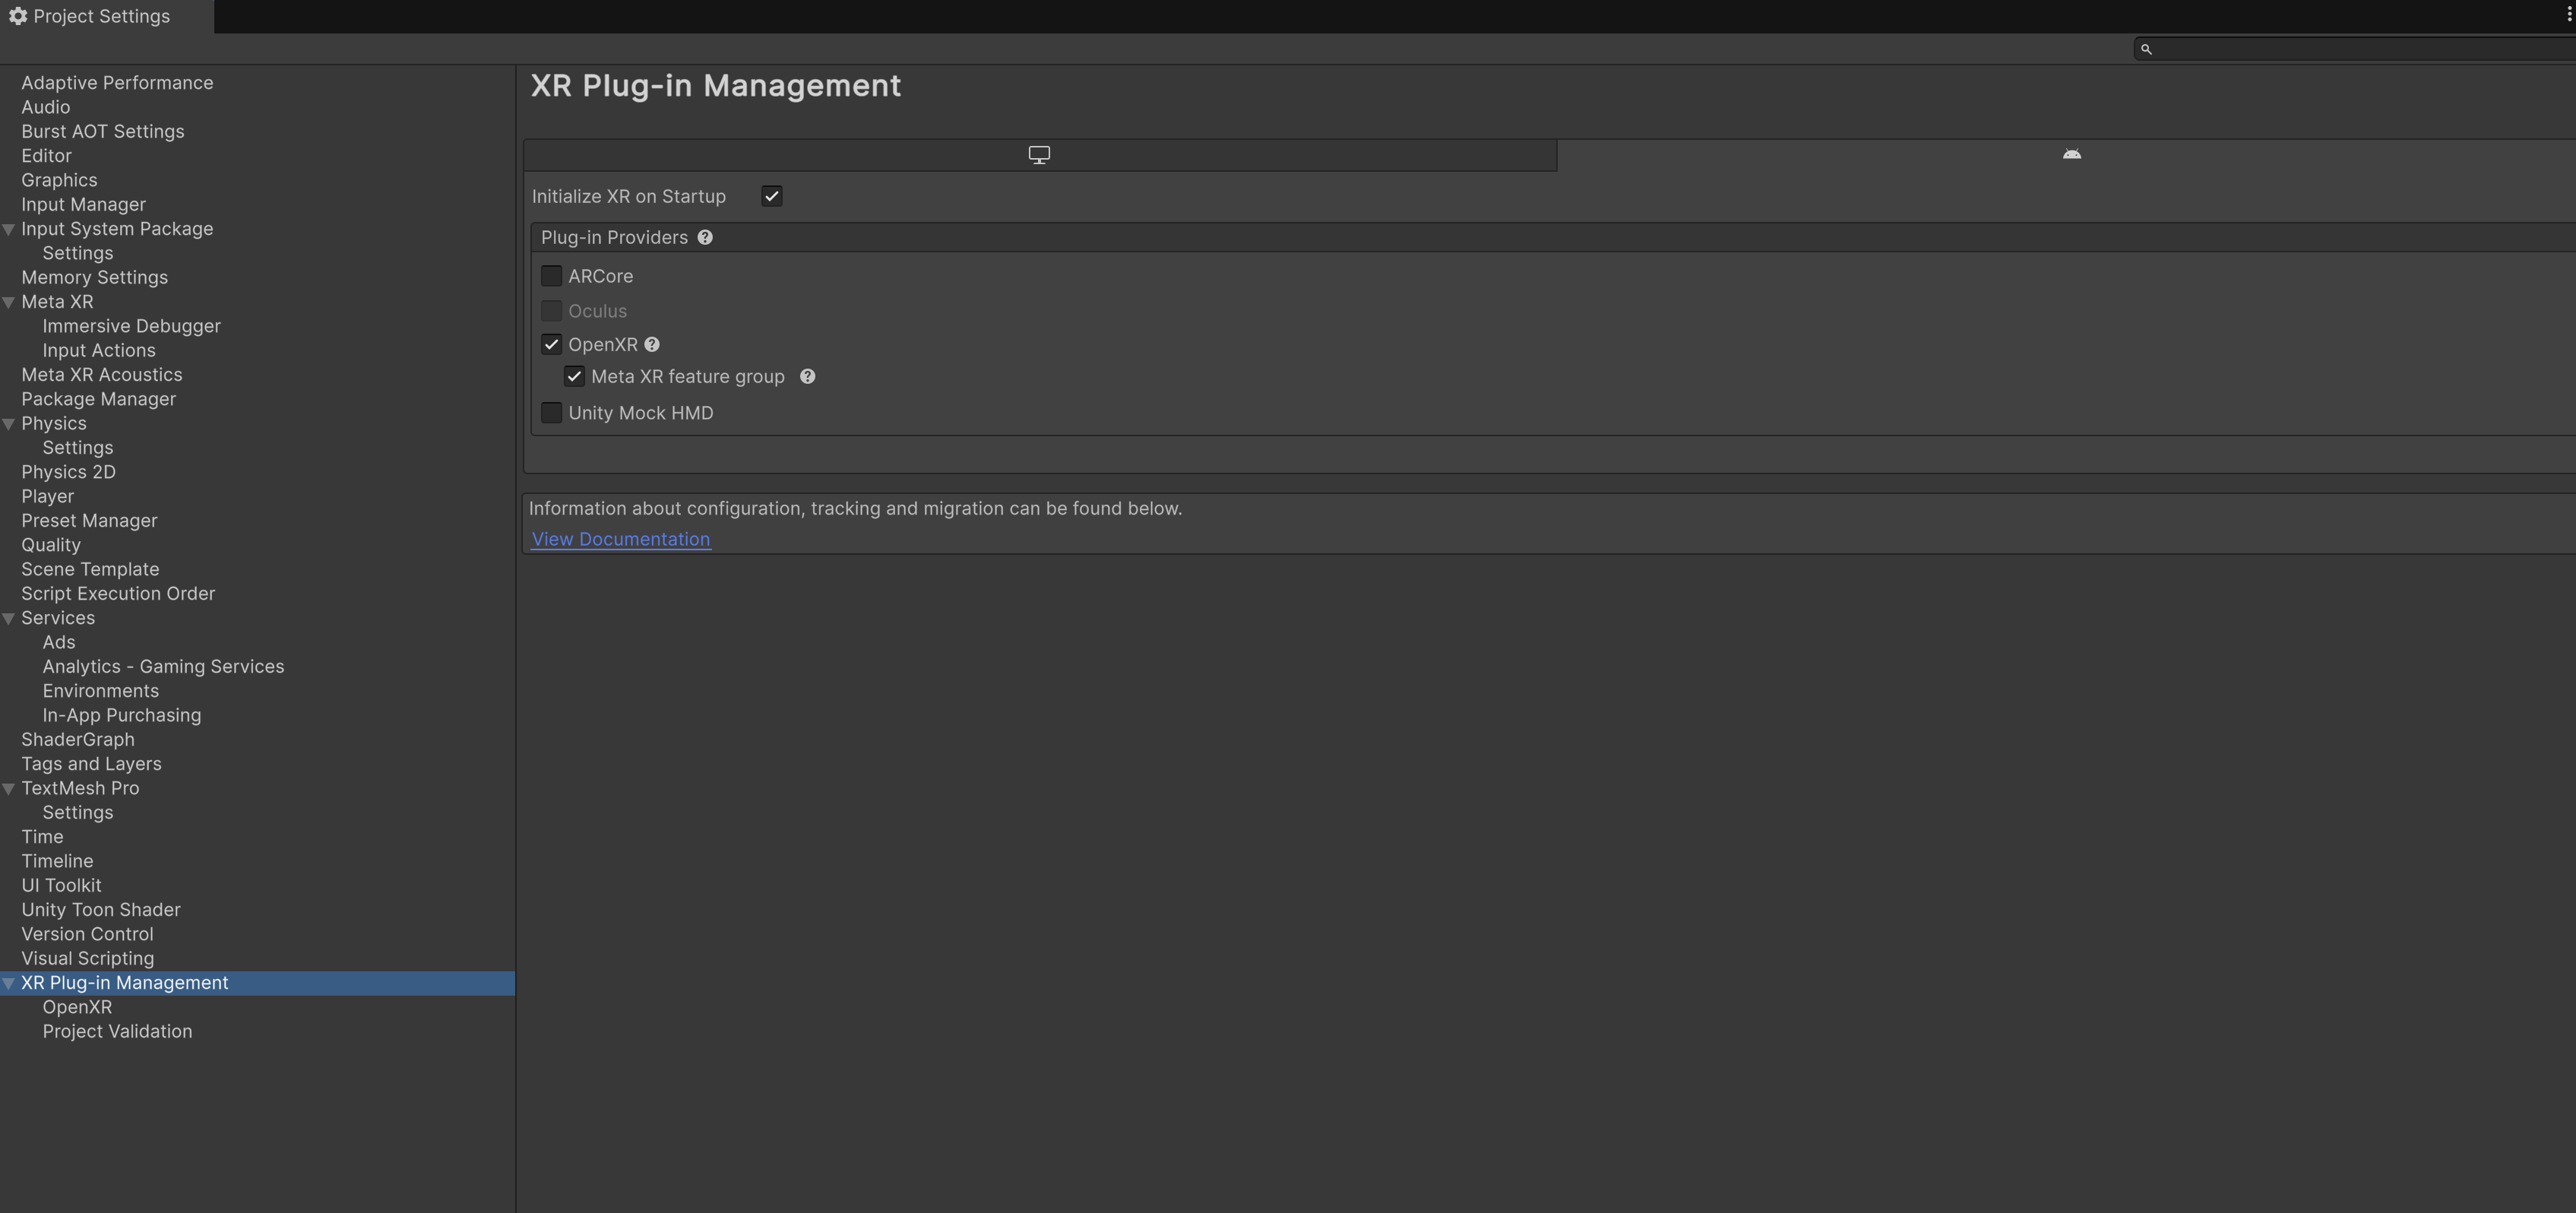
XR Plug-in Management → Android → OpenXRにチェック
-
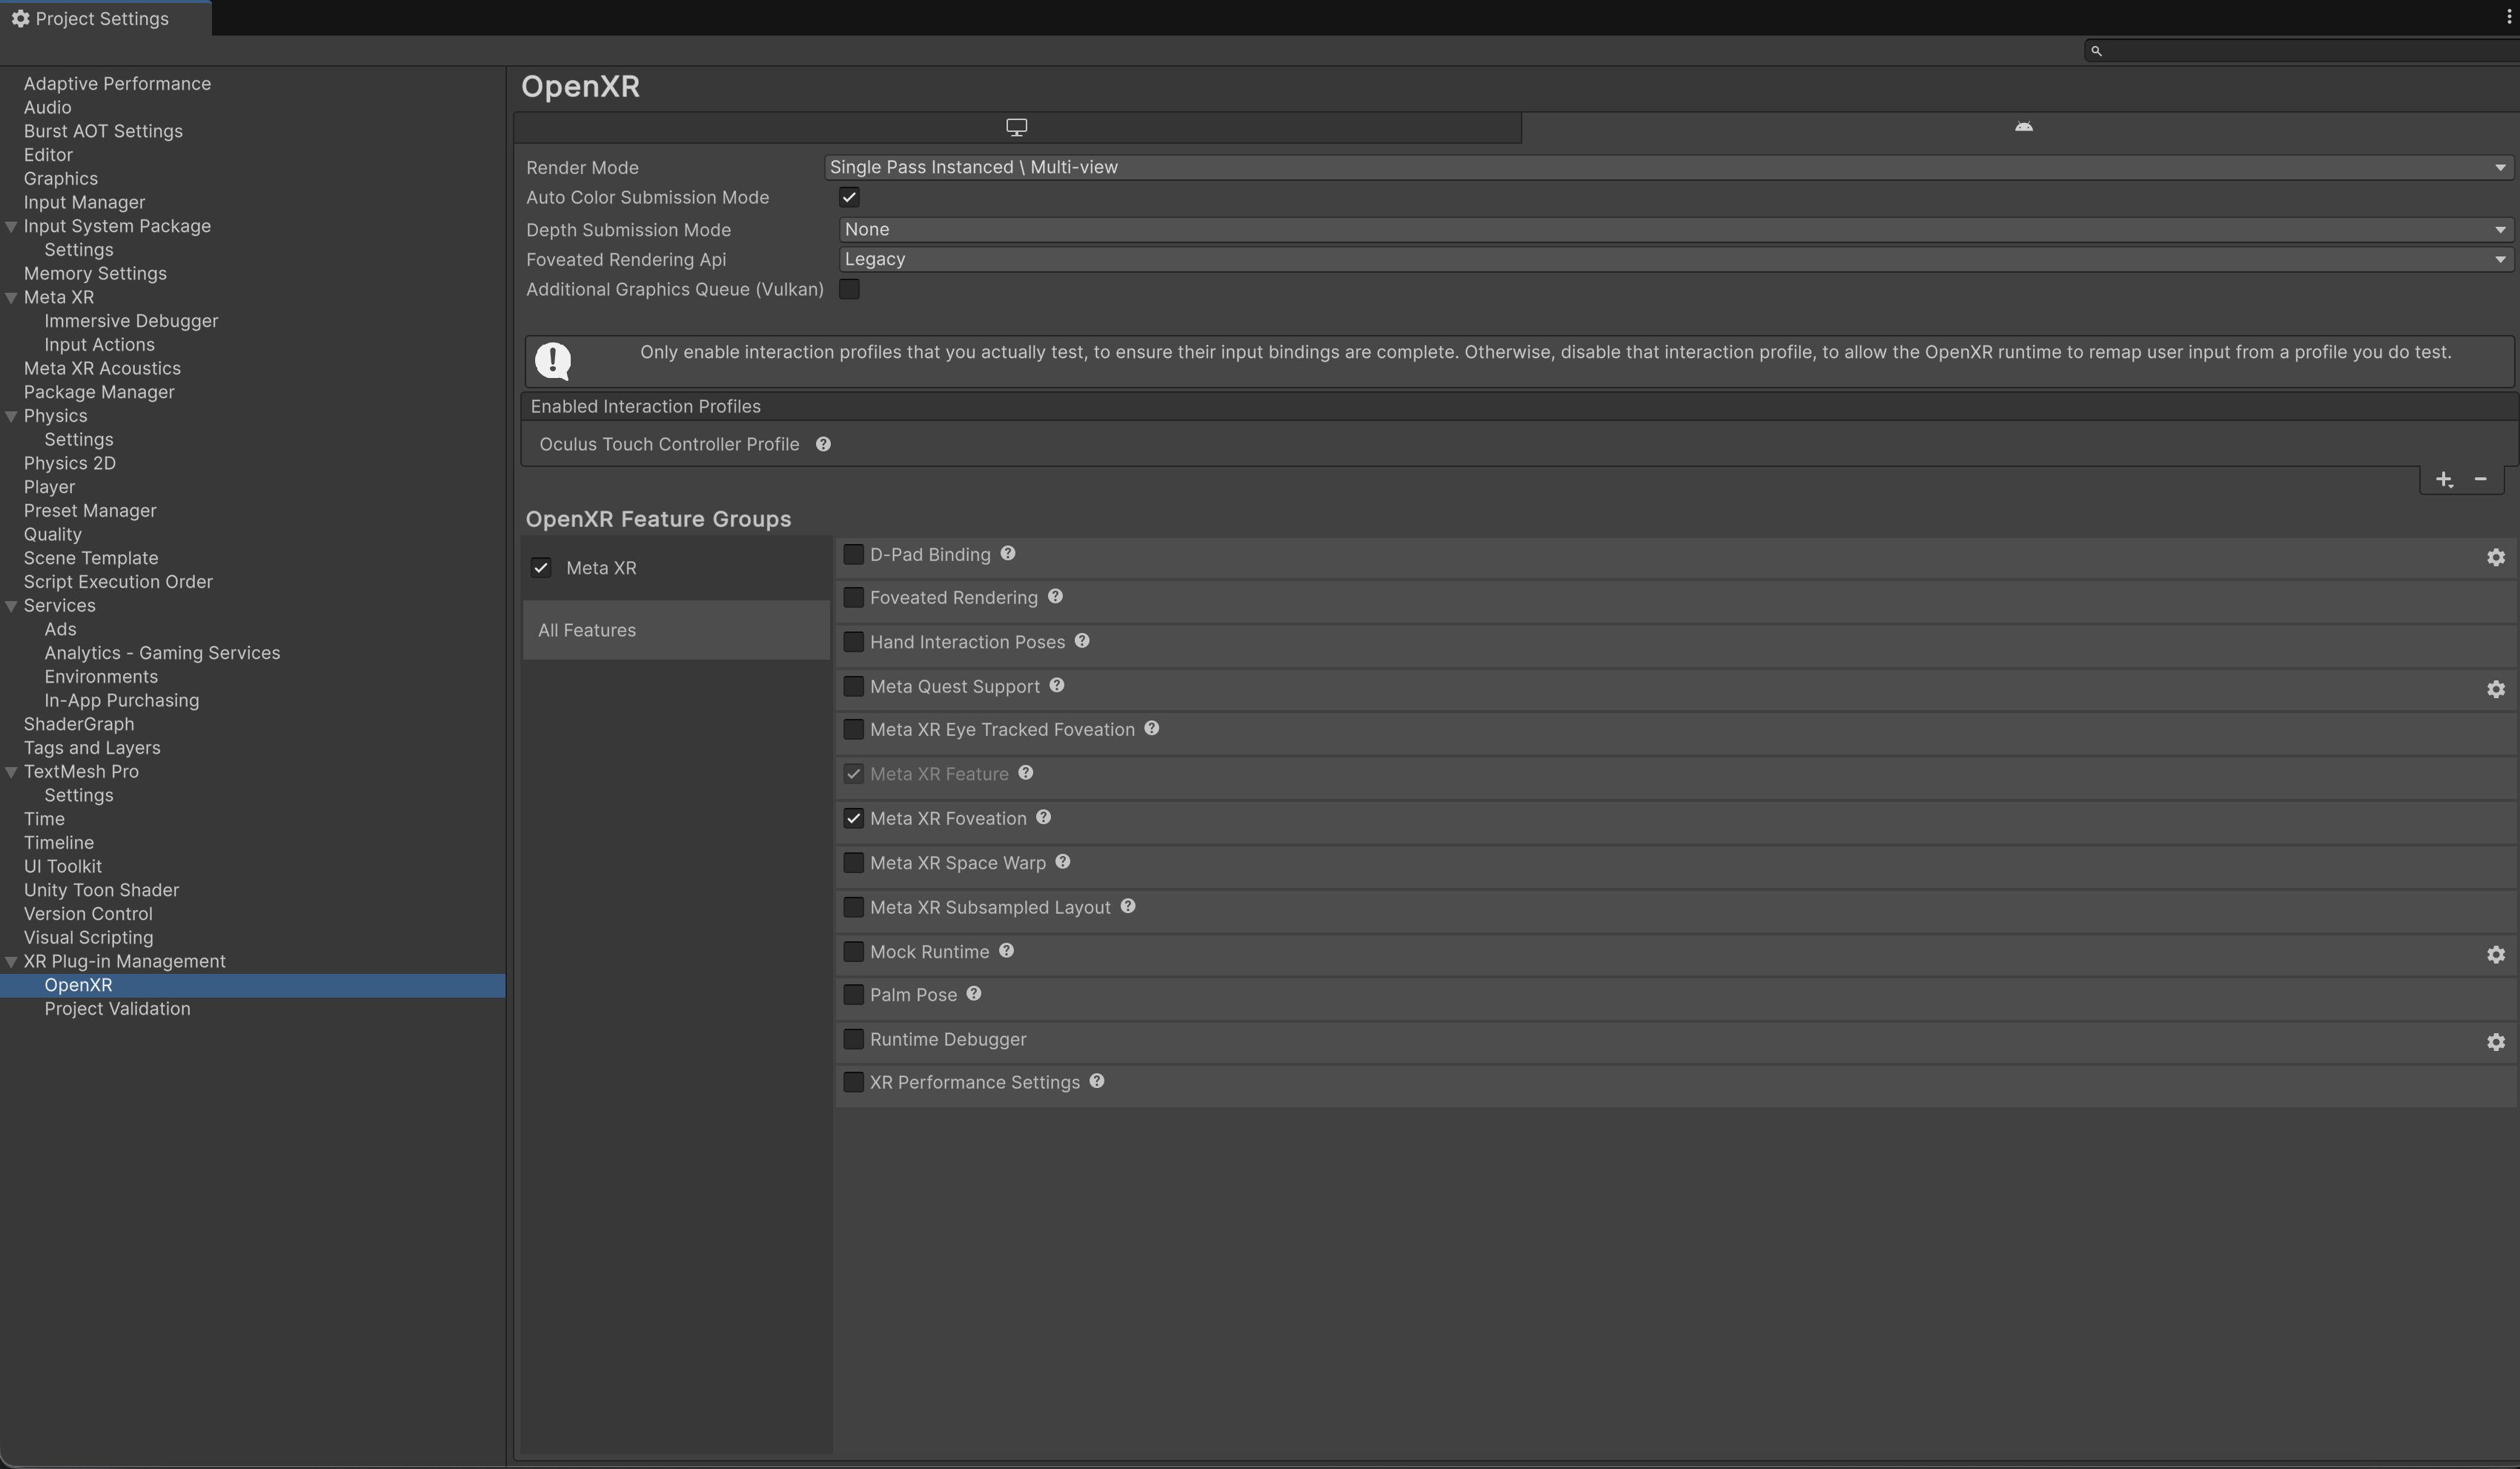
XR Plug-in Management → OpenXR → Enabled Interaction ProfilesにOculus Youch Controller Profilesをセット
-
Minimum API Level: Android 10.0以上
-
Install Location: Auto
-
- 実行時はWindowsのOculusデスクトップによるAirlinkでの起動...または
Build And RunによるMetaQuestでのスタンドアロン実行をする
実装の詳細
コントローラー速度の取得
// 右手と左手の(ローカル座標系での)Y軸速度を取得
Vector3 velocityR = OVRInput.GetLocalControllerVelocity(OVRInput.Controller.RTouch);
Vector3 velocityL = OVRInput.GetLocalControllerVelocity(OVRInput.Controller.LTouch);

// Y軸方向の速度の絶対値を取得(上下に振る動きを検出)
float speedR = Mathf.Abs(velocityR.y);
float speedL = Mathf.Abs(velocityL.y);
移動方向の計算
// 頭(カメラ)の向いている正面方向を取得
Transform headTransform = playerCamera.transform;
Vector3 forwardDirection = headTransform.forward;
forwardDirection.y = 0; // 水平移動のみ(上下を向いても前進する)
forwardDirection.Normalize();

// 移動ベクトルを計算
float totalSpeed = (speedR + speedL) * moveSpeed;
moveDirection = forwardDirection * totalSpeed;
重力と移動の統合
// 空中にいる時は重力を加算
if (!characterController.isGrounded)
{
    verticalVelocity.y += gravity * Time.deltaTime;
}

// 水平移動と垂直移動を合算
characterController.Move((moveDirection + verticalVelocity) * Time.deltaTime);