この記事は筆者のソロ Advent Calendar 2022 2日目の記事です。
前回の続きでKotlinプロジェクトでの Spockの基本的な使い方について紹介していきます。
本記事ではHelperメソッドやSpockでテストを書く際に使用できる関数を紹介します。
KotlinでSpock入門[基礎編]
KotlinでSpock入門[基礎編2] <- 今ここ
KotlinでSpock入門[Data Driven Testを学んでデータ駆動テストを使い倒す]
KotlinでSpock入門[Data Driven Testを学んでデータ駆動テストを使い倒す2]
KotlinでSpock入門[mock編]
KotlinでSpock入門[Spring boot実践編]
記事作成で使用したサンプルコードはこちら
Helperメソッド
重複箇所が目立ってきたらHelperメソッドを導入することができます。
package spocktest

data class PC(
    val vendor: String,
    val clockRate: Int,
    val ram: Int,
    val os: String
)

class Shop {
    fun buyPc(
        vendor: String = "Sunny",
        clockRate: Int = 2333,
        ram: Int = 4096,
        os: String = "Linux"
    ) = PC(vendor, clockRate, ram, os)
}
package spocktest

import spock.lang.Specification

class ShopSpec extends Specification {
    def "offered PC matches preferred configuration"() {
        given:
        def shop = new Shop()
        when:
        def pc = shop.buyPc("Sunny", 2333, 4096, "Linux")

        then:
        pc.vendor == "Sunny"
        pc.clockRate >= 2333
        pc.ram >= 4096
        pc.os == "Linux"
    }
}
Helper関数を導入するとこんな感じ
    def "offered PC matches preferred configuration"() {
        given:
        def shop = new Shop()
        when:
        def pc = shop.buyPc("Sunny", 2333, 4096, "Linux")

        then:
        matchesPreferredConfiguration(pc)
    }
    void matchesPreferredConfiguration(pc) {
        assert pc.vendor == "Sunny"
        assert pc.clockRate >= 2333
        assert pc.ram >= 4096
        assert pc.os == "Linux"
    }
Helper関数を書くときのポイントは以下の2点。
- 関数の戻り値はvoidにすること。
- 検証はassertで検証するようにすること。
こんな感じのBool値を戻り値とするようなHelper関数は書けない。
def matchesPreferredConfiguration(pc) {
  pc.vendor == "Sunny"
  && pc.clockRate >= 2333
  && pc.ram >= 4096
  && pc.os == "Linux"
}
余談ですがKotlinでデフォルト引数を使用している場合にgroovyから引数なしで呼び出そうとするとMissingMethodExceptionが発生した。そのため、デフォルト引数を設定してあったとしても引数は全て埋める必要があった。(もし回避策をご存じの方がいればコメントください🙇♂️)
with
対象のインスタンスに対して繰り返しアサーションするようなケースではwithが有用なケースがある。例えば、上記のHelper関数を導入したケースはwithを使うと以下のように書ける。
    def "offered PC matches preferred configuration2"() {
        given:
        def shop = new Shop()
        when:
        def pc = shop.buyPc("Sunny", 2333, 4096, "Linux")

        then:
        with(pc) {
            vendor == "Sunny"
            clockRate >= 2333
            ram >= 4096
            os == "Linux"
        }
    }
verifyAll
通常だと最初に失敗したアサーションでテストは失敗する。テストが失敗する前にこれらの失敗を収集し、より多くの情報を得ることが有効な場合がある。この動作はsoft assertionsと呼ぶらしい。このようなケースではverifyAllを使用し、以下のように書くことができる。
    def "offered PC matches preferred configuration3"() {
        given:
        def shop = new Shop()
        when:
        def pc = shop.buyPc("Sunny", 2333, 4096, "Linux")
        then:
        verifyAll(pc) {
            vendor == "Sunnyy"
            clockRate >= 2333
            ram >= 406
            os == "Mac"
        }
    }
通常であればvendorのアサーションで失敗しテストは終了するが、verifyAllを使用した場合は以下のようにvendorのアサーション失敗でテストは終了せず、他の検証も続行する。
Condition not satisfied:

vendor == "Sunnyy"
|      |
Sunny  false
       1 difference (83% similarity)
       Sunny(-)
       Sunny(y)

Comparison Failure:

Condition not satisfied:

os == "Mac"
|  |
|  false
|  5 differences (0% similarity)
|  (Linux)
|  (Mac--)
Linux

Comparison Failure:
以下のようにターゲット指定なしでも書ける。
  expect:
  verifyAll {
    2 == 2
    4 == 4
  }
ドキュメントの役割を果たすテスト
よく書かれた仕様書は、より多くの情報を自然言語で提供することが理にかなっている。Spockではブロックにテキストによる説明を付加することができる。PCクラスにosを検証するメソッドを足して各ブロックにテキストを追加してテストを書いてみると以下のような感じになる。
    def "check PC OS"() {
        given: "shopインスタンスを作成"
        def shop = new Shop()
        when: "PCの購入"
        and: "LinuxOSのPCを購入"
        def linuxPC = shop.buyPc("Sunny", 2333, 4096, "Linux")
        and: "MacOSのPCを購入"
        def macPC = shop.buyPc("Sunny", 2333, 4096, "Mac")
        and: "WindowsOSのPCを購入"
        def windowsPC = shop.buyPc("Sunny", 2333, 4096, "Windows")
        then: "LinuxPCの検証"
        linuxPC.isLinux()
        !macPC.isLinux()
        !windowsPC.isLinux()
    }
andブロックを利用することで追加の説明を足すこともできる。
まとめ
本記事では以下のことについて記載しました。
- SpockにおいてのHelper関数の導入の仕方。
- with, verifyAllの使用方法について。
- Spockの仕様書としてテストを書くポイントについて。
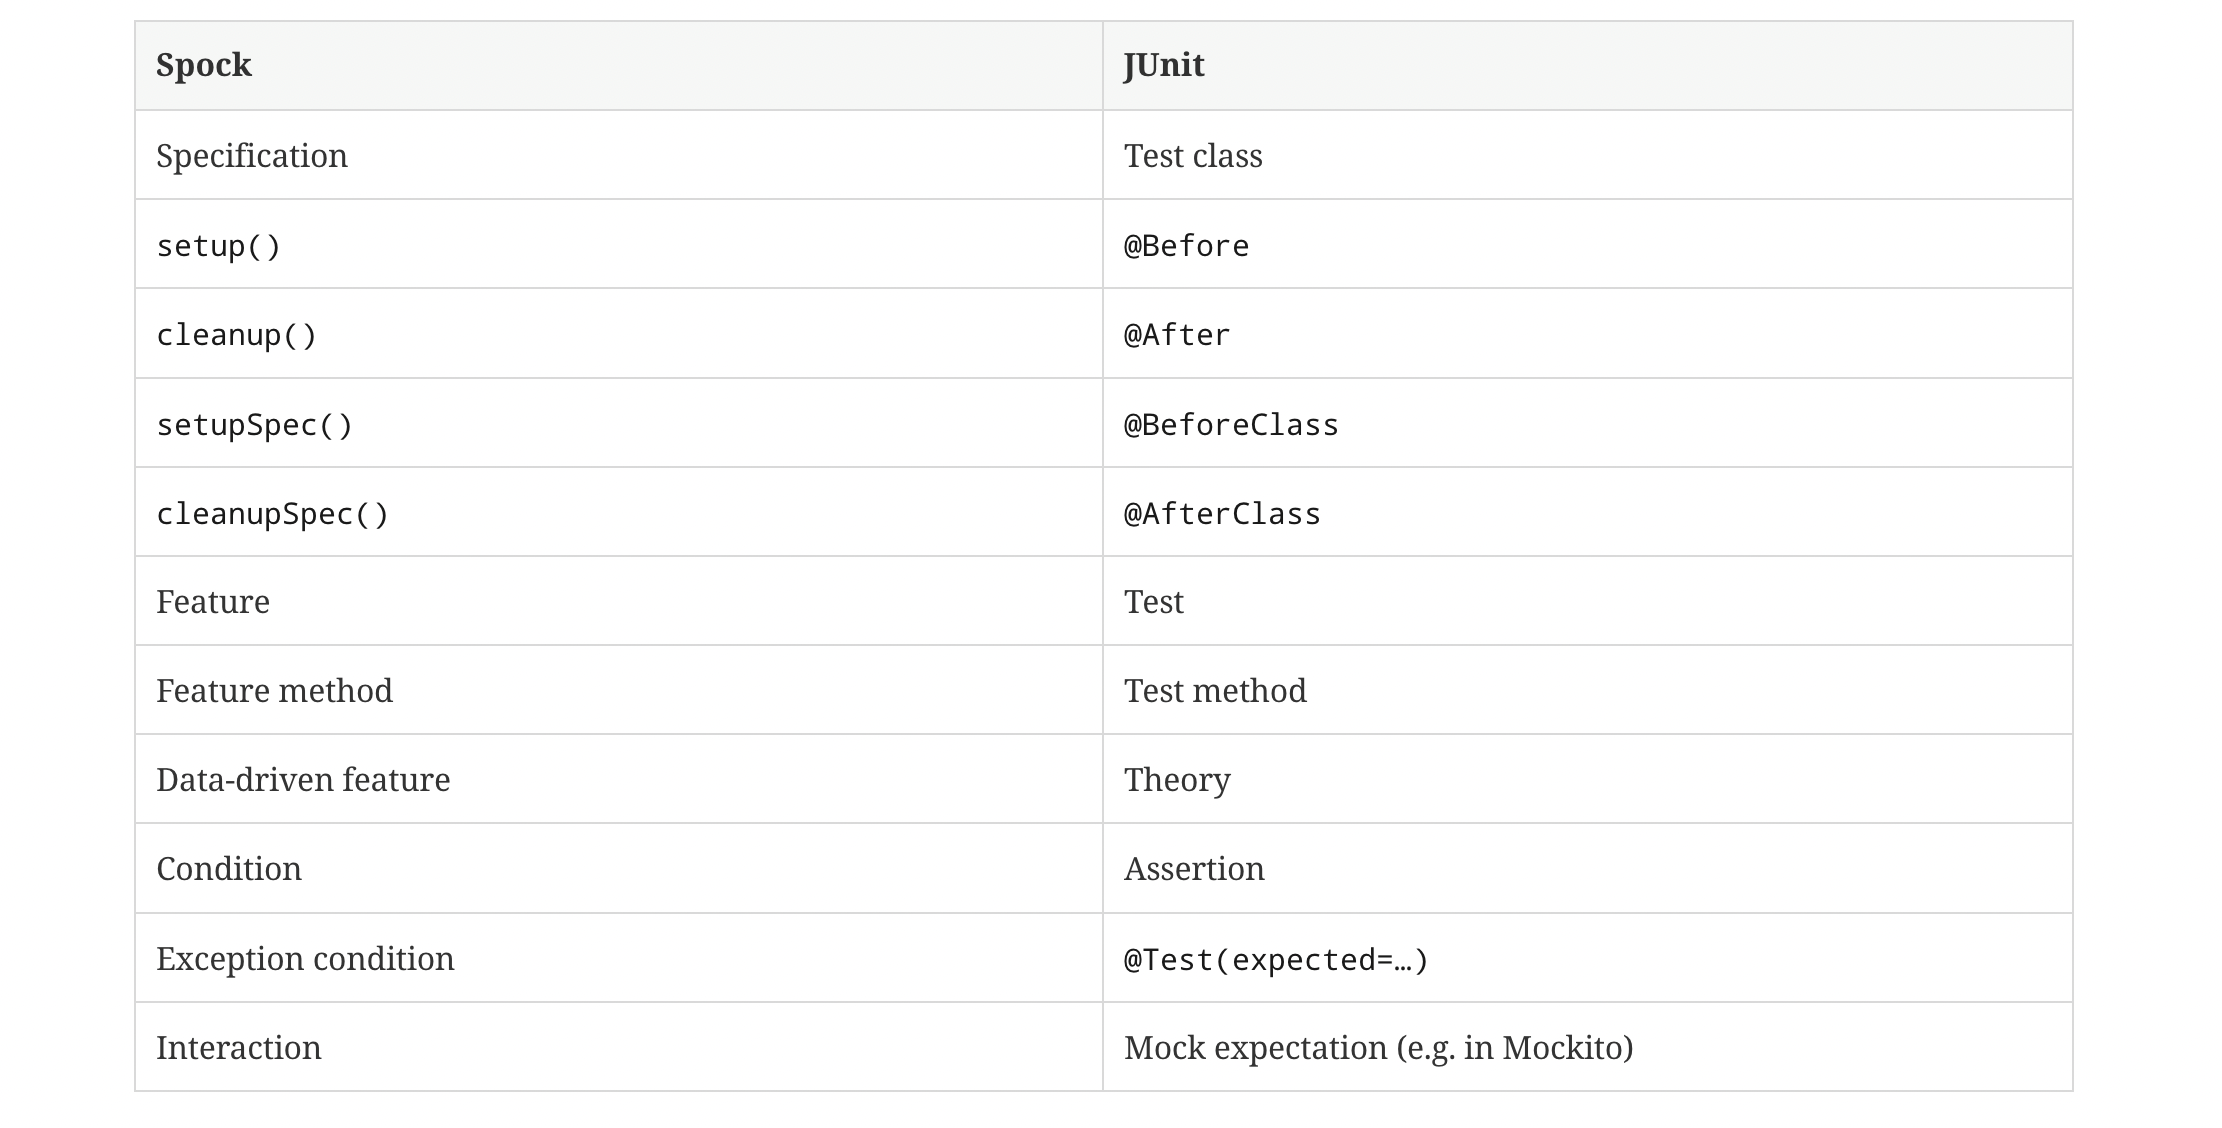
SpockはJUnitなどのテスティングフレームワークにインスパイアされているが、JUnitなどとは違った用語を使用している。(以下は用語の対比表)
あんまり考えたことがなかったのですが、given, when, thenブロックでテストを書くのはBDD(振舞駆動開発, ビヘイビア駆動開発)の手法のようです。BDDについてはちゃんと学んだことがないのですが普段テストを書くときはコメントでgiven, when, thenを記載して意識的にブロックを作ることでテストが書きやすくなるなとは感じていました。
SpockはBDDを実行するためのテスティングフレームワークとしておそらく開発されているためBDDを導入したいという場合にはかなり有用です。BDDを使う予定がないとしても、テストにある程度ドキュメント的な意味合いを持たせたいとか、テストが綺麗に書けないとか、もっと明快で綺麗にテストを書きたいとか今使用しているテスティングフレームワークまたは記述したテストに満足していなければSpockを採用してみてもいいのかなと思いました!
まだ、軽く触った程度ですがSpockは記述量も少なく、かなりいい感じにテストが書けます!(普段はKotlinなのでそこまで不満はないですがJava + JUnitだとやっぱり記述量は多くなりがちでできれば書きたくない。。)
ぜひみなさんもSpockを触ってみてください!以上!
