この記事では、ユーザーデータによるWebサーバー構成を例とし、VPCエンドポイントを利用してプライベートサブネットでyumを実行する方法を解説します。また、構成例をCDKのサンプルコード付きで紹介します。
背景と目的
ユーザーデータでインスタンス起動時にWebサーバーを構成しています。
yum update -y
yum install -y httpd
systemctl start httpd
systemctl enable httpd
echo "This is a sample website." > /var/www/html/index.html
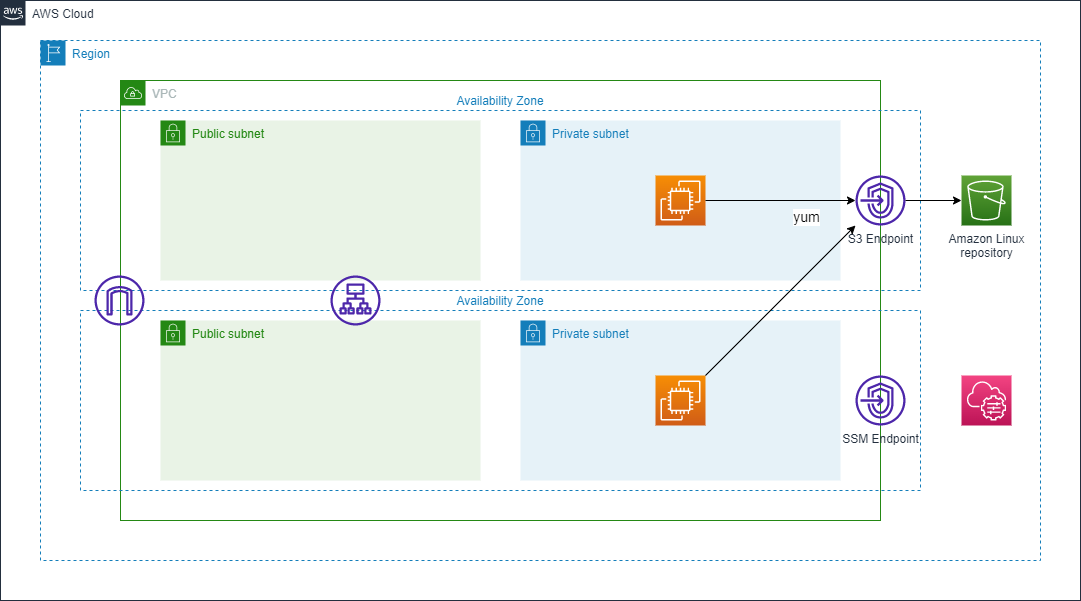
ただし、インターネット接続がない環境ではyumの実行に失敗します。この問題を解決するために、VPCエンドポイントを配置してS3でホストされているAmazon Linuxレポジトリを利用します。
この方法により、NATゲートウェイを配置することなく、インターネット接続なしでWebサーバーを構成できます。
構成図
S3のゲートウェイ型VPCエンドポイントを配置します。
ALBをWebサーバーのパブリックエンドポイントとします。また、リモート接続のためSSMのVPCエンドポイントも配置しています。
CDK利用方法
先にCDKのセットアップを終わらせておきます。
開発環境のセットアップからデプロイまでの手順については、公式ワークショップが詳しいです。
サンプルコード
CDKのプロジェクトを作成し、lib/cdk-private-yum-sample-stack.tsを編集します。
mkdir cdk-private-yum-sample
cd cdk-private-yum-sample
cdk init -l typescript
import { Stack, StackProps, CfnOutput } from 'aws-cdk-lib';
import * as ec2 from 'aws-cdk-lib/aws-ec2';
import * as elbv2 from 'aws-cdk-lib/aws-elasticloadbalancingv2';
import * as elbv2_tg from 'aws-cdk-lib/aws-elasticloadbalancingv2-targets'
import { Construct } from 'constructs';

export class CdkPrivateYumSampleStack extends Stack {
  constructor(scope: Construct, id: string, props?: StackProps) {
    super(scope, id, props);

    // vpc
    const vpc = new ec2.Vpc(this, 'WebVpc', {
      vpcName: 'web-vpc',
      ipAddresses: ec2.IpAddresses.cidr('172.16.0.0/16'),
      natGateways: 0,
      maxAzs: 2,
      subnetConfiguration: [
        {
          cidrMask: 24,
          name: 'Public',
          subnetType: ec2.SubnetType.PUBLIC
        },
        {
          cidrMask: 24,
          name: 'Private',
          subnetType: ec2.SubnetType.PRIVATE_ISOLATED
        }
      ],
      // remove all rules from default security group
      // See: https://docs.aws.amazon.com/config/latest/developerguide/vpc-default-security-group-closed.html
      restrictDefaultSecurityGroup: true
    });

    // add private endpoints for session manager
    vpc.addInterfaceEndpoint('SsmEndpoint', {
      service: ec2.InterfaceVpcEndpointAwsService.SSM,
    });
    vpc.addInterfaceEndpoint('SsmMessagesEndpoint', {
      service: ec2.InterfaceVpcEndpointAwsService.SSM_MESSAGES,
    });
    vpc.addInterfaceEndpoint('Ec2MessagesEndpoint', {
      service: ec2.InterfaceVpcEndpointAwsService.EC2_MESSAGES,
    });
    // add private endpoint for Amazon Linux repository on s3
    vpc.addGatewayEndpoint('S3Endpoint', {
      service: ec2.GatewayVpcEndpointAwsService.S3,
      subnets: [
        { subnetType: ec2.SubnetType.PRIVATE_ISOLATED }
      ]
    });

    //
    // security groups
    //
    const albSg = new ec2.SecurityGroup(this, 'AlbSg', {
      vpc,
      allowAllOutbound: true,
      description: 'security group for alb'
    })
    albSg.addIngressRule(ec2.Peer.anyIpv4(), ec2.Port.tcp(80), 'allow http traffic from anyone')

    const ec2Sg = new ec2.SecurityGroup(this, 'WebEc2Sg', {
      vpc,
      allowAllOutbound: true,
      description: 'security group for a web server'
    })
    ec2Sg.connections.allowFrom(albSg, ec2.Port.tcp(80), 'allow http traffic from alb')

    //
    // web servers
    //
    const userData = ec2.UserData.forLinux({
      shebang: '#!/bin/bash',
    })
    userData.addCommands(
      // setup httpd
      'yum update -y',
      'yum install -y httpd',
      'systemctl start httpd',
      'systemctl enable httpd',
      'echo "This is a sample website." > /var/www/html/index.html',
    )

    // launch one instance per az
    const targets: elbv2_tg.InstanceTarget[] = new Array();
    for (const [idx, az] of vpc.availabilityZones.entries()) {
      targets.push(
        new elbv2_tg.InstanceTarget(
          new ec2.Instance(this, `WebEc2${idx + 1}`, {
            instanceName: `web-ec2-${idx + 1}`,   // web-ec2-1, web-ec2-2, ...
            instanceType: ec2.InstanceType.of(ec2.InstanceClass.T2, ec2.InstanceSize.MICRO),
            machineImage: ec2.MachineImage.latestAmazonLinux2023(),
            vpc,
            vpcSubnets: vpc.selectSubnets({
              subnetType: ec2.SubnetType.PRIVATE_ISOLATED,
            }),
            availabilityZone: az,
            securityGroup: ec2Sg,
            blockDevices: [
              {
                deviceName: '/dev/xvda',
                volume: ec2.BlockDeviceVolume.ebs(8, {
                  encrypted: true
                }),
              },
            ],
            userData,
            ssmSessionPermissions: true,
            propagateTagsToVolumeOnCreation: true,
          })
        )
      );
    }

    //
    // alb
    //
    const alb = new elbv2.ApplicationLoadBalancer(this, 'Alb', {
      internetFacing: true,
      vpc,
      vpcSubnets: {
        subnets: vpc.publicSubnets
      },
      securityGroup: albSg
    })

    const listener = alb.addListener('HttpListener', {
      port: 80,
      protocol: elbv2.ApplicationProtocol.HTTP
    })
    listener.addTargets('WebEc2Target', {
      targets,
      port: 80
    })

    new CfnOutput(this, 'TestCommand', {
      value: `curl http://${alb.loadBalancerDnsName}`
    })
  }
}
デプロイします。
cdk deploy
余談ですが、CDKとGitHub Copilotの組み合わせは開発体験が最高なので、おすすめです。
コードはこちらにあります。
尚、以下のバージョンで検証しました。
$ cdk --version
2.81.0 (build bd920f2)
テスト
まず、Webサーバーの動作を確認します。
セッションマネージャーで接続し、httpリクエストに対してレスポンスを返すことを確認します。
sh-4.2$ curl http://localhost/
This is a sample website.
次に、E2Eで確認します。
CDKのデプロイが完了すると、ターミナルにテスト用コマンドが出力されるので、コピーして実行します。
$ curl http://CdkPr-alb8A-1UPL742M6H83S-1170769314.ap-northeast-1.elb.amazonaws.com
This is a sample website.
ALBが期待通りにレスポンスを返すことを確認できました。
まとめ
VPCエンドポイントを利用することで、インターネット接続なしでyumを実行可能な構成にできます。また、CDKを利用することで開発体験の向上と構築の高速化が実現できます。
参考


