はじめに
これは POV-Rayによる数学お絵かき入門 Advent Calendar 2017 の10日目の記事です.
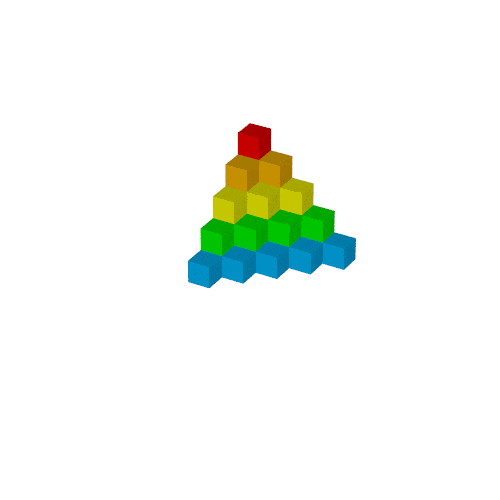
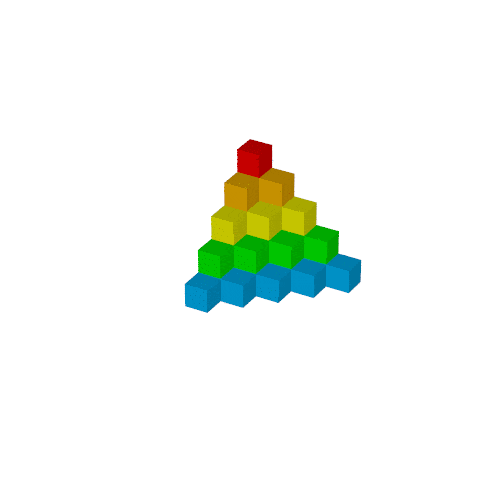
作例2回目では次のgifを作ります.
三角数の和
三角数$T_n$は
$$
T_n=\sum_{k=1}^nk
$$
で定義される自然数です.
今回は三角数の和
$$
S_n=\sum_{k=1}^nT_k=\frac{n(n+1)(n+2)}{6}
$$
をpicture proofで求める事を考えます.
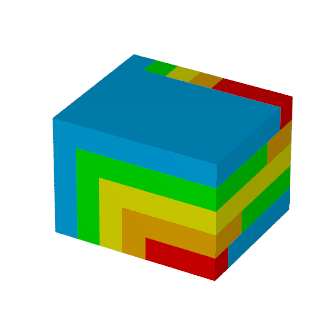
$S_n$は次の図形の体積と同じで,
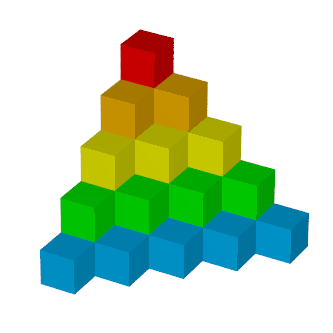
これを6つ集めた直方体の辺の長さが$n, n+1, n+2$となり, 先の公式が得られます.
この方法はProofs without Words: Exercises in Visual Thinkingに記載されています:
https://www.amazon.co.jp/dp/0883857006
実装
povray.ini
povray.iniを以下のように書きます.
Width=500
Height=500
Antialias=On
+KFF20
ただし+KFFの命令は適当で大丈夫です.
カメラ等の設定
次のように書きます:
# version 3.7;
global_settings{assumed_gamma 1.0}
# macro SCS(lng,lat) <cos(radians(lat))*cos(radians(lng)),cos(radians(lat))*sin(radians(lng)),sin(radians(lat))> #end
# macro smootha(a) #if(a>0) #local b=exp(-1/a); #else #local b=0; #end b #end
# macro usmooth(a,b,s) smootha((2/sqrt(3))*((s-a)/(b-a)))/(smootha((2/sqrt(3))*((s-a)/(b-a)))+smootha((2/sqrt(3))*(1-(s-a)/(b-a)))) #end
# declare Time=clock;
# declare Time2=Time*8;
# declare Lng=30;
# declare Lat=30;
# declare Pers=0.1;
# declare Zoom=0.15;
# declare LookAt=<0,0,0>;
# declare AspectRatio=image_width/imageₕeight;
# declare Z=SCS(Lng,Lat);
# declare X=<-sin(radians(Lng)),cos(radians(Lng)),0>;
# declare Y=vcross(Z,X);
# declare Loc=LookAt+SCS(Lng,Lat)/(Zoom*Pers);
camera{
perspective
location Loc
right -2*X*sqrt(AspectRatio)/Zoom
up 2*Y/(sqrt(AspectRatio)*Zoom)
direction Z/(Zoom*Pers)
sky Y
look_at LookAt
}
light_source{
Loc
color rgb<1,1,1>
}
background{rgb<1,1,1>}
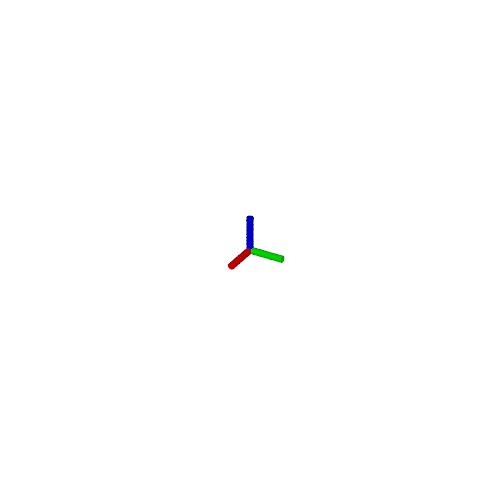
/*axis*/
cylinder{<0,0,0>,<1,0,0>,0.1 pigment{rgb<1,0,0>}}
cylinder{<0,0,0>,<0,1,0>,0.1 pigment{rgb<0,1,0>}}
cylinder{<0,0,0>,<0,0,1>,0.1 pigment{rgb<0,0,1>}}
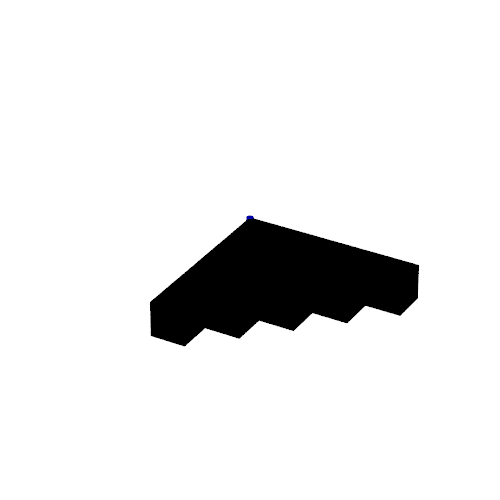
次の出力が得られます.
3つのcylinderは座標軸の方向を確認するためのもので, 最終的には消します.
Tₙのブロック
次のようにwhileを使えば下のような画像得られます.
色はまだ与えてないので黒色になっています.
# declare N=5;

# declare i=0;
# while(i<N)
	#declare j=0;
	#while(j<N-i)
		box{<i,j,0>,<i,j,0>+1}
		#declare j=j+1;
	#end
	#declare i=i+1;
# end

Tₙをマクロに書き直す
詳しくは今度改めて書きますが, 複数のオブジェクトをまとめて扱うにはunionを使うのでした.
# declare N=5;
# macro Tn(n)
	union{
		#local i=0;
		#while(i<n)
			#local j=0;
			#while(j<n-i)
				box{<i,j,N-n>,<i,j,N-n>+1}
				#local j=j+1;
			#end
			#local i=i+1;
		#end
	}
# end

Tn(5)
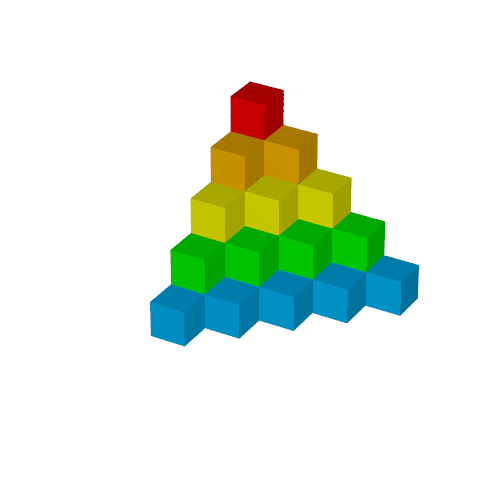
Sₙのブロック
whileで繰り返しても良いですが, pigmentの処理が面倒なので愚直に並べます.
object{Tn(1) pigment{rgb<1,0,0>}}
object{Tn(2) pigment{rgb<1,0.5,0>}}
object{Tn(3) pigment{rgb<1,1,0>}}
object{Tn(4) pigment{rgb<0,1,0>}}
object{Tn(5) pigment{rgb<0,0.5,1>}}
Sₙをマクロに書き直す
$Sₙ$のブロックは多少変形させる必要があるため, マクロは2つの引数を取るようにします.
最後の2つのobjectは確認のためであり, 以降の工程では使いません.
# macro Bl(s1,s2)
	union{
		object{Tn(1) translate<(5-1)*s1,(5-1)*s2,0> pigment{rgb<1,0,0>}}
		object{Tn(2) translate<(5-2)*s1,(5-2)*s2,0> pigment{rgb<1,0.5,0>}}
		object{Tn(3) translate<(5-3)*s1,(5-3)*s2,0> pigment{rgb<1,1,0>}}
		object{Tn(4) translate<(5-4)*s1,(5-4)*s2,0> pigment{rgb<0,1,0>}}
		object{Tn(5) translate<(5-5)*s1,(5-5)*s2,0> pigment{rgb<0,0.5,1>}}
	}
# end

object{Bl(usmooth(0,1,Time),0) translate<0,3,0>}
object{Bl(0,usmooth(0,1,Time)) translate<0,-3,0>}
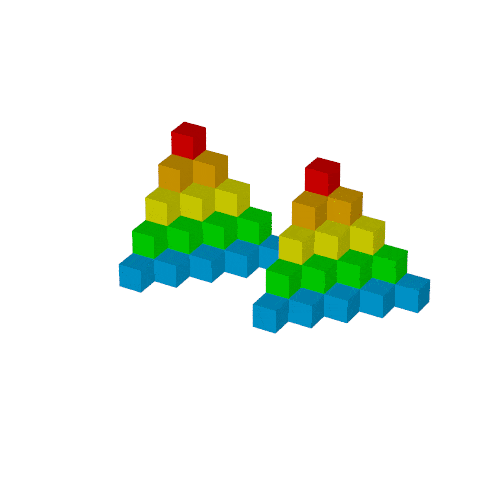
適当に配置
rotateとtranslateを使って3つ配置します.
translateの方が直感的に調整しやすいため, この順番で書くと都合が良いです.
object{Bl(0,1)}
object{Bl(1,0) rotate<0,0,180> translate<5,7,0>}
object{Bl(1,0) rotate<0,-90,-90> translate<0,-6,0>}
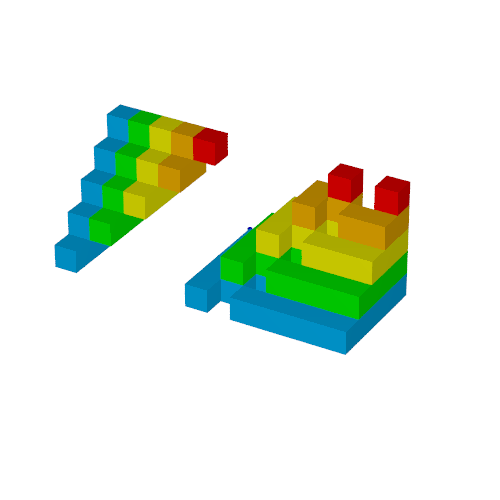
複製1
第9回で定義したusmoothを使って動かします.
アニメーションでは初期状態と最終状態を静止状態で続けると分り易いため, usmoothの第1引数は0.5から始まっています.
このアニメーションではTime2=Time*3としています.
object{Bl(0,usmooth(1.5,2.5,Time2))}
object{Bl(usmooth(1.5,2.5,Time2),0) rotate<0,0,180>*usmooth(0.5,1.5,Time2) translate<5,10,0>*usmooth(0.5,1.5,Time2)}
object{Bl(usmooth(1.5,2.5,Time2),0) rotate<0,-90,-90>*usmooth(0.5,1.5,Time2) translate<0,-6,0>*usmooth(0.5,1.5,Time2)}

合体1
同様にusmoothを使って動かします.
object{Bl(0,usmooth(1.5,2.5,Time2))}
object{Bl(usmooth(1.5,2.5,Time2),0) rotate<0,0,180>*usmooth(0.5,1.5,Time2) translate<5,10,0>*usmooth(0.5,1.5,Time2) translate<0,-4,0>*usmooth(2.5,3.5,Time2)}
object{Bl(usmooth(1.5,2.5,Time2),0) rotate<0,-90,-90>*usmooth(0.5,1.5,Time2) translate<0,-6,0>*usmooth(0.5,1.5,Time2) translate<0,5,0>*usmooth(2.5,3.5,Time2)}

複製2
次のオブジェクトを追加します.
union{
	object{Bl(0,usmooth(1.5,2.5,Time2))}
	object{Bl(usmooth(1.5,2.5,Time2),0) rotate<0,0,180>*usmooth(0.5,1.5,Time2) translate<5,10,0>*usmooth(0.5,1.5,Time2) translate<0,-4,0>*usmooth(2.5,3.5,Time2)}
	object{Bl(usmooth(1.5,2.5,Time2),0) rotate<0,-90,-90>*usmooth(0.5,1.5,Time2) translate<0,-6,0>*usmooth(0.5,1.5,Time2) translate<0,5,0>*usmooth(2.5,3.5,Time2)}
	translate<6,0,-5>*usmooth(3.5,4.5,Time2)
}
合体2
$(6,0,0)$を通る$y$軸に平行な直線を中心に$180^\circ$回転させます.
union{
	object{Bl(0,usmooth(1.5,2.5,Time2))}
	object{Bl(usmooth(1.5,2.5,Time2),0) rotate<0,0,180>*usmooth(0.5,1.5,Time2) translate<5,10,0>*usmooth(0.5,1.5,Time2) translate<0,-4,0>*usmooth(2.5,3.5,Time2)}
	object{Bl(usmooth(1.5,2.5,Time2),0) rotate<0,-90,-90>*usmooth(0.5,1.5,Time2) translate<0,-6,0>*usmooth(0.5,1.5,Time2) translate<0,5,0>*usmooth(2.5,3.5,Time2)}
	translate<6,0,-5>*usmooth(3.5,4.5,Time2)
	translate<-6,0,0>
	rotate<0,-180,0>*usmooth(4.5,5.5,Time2)
	translate<6,0,0>
}

最終調整
- 軸(
cyliner)を消去 -
+KFF60に設定
などをすれば次の出力が得られます.