ターゲット
- Rails、Rubyを全く知らない人
- 何らかのプログラミング言語でコードを書いたことがある人
- ある程度shellの操作に慣れている人
- macがなくてwindowsしかない人
目的
Rails6.1で基本的な機能を雑に触れながらそれっぽいアプリを作る
やること
- Gitの設定
- ログインなしで書き込めるネット掲示板を作る
- ベースはこれを使う + vscodeに拡張機能を入れて開発
1. 開発環境を整える
1-1. vscodeを整える
vscodeをインストールする。
Visual Studio Code - コード エディター | Microsoft Azure
これでWSLに接続して開発できる(これ以降の拡張機能は必要に応じてWSL上にインストールされる。)
Remote - WSL - Visual Studio Marketplace
日本語化
Japanese Language Pack for Visual Studio Code - Visual Studio Marketplace
アイコンをわかりやすく表示
Material Icon Theme - Visual Studio Marketplace
Ruby関連
Ruby - Visual Studio Marketplace
補完とかしてくれる言語サーバ solargraphさん
# solargraphをインストール
gem install solargraph
Ruby Solargraph - Visual Studio Marketplace
endを自動で入れてくれる
endwise - Visual Studio Marketplace
draw.ioを使いたい
Draw.io Integration - Visual Studio Marketplace
1-2. Gitを整える
first commit
git config --global user.email "you@example.com"
git config --global user.name "Your Name"
github SSH認証の準備
参考にさせていただくもの:
WSL2 から起動した VSCode DevContainer に SSH agent で Git の鍵を渡す - Qiita
cd ~
ssh-keygen -t ed25519 -P ""
# 何も入れずにEnter
cd .ssh
more id_ed25519.pub
# 内容をコピー
Build software better, together
SSH and GPG keysで「New SSH Key」ボタンを押す。
わかりやすいTitle(WSL2とか)を入力、Keyにコピーした公開鍵を貼り付け、Add
~/.bashrcを開いて以下のコードを追加
if [ -z "$SSH_AUTH_SOCK" ]; then
   # Check for a currently running instance of the agent
   RUNNING_AGENT="`ps -ax | grep 'ssh-agent -s' | grep -v grep | wc -l | tr -d '[:space:]'`"
   if [ "$RUNNING_AGENT" = "0" ]; then
        # Launch a new instance of the agent
        ssh-agent -s &> $HOME/.ssh/ssh-agent
   fi
   eval `cat $HOME/.ssh/ssh-agent`
fi

ssh-add $HOME/.ssh/id_ed25519
github上にリポジトリを新規作成、(ここでは「Rails6.1_hands_on」という名前)
git remote add origin git@github.com:hirorocky/Rails6.1_hands_on.git
git push -u origin master
# Rails6.1だとまだ”master”
2. 掲示板を作る
2-0. Railsの基礎知識:MVCモデル
詳しくは「Rails MVC」で検索!
私は正しく理解している自信はないですが、こんな図を描いてみました↓
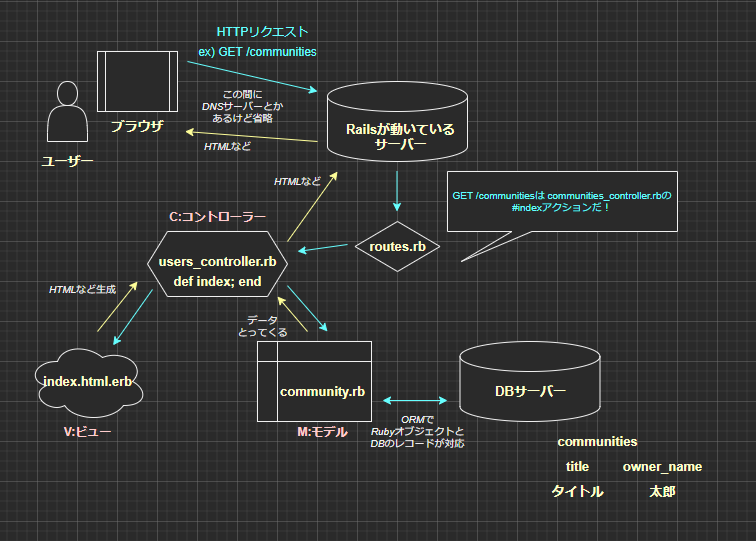
リクエストが来たら、Rails上のroutes.rbがコントローラーとアクション(=メソッド)を決めて、コントローラー上のアクションでモデルからデータを取りながら、ビューを作って、その結果をブラウザに返すイメージです。
2-1. 設計
◆モデル図
(拡張機能により、〇〇.drawioというファイルを作ればvscode上でdraw.ioが使える!)

◆ワイヤーフレーム(?詳しくない)
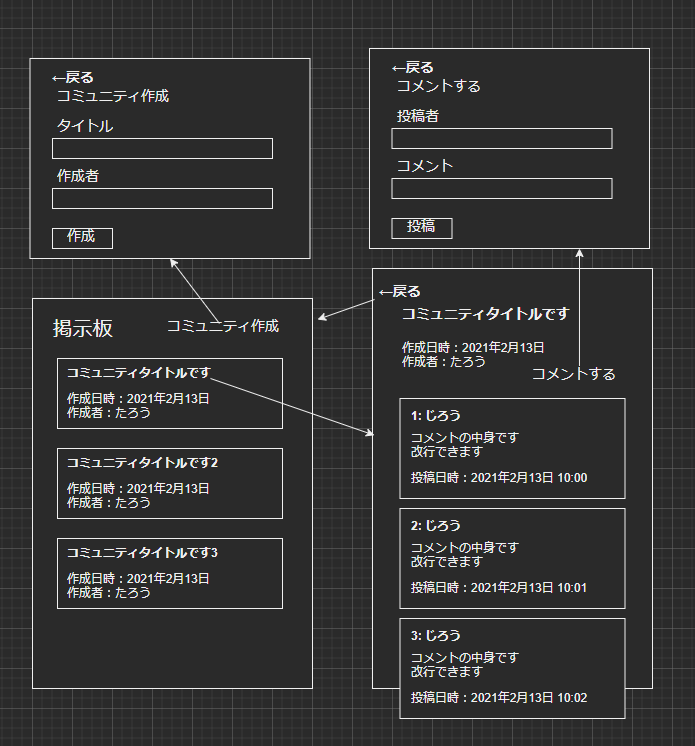
4枚のページが必要そう。
- communities_controller#index:トップページ
- communities_controller#new→#create:コミュニティ作成ページ
- communities_controller#show:1つのコミュニティ&コメント一覧
- comments_controller#new→#create:コメント投稿ページ
なぜこのコントローラー×アクションの組み合わせなのかは聞かないでください。
2-2. 実装
2-2-1. モデル
DB上に各テーブルを作る。
' rails generate model <モデル名> <カラム名>:<型>...'
でモデルに関するファイルを自動で作ってくれる。
rails generateはrails gと省略できる。※以降gで書きます。
rails g model Community title:string owner_name:string
rails g model Comment author_name:string content:text community:references
db/migrateフォルダ内に、2つのファイル(マイグレーションファイル)ができる。
以下のコマンドでDBにテーブルを作成する。
# sqlite上にRails用DBを作成
rails db:setup
# DB上にマイグレーションファイルをもとにテーブルを作成
rails db:migrate
app/models/community.rbにて
class Community < ApplicationRecord
  has_many :comments
end
app/models/comment.rbにて
class Comment < ApplicationRecord
  belongs_to :community
end
こうするだけで、RailsのORMがいい感じにしてくれる。
※ちょっと試すにはターミナルでrails console(rails cでも可)コマンド。
irb(main):001:0> commu = Community.create(title: 'コミュニティタイトルです', owner_name: 'たろう')
   (0.4ms)  SELECT sqlite_version(*)
  TRANSACTION (0.1ms)  begin transaction
  Community Create (0.5ms)  INSERT INTO "communities" ("title", "owner_name", "created_at", "updated_at") VALUES (?, ?, ?, ?)  [["title", "コミュニティタイトルです"], ["owner_name", "たろう"], ["created_at", "2021-02-13 02:21:28.386695"], ["updated_at", "2021-02-13 02:21:28.386695"]]
  TRANSACTION (5.0ms)  commit transaction
=> #<Community id: 1, title: "コミュニティタイトルです", owner_name: "たろう", created_at: "2021-02-13 02:21:28.386695000 +0000", updated_at: "2021-02-13 02:21:28.386695000 +0000">

irb(main):002:0> commu.title
=> "コミュニティタイトルです"

irb(main):003:0> commu.comments.create(author_name: 'じろう', content: "コメント\nああああ")
  TRANSACTION (0.1ms)  begin transaction
  Comment Create (0.5ms)  INSERT INTO "comments" ("author_name", "content", "community_id", "created_at", "updated_at") VALUES (?, ?, ?, ?, ?)  [["author_name", "じろう"], ["content", "コメント\nああああ"], ["community_id", 1], ["created_at", "2021-02-13 02:26:21.103087"], ["updated_at", "2021-02-13 02:26:21.103087"]]
  TRANSACTION (5.1ms)  commit transaction
=> #<Comment id: 1, author_name: "じろう", content: "コメント\nああああ", community_id: 1, created_at: "2021-02-13 02:26:21.103087000 +0000", updated_at: "2021-02-13 02:26:21.103087000 +0000">

irb(main):004:0> commu.comments.create(author_name: 'じろう', content: "コメント2\nああああ")
  TRANSACTION (0.1ms)  begin transaction
  Comment Create (0.5ms)  INSERT INTO "comments" ("author_name", "content", "community_id", "created_at", "updated_at") VALUES (?, ?, ?, ?, ?)  [["author_name", "じろう"], ["content", "コメント2\nああああ"], ["community_id", 1], ["created_at", "2021-02-13 02:26:35.918169"], ["updated_at", "2021-02-13 02:26:35.918169"]]
  TRANSACTION (7.1ms)  commit transaction
=> #<Comment id: 2, author_name: "じろう", content: "コメント2\nああああ", community_id: 1, created_at: "2021-02-13 02:26:35.918169000 +0000", updated_at: "2021-02-13 02:26:35.918169000 +0000">

irb(main):005:0> commu.comments
  Comment Load (0.2ms)  SELECT "comments".* FROM "comments" WHERE "comments"."community_id" = ? /* loading for inspect */ LIMIT ?  [["community_id", 1], ["LIMIT", 11]]
=> #<ActiveRecord::Associations::CollectionProxy [#<Comment id: 1, author_name: "じろう", content: "コメント\nああああ", community_id: 1, created_at: "2021-02-13 02:26:21.103087000 +0000", updated_at: "2021-02-13 02:26:21.103087000 +0000">, #<Comment id: 2, author_name: "じろう", content: "コメント2\nああああ", community_id: 1, created_at: "2021-02-13 02:26:35.918169000 +0000", updated_at: "2021-02-13 02:26:35.918169000 +0000">]>
ログを見ると、rubyのコードをSQLに変換して、DBを操作しているのがなんとなくわかると思います。
ここでは見ませんが、上記コードだけで、DBに1つのcommunityレコードと2つのcommentレコードができています。
2-2-2. Communityのコントローラー・ビュー
◆コントローラー
rails g controller communities index new create show
設計段階で必要なコントローラーとビューがわかったので、
上記コマンドを入力。すると色々作成される(いらないものもできてしまう...※この辺は設定でいい感じにできますがここでは触れません)
app/controllers/communities_controller.rbのアクションの中にコードを入れる
class CommunitiesController < ApplicationController
  def index
    @communities = Community.all
  end

  def new
    @community = Community.new
  end

  def create
    @community = Community.new(community_params)
    if @community.save
      redirect_to communities_path
    else
      render :new
    end
  end

  def show
    @community = Community.find(params[:id])
    @comments = @community.comments
  end

  private

  def community_params
    params.require(:community).permit(:title, :owner_name)
  end
end
@hogeはインスタンス変数で、この文脈で必要な知識としては、
「インスタンス変数はビューに渡せる」ということです。
community_paramsメソッドはStrong Parameterというやつです。セキュリティ的に必要なもので、詳しくはググってください。
◆ルーティング
Rails.application.routes.draw do
  root to: 'communities#index'
  resources :communities, only: %i[index new create show]
end
自動生成されたものは全部削除、ルートをcommunities_controllerのindexアクションに割りあて、resourcesメソッドでcommunities_controller関連のルーティングを一気に作成。
rails routes
で設定されているルーティングを見ることができ、またもっと見やすくしたいときは、
ブラウザ上で「http://[::1]:3000/rails/info/routes」で見れる。
◆ビュー
ビュー関連はapp/viewsの中に入っている。
自動で作成されたcreate.html.erbはいらないので削除。
早くhamlを使いたい。
一旦、見た目ガン無視の最低限の機能を実装する。
app/views/communities/index.html.erb
<h1>掲示板</h1>

<%= link_to 'コミュニティ作成', new_community_path %>

<% @communities.each do |community| %>
  <div>
    <p><%= link_to community.title, community_path(community) %></p>
    <p><%= community.created_at %></p>
    <p><%= community.owner_name %></p>
  </div>
<% end %>
<% %>の中にrubyのコードを入れることができる。
<%= %>はrubyの評価結果をそのままhtmlに書き出す。
=かそうじゃないかは慣れだと思う。
app/views/communities/new.html.erb
<h1>コミュニティ作成</h1>

<%= form_with model: @community do |form| %>
  <%= form.label :title %>
  <%= form.text_field :title %>
  <%= form.label :owner_name %>
  <%= form.text_field :owner_name %>

  <%= form.submit '作成' %>
<% end %>
※form_withは一時期デフォルトがremote: trueだったが、local: trueになった。
app/views/communities/show.html.erb
<h1><%= @community.title %></h1>

<% @comments.each do |comment| %>
  <div>
    <p><%= comment.author_name %></p>
    <p><%= simple_format(comment.content) %></p>
    <p><%= comment.created_at %></p>
  </div>
<% end %>
2-2-3. Commentのコントローラー・ビュー
◆コントローラー
rails g controller comments new create
app/controllers/comments_controller.rb
class CommentsController < ApplicationController
  before_action :set_community

  def new
    @comment = @community.comments.new
  end

  def create
    @comment = @community.comments.new(comment_params)
    if @comment.save
      redirect_to community_path(@community)
    else
      render :new
    end
  end

  private

  def set_community
    @community = Community.find(params[:community_id])
  end

  def comment_params
    params.require(:comment).permit(:author_name, :content)
  end
end
◆ルーティング
Rails.application.routes.draw do
  root to: 'communities#index'
  resources :communities, only: %i[index new create show] do
    resources :comments, only: %i[new create]
  end
end
rails routesコマンドでこうなる。
Prefix                Verb URI Pattern                                       Controller#Action
                 root GET  /                                                 communities#index
   community_comments POST /communities/:community_id/comments(.:format)     comments#create
new_community_comment GET  /communities/:community_id/comments/new(.:format) comments#new
          communities GET  /communities(.:format)                            communities#index
                      POST /communities(.:format)                            communities#create
        new_community GET  /communities/new(.:format)                        communities#new
            community GET  /communities/:id(.:format)                        communities#show
◆ビュー
app/views/communities/show.html.erb
<%= link_to '←戻る', communities_path %>
<h1><%= @community.title %></h1>

<%= link_to 'コメントする', new_community_comment_path(@community) %>

<% @comments.each do |comment| %>
  <div>
    <p><%= comment.author_name %></p>
    <p><%= simple_format(comment.content) %></p>
    <p><%= comment.created_at %></p>
  </div>
<% end %>
app/views/comments/new.html.erb
<%= link_to '←戻る', community_path(@community) %>
<h1>コメントする</h1>

<%= form_with model: [@community, @comment] do |form| %>
  <%= form.label :author_name %>
  <%= form.text_field :author_name %>

  <%= form.label :content %>
  <%= form.text_area :content %>

  <%= form.submit '投稿' %>
<% end %>
app/views/comments/create.html.erbは削除。
2-2-4. Gemfileの変更
左上に出ている表示が邪魔なので、rack-mini-profilerを削除。
デバッグ用にpry-railsを入れる。
source 'https://rubygems.org'
git_source(:github) { |repo| "https://github.com/#{repo}.git" }

ruby '3.0.0'

gem 'rails', '~> 6.1.2', '>= 6.1.2.1'
gem 'sqlite3', '~> 1.4'
gem 'puma', '~> 5.0'
gem 'sass-rails', '>= 6'
gem 'webpacker', '~> 5.0'
gem 'turbolinks', '~> 5'
gem 'jbuilder', '~> 2.7'
# gem 'redis', '~> 4.0'
# gem 'bcrypt', '~> 3.1.7'
gem 'bootsnap', '>= 1.4.4', require: false

group :development, :test do
  gem 'byebug', platforms: [:mri, :mingw, :x64_mingw]
  gem 'pry-rails'
end

group :development do
  gem 'web-console', '>= 4.1.0'
  # gem 'rack-mini-profiler', '~> 2.0'
  gem 'listen', '~> 3.3'
  gem 'spring'
end

gem 'tzinfo-data', platforms: [:mingw, :mswin, :x64_mingw, :jruby]
ひとまず完成。