6/3、サービス公開後の顛末を記事にしました 【コチラ】
タイトルはアオリです。ツイート内容を言語処理して年代・性別・収入などを推測するアプリを簡単に作るお話です。
作ったもの
Nuxt.js + Express + COTOHAのユーザ属性推定API(β)で作ったお手軽Twitter分析アプリです
Google App Engineに載せて誰でも使えるようにしてます。
↓↓↓作ったものはこちら↓↓↓
https://tweet-analytics.com/
↑↑↑↑↑↑↑↑↑↑↑↑↑↑↑↑
5/21 16:00 追記: 基盤費用が一日60$を超えてしまっているため、投げ銭窓口をつけました。もし楽しんでいただけたら投げ銭頂けると大変助かります・・・
PWAにも対応しているので、例えばiPhoneのSafariで開き「ホーム画面に追加」というボタンを押すと、ネイティブアプリのように使うことができます。
ユーザ名を入力すると直近200件のTweetを言語処理・分析して様々なユーザ属性を推定します。
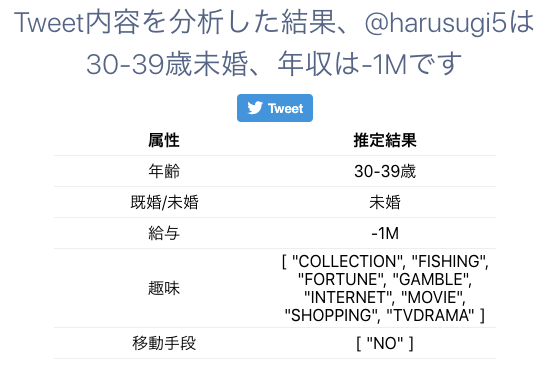
例えば私のアカウントを入力した結果は以下です。
 |
|---|
年収が-1Mになってますが、0-1M、つまり100万以下という意味です。
低年収〜。
5/20 17:00 追記: 現在は0-100万、300万-500万などと結果を出すように修正しています。
何人か試してみた結果
年収が推測されるので、高年収そうな方を入力してみてどうなるか試してみました。
-
某アパレル社長 @yousuck2020

-
某ECサイト社長 @hmikitani

-
某消耗してない人 @IHayato

-
某Youtuber @entrypostman

-
某事業家 @takapon_jp

こんだけ年収が高そうな人々でこの結果なら
Twitter民、実は全員年収が低いのでは・・・?🤔
(タイトル回収)
まぁエクストリームなユーザは難しいですかね・・・。
私の周りの一般人で試したところ、「だいたいあってる」という印象でした。
ユーザ属性推定APIはまだβ版らしいので今後の精度向上に期待。
以下は実際に作った手順です。
動作確認環境
Mac 10.14.3
node 11.10.1
npm 6.9.0
nuxt 2.6.3
express 4.16.4
twitter 1.7.1
作成手順
nuxtアプリの作成
Nuxt.jsの環境作成。
下記のようにシンプルに作ります。
コマンドはこちら(クリックで展開する)
$ npx create-nuxt-app nuxt-backend
npx: 379個のパッケージを17.593秒でインストールしました。
> Generating Nuxt.js project in /Users/(Username)/nuxt-backend
? Project name nuxt-backend
? Project description My laudable Nuxt.js project
? Use a custom server framework express
? Choose features to install Progressive Web App (PWA) Support, Axios
? Use a custom UI framework none
? Use a custom test framework none
? Choose rendering mode Single Page App
? Author name harusugi5
? Choose a package manager npm
Express側にAPIを作成
Nuxt.js でバックもフロントもこれ一本の記事を参考に、バックエンドのserver/api.jsとserver/index.jsを作ります。
ここまででnpm run devと打ってhttp://localhost:3000/api/test を開くと、GET結果が返り、APIを作成できていることがわかります。
Twitter APIを使って直近200件のTweetを取ってくるAPIを作成
1. TwitterAPIに登録
Twitter API 登録 (アカウント申請方法) から承認されるまでの手順まとめを参考にTwitter Developersに登録します。
2. nodeでTwitterのパッケージをインストール
先ほど作成したプロジェクトの中で
$ npm install twitter
とすることでTwitter APIを使うためのパッケージをインストールできます。
3. api.jsにTweetを取得するためのAPI追加
下記のようにコンフィグを外に出したファイルを作成し、api.jsにTweetを取得するためのAPIを追記します。
コードはこちら(クリックで展開する)
exports.consumer_key = '<TwitterAPI登録申請して取得した API key>'
exports.consumer_secret = '<TwitterAPI登録申請して取得したConsumer_secret>'
exports.access_token_key = '<TwitterAPI登録申請して取得したAccess_token>'
exports.access_token_secret = '<TwitterAPI登録申請して取得したAccess_secret>'
var config  = require('./env');
var twitter = require('twitter');

var client = new twitter({
    consumer_key: config.consumer_key,
    consumer_secret: config.consumer_secret,
    access_token_key: config.access_token_key,
    access_token_secret: config.access_token_secret,
});

router.post('/tweettest', (req, res, next) => {

  var params = {screen_name: req.body.username,count: 200, exclude_replies: true,include_rts: false};

  client.get('statuses/user_timeline', params, function(error, tweets, response){
    if (!error) {
        // console.log(tweets);
        res.header('Content-Type', 'application/json; charset=utf-8')
        json = JSON.parse(JSON.stringify(tweets))

        tweetlist = [];
        json.forEach(function(value, index) {
          tweetlist.push(value.text)
        })
        res.send(tweetlist)
    }
  });
})
この状態でnpm run devでサーバを建て、
$ curl -X POST http://localhost:3000/api/tweettest -H "Accept: application/json" -H "Content-type: application/json" -d '{ "username" : "harusugi5" }'
などとすると直近Tweetの内容が返ってくるのが確認できるかと思います。
(リプライやRTはオプションで除いています。)
テキストからユーザ解析するAPIの追加
1.COTOHA APIに登録
COTOHA APIのDeveloper版に登録してClient ID, Client Secretを払い出します。
2.api.jsにユーザ解析するためのAPI追加
コンフィグファイルに上記ID, Secretを追記し、api.jsにCOTOHA APIのユーザ属性推定APIにPOSTするAPIを作成します。
コードはこちら(クリックで展開する)
exports.client_id = "<COTOHA API Client ID>"
exports.client_secret = "<COTOHA API Client Secret>"
router.post('/cotohatest', function(req, res) {

  var access_token;

    token_url = "https://api.ce-cotoha.com/v1/oauth/accesstokens"
    headers = {
        "Content-Type": "application/json",
        "charset": "UTF-8"
    }

    data = {
        "grantType": "client_credentials",
        "clientId": config.client_id,
        "clientSecret": config.client_secret
    }

    fetch(token_url, {
       method: 'POST',
       headers: headers,
       body: JSON.stringify(data),
    })
    .then(res => res.json())
    .then(json => {
       access_token = json["access_token"]

       parse_url = "https://api.ce-cotoha.com/api/nlp/beta/user_attribute"

       headers = {
           "Content-Type": "application/json",
           "charset": "UTF-8",
           "Authorization": `Bearer ${access_token}`
       }

       data = {
           "document": req.body.document,
           "type": 'kuzure',
       }

       fetch(parse_url, {
          method: 'POST',
          headers: headers,
          body: JSON.stringify(data),
       })
       .then(response => response.json())
       .then(json => {
          res.send(JSON.stringify(json,null,'\t'))
        });
     });
})
この状態でnpm run devでサーバを建て、
$ curl -X POST http://localhost:3000/api/cotohatest -H "Accept: application/json" -H "Content-type: application/json" -d '{ "document" : "今日も一日がんばるぞい" }'
などとすると以下のように推定された結果が結果が帰ってきます。
結果はこちら(クリックで展開する)
{
	"result": {
		"age": "40-49歳",
		"hobby": [
			"ANIMAL",
			"COOKING",
			"FORTUNE",
			"GAMBLE",
			"GOURMET",
			"GYM",
			"INTERNET",
			"PAINT",
			"SHOPPING",
			"STUDY",
			"TVDRAMA"
		],
		"moving": [
			"RAILWAY",
			"WALKING"
		]
	},
	"status": 0,
	"message": "OK"
}
index.vueを編集し、結果を表示させる
pages/index.vueのテンプレートを改造して、ユーザ名入力後、ボタンを押すと結果が表示されるようにします。
コードはこちら(クリックで展開する)
<input type="text" v-model="username" value="harusugi5" name="username"/>
<button @click="post_twitter()">上のユーザのTweetから属性推定</button>
<p>user attributes: {{ user_result }}</p>
<p>tweets: {{ tweet_result }}</p>
export default {
  data: function() {
    return {
      tweet_result: "ここに解析したtweetを表示",
      user_result: null,
      username: "harusugi5",
    }
  },
  methods: {
    post_twitter(){
      this.$axios
          .$post('api/tweettest',{
           "username" : this.username
      })
      .then(response => {
        this.result_username = this.username
        this.tweet_result = response
        this.$axios
           .$post('api/cotohatest',{
           "document" : response
        })
        .then(response2 => {
          this.user_result = response2
        })
        .catch(error => {
          console.log(error)
        })
      })
      .catch(error => {
        console.log(error)
      })
    },
  },
}
GAE上にアップロードする
Nuxt.js on Google App Engine(GAE)の記事等、やり方の細かい点は他に任せますが、GCPに登録してGAEを使える状態にした後、app.yamlを書き、npm run buildとgcloud app deployを行えばGAE上にアップロードすることができます。
app.yamlの例はこちら(クリックで展開する)
runtime: nodejs10

instance_class: F2

automatic_scaling:
  min_instances: 0

handlers:
  - url: /_nuxt
    static_dir: .nuxt/dist/client

  - url: /(.*\.(gif|png|jpg|ico|txt))$
    static_files: static/\1
    upload: static/.*\.(gif|png|jpg|ico|txt)$

  - url: /sw.js
    static_files: static/sw.js
    upload: static/sw.js

  - url: /.*
    script: auto
    secure: always

env_variables:
  NUXT_HOST: '0.0.0.0'
  NUXT_PORT: '8080'
アップロード後はURLが払い出されるので、それを公開すればもうWebサービスです。
PWAにも対応しているので、ネイティブアプリのようにスマートフォンに保存して使うこともできます。
あとは
- 結果を整形して表示する
- Googleドメインでドメインを取得し、App Engineと紐づける
- Google Analyticsを導入する
- 広告を載せる (今回はポイントサイトのリンクで代用)
などすることで、よりサービスっぽくしていくことができます。
まとめ
Nuxtと言語処理APIを組み合わせ、簡単なTwitter分析アプリを作り、公開まで行うことができました。フロントエンド素人なので大変でしたが、新しいフレームワークと適当なAPIサービスを組み合わせることで、少しの作業で様々なWebサービスが簡単に作れてしまうのは魅力的だなぁと思います。