Blazorでカレンダーコンポーネントを使ってみる
はじめに
以前にも記事にしましたが、MudBlazorって非常に強力なUIフレームワークがあります。
MudBlazor使用していく中でカレンダーUIが必要になってきたのですけど、MudBlazorにはありませんでした。
自作しようか迷っていたところ、MudBlazorベースで作成されたカレンダーコンポーネントHeron.MudCalendarを見つけましたので、今回はHeron.MudCalendarを使ってみます。
カレンダーコンポートネントとしては、月、週、日のカレンダーが用意さているので、シンプルながら非常に有用性の高いコンポーネント
Heron.MudCalendar
- 日カレンダー
開発環境
- Visual Studio 2022 (C#)
- MudBlazor 6.9.0
- MudBlazor/Template
- Hero.MudCalendar 1.0.10
プロジェクト作成
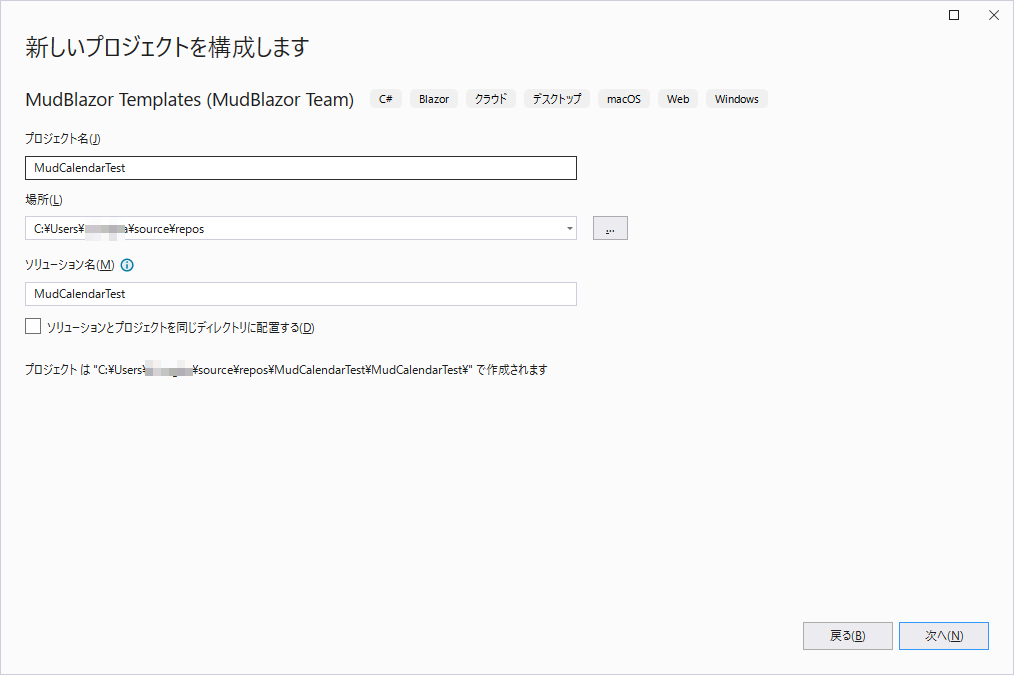
- MudBlazor Templates(MudBlazor Team)のプロジェクトテンプレートを選択します。
- インストールしていない場合は、パッケージマネージャからインストールしておくと便利です。
インストール
PM > dotnet new install MudBlazor.Templates
- 適当な名前を付けます。
- Project Typeは、Wasm-Hostedを選択します。
- 他のでもよいです。
- 無事テンプレートからMudBlazorを適用したプロジェクトが作成できたかと思います。
- 基本的な設定は、テンプレートが行ってくれているので、_Imports.razorやProgram.cs等の設定は、不要です。
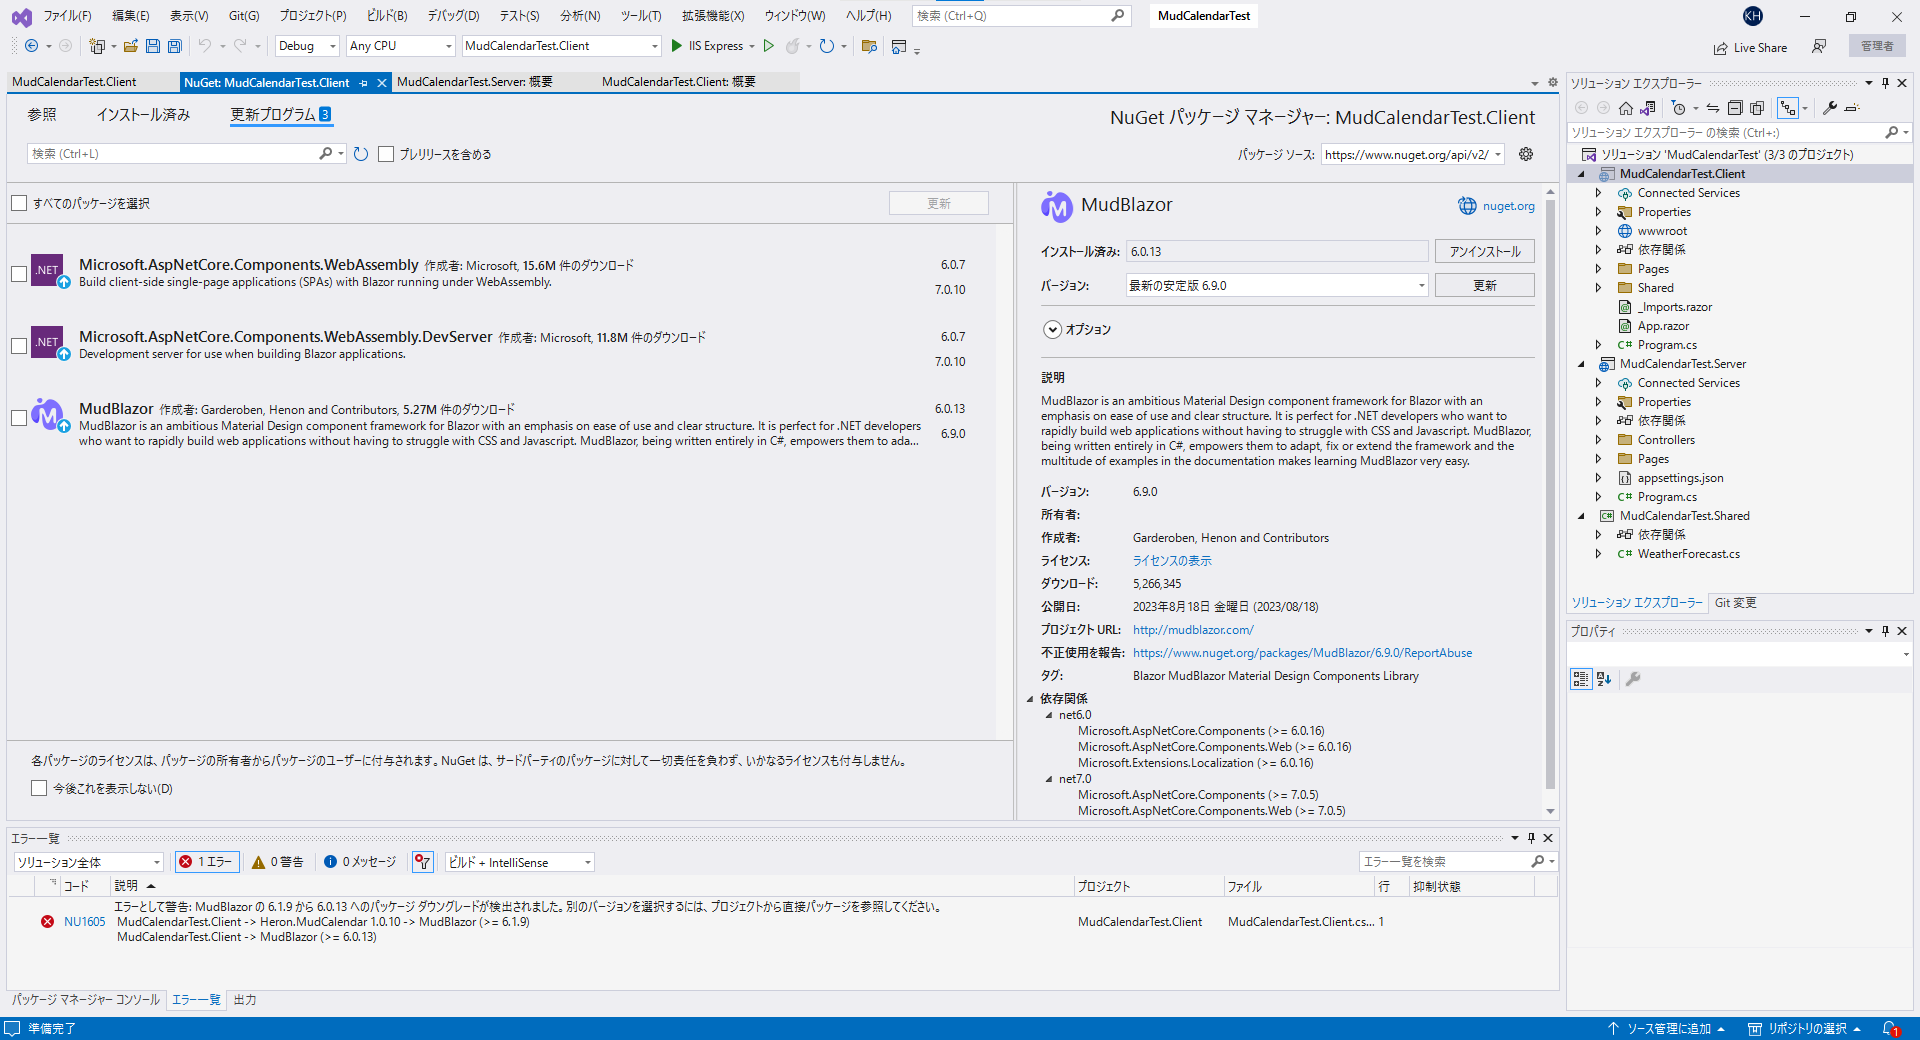
MudBlazorの更新
-
*.Clientを右クリック > Nugetパッケージの管理 > 更新プログラムタブ > MudBlazorを選択 > 更新を押下
MudCalendarの適用
- Nugetパッケージの管理 > 参照タブ > 入力欄に
MudCalendarと入力 >Heron.MudCalendarを選択して、インストールを押下。
- _Imports.razorを編集
-
@using Heron.MudCalendarを追加
-
_Imports.razor
@using System.Net.Http
@using System.Net.Http.Json
@using Microsoft.AspNetCore.Components.Forms
@using Microsoft.AspNetCore.Components.Routing
@using Microsoft.AspNetCore.Components.Web
@using Microsoft.AspNetCore.Components.Web.Virtualization
@using Microsoft.AspNetCore.Components.WebAssembly.Http
@using Microsoft.JSInterop
@using MudBlazor
@using MudCalendarTest.Client
@using MudCalendarTest.Client.Shared
+ @using Heron.MudCalendar
- WWWroot直下のindex.htmlを編集
- 以下を追加
<link href="_content/Heron.MudCalendar/Heron.MudCalendar.min.css" rel="stylesheet" /><script src="_content/Heron.MudCalendar/Heron.MudCalendar.js"></script>
- 以下を追加
index.html
<!DOCTYPE html>
<html>

<head>
    <meta charset="utf-8" />
    <meta name="viewport" content="width=device-width, initial-scale=1.0, maximum-scale=1.0, user-scalable=no" />
    <title>MudCalendarTest</title>
    <base href="/" />
    <link href="https://fonts.googleapis.com/css?family=Roboto:300,400,500,700&display=swap" rel="stylesheet" />
    <link href="_content/MudBlazor/MudBlazor.min.css" rel="stylesheet" />

+    <!--MudCalendar-->
+    <link href="_content/Heron.MudCalendar/Heron.MudCalendar.min.css" rel="stylesheet" />
</head>

<body>
    <div id="app">Loading...</div>

    <div id="blazor-error-ui">
        An unhandled error has occurred.
        <a href="" class="reload">Reload</a>
        <a class="dismiss">🗙</a>
    </div>
    <script src="_framework/blazor.webassembly.js"></script>
    <script src="_content/MudBlazor/MudBlazor.min.js"></script>

+    <!--MudCalendar-->
+    <script src="_content/Heron.MudCalendar/Heron.MudCalendar.js"></script>
</body>

</html>
カスタムクラスの実装
- デフォルトのクラスを使用してもよいのですが、
CalendarItemを継承することで、カスタムクラスを作成することができます。- 例:
Componentsのディレクトリを作成し、その直下にCustomCalendarItemを作成
- 例:
- 既存クラス(CalendarItem)
| 項目名 | 型 |
|---|---|
| Start | DateTime |
| End | DateTime? |
| AllDay | bool |
| Text | string |
- 上記以外の項目をCustomCalendarItemに追記します。
CustomCalendarItem.cs
using Heron.MudCalendar;

namespace MudCalendarTest.Client.Components
{
    public class CustomCalendarItem: CalendarItem
    {
        /// <summary>予定ID</summary>
        public int? ScheduleId { get; set; }

        /// <summary>タイトル</summary>
        public string Title { get; set; } = string.Empty;

        /// <summary>MudBlazor.Color</summary>
        public MudBlazor.Color Color { get; set; } = MudBlazor.Color.Primary;
    }
}
カレンダーの実装
デモページで、FetchDataというページがあるのでそちらのデータを使ってカレンダーを実装します。
- 初期のFetchDataページは、こんな感じでデータを持っているので、こちらのクラスモデルに入っているデータを使用してみます。
ダイアログの実装
- スケジュールのクリックした際に表示されるダイアログの実装
- 例:Pagesの配下にFetchDataDialog.razorを作成
FetchDataDialog.razor
@using MudCalendarTest.Client.Components

<MudDialog >
    <TitleContent>
        <MudText Typo="Typo.h6">スケジュール詳細</MudText>
    </TitleContent>
    <DialogContent>
        <MudStack>
            <MudTextField @bind-Value="_selectedCustomItem.ScheduleId" Label="スケジュールID" />
            <MudTextField @bind-Value="_selectedCustomItem.Title" Label="タイトル" />
            <MudTextField @bind-Value="_selectedCustomItem.Color" Label="配色" />
            <MudTextField @bind-Value="_selectedCustomItem.Start" Format="s" InputType="InputType.DateTimeLocal" Label="開始日時" />
            <MudTextField @bind-Value="_selectedCustomItem.End" Format="s" InputType="InputType.DateTimeLocal" Label="終了日時" />
            <MudCheckBox @bind-Checked="_selectedCustomItem.AllDay" Label="終日" />
        </MudStack>
    </DialogContent>
    <DialogActions>
        <MudButton OnClick="Cancel">Cancel</MudButton>
        <MudButton Color="Color.Primary" OnClick="Submit">Ok</MudButton>
    </DialogActions>
</MudDialog>

@code {
    [CascadingParameter]
    MudDialogInstance MudDialog { get; set; }

    [Parameter]
    public CustomCalendarItem _selectedCustomItem { get; set; }

    void Submit() => MudDialog.Close(DialogResult.Ok(true));
    void Cancel() => MudDialog.Cancel();
}
カレンダーの配置
- とりあえず、FetchData.razorにテーブルの上にカレンダーを配置します。
@page "/fetchdata"
@inject HttpClient Http
+ @inject ISnackbar Snackbar;
+ @inject IDialogService DialogService
+ @using MudCalendarTest.Client.Components;
+ @using MudCalendarTest.Shared

+ <PageTitle>Weather forecast</PageTitle>

+ <MudText Typo="Typo.h3" GutterBottom="true">Weather forecast</MudText>
+ <MudText Class="mb-8">This component demonstrates fetching data from the server.</MudText>

+ <MudCalendar Items="_customCalendarItem">
+     <CellTemplate>
+         <MudButton Variant="Variant.Outlined" FullWidth="true" Color="((CustomCalendarItem)context).Color" OnClick="() => EventClicked((CustomCalendarItem)context)">
+             <MudStack Row="true" AlignItems="AlignItems.Center">
+                 <MudText Typo="Typo.body2">@context.Start.ToShortTimeString()</MudText>
+                 <MudText Typo="Typo.body1">
+                     @(
+                         ((CustomCalendarItem)context).Title
+                         )
+                 </MudText>
+                 <MudText Typo="Typo.body2">@context.Text</MudText>
+             </MudStack>
+         </MudButton>
+     </CellTemplate>
+ </MudCalendar>

@if (forecasts == null)
{
    <MudProgressCircular Color="Color.Default" Indeterminate="true" />
}
else
{
    <MudTable Items="forecasts" Hover="true" SortLabel="Sort By" Elevation="0">
        <HeaderContent>
            <MudTh><MudTableSortLabel InitialDirection="SortDirection.Ascending" SortBy="new Func<WeatherForecast, object>(x=>x.Date)">Date</MudTableSortLabel></MudTh>
            <MudTh><MudTableSortLabel SortBy="new Func<WeatherForecast, object>(x=>x.TemperatureC)">Temp. (C)</MudTableSortLabel></MudTh>
            <MudTh><MudTableSortLabel SortBy="new Func<WeatherForecast, object>(x=>x.TemperatureF)">Temp. (F)</MudTableSortLabel></MudTh>
            <MudTh><MudTableSortLabel SortBy="new Func<WeatherForecast, object>(x=>x.Summary!)">Summary</MudTableSortLabel></MudTh>
        </HeaderContent>
        <RowTemplate>
            <MudTd DataLabel="Date">@context.Date</MudTd>
            <MudTd DataLabel="Temp. (C)">@context.TemperatureC</MudTd>
            <MudTd DataLabel="Temp. (F)">@context.TemperatureF</MudTd>
            <MudTd DataLabel="Summary">@context.Summary</MudTd>
        </RowTemplate>
        <PagerContent>
            <MudTablePager PageSizeOptions="new int[]{50, 100}" />
        </PagerContent>
    </MudTable>
}


@code {
    private WeatherForecast[]? forecasts;
+     private List<CustomCalendarItem> _customCalendarItem = new List<CustomCalendarItem>();
+     private CustomCalendarItem _selectedCustomItem = new CustomCalendarItem();

    protected override async Task OnInitializedAsync()
    {
        forecasts = await Http.GetFromJsonAsync<WeatherForecast[]>("WeatherForecast");

+         int id = 0;
+         foreach (var item in forecasts)
+         {
+             id += 1;
+             MudBlazor.Color color = MudBlazor.Color.Default;
+             switch (item.Summary)
+             {
+                 case "Cool":
+                     color = MudBlazor.Color.Primary;
+                     break;
+                 case "Freezing":
+                     color = MudBlazor.Color.Tertiary;
+                     break;
+                 case "Hot":
+                     color = MudBlazor.Color.Error;
+                     break;
+                 case "Warm":
+                     color = MudBlazor.Color.Secondary;
+                     break;
+                 default:
+                     color = MudBlazor.Color.Info;
+                     break;
+             }
+             _customCalendarItem.Add(new CustomCalendarItem
+                 {
+                     ScheduleId = id,
+                     Color = color,
+                     Title = string.IsNullOrEmpty(item.Summary) ? string.Empty : item.Summary,
+                     Start = item.Date,
+                     AllDay = false,
+                     Text = item.TemperatureC.ToString(),
+                 });
+         }
    }

+     /// <summary>
+     /// カレンダー選択イベント
+     /// </summary>
+     /// <param name="selectedItem"></param>
+     /// <returns></returns>
+     private async Task EventClicked(CustomCalendarItem selectedItem)
+     {
+         try
+         {
+             var dialogOptions = new DialogOptions { FullWidth = true, CloseButton = true };
+             var parameters = new DialogParameters<FetchDataDialog> { { x => x._selectedCustomItem, selectedItem } };
+             var dialog = await DialogService.ShowAsync<FetchDataDialog>("スケジュール", parameters, dialogOptions);
+             var result = await dialog.Result;
+         }
+         catch (Exception ex)
+         {
+             Snackbar.Add(ex.Message, Severity.Error);
+         }
+     }
}
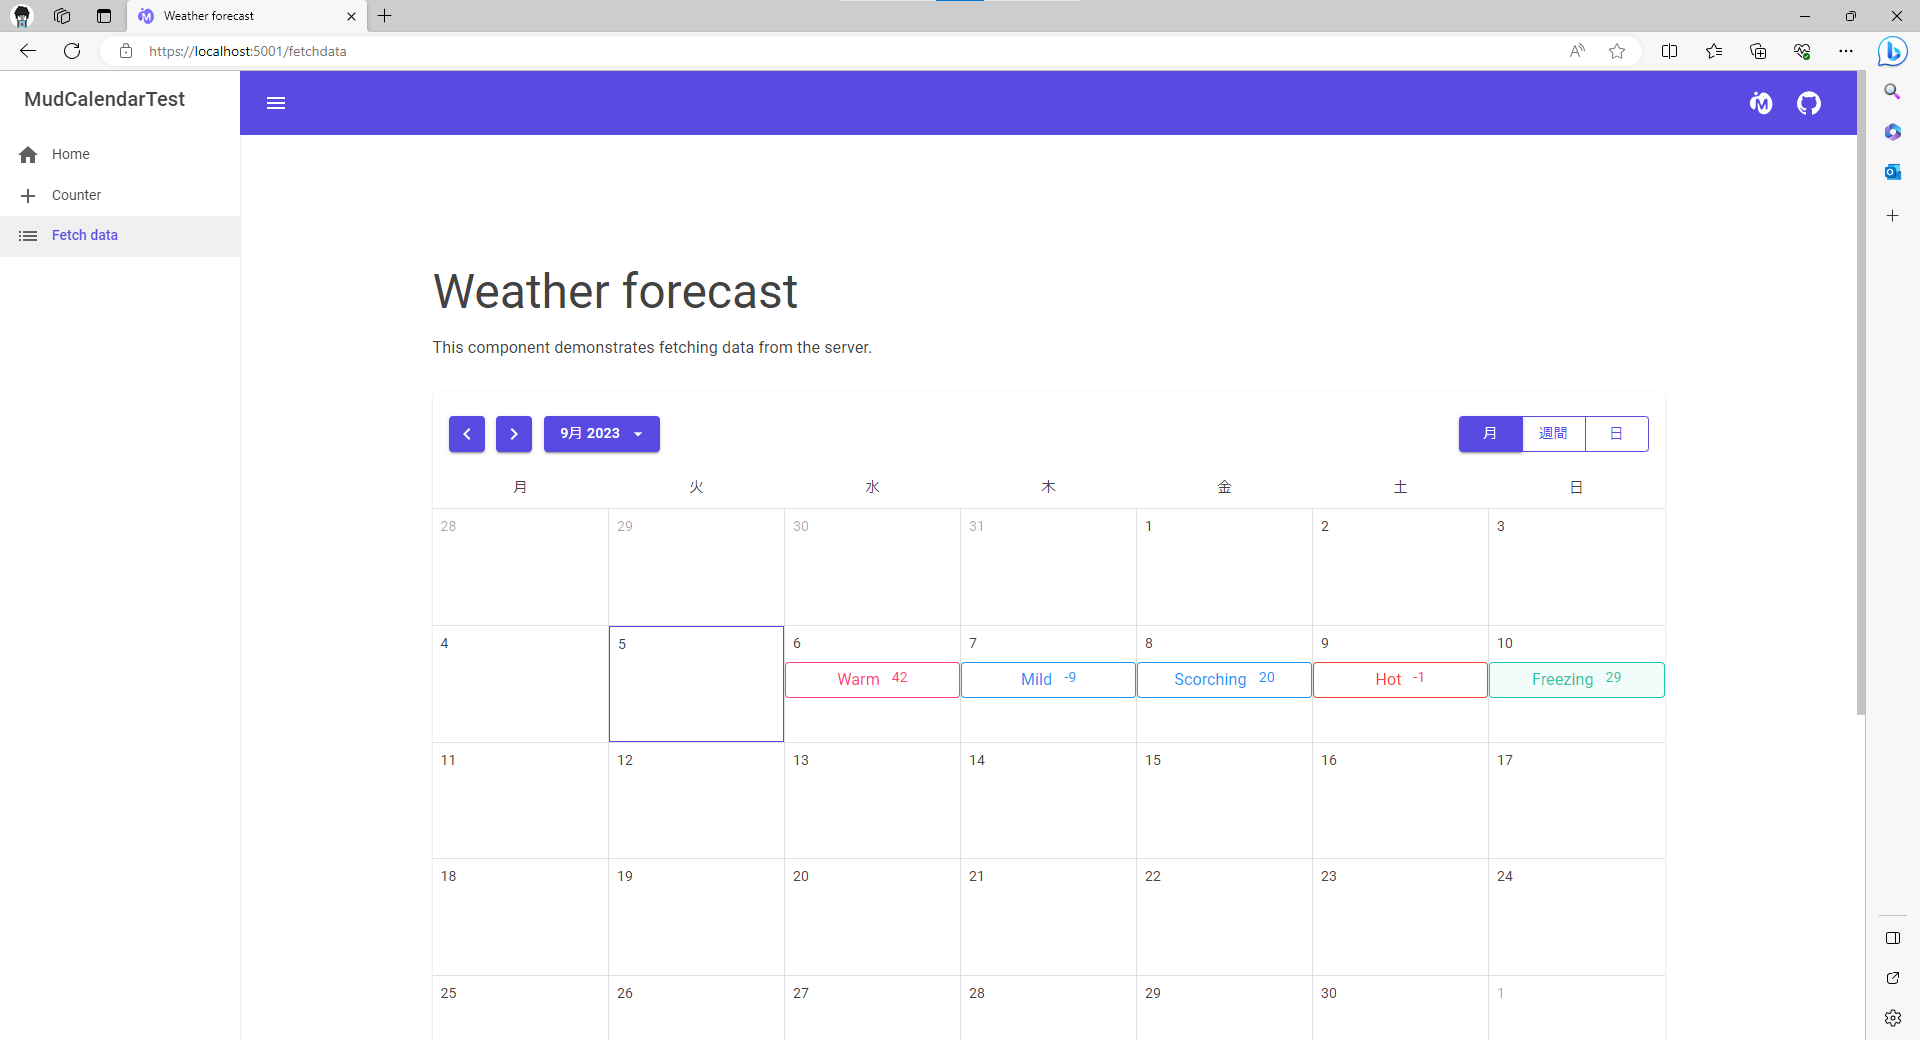
完成
- とりあえず完成。
- スケジュールの項目をクリックするとダイアログが呼び出されます。
まとめ
- ちょっと2回イベントが走ったりとまだバグがあったりしてますが、比較的自由にデザインも配置できますし、イベントも設定できるので使い買っては良い方ではと思います。
参照
GitHub
MudCalendarドキュメント


