WPFでInkCanvasを使ってみる
開発環境
- Visual Studio 2017 (C#)
- Visual Studioの拡張機能の「Prism Template Pack」
- Prism.Core 6.3.0
- Prism.Unity 6.3.0
- Prism.Wpf 6.3.0
- CommonServiceLocator 1.3.0
- Unity 4.0.1
- MahApps.Metro 1.5.0
初めに
社内で人体図に絵を描く必要があったので、サンプルを作ってみました。
背景画像を人体図にして、その上に障害部位などを記入できるようにします。
※背景レイヤーと重ねて線を描画する機能を実装します。(背景画像との合成)
WPFでは、上記のことを行うのにInkCanvasというコントロールがあるので、簡単に実装できます。
※MahApps.Metroは、InkCanvasには、必要ありませんが、使い慣れているので使用しています。
※Prismを使って、MVVM風に実装します。
参考
HIRO'sさんのBlog
HIRO's.NET http://blog.hiros-dot.net/
人体図画像をお借りしました。
フリーイラスト http://www.sharots.com/ai.html
説明省略部分
- 「Prism Template Pack」のインストール
- 「MahApps」のインストール
- 「Prism Template Pack」のプロジェクト作成
※「Prism Template Pack」のインストールは、以前の記事を参考にしてください。
PrismとUnityを使うWPFプロジェクトテンプレートを使ってみる
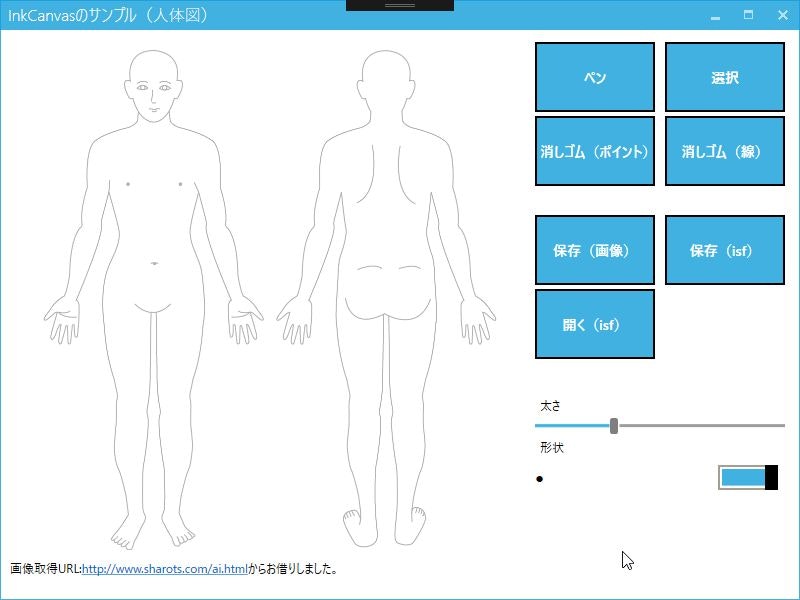
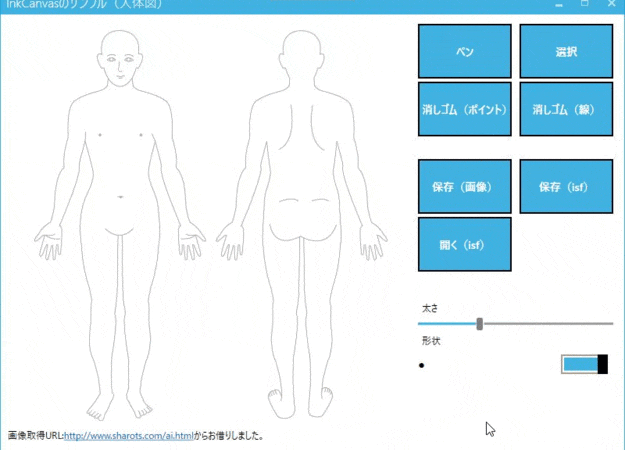
完成イメージ
ソリューションの構成
- 「Prism Template Pack」の「Prism Unity App(WPF)」を使って「InkCanvasShell」の作成
- 「Prism Template Pack」の「Prism Module(WPF)」を使って「InkCanvasApp」の作成
- それぞれにNugetから「MahApps」をインストール
プロジェクト名:InkCanvasShellの実装(メインウィンドウ)
InkCanvasShellプロジェクトの作成
- 「Prism Template Pack」の「Prism Unity App(WPF)」を使って「InkCanvasShell」の作成
- Nugetから「MahApps.Metro」のインストール
※手順は省略
「ResourceDictionary」の追加
-
<Application.Resources>に<ResourceDictionary>を以下のように追加し、MahAppsを読み込めるようにします。
App.xaml(変更前)
<Application x:Class="InkCanvasShell.App"
             xmlns="http://schemas.microsoft.com/winfx/2006/xaml/presentation"
             xmlns:x="http://schemas.microsoft.com/winfx/2006/xaml"
             xmlns:local="clr-namespace:MahAppsMetro.App">
    <Application.Resources>

    </Application.Resources>
</Application>
App.xaml(変更後)
<Application x:Class="InkCanvasShell.App"
             xmlns="http://schemas.microsoft.com/winfx/2006/xaml/presentation"
             xmlns:x="http://schemas.microsoft.com/winfx/2006/xaml"
             xmlns:local="clr-namespace:InkCanvasShell">
    <Application.Resources>
        <ResourceDictionary>
            <ResourceDictionary.MergedDictionaries>
                <!-- MahApps.Metro resource dictionaries. Make sure that all file names are Case Sensitive! -->
                <ResourceDictionary Source="pack://application:,,,/MahApps.Metro;component/Styles/Controls.xaml" />
                <ResourceDictionary Source="pack://application:,,,/MahApps.Metro;component/Styles/Fonts.xaml" />
                <ResourceDictionary Source="pack://application:,,,/MahApps.Metro;component/Styles/Colors.xaml" />
                <!-- Accent and AppTheme setting -->
                <ResourceDictionary Source="pack://application:,,,/MahApps.Metro;component/Styles/Accents/Blue.xaml" />
                <ResourceDictionary Source="pack://application:,,,/MahApps.Metro;component/Styles/Accents/BaseLight.xaml" />
            </ResourceDictionary.MergedDictionaries>
        </ResourceDictionary>
    </Application.Resources>
</Application>
Shell.xaml(MainWindow.xamlをリネーム)
MainWindow.xaml(変更前)
<Window x:Class="InkCanvasShell.Views.MainWindow"
        xmlns="http://schemas.microsoft.com/winfx/2006/xaml/presentation"
        xmlns:x="http://schemas.microsoft.com/winfx/2006/xaml"
        xmlns:prism="http://prismlibrary.com/"
        prism:ViewModelLocator.AutoWireViewModel="True"
        Title="{Binding Title}" Height="350" Width="525">
    <Grid>
        <ContentControl prism:RegionManager.RegionName="ContentRegion" />
    </Grid>
</Window>
-
Windowは、MahApps:MetroWindowに変更 -
xmlns:MahApps="clr-namespace:MahApps.Metro.Controls;assembly=MahApps.Metro"を追加 -
TitleCaps="False"にしてタイトルの大文字化を行わない。 -
BorderBrush="{DynamicResource AccentColorBrush}"にしてフォームの線を表示(VS2015だと不要かも?)
Shell.xaml(変更後)
<MahApps:MetroWindow x:Class="InkCanvasShell.Views.Shell"
        xmlns="http://schemas.microsoft.com/winfx/2006/xaml/presentation"
        xmlns:x="http://schemas.microsoft.com/winfx/2006/xaml"
        xmlns:prism="http://prismlibrary.com/"
        xmlns:MahApps="clr-namespace:MahApps.Metro.Controls;assembly=MahApps.Metro"
        prism:ViewModelLocator.AutoWireViewModel="True"
        Title="{Binding Title}" Height="600" Width="800"
        WindowState="Normal" TitleCaps="False"
        BorderBrush="{DynamicResource AccentColorBrush}">
    <Grid>
        <ContentControl prism:RegionManager.RegionName="ContentRegion" />
    </Grid>
</MahApps:MetroWindow>
Shell.xaml.cs(MainWindow.xaml.csをリネーム)
MainWindow.xaml.cs(変更前)
using System.Windows;

namespace InkCanvasShell.Views
{
    /// <summary>
    /// Interaction logic for MainWindow.xaml
    /// </summary>
    public partial class MainWindow : Window
    {
        public MainWindow()
        {
            InitializeComponent();
        }
    }
}
-
using MahApps.Metro.Controls;を追加 -
MainWindow : WindowをShell : MetroWindowに変更 - コンストラクタも
public MainWindow()からpublic Shell()に変更
Shell.xaml.cs(変更後)
using System.Windows;
using MahApps.Metro.Controls;

namespace InkCanvasShell.Views
{
    /// <summary>
    /// Interaction logic for MainWindow.xaml
    /// </summary>
    public partial class Shell : MetroWindow
    {
        public Shell()
        {
            InitializeComponent();
        }
    }
}
ShellViewModel.cs(MainWindowViewModel.csをリネーム)
MainWindowViewModel.cs(変更後)
using Prism.Mvvm;

namespace InkCanvasShell.ViewModels
{
    public class MainWindowViewModel : BindableBase
    {
        private string _title = "Prism Unity Application";
        public string Title
        {
            get { return _title; }
            set { SetProperty(ref _title, value); }
        }

        public MainWindowViewModel()
        {

        }
    }
}
-
MainWindowViewModelをShellViewModel - ウィンドウタイトルの設定
ShellViewModel.cs(変更後)
using Prism.Mvvm;

namespace InkCanvasShell.ViewModels
{
    public class ShellViewModel : BindableBase
    {
        private string _title = "InkCanvasのサンプル(人体図)";
        public string Title
        {
            get { return _title; }
            set { SetProperty(ref _title, value); }
        }

        public ShellViewModel()
        {

        }
    }
}
Bootstrapperクラスの作成
Bootstrapper.cs(変更前)
using Microsoft.Practices.Unity;
using Prism.Unity;
using InkCanvasShell.Views;
using System.Windows;

namespace InkCanvasShell
{
    class Bootstrapper : UnityBootstrapper
    {
        protected override DependencyObject CreateShell()
        {
            return Container.Resolve<MainWindow>();
        }

        protected override void InitializeShell()
        {
            Application.Current.MainWindow.Show();
        }
    }
}
-
Container.Resolve<MainWindow>をContainer.Resolve<Shell>に変更 -
InitializeShellの変更
Bootstrapper.cs(変更後)
using Microsoft.Practices.Unity;
using Prism.Unity;
using InkCanvasShell.Views;
using System.Windows;

namespace InkCanvasShell
{
    class Bootstrapper : UnityBootstrapper
    {
        protected override DependencyObject CreateShell()
        {
            return Container.Resolve<Shell>();
        }

        protected override void InitializeShell()
        {
            base.InitializeShell();

            Application.Current.MainWindow = (Shell)this.Shell;
            Application.Current.MainWindow.Show();
        }
    }
}
デバッグ実行
- MetroWindowのスタイルになっているか確認します。
プロジェクト名:InkCanvasAppの実装(ユーザーコントロール)
InkCanvasAppプロジェクトの作成
- 「Prism Template Pack」の「Prism Module(WPF)」を使って「InkCanvasApp」の作成
- Nugetから「MahApps.Metro」をインストール
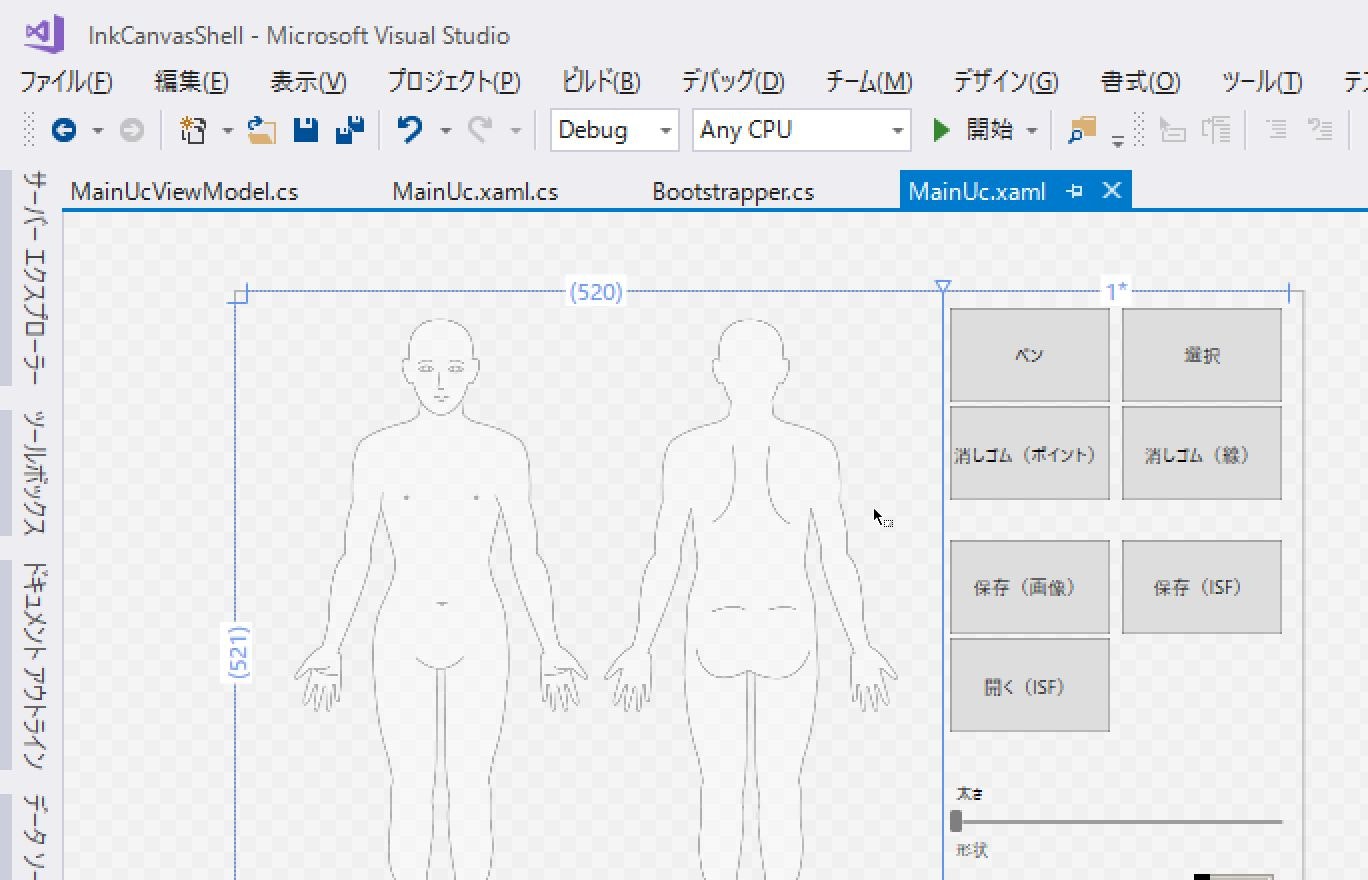
「MainUc.xaml」の作成
- Viewsフォルダを右クリック > 追加 > 新しい項目
- Prism > WPF > Prism UserControl(WPF)を選択
- コントロール名は、「MainUc」
MainUc.xaml(変更前)
<UserControl x:Class="InkCanvasApp.Views.MainUc"
             xmlns="http://schemas.microsoft.com/winfx/2006/xaml/presentation"
             xmlns:x="http://schemas.microsoft.com/winfx/2006/xaml"
             xmlns:prism="http://prismlibrary.com/"
             prism:ViewModelLocator.AutoWireViewModel="True">
    <Grid>

    </Grid>
</UserControl>
-
xmlns:MahApps="clr-namespace:MahApps.Metro.Controls;assembly=MahApps.Metro"を追加 -
Height="600" Width="800"を指定
MainUc.xaml(変更後)
<UserControl x:Class="InkCanvasApp.Views.MainUc"
             xmlns="http://schemas.microsoft.com/winfx/2006/xaml/presentation"
             xmlns:x="http://schemas.microsoft.com/winfx/2006/xaml"
             xmlns:prism="http://prismlibrary.com/"
             xmlns:MahApps="clr-namespace:MahApps.Metro.Controls;assembly=MahApps.Metro"
             prism:ViewModelLocator.AutoWireViewModel="True"
             Height="600" Width="800" >
    <Grid VerticalAlignment="Stretch" HorizontalAlignment="Stretch" Margin="10">

    </Grid>
</UserControl>
InkCanvasAppModule.csの作成
InkCanvasAppModule.cs(変更前)
using Prism.Modularity;
using Prism.Regions;
using System;

namespace InkCanvasApp
{
    public class InkCanvasAppModule : IModule
    {
        IRegionManager _regionManager;

        public InkCanvasAppModule(IRegionManager regionManager)
        {
            _regionManager = regionManager;
        }

        public void Initialize()
        {
            throw new NotImplementedException();
        }
    }
}
-
InitializeでメインウィンドウのContentRegionにMainUcを差し込みます。
InkCanvasAppModule.cs(変更後)
using Prism.Modularity;
using Prism.Regions;
using System;

namespace InkCanvasApp
{
    public class InkCanvasAppModule : IModule
    {
        IRegionManager _regionManager;

        public InkCanvasAppModule(IRegionManager regionManager)
        {
            _regionManager = regionManager;
        }

        public void Initialize()
        {
            _regionManager.RegisterViewWithRegion("ContentRegion", typeof(Views.MainUc));
        }
    }
}
InkCanvasAppのプロジェクトリビルド
- 一旦、「InkCanvasApp」のプロジェクトをリビルドします。
プロジェクト名:InkCanvasShellの実装(メインウィンドウ)
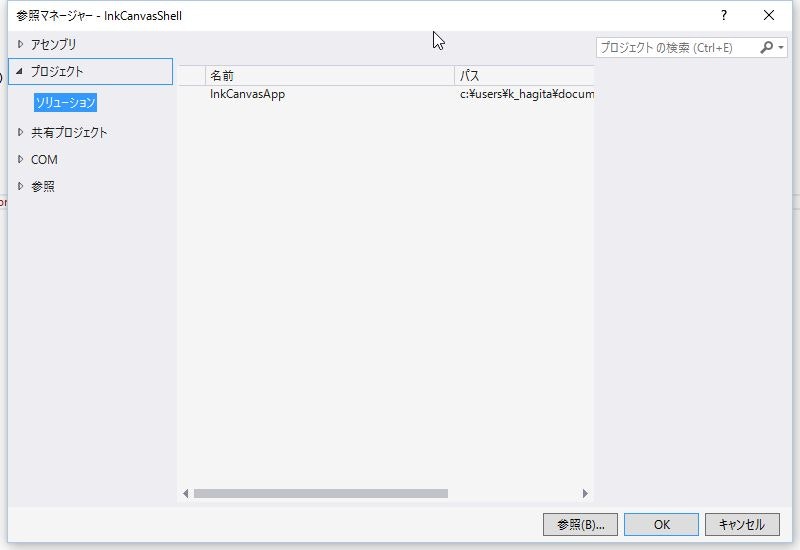
- 「InkCanvasShell」のプロジェクトを右クリック > 追加 > 参照
- プロジェクト > ソリューション > 「InkCanvasApp」にチェックを入れる > OKをクリック
Bootstrapperクラスの作成
- InkCanvasAppで作成したモジュールをメインウィンドウ側のモジュールカタログに追加します。
-
using Prism.Modularity;を追加 -
ConfigureModuleCatalog()を追加
Bootstrapper.cs(変更後)
protected override void ConfigureModuleCatalog()
{
    base.ConfigureModuleCatalog();

    ModuleCatalog moduleCatalog = (ModuleCatalog)this.ModuleCatalog;
    moduleCatalog.AddModule(typeof(InkCanvasApp.InkCanvasAppModule));
}
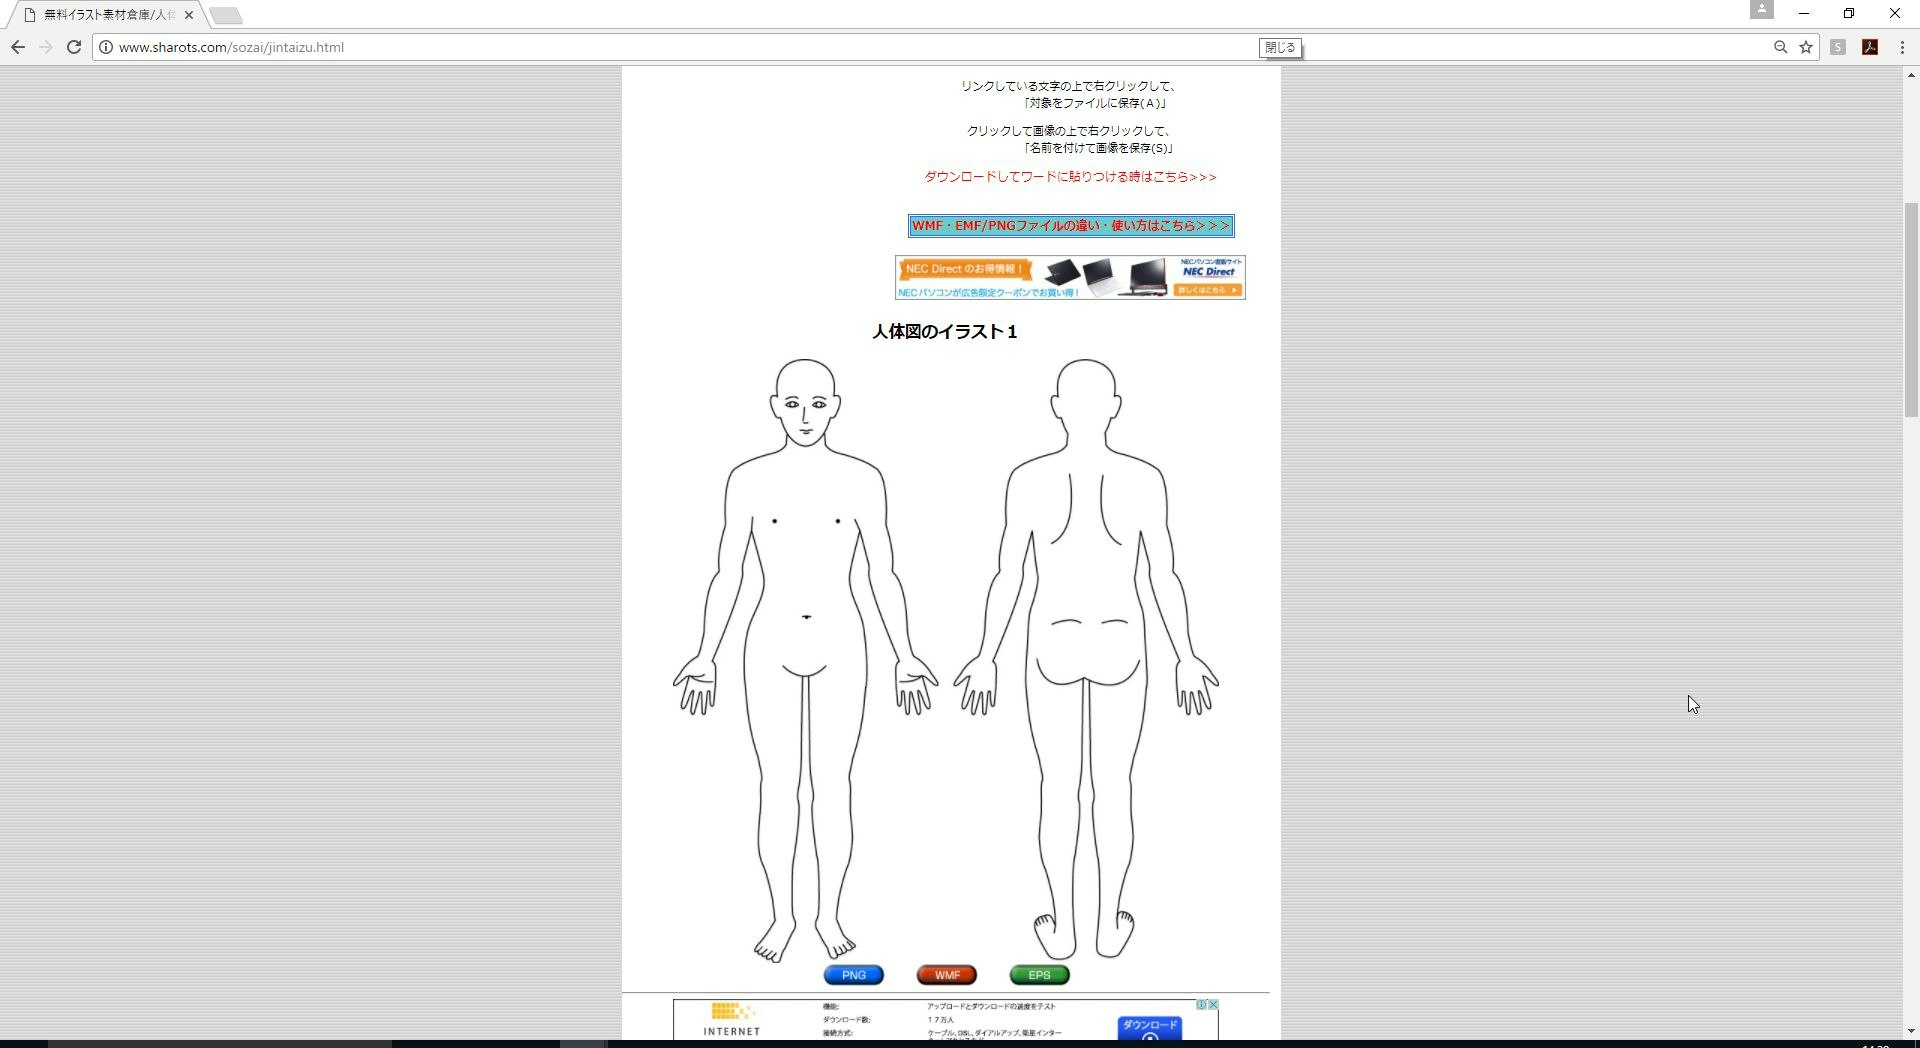
背景画像の取得
- 今回は、フリー素材の人体図をWEBからお借りしました。 http://www.sharots.com/sozai/jintaizu.html
※2017/07/10 現時点では、「ご自由にお使いください。個人・商用を問いません。無料です。」と記載されています。
プロジェクト名:InkCanvasAppの実装(ユーザーコントロール)
- 取得した画像をResourceフォルダを作成しその中に配置します。
「MainUc.xaml」にコントロールを追加
MainUc.xaml(変更後)
<UserControl x:Class="InkCanvasApp.Views.MainUc"
             xmlns="http://schemas.microsoft.com/winfx/2006/xaml/presentation"
             xmlns:x="http://schemas.microsoft.com/winfx/2006/xaml"
             xmlns:prism="http://prismlibrary.com/"
             xmlns:MahApps="clr-namespace:MahApps.Metro.Controls;assembly=MahApps.Metro"
             prism:ViewModelLocator.AutoWireViewModel="True"
             Height="600" Width="800" >
    <Grid VerticalAlignment="Stretch" HorizontalAlignment="Stretch" Margin="10">
        <Grid.Resources>
            <!--ボタンスタイルの作成-->
            <Style TargetType="Button" BasedOn="{StaticResource AccentedSquareButtonStyle}">
                <Setter Property="Margin" Value="5,2"/>
                <Setter Property="Height" Value="70"/>
                <Setter Property="Width" Value="120"/>
                <Setter Property="FontSize" Value="14"/>
                <Setter Property="HorizontalContentAlignment" Value="Center"/>
                <Setter Property="VerticalContentAlignment" Value="Center"/>
            </Style>
        </Grid.Resources>

        <Grid.RowDefinitions>
            <RowDefinition Height="auto"/>
            <RowDefinition Height="auto"/>
        </Grid.RowDefinitions>
        <Grid.ColumnDefinitions>
            <ColumnDefinition Width="auto"/>
            <ColumnDefinition Width="*"/>
        </Grid.ColumnDefinitions>

        <InkCanvas Grid.Row="0" x:Name="inkCanvas" Opacity="0.3" Margin="10" Width="500" Height="500"
                   DefaultDrawingAttributes="{Binding PenAttrivutes,UpdateSourceTrigger=PropertyChanged}"
                   EditingMode="{Binding InkEditingMode}"
                   Strokes="{Binding Signature}">

            <InkCanvas.Background>
                <!--背景画像の指定-->
                <ImageBrush ImageSource="..\Resource\jintaizu.png" Stretch="Uniform" />
            </InkCanvas.Background>
        </InkCanvas>


        <Grid Grid.Column="1" Grid.Row="0">
            <Grid.RowDefinitions>
                <RowDefinition />
                <RowDefinition />
                <RowDefinition />
            </Grid.RowDefinitions>

            <!--操作系各種ボタン-->
            <WrapPanel Grid.Row="0">
                <Button Content="ペン" Command="{Binding InkCommand}"/>
                <Button Content="選択" Command="{Binding InkSelectCommand}"/>
                <Button Content="消しゴム(ポイント)"  Command="{Binding EraseByPointCommand}" />
                <Button Content="消しゴム(線)" Command="{Binding EraseByStrokeCommand}"/>
            </WrapPanel>

            <!--保存系各種ボタン-->
            <WrapPanel Grid.Row="1">
                <Button Content="保存(画像)" Command="{Binding SaveCommand}" CommandParameter="{Binding ElementName=inkCanvas}"/>
                <Button Content="保存(ISF)" Command="{Binding SaveAsIsfCommand}" CommandParameter="{Binding ElementName=inkCanvas}"/>
                <Button Content="開く(ISF)" Command="{Binding OpenAsIsfCommand}" CommandParameter="{Binding ElementName=inkCanvas}" />
            </WrapPanel>

            <!--操作系コントロール-->
            <StackPanel Grid.Row="2" Orientation="Vertical" Margin="5">
                <Label>太さ</Label>
                <Slider Style="{StaticResource MetroSlider}" Minimum="1" Maximum="30" SmallChange="1" Value="{Binding PenSize,UpdateSourceTrigger=PropertyChanged}" ToolTip="{Binding PenSize}"/>
                <Label>形状</Label>
                <MahApps:ToggleSwitch OnLabel="●" OffLabel="■" IsChecked="{Binding PenStyle,UpdateSourceTrigger=PropertyChanged}"/>
            </StackPanel>
        </Grid>

        <!--リンク-->
        <StackPanel Grid.Column="0" Grid.Row="1" Grid.ColumnSpan="2" VerticalAlignment="Bottom">
            <TextBlock>画像取得URL:<Hyperlink>http://www.sharots.com/ai.html</Hyperlink>からお借りしました。</TextBlock>
        </StackPanel>
    </Grid>
</UserControl>
- MVVM風にするために、ボタン操作系は、Commandプロパティを割り当てています。
- またCANVAS自体をViewModel側へ渡したかったため、CommandParameterでCanvasをElementNameで指定して渡しています。
-
ImageBrushのStretchは、縦横比を変えたくないので、Uniformを指定。
MainUcViewModelの作成
- Viewsフォルダを右クリック > 追加 > 新しい項目
- Prism > Code > Prism ViewModelを選択
- コントロール名は、「MainUcViewModel」
MainUcViewModel.cs(変更前)
using Prism.Commands;
using Prism.Mvvm;
using System;
using System.Collections.Generic;
using System.Linq;

namespace InkCanvasApp.ViewModels
{
    public class MainUcViewModel : BindableBase
    {
        public MainUcViewModel()
        {

        }
    }
}
- プロパティ系の追加
MainUcViewModel.cs(変更後)
/// <summary>
/// InkCanvasのDrawingAttributes
/// </summary>
private DrawingAttributes penAttrivutes;
public DrawingAttributes PenAttrivutes
{
    get { return penAttrivutes; }
    set { SetProperty(ref penAttrivutes, value); }
}

/// <summary>
/// ペンの太さ
/// </summary>
private int penSize;
public int PenSize
{
    get { return penSize; }
    set
    {
        SetProperty(ref penSize, value);
        PenStyleChanged();
    }
}


/// <summary>
/// ペンの形状
/// </summary>
private bool penStyle;
public bool PenStyle
{
    get { return penStyle; }
    set
    {
        SetProperty(ref penStyle, value);
        PenStyleChanged();
    }
}

/// <summary>
/// InkCanvasの編集モード
/// </summary>
private InkCanvasEditingMode inkEditingMode;
public InkCanvasEditingMode InkEditingMode
{
    get { return inkEditingMode; }
    set { SetProperty(ref inkEditingMode, value); }
}

/// <summary>
/// InkCanvasのStroke
/// </summary>
private StrokeCollection signature;
public StrokeCollection Signature
{
    get { return signature; }
    set { SetProperty(ref signature, value); }
}
- コマンド系の追加
MainUcViewModel.cs(変更後)
/// <summary>
/// ペンボタンコマンド
/// </summary>
private DelegateCommand inkCommand;
public DelegateCommand InkCommand =>
    inkCommand ?? (inkCommand = new DelegateCommand(InkCommandExecute));

/// <summary>
/// 選択ボタンコマンド
/// </summary>
private DelegateCommand inkSelectCommand;
public DelegateCommand InkSelectCommand =>
    inkSelectCommand ?? (inkSelectCommand = new DelegateCommand(InkSelectEexecute));

/// <summary>
/// 消しゴム(ポイント)ボタンコマンド
/// </summary>
private DelegateCommand eraseByPointCommand;
public DelegateCommand EraseByPointCommand =>
    eraseByPointCommand ?? (eraseByPointCommand = new DelegateCommand(EraseByPointCommandExectuite));

/// <summary>
/// 消しゴム(線)ボタンコマンド
/// </summary>
private DelegateCommand eraseByStrokeCommand;
public DelegateCommand EraseByStrokeCommand =>
    eraseByStrokeCommand ?? (eraseByStrokeCommand = new DelegateCommand(EraseByStrokeCommandExecute));

/// <summary>
/// 保存(画像)ボタンコマンド
/// </summary>
private DelegateCommand<InkCanvas> saveCommand;
public DelegateCommand<InkCanvas> SaveCommand =>
    saveCommand ?? (saveCommand = new DelegateCommand<InkCanvas>(SaveCommandExecute));

/// <summary>
/// 保存(ISF)ボタンコマンド
/// </summary>
private DelegateCommand<InkCanvas> saveAsIsfCommand;
public DelegateCommand<InkCanvas> SaveAsIsfCommand =>
    saveAsIsfCommand ?? (saveAsIsfCommand = new DelegateCommand<InkCanvas>(SaveAsIsfCommandExecute));

/// <summary>
/// 開く(ISF)ボタンコマンド
/// </summary>
private DelegateCommand<InkCanvas> openAsIsfCommand;
public DelegateCommand<InkCanvas> OpenAsIsfCommand =>
    openAsIsfCommand ?? (openAsIsfCommand = new DelegateCommand<InkCanvas>(OpenAsIsfCommandExecute));
- メソッド系の追加
MainUcViewModel.cs(変更後)
/// <summary>
/// コンストラクタ
/// </summary>
public MainUcViewModel()
{
    //初期値指定
    PenSize = 10;
    PenStyle = true;

    //ペンのスタイル指定
    PenStyleChanged();
}

/// <summary>
/// DrawingAttributesの変更
/// </summary>
private void PenStyleChanged()
{
    //DrawingAttributesの指定
    PenAttrivutes = new DrawingAttributes()
    {
        //太さ
        Width = PenSize,
        //高さ
        Height = PenSize,
        //形状
        StylusTip = PenStyle == true ? StylusTip.Ellipse : StylusTip.Rectangle,
        //色
        Color = Colors.Green,
        //滑らかな線(ギザギザするのでTrue推奨)
        FitToCurve = true,
        //蛍光ペン(背景画像の上に色を置くのでTrue推奨)
        IsHighlighter = true
    };
}

/// <summary>
/// ペンボタンコマンドの処理
/// </summary>
private void InkCommandExecute()
{
    InkEditingMode = InkCanvasEditingMode.Ink;
}

/// <summary>
/// 選択ボタンコマンドの処理
/// </summary>
private void InkSelectEexecute()
{
    InkEditingMode = InkCanvasEditingMode.Select;
}
/// <summary>
/// 消しゴム(ポイント)ボタンコマンドの処理
/// </summary>
private void EraseByPointCommandExectuite()
{
    InkEditingMode = InkCanvasEditingMode.EraseByPoint;
}

/// <summary>
/// 消しゴム(線)ボタンコマンドの処理
/// </summary>
private void EraseByStrokeCommandExecute()
{
    InkEditingMode = InkCanvasEditingMode.EraseByStroke;
}

/// <summary>
/// 保存(画像)ボタンコマンドの処理
/// </summary>
private void SaveCommandExecute(InkCanvas inkCanvas)
{
    Microsoft.Win32.SaveFileDialog dlgSave = new Microsoft.Win32.SaveFileDialog();

    dlgSave.Filter = "PNGファイル(*.png)|*.png";
    dlgSave.AddExtension = true;

    if ((bool)dlgSave.ShowDialog())
    {
        // 拡張子を取得する
        string extension = System.IO.Path.GetExtension(dlgSave.FileName).ToUpper();

        // ストロークが描画されている境界を取得
        Rect rectBounds = inkCanvas.Strokes.GetBounds();
        Rect rect = new Rect(0, 0, inkCanvas.Width, inkCanvas.Height);

        // 描画先を作成
        DrawingVisual drawingVisual = new DrawingVisual();
        DrawingContext context = drawingVisual.RenderOpen();

        // 描画エリアを作成
        context.DrawRectangle(inkCanvas.Background, null, rect);
        inkCanvas.Strokes.Draw(context);
        context.Close();

        // ビットマップに変換
        RenderTargetBitmap rtb = new RenderTargetBitmap((int)rect.Width, (int)rect.Height, 96, 96, PixelFormats.Default);
        rtb.Render(drawingVisual);

        // ビットマップエンコーダー変数の宣言
        BitmapEncoder enc = new PngBitmapEncoder();

        if (enc != null)
        {
            // ビットマップフレームを作成してエンコーダーにフレームを追加する
            enc.Frames.Add(BitmapFrame.Create(rtb));
            // ファイルに書き込む
            System.IO.Stream stream = System.IO.File.Create(dlgSave.FileName);
            enc.Save(stream);
            stream.Close();
        }

    }
}

/// <summary>
/// 保存(ISF)ボタンコマンドの処理
/// </summary>
private void SaveAsIsfCommandExecute(InkCanvas inkCanvas)
{
    Microsoft.Win32.SaveFileDialog dlgSave = new Microsoft.Win32.SaveFileDialog();

    dlgSave.Filter = "ISFファイル(*.isf)|*.isf";

    if ((bool)dlgSave.ShowDialog())
    {
        using (System.IO.FileStream fs = new System.IO.FileStream(dlgSave.FileName, System.IO.FileMode.Create))
        {
            inkCanvas.Strokes.Save(fs);
        }

        MessageBox.Show("保存しました");
    }
}


/// <summary>
/// 開く(ISF)ボタンコマンドの処理
/// </summary>
private void OpenAsIsfCommandExecute(InkCanvas inkCanvas)
{

    Microsoft.Win32.OpenFileDialog dlgOpen = new Microsoft.Win32.OpenFileDialog();

    dlgOpen.Filter = "ISFファイル(*.isf)|*.isf";

    if ((bool)dlgOpen.ShowDialog())
    {
        // 現在のストロークをクリア
        inkCanvas.Strokes.Clear();

        using (System.IO.FileStream fs = new System.IO.FileStream(dlgOpen.FileName, System.IO.FileMode.Open))
        {
            inkCanvas.Strokes = new System.Windows.Ink.StrokeCollection(fs);
        }
    }
}
- 以下名前空間の追加
using System.Windows;using System.Windows.Controls;using System.Windows.Ink;using System.Windows.Media;using System.Windows.Media.Imaging;
- DrawingAttributesの指定は、ご自由に
-
FitToCurveをtrueに指定しないと線を引く際にギザギザするようです。 -
IsHighlighterをtrueにすることで蛍光ペン(ハイライト)となるので、背景画像が消えずに線が引けます。
-
デバッグ実行
- 動作するか確認します。
- ペンが動作するか。
- ペンの太さが変更されるか。
- ペンの形状が変更されるか。
- 描画したポイントを消しゴムで削除できるか。
- 描画した線を消しゴムで削除できるか。
- 描画した線を選択できるか、サイズ変更できるか。
- pngファイルで保存できるか。
- isfファイルで保存できるか。
- isfファイルを読み込みできるか。
- 以上が今回の作成した対象範囲です。
まとめ
WPFは、最初から用意されているInkCanvasを使用することによって、インク機能が簡単に実装できました。
WindowsFormsと違って、「Windows SDK for Vista」を参照する必要がないです。
今回は、作成範囲に入れていませんが、テキストを入れたり、囲ったら塗りつぶすことも実装できそうです。