環境
OS:CentOS7
仮想マシン:Virtual Box
方法
CloudWatchを利用するには、オンプレの場合はEC2インスタンスの場合と違ってCloudWatchエージェントをインストールする必要があります。
しかし、エージェントをインストールするだけでは不十分で、専用のIAMユーザーを作成し、サーバーに情報を設定しなければなりません。
手順
CentOSにrootユーザーでログインする。
CloudWatch エージェントパッケージをダウンロード
CloudWatch エージェントパッケージをダウンロードします。
wget https://s3.amazonaws.com/amazoncloudwatch-agent/centos/amd64/latest/amazon-cloudwatch-agent.rpm
パッケージの署名を確認します。
# 公開鍵のダウンロード
wget https://s3.amazonaws.com/amazoncloudwatch-agent/assets/amazon-cloudwatch-agent.gpg

# 公開鍵をインポート
gpg --import amazon-cloudwatch-agent.gpg
# 結果
gpg: 鍵3B789C72: 公開鍵"Amazon CloudWatch Agent"をインポートしました
gpg:         処理数の合計: 1
gpg:           インポート: 1  (RSA: 1)
# この場合キー値は3B789C72


# フィンガープリントの確認
# 引数にキー値をとる
gpg --fingerprint 3B789C72
# 結果
pub   2048R/3B789C72 2017-11-14
   フィンガー・プリント = 9376 16F3 450B 7D80 6CBD  9725 D581 6730 3B78 9C72
uid                  Amazon CloudWatch Agent


# パッケージ署名ファイルのダウンロード
wget https://s3.amazonaws.com/amazoncloudwatch-agent/centos/amd64/latest/amazon-cloudwatch-agent.rpm.sig

# 署名の確認
gpg --verify amazon-cloudwatch-agent.rpm.sig amazon-cloudwatch-agent.rpm
# 結果
gpg: 2021年01月14日 07時00分29秒 JSTにRSA鍵ID 3B789C72で施された署名
gpg: "Amazon CloudWatch Agent"からの正しい署名
gpg: *警告*: この鍵は信用できる署名で証明されていません!
gpg:       この署名が所有者のものかどうかの検証手段がありません。
主鍵のフィンガー・プリント: 9376 16F3 450B 7D80 6CBD  9725 D581 6730 3B78 9C72
# このフィンガープリントと先のフィンガープリントが一致しているのでOKです
インストール
rpm -Uvh ./amazon-cloudwatch-agent.rpm
IAMユーザーの作成
次にIAMユーザーを作成します。
IAMコンソールを開きます。
ユーザーを追加をクリックします。

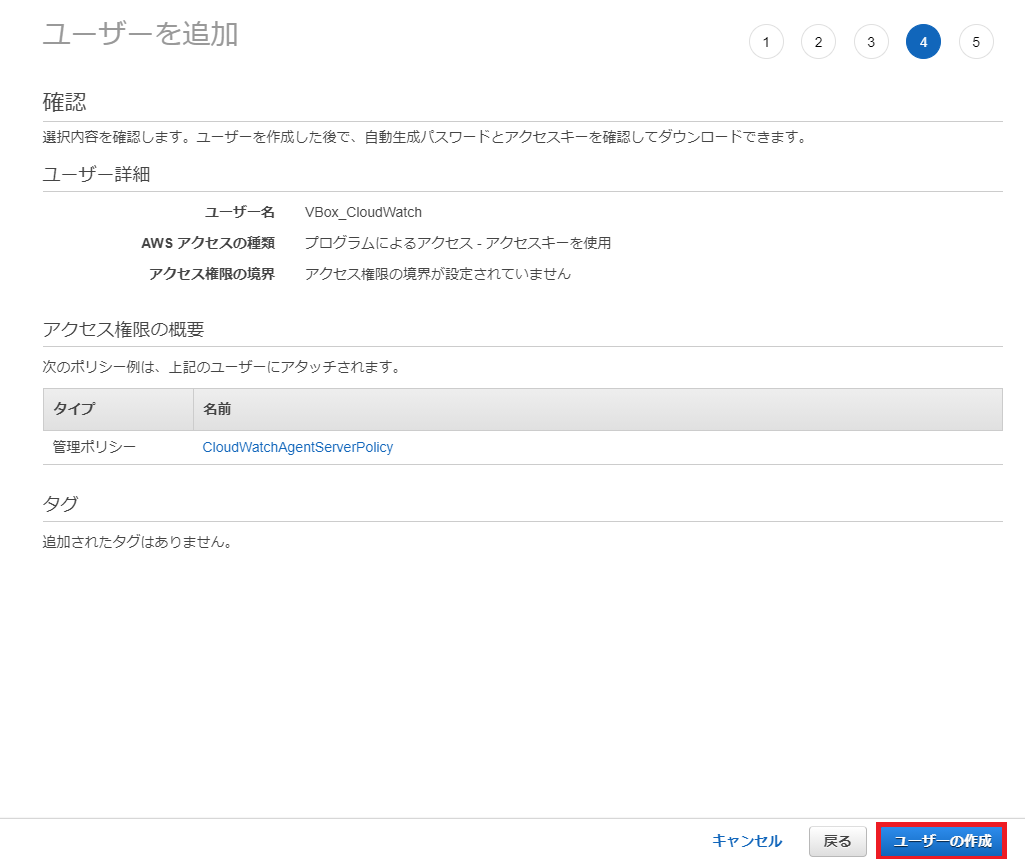
今回ユーザー名は「VBox_CloudWatch」とします。
プログラムによるアクセス、次のステップ:アクセス権限 の順に選択します。

既存のポリシーを直接アタッチを選択します。
CloudWatchAgentServerPolicyを選択します。

適切なポリシーがリストされていることを確認し、ユーザーの作成を選択します。

AWS CLIのインストール
IAM情報をコマンドラインで入力するために、まずはAWS CLIをインストールする必要があります。
# AWS CLIのインストールファイルをダウンロード
curl "https://awscli.amazonaws.com/awscli-exe-linux-x86_64-2.0.30.zip" -o "awscliv2.zip"

# インストーラを解凍
unzip awscliv2.zip

# インストールプログラムの実行
./aws/install

# インストールの確認
aws --version
# 結果
aws-cli/2.0.30 Python/3.7.3 Linux/3.10.0-1160.15.2.el7.x86_64 botocore/2.0.0dev34
IAM認証情報とAWSリージョンの指定
# 認証情報の設定
aws configure --profile AmazonCloudWatchAgent
# 対話形式で設定
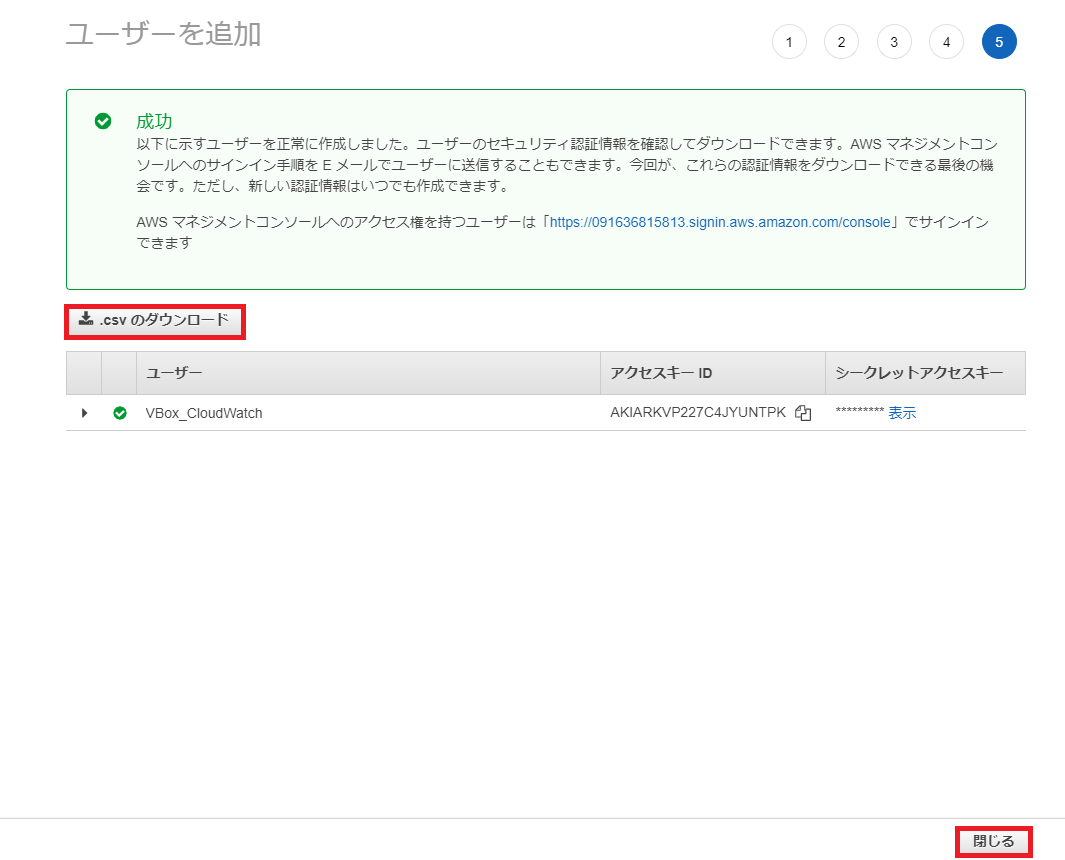
AWS Access Key ID [None]:  #ダウンロードしたcsvファイルを参照し入力
AWS Secret Access Key [None]: # 同上
Default region name [None]: ap-northeast-1
Default output format [None]: json
CloudWatch エージェントを起動
ウィザードを使用して CloudWatch エージェント設定ファイルを作成します。
/opt/aws/amazon-cloudwatch-agent/bin/amazon-cloudwatch-agent-config-wizard
# 対話形式で入力
=============================================================
= Welcome to the AWS CloudWatch Agent Configuration Manager =
=============================================================
On which OS are you planning to use the agent?
1. linux
2. windows
3. darwin
default choice: [1]:

Trying to fetch the default region based on ec2 metadata...
Are you using EC2 or On-Premises hosts?
1. EC2
2. On-Premises
default choice: [2]:
2
Please make sure the credentials and region set correctly on your hosts.
Refer to http://docs.aws.amazon.com/cli/latest/userguide/cli-chap-getting-started.html
Which user are you planning to run the agent?
1. root
2. cwagent
3. others
default choice: [1]:
1
Do you want to turn on StatsD daemon?
1. yes
2. no
default choice: [1]:
2
Do you want to monitor metrics from CollectD?
1. yes
2. no
default choice: [1]:
2
Do you want to monitor any host metrics? e.g. CPU, memory, etc.
1. yes
2. no
default choice: [1]:
1
Do you want to monitor cpu metrics per core? Additional CloudWatch charges may apply.
1. yes
2. no
default choice: [1]:
1
Would you like to collect your metrics at high resolution (sub-minute resolution)? This enables sub-minute resolution for all metrics, but you can customize for specific metrics in the output json file.
1. 1s
2. 10s
3. 30s
4. 60s
default choice: [4]:
4
Which default metrics config do you want?
1. Basic
2. Standard
3. Advanced
4. None
default choice: [1]:
1
Current config as follows:
{
	"agent": {
		"metrics_collection_interval": 60,
		"run_as_user": "root"
	},
	"metrics": {
		"metrics_collected": {
			"cpu": {
				"measurement": [
					"cpu_usage_idle"
				],
				"metrics_collection_interval": 60,
				"resources": [
					"*"
				],
				"totalcpu": true
			},
			"disk": {
				"measurement": [
					"used_percent"
				],
				"metrics_collection_interval": 60,
				"resources": [
					"*"
				]
			},
			"diskio": {
				"measurement": [
					"write_bytes",
					"read_bytes",
					"writes",
					"reads"
				],
				"metrics_collection_interval": 60,
				"resources": [
					"*"
				]
			},
			"mem": {
				"measurement": [
					"mem_used_percent"
				],
				"metrics_collection_interval": 60
			},
			"net": {
				"measurement": [
					"bytes_sent",
					"bytes_recv",
					"packets_sent",
					"packets_recv"
				],
				"metrics_collection_interval": 60,
				"resources": [
					"*"
				]
			},
			"swap": {
				"measurement": [
					"swap_used_percent"
				],
				"metrics_collection_interval": 60
			}
		}
	}
}
Are you satisfied with the above config? Note: it can be manually customized after the wizard completes to add additional items.
1. yes
2. no
default choice: [1]:
1
Do you have any existing CloudWatch Log Agent (http://docs.aws.amazon.com/AmazonCloudWatch/latest/logs/AgentReference.html) configuration file to import for migration?
1. yes
2. no
default choice: [2]:
2
Do you want to monitor any log files?
1. yes
2. no
default choice: [1]:
1
Log file path:
/var/log/messages
Log group name:
default choice: [messages]
/var/log/messages
Log stream name:
default choice: [{hostname}]

Do you want to specify any additional log files to monitor?
1. yes
2. no
default choice: [1]:
2
Saved config file to /opt/aws/amazon-cloudwatch-agent/bin/config.json successfully.
Current config as follows:
{
	"agent": {
		"metrics_collection_interval": 60,
		"run_as_user": "root"
	},
	"logs": {
		"logs_collected": {
			"files": {
				"collect_list": [
					{
						"file_path": "/var/log/messages",
						"log_group_name": "/var/log/messages",
						"log_stream_name": "{hostname}"
					}
				]
			}
		}
	},
	"metrics": {
		"metrics_collected": {
			"cpu": {
				"measurement": [
					"cpu_usage_idle"
				],
				"metrics_collection_interval": 60,
				"resources": [
					"*"
				],
				"totalcpu": true
			},
			"disk": {
				"measurement": [
					"used_percent"
				],
				"metrics_collection_interval": 60,
				"resources": [
					"*"
				]
			},
			"diskio": {
				"measurement": [
					"write_bytes",
					"read_bytes",
					"writes",
					"reads"
				],
				"metrics_collection_interval": 60,
				"resources": [
					"*"
				]
			},
			"mem": {
				"measurement": [
					"mem_used_percent"
				],
				"metrics_collection_interval": 60
			},
			"net": {
				"measurement": [
					"bytes_sent",
					"bytes_recv",
					"packets_sent",
					"packets_recv"
				],
				"metrics_collection_interval": 60,
				"resources": [
					"*"
				]
			},
			"swap": {
				"measurement": [
					"swap_used_percent"
				],
				"metrics_collection_interval": 60
			}
		}
	}
}
Please check the above content of the config.
The config file is also located at /opt/aws/amazon-cloudwatch-agent/bin/config.json.
Edit it manually if needed.
Do you want to store the config in the SSM parameter store?
1. yes
2. no
default choice: [1]:
2
Program exits now.
/opt/aws/amazon-cloudwatch-agent/bin/config.jsonに設定ファイルが保存されます。
確認します。
ls -l /opt/aws/amazon-cloudwatch-agent/bin/config.json
# 結果
-rwxr-xr-x. 1 root root 1258  2月 13 16:19 /opt/aws/amazon-cloudwatch-agent/bin/config.json
エージェントの起動
# エージェントの起動
/opt/aws/amazon-cloudwatch-agent/bin/amazon-cloudwatch-agent-ctl -a fetch-config -m onPremise -s -c file:/opt/aws/amazon-cloudwatch-agent/bin/config.json

# 確認
systemctl status amazon-cloudwatch-agent.service -l
# 結果
● amazon-cloudwatch-agent.service - Amazon CloudWatch Agent
   Loaded: loaded (/etc/systemd/system/amazon-cloudwatch-agent.service; enabled; vendor preset: disabled)
   Active: active (running) since 土 2021-02-13 16:22:47 JST; 3min 25s ago
 Main PID: 4406 (amazon-cloudwat)
    Tasks: 7
   CGroup: /system.slice/amazon-cloudwatch-agent.service
           └─4406 /opt/aws/amazon-cloudwatch-agent/bin/amazon-cloudwatch-agent -config /opt/aws/amazon-cloudwatch-agent/etc/amazon-cloudwatch-agent.toml -envconfig /opt/aws/amazon-cloudwatch-agent/etc/env-config.json -pidfile /opt/aws/amazon-cloudwatch-agent/var/amazon-cloudwatch-agent.pid
CloudWatchエージェントが無事に起動されたことが確認されました。
アラームの作成
ではCloudWatchコンソールを開いてアラームを作成します。

メトリクスの選択を選択します。

「CWAgent」が今回導入した名前空間です。

「cpu,host」を選択します。

「cpu-total」を選択します。

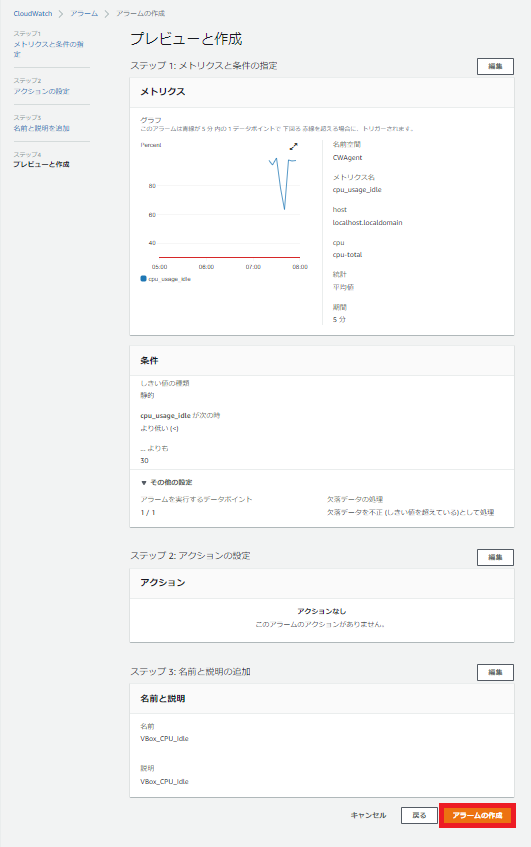
CPUのアイドル率の監視をするメトリクスなので、アイドル率があるパーセンテージを下回った時にアラームが発せられるように設定します。
というか、CPU使用率そのものを監視するメトリクスがなかったのですが、どう設定したらできるようになるんですかね?詳しい人教えてください。
追記 ⇒設定ファイル(ウィザードで作成した場合は/opt/aws/amazon-cloudwatch-agent/bin/config.json)のメトリクス値に「cpu_usage_active」を追加するとCPU使用率のメトリクス値を収集することができるようです。
https://docs.aws.amazon.com/ja_jp/AmazonCloudWatch/latest/monitoring/metrics-collected-by-CloudWatch-agent.html

今回は通知の設定はしません。

アラーム名は「VBox_CPU_Idle」とします。

問題がなければアラームの作成を選択します。

これでアラームが作成されました。
CPUに負荷をかける
CPUに負荷をかけてアラームが発生するか確認しましょう。
以下のコマンドを4回くらい打ってCPUに負荷をかけます。
yes >> /dev/null &
このままだとCPUに負荷がかかったままなのでバックグラウンドで実行されているyesコマンド停止させるのを忘れずに。
killall yes
感想
慣れないうちはオンプレ環境にCloudWatchを導入するのは大変ですが、クラウドとオンプレを併用した環境でも一緒にCloudWatchで監視することができるのは便利ですね。
参考
https://docs.aws.amazon.com/ja_jp/AmazonCloudWatch/latest/monitoring/installing-cloudwatch-agent-commandline.html
https://docs.aws.amazon.com/ja_jp/AmazonCloudWatch/latest/monitoring/install-CloudWatch-Agent-on-premise.html
https://dev.classmethod.jp/articles/cloudwatch-agent-on-premise-windows/
https://qiita.com/murata-tomohide/items/3e66d63b21c08d6481a2
https://qiita.com/TK1989/items/0d1903846c6c54956132
この記事はAWS初学者を導く体系的な動画学習サービス
「AWS CloudTech」の課題カリキュラムで作成しました。
https://aws-cloud-tech.com


