副作用フックのuseEffect()は、DOMの扱いやコンポーネントの外からのデータの受け取りなどに用いられます。今回ご紹介するのは、これらとは少し異なる、コンポーネントのデータの監視です。違いが目で確かめられます。
状態の更新が追いつかなくなる例
問題となるコード例を先にお見せしましょう。以下のサンプル001は、矩形領域にグリッドを表示する簡単なReactアプリケーションです。数値入力フィールドで、グリッドサイズが10から100ピクセルの間で変えられます。
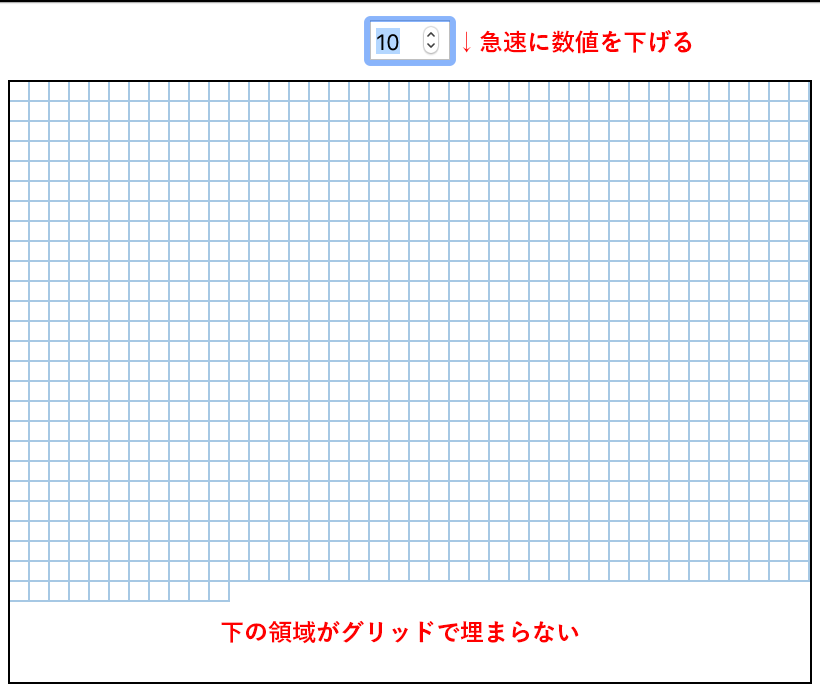
問題は、フィールドの数値を急に下げると、領域の下がグリッドで埋まらなくなることです(図001)。領域に必要なグリッド数を求める処理の更新が、追いつかなくなるものと思われます。
サンプル001■グリッドサイズを急激に下げると処理が追いつかない
See the Pen React: Displaying grids in rectangle area dynamically by Fumio Nonaka (@FumioNonaka) on CodePen.
図001■矩形領域の下部のグリッドが埋まらない
静的なグリッド表示
グリッドサイズの動的な変更に入る前に、グリッドをどのように描いているのか、静的に示しているのがつぎのサンプル002です。
サンプル002■グリッドを静的に描く
See the Pen React: Displaying grids in rectangle area static by Fumio Nonaka (@FumioNonaka) on CodePen.
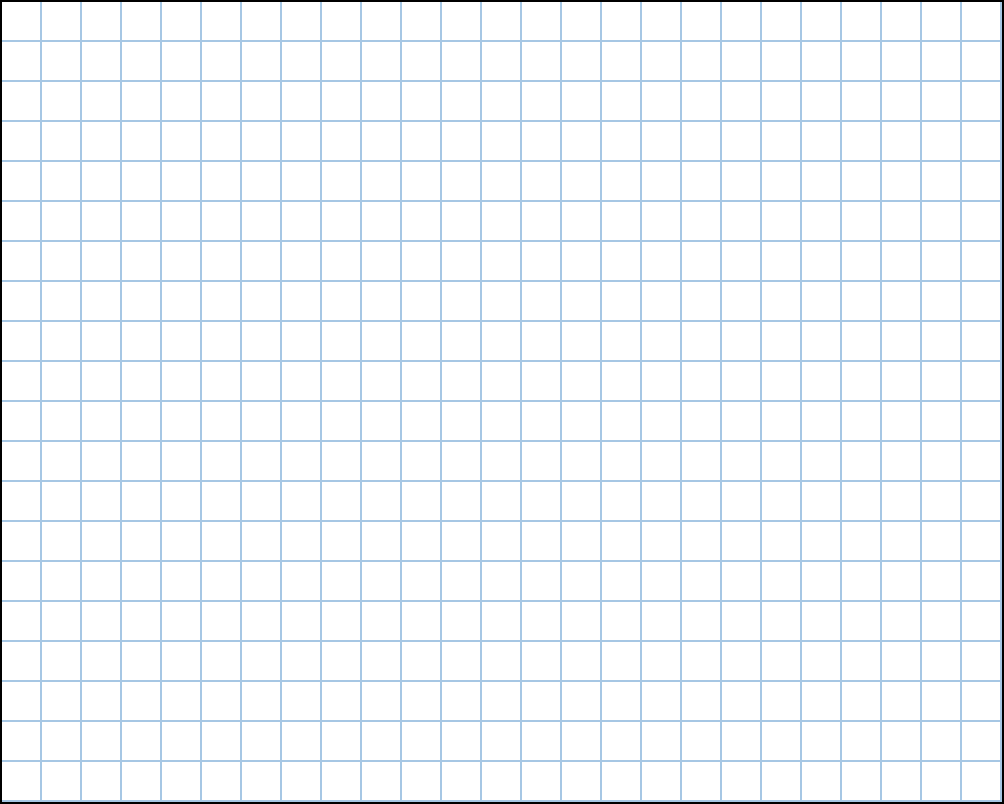
コードもまとめて掲げておきましょう。矩形領域(layoutAreaStyle)の幅(width)と高さ(height)、グリッドの1辺の大きさ(boxSize)は、動的に変えさえしなければ、値に応じて正しく表示されます(図002)。
<div id="root"></div>
const layoutAreaStyle = {
	width: 500,
	height: 400,
	overflow: 'hidden',
};
function App() {
	const boxSize = 20;
	const boxStyle = {
		width: boxSize,
		height: boxSize,
		boxShadow: 'inset -1px -1px #0275b8',
		opacity: 0.4
	};
	const getBoxCount = () => {
		const countX = Math.floor(layoutAreaStyle.width / boxSize) + 1;
		const countY = Math.floor(layoutAreaStyle.height / boxSize) + 1;
		return countX * countY;
	};
	const boxCount = getBoxCount();
	return (
		<div className="App">
			<header className="App-header">
			</header>
			<main>
				<div id="layout-area" style={layoutAreaStyle}>
					<div id="grid" style={{ width: layoutAreaStyle.width + boxSize }}>
						{Array.from(new Array(boxCount), (element, id) => (
							<div style={boxStyle} key={id} />
						))}
					</div>
				</div>
			</main>
		</div>
	);
}

ReactDOM.render(
	<React.StrictMode>
		<App />
	</React.StrictMode>,
	document.getElementById('root')
);
body {
	font-family: -apple-system, BlinkMacSystemFont, 'Segoe UI', 'Roboto', 'Oxygen',
		'Ubuntu', 'Cantarell', 'Fira Sans', 'Droid Sans', 'Helvetica Neue',
		sans-serif;
	-webkit-font-smoothing: antialiased;
	-moz-osx-font-smoothing: grayscale;
}
.App {
	display: flex;
	flex-direction: column;
	align-items: center;
	justify-content: center;
}
# layout-area {
	border: 1px solid;
}
# grid {
	display: flex;
	flex-wrap: wrap;
}
.App-header {
	margin-bottom: 0.5rem;
}
図002■矩形領域やグリッドサイズに応じて静的には正しく表示される
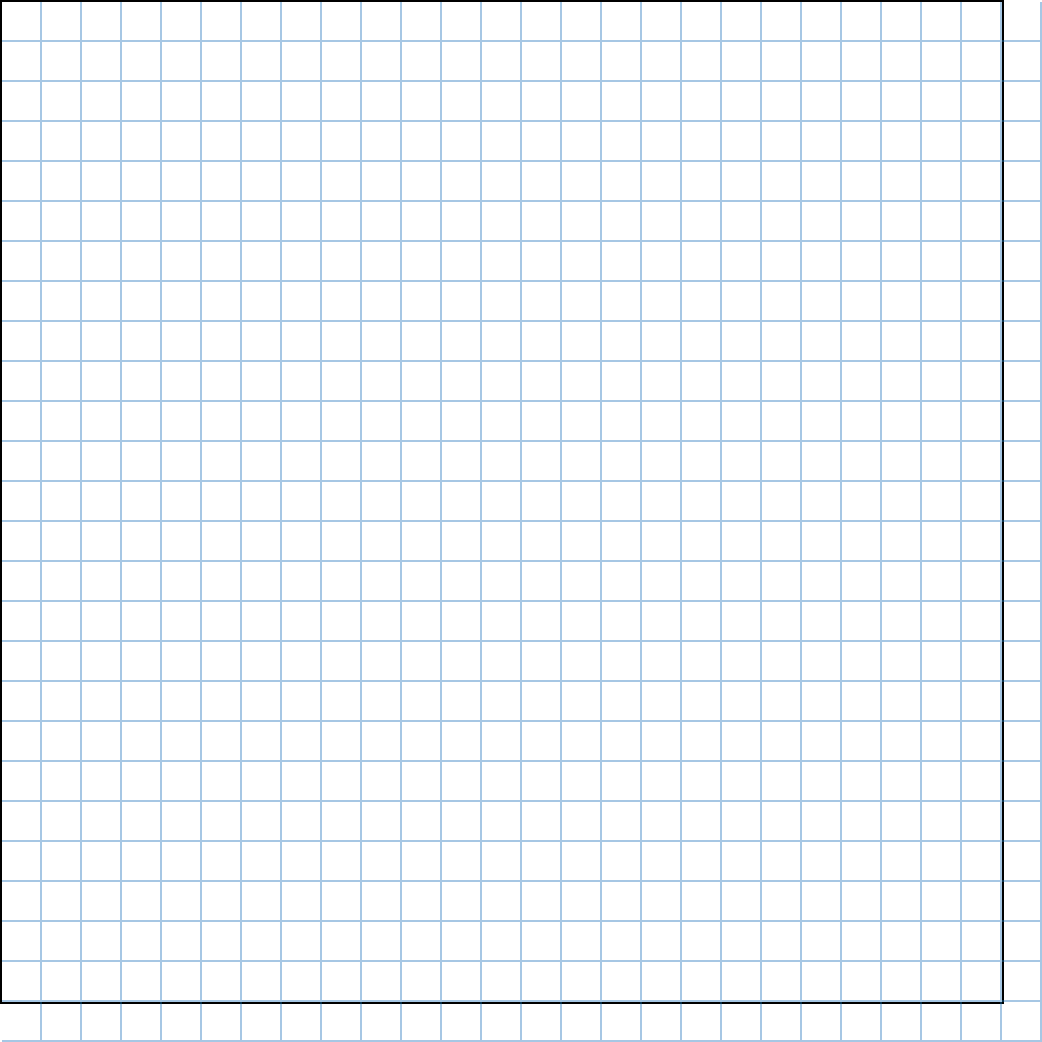
矩形領域の要素(<div id="layout-area">)の子にグリッド領域の要素(<div id="grid">)が収められ、その中に個々のグリッドを並べました。右端に隙間ができないよう、グリッド領域の幅は親よりひとマス分広げ、グリッド個数(boxCount)も領域より縦横ひとつ分多くしています(図003)。そのうえで、矩形領域のスタイル(layoutAreaStyle)により外側を非表示(overflow: 'hidden')にしたのが、前掲サンプル002です。
図003■グリッドは矩形領域より縦横ひとマス大きい
グリッドサイズを動的に変える
矩形領域のグリッドサイズが動的に変えられるように、useState()フックでふたつの値をstate変数にとります。マス目の大きさ(boxSize)と、矩形領域を埋めるのに必要なグリッドの数(boxCount)です。
数値入力フィールド(<input type="number")のonChangeハンドラ(boxSizeChanged())でふたつのstate変数を書き替えればよいでしょう。そのように改めたのが、冒頭のサンプル001です。処理の流れに誤りはありません。問題は、state変数の更新が、直ちにはその値を用いた処理(getBoxCount())に反映されないことです。
function App() {
	// const boxSize = 20;
	const [boxSize, setBoxSize] = React.useState(20);

	// const boxCount = getBoxCount();
	const [boxCount, setBoxCount] = React.useState(getBoxCount());
	const boxSizeChanged = (event) => {
		const numberInput = event.currentTarget;
		const newBoxSize = parseInt(numberInput.value, 10);
		setBoxSize(newBoxSize);
		setBoxCount(getBoxCount);
	};
	return (
		<div className="App">
			<header className="App-header">
				<input
					type="number"
					min="10"
					max="100"
					value={boxSize}
					onChange={boxSizeChanged}
				/>
			</header>

		</div>
	);
}
なお、stateの設定関数(setBoxCount())には、引数に関数(boxSizeChanged())を渡せることにご注目ください。
useEffect()フックで状態が変わるのを監視する
useEffect()フックを使えば、状態が変わるのを監視して処理できます。前掲サンプル001で、グリッドの大きさは直ちに変わりました。状態の反映が遅れていたのは個数です。
そこで、useEffect()フックで個数をカウントしましょう。第1引数が処理のコールバック関数で、第2引数の配列に依存するデータを要素として加えます。コールバックの本体から呼び出すのは、個数を数える関数(setBoxCount())です。引数の関数(getBoxCount())が依存データとなります。
function App() {

	const boxSizeChanged = (event) => {

		// setBoxCount(getBoxCount);
	};
	React.useEffect(() => {
		setBoxCount(getBoxCount);
	}, [getBoxCount]);

}
コンポーネント本体に定めた関数は、レンダーのたびにつくり直されるのが基本です。けれど、グリッドの個数はグリッドサイズが変わらないかぎり数え直す必要はありません。
このようなときに使うのが、useCallback()フックです。構文はuseEffect()と同じで、第1引数がコールバック、第2引数には依存するデータの配列を定めます。依存データに変わりがなければ、戻り値のコールバック関数はそのままつくり直されません。
function App() {

	// const getBoxCount = () => {
	const getBoxCount = React.useCallback(() => {
			const countX = Math.floor(layoutAreaStyle.width / boxSize) + 1;
			const countY = Math.floor(layoutAreaStyle.height / boxSize) + 1;
			return countX * countY;
		}
		, [boxSize]
	);


}
フックuseEffect()とuseCallback()を用いて書き改めたのが、つぎのサンプル003です。グリッドサイズを急に下げても、矩形領域がグリッドで埋まります。
サンプル003■useEffect()とuseCallback()を使ったグリッドの描画
See the Pen React: Displaying grids in rectangle area with useEffect() by Fumio Nonaka (@FumioNonaka) on CodePen.
JavaScriptコード全体はつぎのとおりです。
const layoutAreaStyle = {
	width: 400,
	height: 300,
	overflow: 'hidden',
};
function App() {
	const [boxSize, setBoxSize] = React.useState(20);
	const boxStyle = {
		width: boxSize,
		height: boxSize,
		boxShadow: 'inset -1px -1px #0275b8',
		opacity: 0.4
	};
	const getBoxCount = React.useCallback(() => {
			const countX = Math.floor(layoutAreaStyle.width / boxSize) + 1;
			const countY = Math.floor(layoutAreaStyle.height / boxSize) + 1;
			return countX * countY;
		}
		, [boxSize]
	);
	const [boxCount, setBoxCount] = React.useState(getBoxCount());
	const boxSizeChanged = (event) => {
		const numberInput = event.currentTarget;
		const newBoxSize = parseInt(numberInput.value, 10);
		setBoxSize(newBoxSize);
	};
	React.useEffect(() => {
		setBoxCount(getBoxCount);
	}, [getBoxCount]);
	return (
		<div className="App">
			<header className="App-header">
				<input
					type="number"
					min="10"
					max="100"
					value={boxSize}
					onChange={boxSizeChanged}
				/>
			</header>
			<main>
				<div id="layout-area" style={layoutAreaStyle}>
					<div id="grid" style={{ width: layoutAreaStyle.width + boxSize }}>
						{Array.from(new Array(boxCount), (element, id) => (
							<div style={boxStyle} key={id} />
						))}
					</div>
				</div>
			</main>
		</div>
	);
}

ReactDOM.render(
	<React.StrictMode>
		<App />
	</React.StrictMode>,
	document.getElementById('root')
);
useEffect()は使わなくても済む
もっとも、今回のサンプルでは、useEffect()は使わなくても簡単に対応はできます。グリッドの個数をstate変数(boxSize)に頼らずに数えればよいのです。前掲サンプル001のコードをつぎのように書き替えます。
function App() {

	// const getBoxCount = () => {
	const getBoxCount = (boxSize) => {
			const countX = Math.floor(layoutAreaStyle.width / boxSize) + 1;
			const countY = Math.floor(layoutAreaStyle.height / boxSize) + 1;
			return countX * countY;
	};
	// const [boxCount, setBoxCount] = React.useState(getBoxCount());
	const [boxCount, setBoxCount] = React.useState(getBoxCount(boxSize));
	const boxSizeChanged = (event) => {
			const numberInput = event.currentTarget;
			const newBoxSize = parseInt(numberInput.value, 10);
			setBoxSize(newBoxSize);
			// setBoxCount(getBoxCount);
			setBoxCount(getBoxCount(newBoxSize));
	};

}
さらに、今回のように複数のstate変数の処理が組み合わさる場合は、useReducer()フックを使うことも検討すべきでしょう。このお題については、稿を改め「React: useReducer()フックで複数stateの処理を行う」で解説します。