(前回までのあらすじ)「React: フックuseEffect()とuseCallback()を使った結果が目で確かめられるコード例」では、複数のstateの処理が組み合わさったとき、値の更新が描画に追いつかない例をご紹介しました。具体的には、グリッドのマス目の大きさを動的に変えるつぎのサンプル001です。
サンプル001■グリッドサイズを急激に下げると処理が追いつかない
See the Pen React: Displaying grids in rectangle area dynamically by Fumio Nonaka (@FumioNonaka) on CodePen.
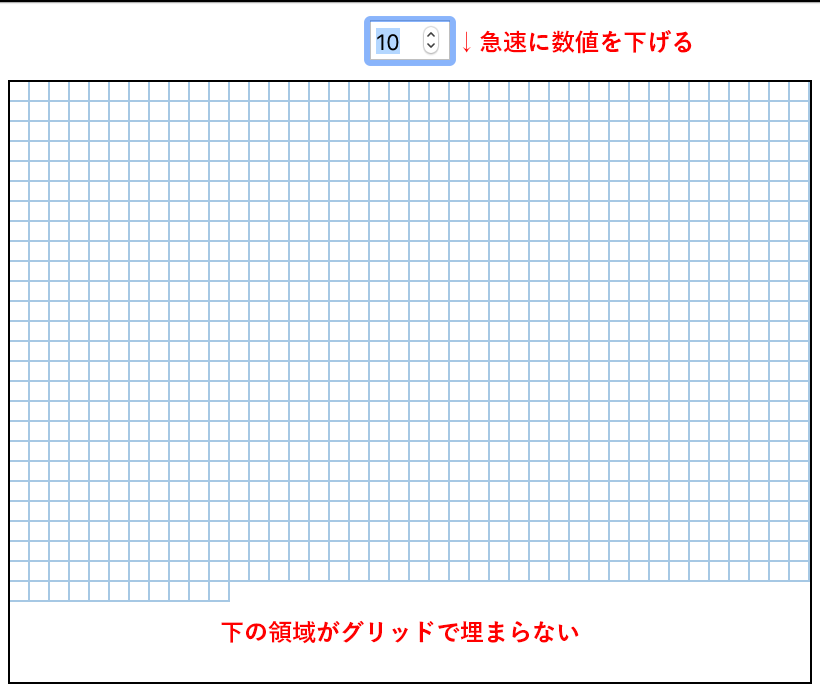
数値入力フィールドでマス目の大きさを急に小さくすると、矩形領域の下側でグリッドが足りなくなってしまうというものでした(図001)。フックuseEffect()とuseCallback()を用いて解決したのが前回です。今回は、useReducer()で対応します。
図001■矩形領域の下部のグリッドが埋まらない
useReducer()フックの役割と使い途
useReducer()フックは、状態(state)をコンポーネントから分け、コンポーネントが発行するアクション(action)のデータにもとづいて状態を書き替えます。つぎの説明は「フック API リファレンス」「useReducer」からの引用です。
通常、
useReducerがuseStateより好ましいのは、複数の値にまたがる複雑なstateロジックがある場合や、前のstateに基づいて次のstateを決める必要がある場合です。
前掲サンプル001の問題は、グリッドの大きさにもとづいて数を計算しようとしたとき、大きさのstate変数から参照した値の更新が間に合わないことでした。useReducer()フックなら、stateの複数プロパティをまとめて処理できるのです。
useReducer()からstateとdispatchを受け取る
useReducer()の引数は、stateのデータを処理する関数(reducer)とstateの初期値(initialState)のふたつです。そして、現在の状態(state)と、状態の変更を求めるメソッド(dispatch())が配列で返されます。
stateの初期値には、サンプル001がuseState()で定めたふたつのstate変数をプロパティとして収めればよいでしょう。dispatch()メソッドは引数に渡されたactionと呼ばれるオブジェクトをreducerに送ります。actionには何が起きたのかを示すtypeプロパティが与えられていなければなりません。そのほかに、新たなstateを決めるためのプロパティが加えられます。そして、reducerはaction.typeプロパティに応じて、新たなstateを求めて返すというのが大きな仕組みです。
const initialState = {
	// 状態(state)の初期値
	boxSize: 20,
	boxCount: /* (略) */
};
const reducer = (state, action) => {
	switch (action.type) {
		case 'CHANGE_BOX_SIZE':
			// 新しい状態(state)を返す
			return state;  // (仮)
};
function App() {
	const [state, dispatch] = React.useReducer(reducer, initialState);
	// const [boxSize, setBoxSize] = React.useState(20);

	// const [boxCount, setBoxCount] = React.useState(getBoxCount());
	const boxSizeChanged = (event) => {
		const numberInput = event.currentTarget;
		const newBoxSize = parseInt(numberInput.value, 10);
		// setBoxSize(newBoxSize);
		// setBoxCount(getBoxCount);
		dispatch({ type: 'CHANGE_BOX_SIZE', boxSize: newBoxSize, ...otherProps });
	};


}
stateからプロパティを取り出して用いる
コンポーネントからは、useState()によるstate変数は外します。替わりに、useReducer()が返したstateからプロパティ値を取り出せばよいのです。プロパティの名前はstate変数と揃えましょう。そうすると、コンポーネントの中で参照しているstate変数の頭に、state.を添えればよいということです。
function App() {
	const [state, dispatch] = React.useReducer(reducer, initialState);
	const boxStyle = {
		// width: boxSize,
		width: state.boxSize,
		// height: boxSize,
		height: state.boxSize,

	};

	return (
		<div className="App">
			<header className="App-header">
				<input

					// value={boxSize}
					value={state.boxSize}

				/>
			</header>
			<main>
				<div id="layout-area" style={layoutAreaStyle}>
					{/* <div id="grid" style={{ width: layoutAreaStyle.width + boxSize }}> */}
					<div id="grid" style={{ width: layoutAreaStyle.width + state.boxSize }}>
						{/* {Array.from(new Array(boxCount), (element, id) => ( */}
						{Array.from(new Array(state.boxCount), (element, id) => (
							<div style={boxStyle} key={id} />
						))}
					</div>
				</div>
			</main>
		</div>
	);
}
reducerを定める
いよいよ状態処理の本丸となるreducerを定めます。もっとも、reducerも状態に直に手は触れません。受け取ったactionにもとづき、新たなstateを決めて返すだけです。これで、stateに収められたプロパティの値が改められます。
stateのプロパティ値を計算する関数(getBoxCount())も、つぎのようにコンポーネントの外に出しましょう。処理を見ると、矩形領域(layoutArea)の幅と高さが要るようです。これはあとで、dispatch()メソッドから送るactionに含めることにします。
const reducer = (state, action) => {
	switch (action.type) {
		case 'CHANGE_BOX_SIZE':
			const boxSize = action.boxSize;
			const layoutArea = action.layoutArea;
			const boxCount = getBoxCount(layoutArea, boxSize);
			return {boxSize, boxCount};
		default:
			return state;
	}
};
function getBoxCount(layoutArea, boxSize) {
	const countX = Math.floor(layoutArea.width / boxSize) + 1;
	const countY = Math.floor(layoutArea.height / boxSize) + 1;
	return countX * countY;
};
function App() {

	/* const getBoxCount = () => {
		const countX = Math.floor(layoutAreaStyle.width / boxSize) + 1;
		const countY = Math.floor(layoutAreaStyle.height / boxSize) + 1;
		return countX * countY;
	}; */

}
dispatch()メソッドでactionを送る
矩形領域の幅と高さをもつオブジェクトの変数(layoutArea)は、スタイルを定める変数(layoutAreaStyle)から分けました。グリッドサイズの初期値も新たな変数(initialBoxSize)に収めます。そのうえで、矩形領域のオブジェクトをdispatch()から送るactionに加えたのがつぎのコードです。
const layoutArea = {
	width: 400,
	height: 300,
};
const layoutAreaStyle = {
	// width: 400,
	width: layoutArea.width,
	// height: 300,
	height: layoutArea.height,
	overflow: 'hidden',
};
const initialBoxSize = 20;
const initialState = {
	boxSize: initialBoxSize,
	boxCount: getBoxCount(initialBoxSize),
};

function App() {
	const [state, dispatch] = React.useReducer(reducer, initialState);

	const boxSizeChanged = (event) => {

		dispatch({type: 'CHANGE_BOX_SIZE', boxSize: newBoxSize, layoutArea});
	};

}
これでstateのふたつのプロパティが、まとめて更新されます。矩形領域を埋めるグリッドが足りなくなったりしません。
コンポーネントから返すテンプレートには手を加えなくても済みます。ただ、その役割にかんがみて矩形領域の幅を参照する変数(layoutArea)は差し替えました。
function App() {

	return (
		<div className="App">

			<main>
				<div id="layout-area" style={layoutAreaStyle}>
					{/* <div id="grid" style={{ width: layoutAreaStyle.width + state.boxSize }}> */}
					<div id="grid" style={{ width: layoutArea.width + state.boxSize }}>

					</div>
				</div>
			</main>
		</div>
	);
}
また、<input type="number">要素のonChangeイベントに与えたコールバック関数(boxSizeChanged())は、useCallback()でラップした方がよいでしょう(「useEffect()フックで状態が変わるのを監視する」参照)。第2引数の依存配列には、加えるとすればdispatch()メソッドです。けれど、「フックAPIリファレンス」の「useReducer」の項にはつぎのように説明されており、省いて構いません。
Reactは再レンダー間で
dispatch関数の同一性が保たれ、変化しないことを保証します。従ってuseEffectやuseCallbackの依存リストにはこの関数を含めないでも構いません。
function App() {

	// const boxSizeChanged = (event) => {
	const boxSizeChanged = React.useCallback((event) => {
		const numberInput = event.currentTarget;
		const newBoxSize = parseInt(numberInput.value, 10);
		dispatch({type: 'CHANGE_BOX_SIZE', boxSize: newBoxSize, layoutArea});
	// };
	}, []);

}
これらの書き替えを加えたのがつぎのサンプル002です。JavaScriptの記述全体は、以下のコード001にまとめました。状態の処理はコンポーネントの外に切り分けられ、コンポーネントは状態(state)の表示と変更の伝達(dispatch())に専念します。このように管理できることがuseReducer()フックの利点です。
サンプル002■useReducer()で複数stateを処理する
See the Pen React: Displaying grids in rectangle area with useReducer() by Fumio Nonaka (@FumioNonaka) on CodePen.
コード002■useReducer()で処理した複数のstateプロパティによりグリッドを描く
const layoutArea = {
	width: 400,
	height: 300,
};
const layoutAreaStyle = {
	width: layoutArea.width,
	height: layoutArea.height,
	overflow: 'hidden',
};
const initialBoxSize = 20;
const initialState = {
	boxSize: initialBoxSize,
	boxCount: getBoxCount(layoutArea, initialBoxSize),
};
const reducer = (state, action) => {
	switch (action.type) {
		case 'CHANGE_BOX_SIZE':
			const boxSize = action.boxSize;
			const layoutArea = action.layoutArea;
			const boxCount = getBoxCount(layoutArea, boxSize);
			return {boxSize, boxCount};
		default:
			return state;
	}
};
function getBoxCount(layoutArea, boxSize) {
	const countX = Math.floor(layoutArea.width / boxSize) + 1;
	const countY = Math.floor(layoutArea.height / boxSize) + 1;
	return countX * countY;
};
function App() {
	const [state, dispatch] = React.useReducer(reducer, initialState);
	const boxStyle = {
		width: state.boxSize,
		height: state.boxSize,
		boxShadow: 'inset -1px -1px #0275b8',
		opacity: 0.4
	};
	const boxSizeChanged = React.useCallback((event) => {
		const numberInput = event.currentTarget;
		const newBoxSize = parseInt(numberInput.value, 10);
		dispatch({type: 'CHANGE_BOX_SIZE', boxSize: newBoxSize, layoutArea});
	}, []);
	return (
		<div className="App">
			<header className="App-header">
				<input
					type="number"
					min="10"
					max="100"
					value={state.boxSize}
					onChange={boxSizeChanged}
				/>
			</header>
			<main>
				<div id="layout-area" style={layoutAreaStyle}>
					<div id="grid" style={{ width: layoutArea.width + state.boxSize }}>
						{Array.from(new Array(state.boxCount), (element, id) => (
							<div style={boxStyle} key={id} />
						))}
					</div>
				</div>
			</main>
		</div>
	);
}

ReactDOM.render(
	<React.StrictMode>
		<App />
	</React.StrictMode>,
	document.getElementById('root')
);
