Azure Developer Associate(AZ-204)の演習についてまとめてみた
本記事は、Azure Developer Associate (AZ-204) 試験の受験を考えている方、特に実践的な演習に焦点を当てて学習したい方向けの内容です。
Microsoft認定資格試験の問題内容は、受験者契約により第三者への開示が禁止されています。
本記事では具体的な問題内容には触れません。
また、一部AIツールを使用して生成した内容を含みます。
はじめに
筆者は AZ-204 試験で、特に穴埋め問題・並び替え問題に苦労し、一度不合格を経験しました。その経験から、Microsoft Learn の演習をしっかりと行うことの重要性を痛感しました。
本記事では、再受験に向けて取り組んだ演習の内容を、実践的な手順とともにまとめています。
公式リソース
-
試験 AZ-204: Microsoft Azure 向けソリューションの開発の学習ガイド
→ 出題範囲や学習ポイントがまとまっています。 -
マイクロソフト認定: Azure 開発者アソシエイト
→ 試験概要や公式練習問題へのリンクがあります。
演習内容
事前準備
Azureの無料アカウントを新規作成します。最初の30日間は$300のクレジットがあるので、それを使用して演習を行いましょう。
https://azure.microsoft.com/ja-jp/pricing/purchase-options/azure-account
Azure App Service
演習 - Azure App Service のデプロイ スロットをスワップする
概要: 静的 HTML ウェブサイトを Azure App Service にデプロイし、ステージング デプロイ スロットを作成する
試験対策: App Serviceの主要コマンドまとめ
| コマンド | 役割 | 使い方/注意点 |
|---|---|---|
| az webapp up | Webアプリの作成とデプロイを一括で行う |
--skuで価格レベルを指定する。無料プラン(F1)はスロット非対応--htmlで静的HTMLサイトとしてデプロイ |
| az webapp deployment slot create | デプロイスロットの作成 |
--slotでスロット名を指定スロット名は英数字とハイフンのみ使用可能 |
| az webapp deploy | Webアプリまたはスロットへのデプロイ |
--src-pathでデプロイするzipファイルを指定--slotでスロット名を指定しない場合は本番スロットにデプロイ |
デプロイスロット作成・スワップの詳細手順を見る
-
サンプルアプリのダウンロード
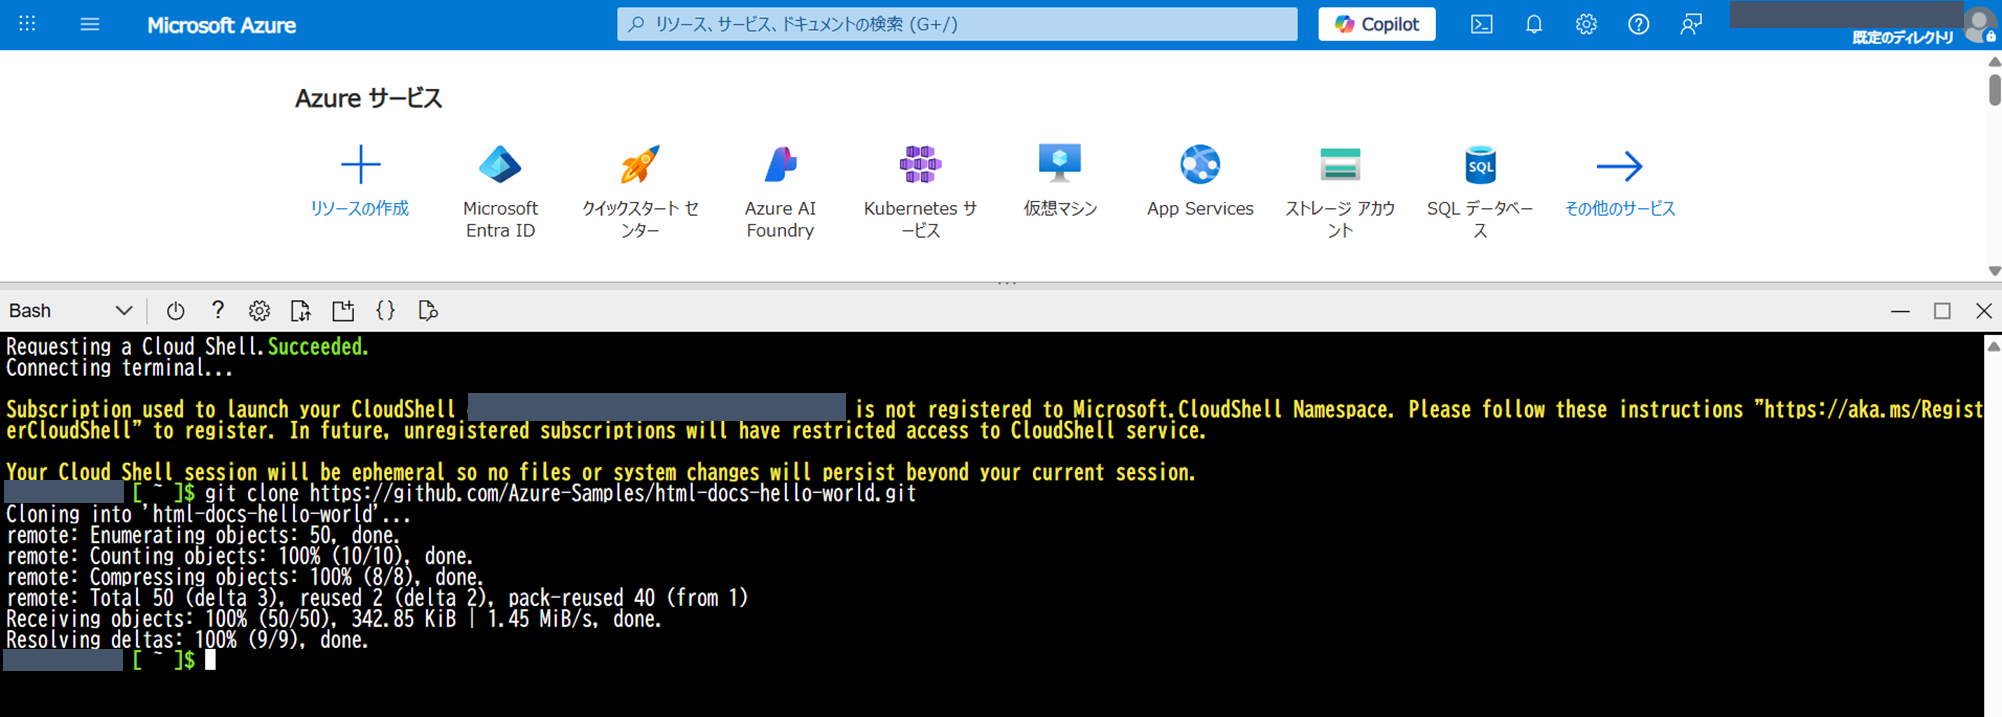
Azure Portalからクラウドシェルをクラシックバージョンで開き、サンプルアプリリポジトリをクローンする
git clone https://github.com/Azure-Samples/html-docs-hello-world.git
-
サンプルアプリのデプロイ
-
変数の設定
リソースグループとapp-nameを指定するresourceGroup=rg-mywebapp appName=mywebapp$RANDOM echo $appName -
ディレクトリの移動・デプロイ
cd html-docs-hello-world
az provider register --namespace Microsoft.Web
az webapp up -g $resourceGroup -n $appName --sku P0V3 --html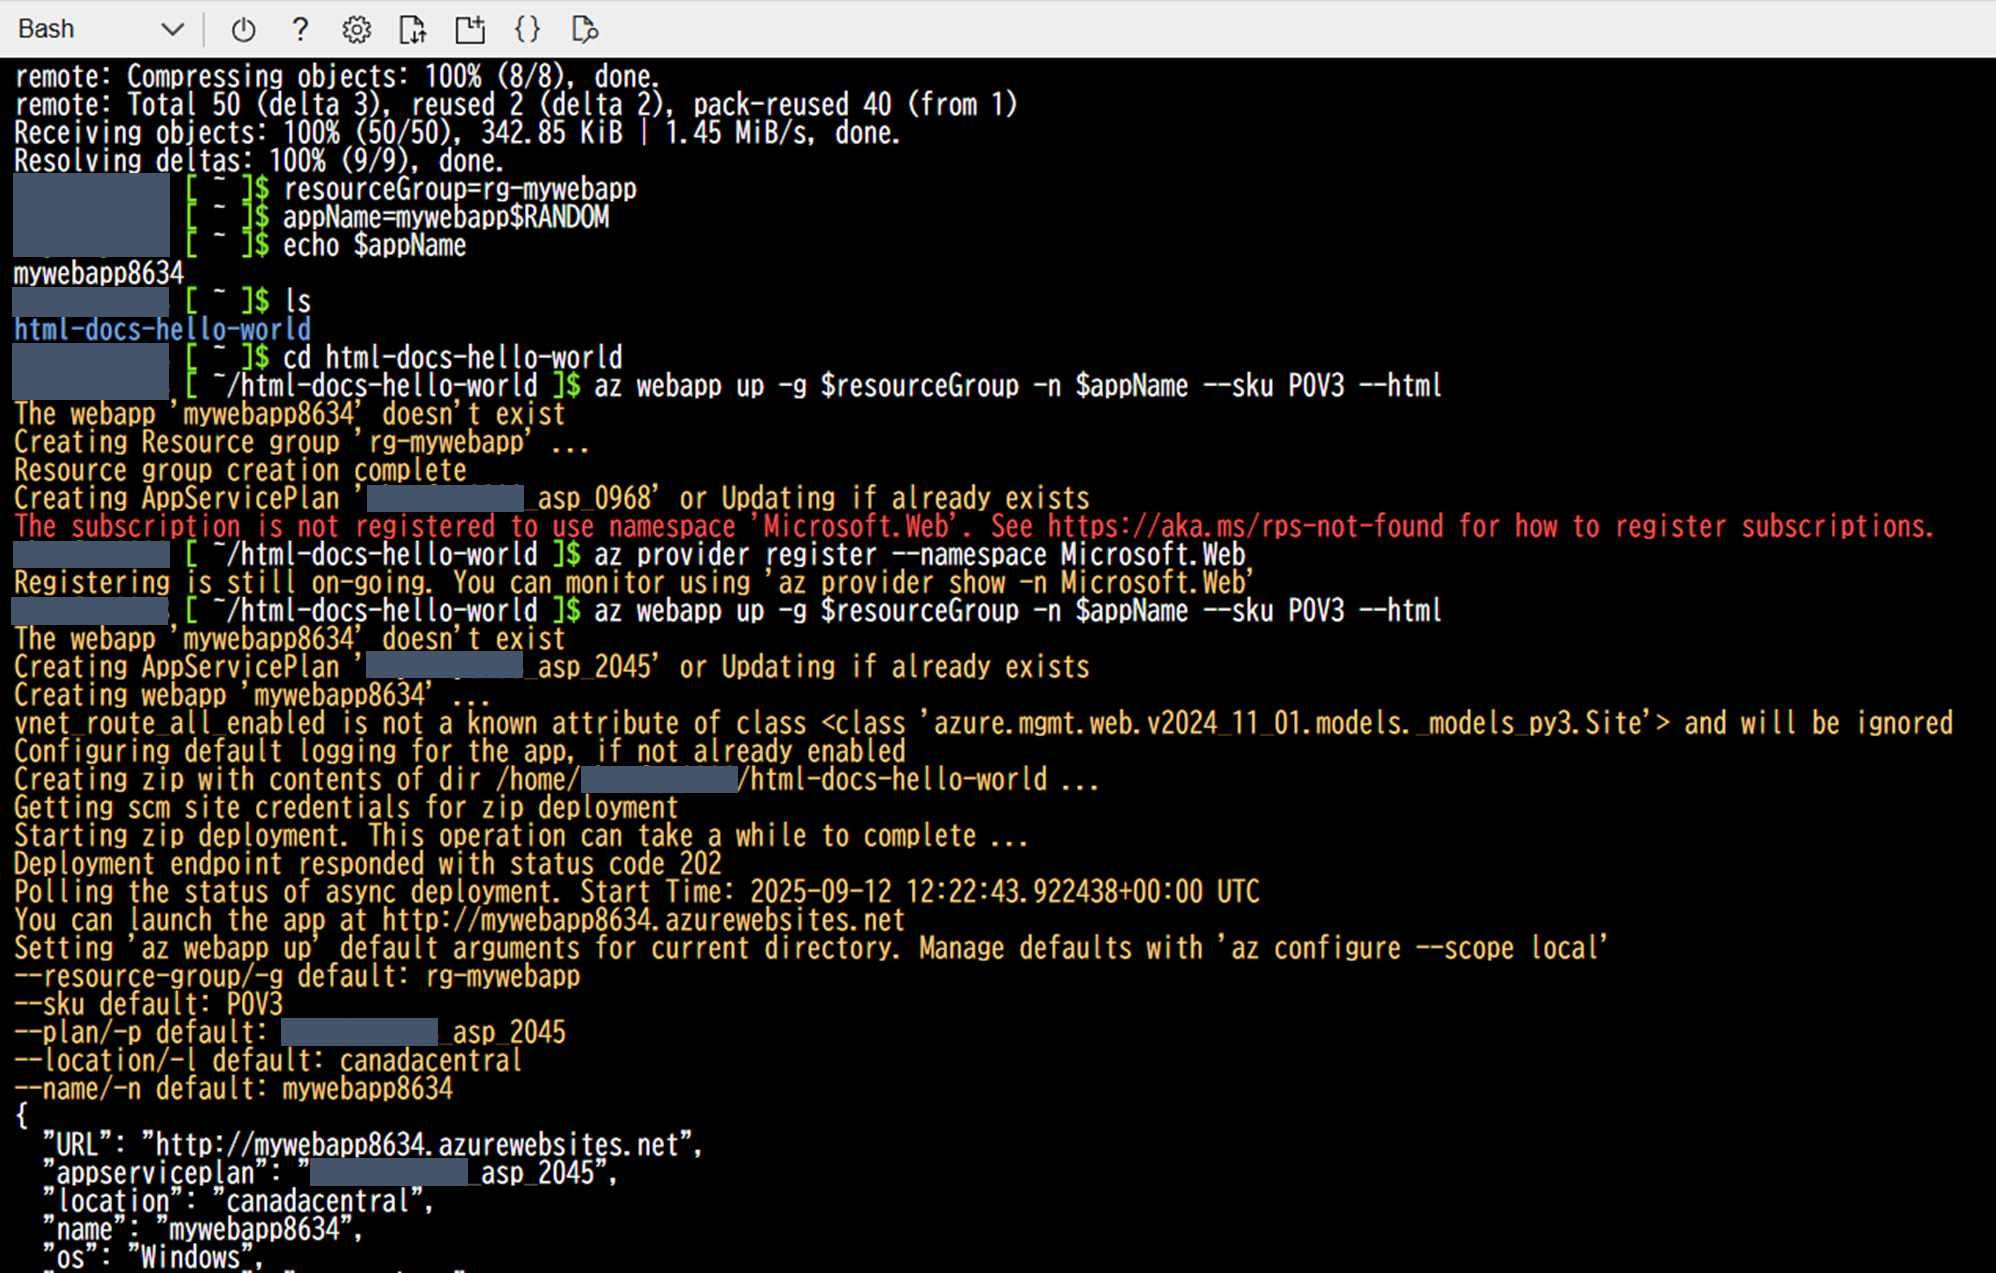
公式の手順では
az provider register --namespace Microsoft.Webという手順は無いですが、サブスクリプションにリソースプロバイダーが未登録でエラーになるので登録します。
-
-
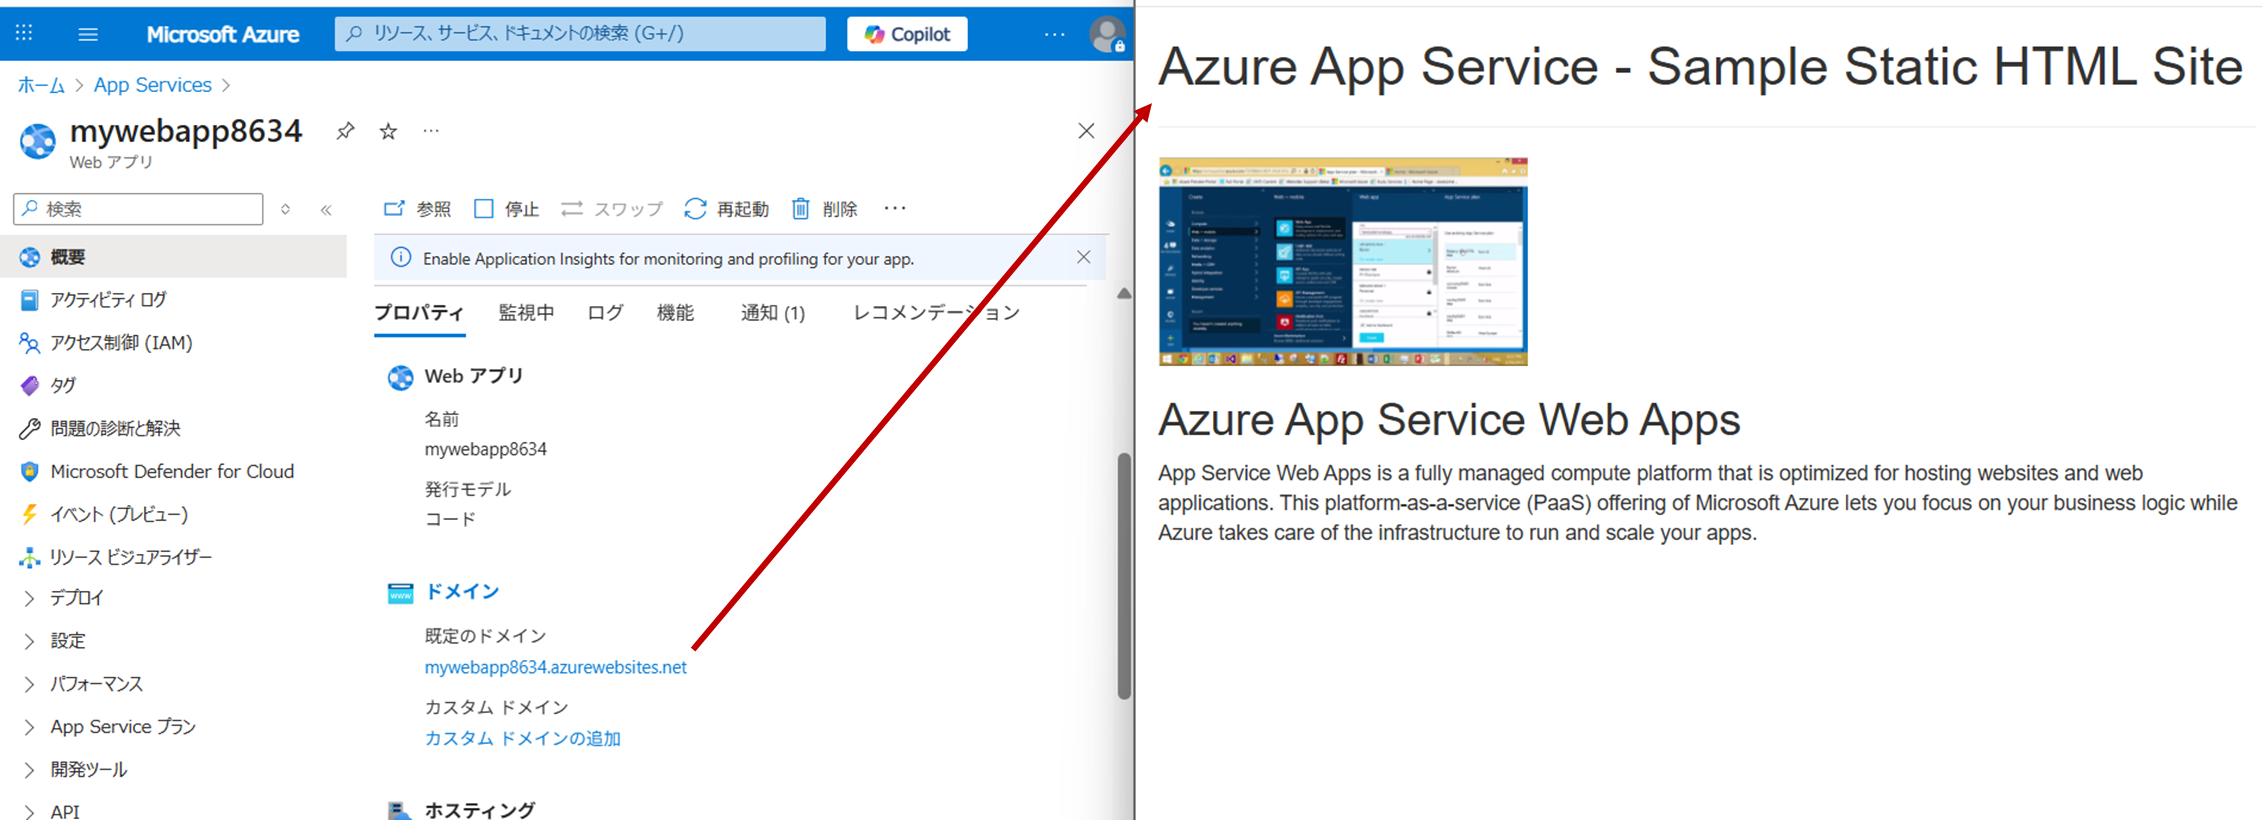
デプロイされたWebアプリの確認
PortalからApp Serviceを検索し、アプリがデプロイされていることを確認する
アプリのプロパティのドメインから、対象ページにアクセスできることを確認する
-
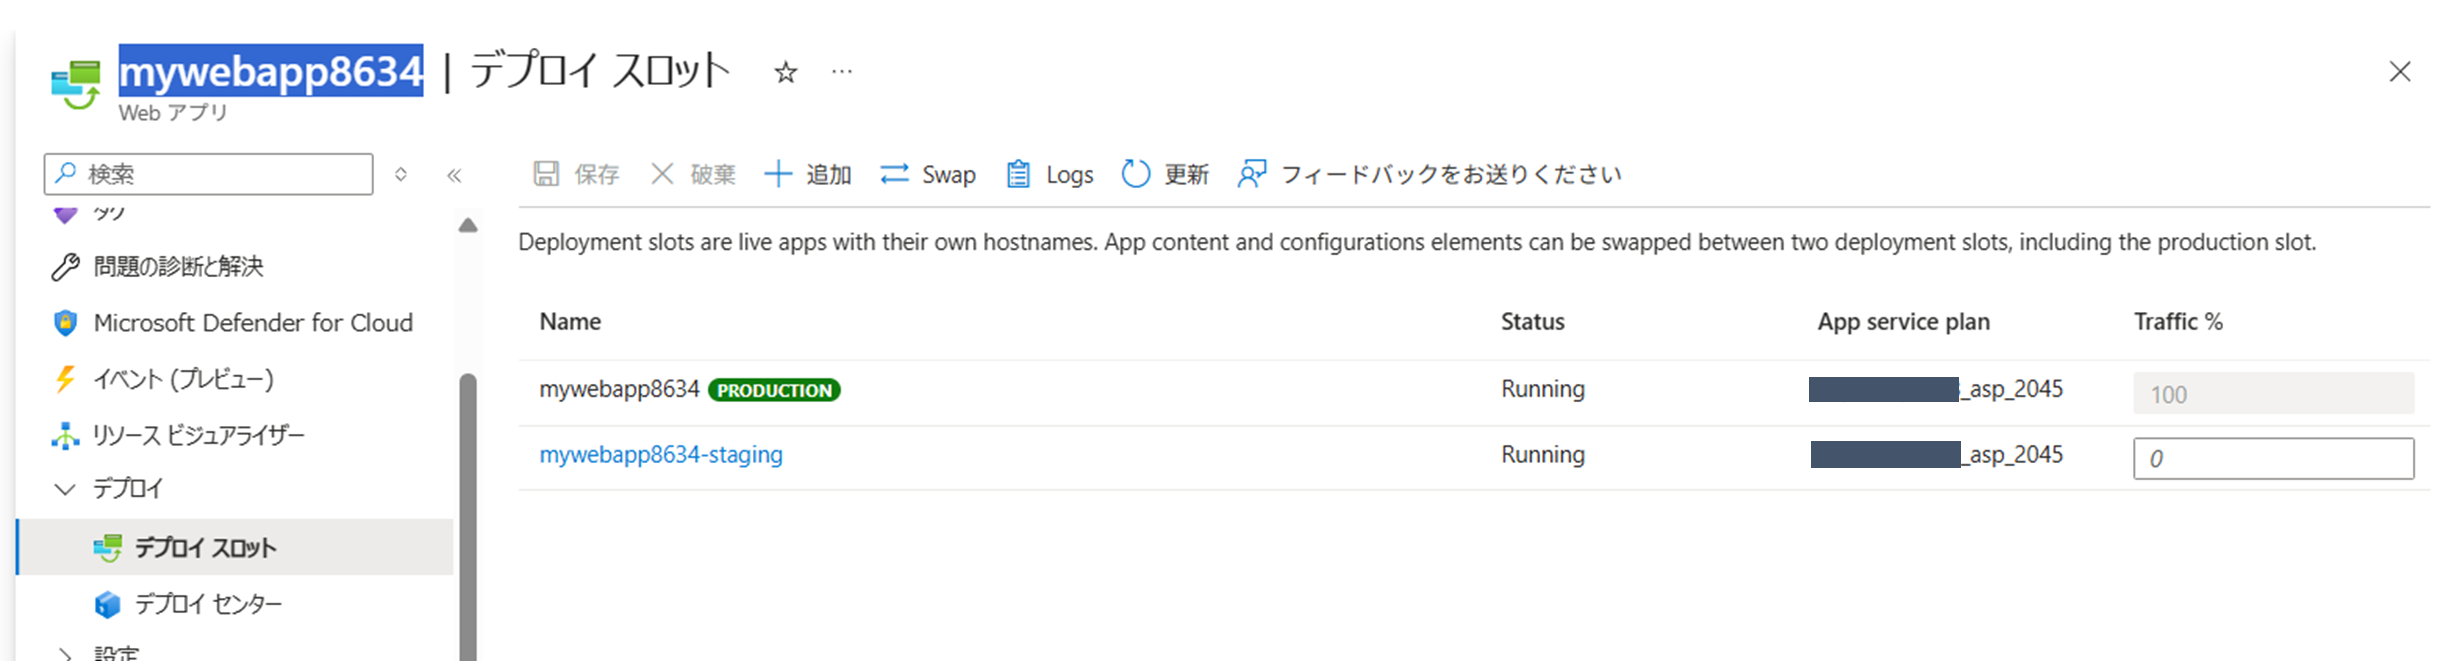
デプロイスロットの作成
次のコマンドを実行してデプロイスロットを作成する
az webapp deployment slot create -n $appName -g $resourceGroup --slot staging
新しいスロットの名前に「-staging」が追加されていることを確認する
-
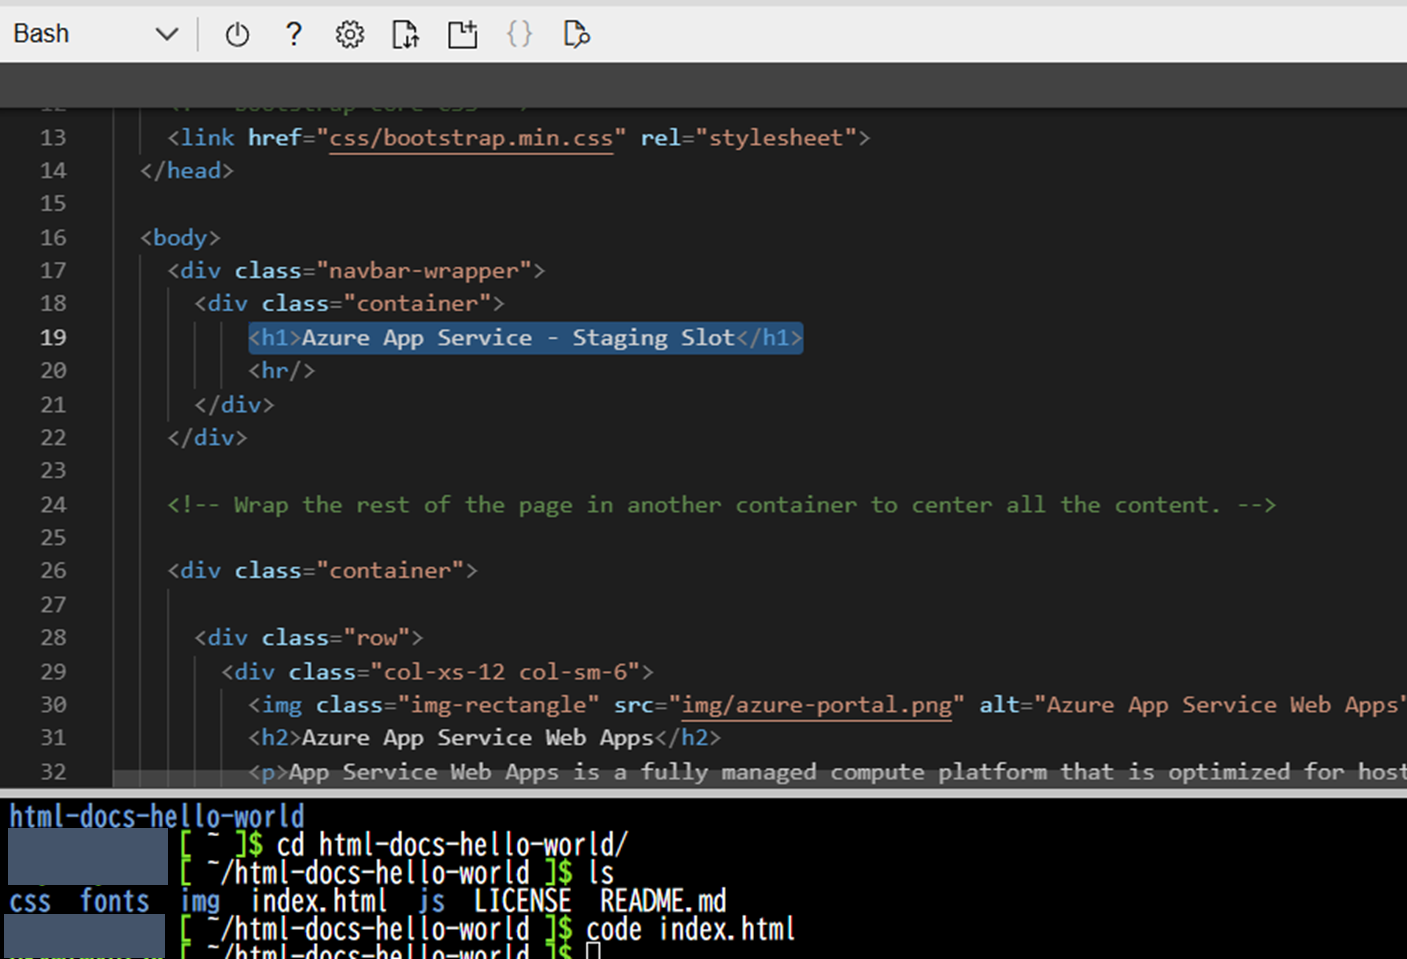
コードの更新
code index.htmlでindex.htmlを開き、題名を「Azure App Service - Staging Slot」に編集して保存する
-
更新したコードのステージングスロットへのデプロイ
更新されたプロジェクトのzipファイルを作成する
zip -r stagingcode.zip .
ステージング スロットに更新をデプロイする
az webapp deploy -g $resourceGroup -n $appName --src-path ./stagingcode.zip --slot staging -
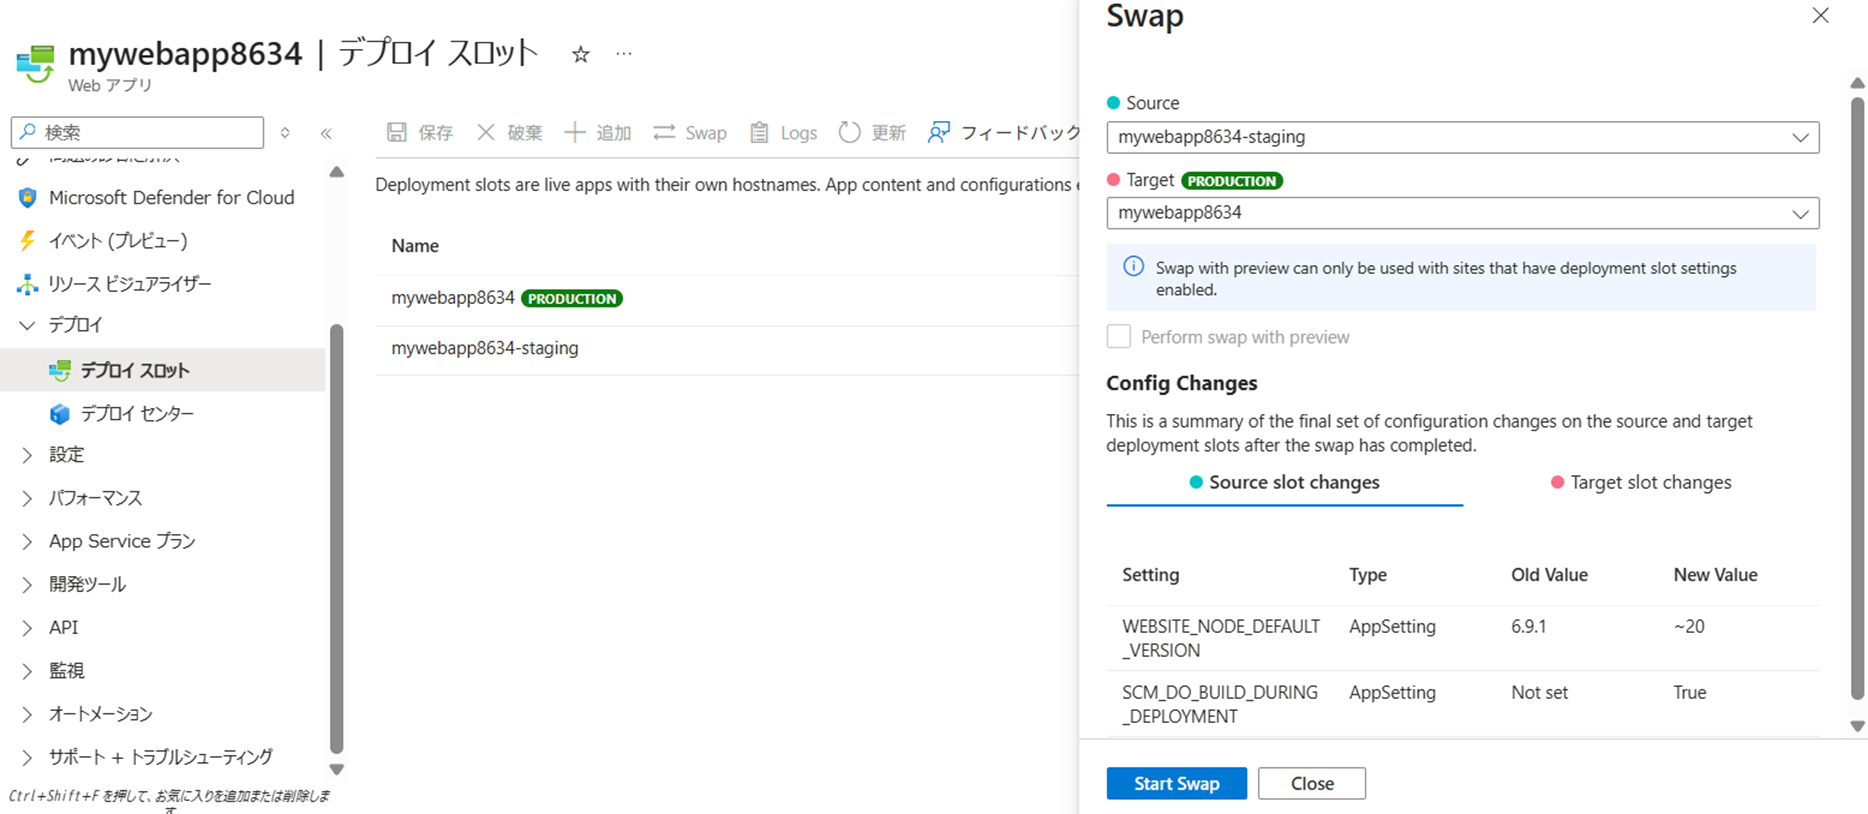
ステージングと本番のスロットの入れ替え
[Source]に「-staging」のスロットを、[Target]に現在本番稼働しているスロットを選択し、スワップを開始する
本番のURLへ移動し、題名が変更されていることを確認する

-
リソースのクリーンアップ
演習完了後は、不要な課金を防ぐためリソースグループごと削除してクリーンアップする
Azure Functions
演習 - Visual Studio Code を使用して Azure 関数を作成する
概要: Visual Studio Code でローカルにコードを作成してテストした後、Azure に関数をデプロイする
VScodeからAzure Functionsにデプロイする詳細手順を見る
-
ローカルプロジェクトの作成
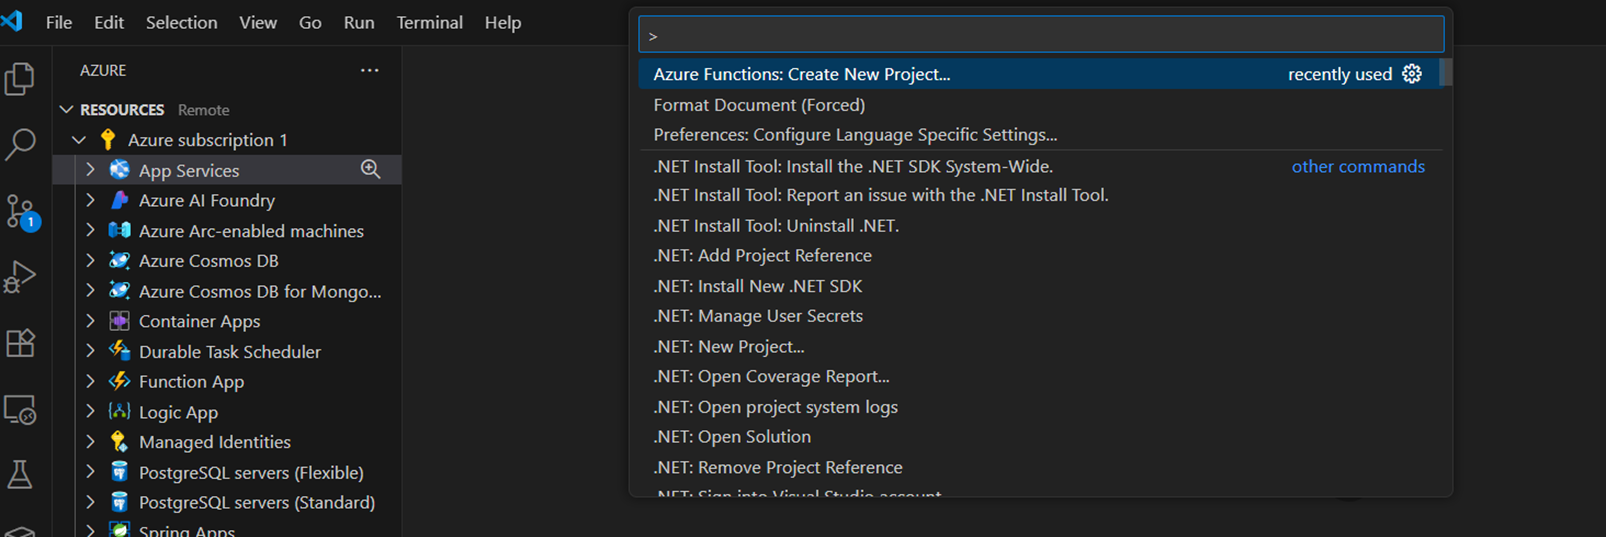
[Ctrl]+[Shift]+p でコマンドパレットを開き、[Azure Functions: Create New Project...]を実行する
プロンプトに対して、公式ドキュメント通りに入力する
入力後、指定したパス配下にプロジェクトが作成されている -
関数をローカルで実行する
ターミナルを開き、[F5キー]を押下してデバッガーで関数アプリプロジェクトを起動する
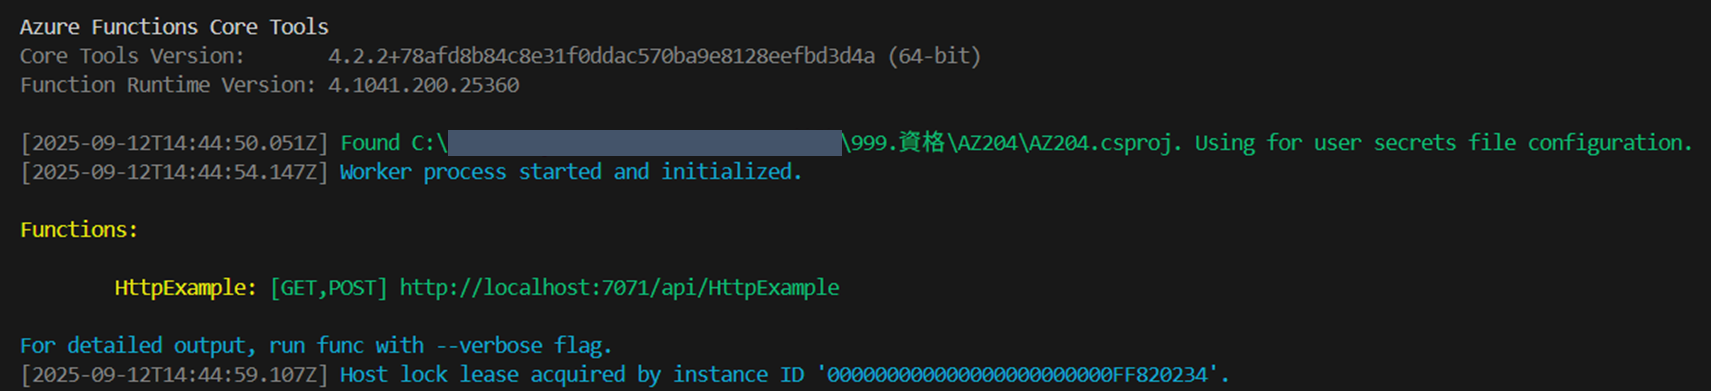
HTTPトリガー関数のURLエンドポイントがローカルで実行されていることが確認できる -
Azureでリソースを作成する
VScodeのAzureの拡張機能タブからサインインして、新しくAzure Functionsのリソースを作成する
プロンプトに対する入力内容は公式ドキュメント参照
-
プロジェクトをAzureにデプロイする
[Ctrl]+[Shift]+p でコマンドパレットを開き、[Azure Functions: Deploy to Function App...]を実行する -
Azureで関数を実行する
VScodeのサイドバーのリソースエリアに戻り、関数を展開する。[HttpExample]をクリックし、[関数を今すぐに実行]を選択する -
リソースのクリーンアップ
演習完了後は、不要な課金を防ぐためリソースグループごと削除してクリーンアップする
Azure Blob Storage
演習 - .NET クライアント ライブラリを使用して BLOB ストレージ リソースを作成する
概要: Azure Storage アカウントを作成し、Azure Storage Blob クライアント ライブラリを使用して .NET コンソール アプリケーションを構築する
試験対策: SDKの主要クラスと代表メソッドまとめ
| クラス | 役割 | 代表メソッド | 使い方/注意点 |
|---|---|---|---|
| BlobServiceClient | ストレージアカウント全体のエントリポイント。エンドポイントと認証で作成する。 | GetBlobContainerClient, CreateBlobContainerAsync, GetAccountInfoAsync | アカウント単位の操作(コンテナ作成・一覧)。DefaultAzureCredential 等で初期化。 |
| BlobContainerClient | 特定コンテナへの操作を提供するクライアント。 | CreateIfNotExistsAsync, DeleteAsync, GetBlobsAsync, GetBlobClient | コンテナ内の BLOB 操作の開始点。GetBlobsAsync は await foreach で列挙。 |
| BlobClient | 個々の BLOB(ファイル)に対するアップロード・ダウンロード・プロパティ操作を行う。 | UploadAsync, DownloadAsync, ExistsAsync, DeleteIfExistsAsync | ファイルのアップロード/ダウンロードに使用。大きいファイルは分割アップロードや UploadOptions を検討。 |
| BlobItem | GetBlobsAsync の列挙で取得する各 BLOB のメタデータ(名前・プロパティ等)。 | -(列挙で使用) | 列挙ループで blobItem.Name 等を参照。メタ確認に使用。 |
| BlobDownloadInfo | DownloadAsync の戻り値。コンテンツストリームやヘッダを含む。 | (プロパティ)Content, ContentType, ContentLength | download.Content を FileStream にコピーして保存。 |
SDKを使用してコンテナ・BLOBを作成しローカルにダウンロードする手順を見る
-
Azure Storage アカウントの作成
- Azure Portalから新しいクラウドシェルを作成し、Bashを選択してクラシックバージョンに移動する(※Azure App Serviceの手順1と同様です)
- リソースグループを作成する
az group create --location eastus2 --name myResourceGroup - 変数を設定する
resourceGroup=myResourceGroup location=eastus accountName=storageacct$RANDOM$RANDOM - Azureストレージアカウントを作成する
az storage account create --name $accountName \
    --resource-group $resourceGroup \
    --location $location \
    --sku Standard_LRS

echo $accountName
公式の手順では
accountName=storageacct$RANDOMというコマンドになっていますが、重複エラーが発生したのでaccountName=storageacct$RANDOM$RANDOMとして回避しました。 -
.NETコンソールアプリを作成する
- プロジェクトを作成するディレクトリの作成し、.NETコンソールアプリケーションを作成する
mkdir azstore cd azstore dotnet new console - アプリケーションに必要なパッケージを追加する
dotnet add package Azure.Storage.Blobs dotnet add package Azure.Identity - プロジェクトにデータフォルダーを作成する
mkdir date
- プロジェクトを作成するディレクトリの作成し、.NETコンソールアプリケーションを作成する
-
プロジェクトにコードを記述する
code Program.csでプログラムファイルを開き、編集する全コードを見る
using Azure.Storage.Blobs; using Azure.Storage.Blobs.Models; using Azure.Identity; Console.WriteLine("Azure Blob Storage exercise\n"); // Create a DefaultAzureCredentialOptions object to configure the DefaultAzureCredential DefaultAzureCredentialOptions options = new() { ExcludeEnvironmentCredential = true, ExcludeManagedIdentityCredential = true }; // Run the examples asynchronously, wait for the results before proceeding await ProcessAsync(); Console.WriteLine("\nPress enter to exit the sample application."); Console.ReadLine(); async Task ProcessAsync() { // CREATE A BLOB STORAGE CLIENT // Create a credwntial using DefaultAzureCredential with configured options string accountName = "storageacct469511556"; // Replace with your storage account name // Use the DefaultAzureCredential with the options configred at the top of the program DefaultAzureCredential credential = new DefaultAzureCredential(options); // Create the BlobServiceClient using the endpoint and DefaultAzureCredential string blobServiceEndpoint = $"https://{accountName}.blob.core.windows.net"; BlobServiceClient blobServiceClient = new BlobServiceClient(new Uri(blobServiceEndpoint), credential); // CREATE A CONTAINER // Create a unique name for the container string containerName = "wtblob" + Guid.NewGuid().ToString(); // Create the container and return a container client object Console.WriteLine("Create container: "+ containerName); BlobContainerClient containerClinet = await blobServiceClient.CreateBlobContainerAsync(containerName); // Create if the container was created successfully if (containerClinet != null) { Console.WriteLine("Container created successfully, press 'Enter' to continue."); Console.ReadLine(); } else { Console.WriteLine("Failed to create the container, exiting program."); return; } // CREATE A LOCAL FILE FOR UPLOAD TO BLOB STORAGE // Create a local file in the ./data/ directory uploading and downloading Console.WriteLine("Creating a local file for upload to Blob storage..."); string localPath = "./data/"; string fileName = "wtfile" + Guid.NewGuid().ToString() + ".txt"; string localFilePath = Path.Combine(localPath, fileName); // Write text to the file await File.WriteAllTextAsync(localFilePath, "Hello, World"); Console.WriteLine("Local file created, press 'Enter' to continue."); Console.ReadLine(); // UPLOAD THE FILE TO BLOB STORAGE // Get a reference to the blob and upload the file BlobClient blobClient = containerClinet.GetBlobClient(fileName); Console.WriteLine("Uploading to Blob storage as blob:\n\t {0}", blobClient.Uri); // Open the file and upload its data using (FileStream uploadFileStream = File.OpenRead(localFilePath)){ await blobClient.UploadAsync(uploadFileStream); uploadFileStream.Close(); } // Verify if the file was uploaded successfully bool blobExists = await blobClient.ExistsAsync(); if (blobExists) { Console.WriteLine("File uploaded successfully, press 'Enter' to continue."); Console.ReadLine(); } else { Console.WriteLine("File uploaded failed, exiting program."); return; } // LIST BLOBS IN THE CONTAINER Console.WriteLine("Listing blobs in container..."); await foreach (BlobItem blobItem in containerClinet.GetBlobsAsync()) { Console.WriteLine("/t" + blobItem.Name); } Console.WriteLine("Press 'Enter' to continue."); Console.ReadLine(); // DOWNLOAD THE BLOB TO A LOCAL FILE // Add the string "DOWNLOAD" before the .txt extention so it doesn't // overwite the original file string downloadFilePath = localFilePath.Replace(".txt", "DOWNLOADED.txt"); Console.WriteLine("Downloading blob to: {0}", downloadFilePath); // Download the blob's contants and save it to a file BlobDownloadInfo download = await blobClient.DownloadAsync(); using (FileStream downloadFileStream = File.OpenWrite(downloadFilePath)) { await download.Content.CopyToAsync(downloadFileStream); } Console.WriteLine("Blob downloaded successfully to: {0}", downloadFilePath); } -
Azure にサインインしする
az loginを実行すると、黄文字で指示が出るので従いログインする
指定のURLにアクセスし、認証コードを入力してログインする
-
アプリを実行する
dotnet runを実行する初回実行時は権限エラー(AuthorizationPermissionMismatch)が発生しました。
[ストレージアカウント] > [アクセス制御(IAM)] > [ロール割り当ての追加] から、ログインしたアカウントに対してストレージ BLOB データ共同作成者を追加して再実行しました。
-
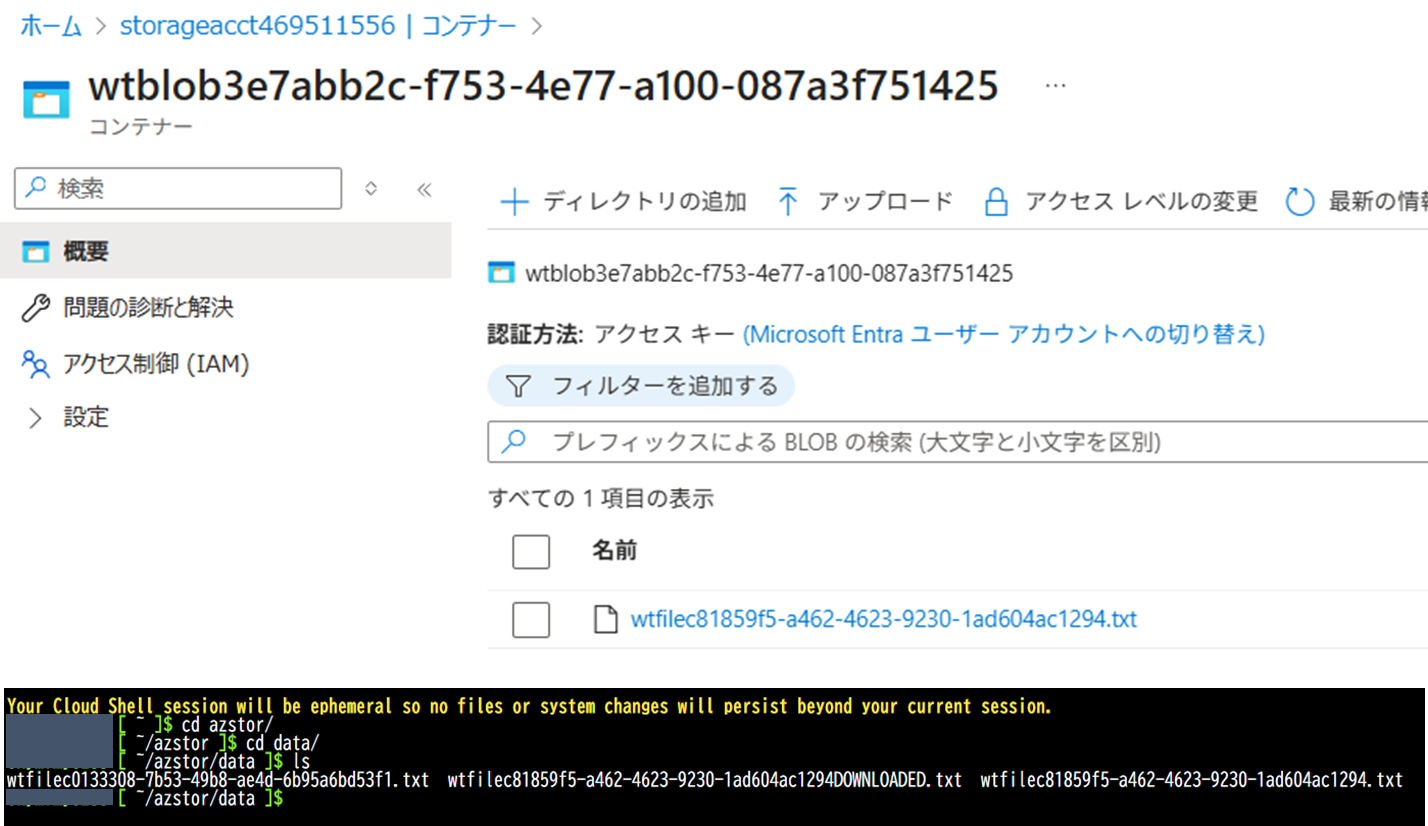
ファイルを確認する
ストレージアカウントにコンテナー、Blobが作成され、ローカルにもダウンロードされていることを確認する
-
リソースのクリーンアップ
演習完了後は、不要な課金を防ぐためリソースグループごと削除してクリーンアップする
Azure Cosmos DB
演習 - .NET を使用して Azure Cosmos DB for NoSQL にリソースを作成する
概要: Azure Cosmos DB アカウントを作成し、Microsoft Azure Cosmos DB SDK を使用してデータベース、コンテナー、サンプルアイテムを作成する .NET コンソール アプリケーションを構築する
試験対策: SDK の主要クラスと代表メソッドまとめ
| クラス | 役割 | 代表メソッド | 使い方/注意点 |
|---|---|---|---|
| CosmosClient | Cosmos DB アカウント全体のエントリポイント。エンドポイントと認証で作成する。 | GetDatabase, CreateDatabaseIfNotExistsAsync, GetContainer | アカウント単位の操作(データベース作成・一覧)。 |
| Database | 特定データベースへの操作を提供するクライアント。 | CreateContainerIfNotExistsAsync, GetContainer | データベース内のコンテナ操作の開始点。CreateContainerIfNotExistsAsync は非同期で実行。 |
| Container | 特定コンテナへの操作を提供するクライアント。 | CreateItemAsync, ReadItemAsync, GetItemQueryIterator | コンテナ内のアイテム操作の開始点。CreateItemAsync は非同期で実行。 |
| ItemResponse | アイテム操作の結果を表すジェネリッククラス。 | (プロパティ)Resource, StatusCode, RequestCharge | Resource プロパティで操作結果のアイテムを取得。RequestCharge で消費した RUs を確認可能。 |
Cosmos DBへアイテムを格納する手順を見る
-
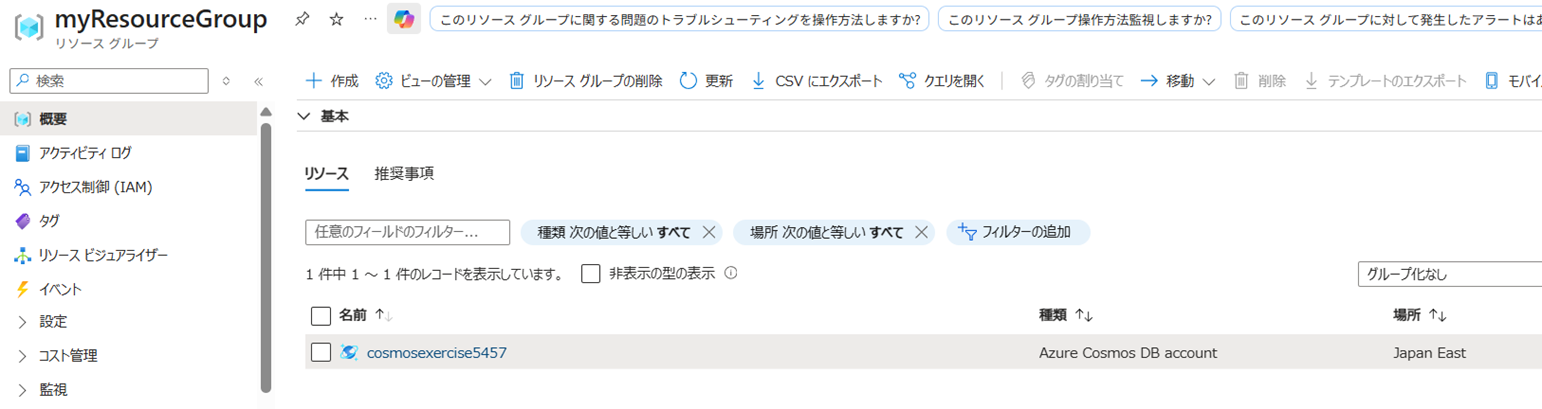
Azure Cosmos DB アカウントの作成
-
Azure Portal から新しいクラウドシェルを作成し、Bash を選択してクラシックバージョンに移動する(※Azure App Serviceの手順 1 と同様です)
-
リソースグループを作成する
az group create --location japaneast --name myResourceGroup -
変数を設定する
resourceGroup=myResourceGroup accountName=cosmosexercise$RANDOM -
Azure Cosmos DB アカウントを作成する
az provider register --namespace Microsoft.DocumentDB
az cosmosdb create --name $accountName \
--resource-group $resourceGroup
リソースグループ配下にCosmos DB アカウントが作成される
プロバイダーを登録しないとエラーになる場合があります。
作成には数分かかります。 -
-
Azure Cosmos DB アカウントの documentEndpoint・主キーを取得する
- documetEndoiintの取得
az cosmosdb show --name $accountName \ --resource-group $resourceGroup \ --query "documentEndpoint" --output tsv - 主キーの取得
az cosmosdb keys list --name $accountName \
  --resource-group $resourceGroup \
  --query "primaryMasterKey" --output tsv
取得した値は後で使用するのでメモしておきます。
主キーは機密情報なので、取り扱いに注意してください。 - documetEndoiintの取得
-
.NET コンソールアプリを作成する
- プロジェクトを作成するディレクトリの作成し、.NET コンソールアプリケーションを作成する
mkdir cosmosdb cd cosmosdb dotnet new console - アプリケーションに必要なパッケージを追加する
dotnet add package Microsoft.Azure.Cosmos --version 3.*
dotnet add package Newtonsoft.Json --version 13.*
dotnet add package dotenv.net
- プロジェクトを作成するディレクトリの作成し、.NET コンソールアプリケーションを作成する
-
環境変数の設定
- プロジェクトのルートディレクトリに
.envファイルを作成し、次の内容を記述するCOSMOS_ENDPOINT="<手順 2 で取得した documentEndpoint の値>" COSMOS_KEY="<手順 2 で取得した 主キー の値>"
- プロジェクトのルートディレクトリに
-
プロジェクトにコードを記述する
code Program.csでプログラムファイルを開き、編集する全コードを見る
using Microsoft.Azure.Cosmos; using dotenv.net; string databaseName = "myDatabase"; // Name of the database to create or use string containerName = "myContainer"; // Name of the container to create or use // Load environment variables from .env file DotEnv.Load(); var envVars = DotEnv.Read(); string cosmosDbAccountUrl = envVars["DOCUMENT_ENDPOINT"]; string accountKey = envVars["ACCOUNT_KEY"]; if (string.IsNullOrEmpty(cosmosDbAccountUrl) || string.IsNullOrEmpty(accountKey)) { Console.WriteLine("Please set the DOCUMENT_ENDPOINT and ACCOUNT_KEY environment variables."); return; } // CREATE THE COSMOS DB CLIENT USING THE ACCOUNT URL AND KEY CosmosClient client = new( accountEndpoint: cosmosDbAccountUrl, authKeyOrResourceToken: accountKey ); try { // CREATE A DATABASE IF IT DOESN'T ALREADY EXIST Database database = await client.CreateDatabaseIfNotExistsAsync(databaseName); Console.WriteLine($"Create or retrieved database: {database.Id}"); // CREATE A CONTAINER WITH A SPECIFIED PARTITION KEY Container container = await database.CreateContainerIfNotExistsAsync( id: containerName, partitionKeyPath: "/id" ); Console.WriteLine($"Create or retrieved container: {container.Id}"); // DEFINE A TYPED ITEM (PRODUCT) TO ADD TO THE CONTAINER Product newItem = new Product{ id = Guid.NewGuid().ToString(), name = "Sample Item", description = "This is a sample item in my Azure Cosmos DB exercise." }; // ADD THE ITEM TO THE CONTAINER ItemResponse<Product> createResponse = await container.CreateItemAsync( item: newItem, partitionKey: new PartitionKey(newItem.id) ); Console.WriteLine($"Created item with ID: {createResponse.Resource.id}"); Console.WriteLine($"Response charge: {createResponse.RequestCharge} RUs"); } catch (CosmosException ex) { // Handle Cosmos DB-specific exceptions // Log the status code and error message for debugging Console.WriteLine($"Cosmos DB Error: {ex.StatusCode} - {ex.Message}"); } catch (Exception ex) { // Handle general exceptions // Log the error message for debugging Console.WriteLine($"Error: {ex.Message}"); } // This class represents a product in the Cosmos DB container public class Product { public string? id { get; set; } public string? name { get; set; } public string? description { get; set; } } -
ビルドエラーがないことを確認する
dotnet buildを実行する -
アプリを実行する
dotnet runを実行する
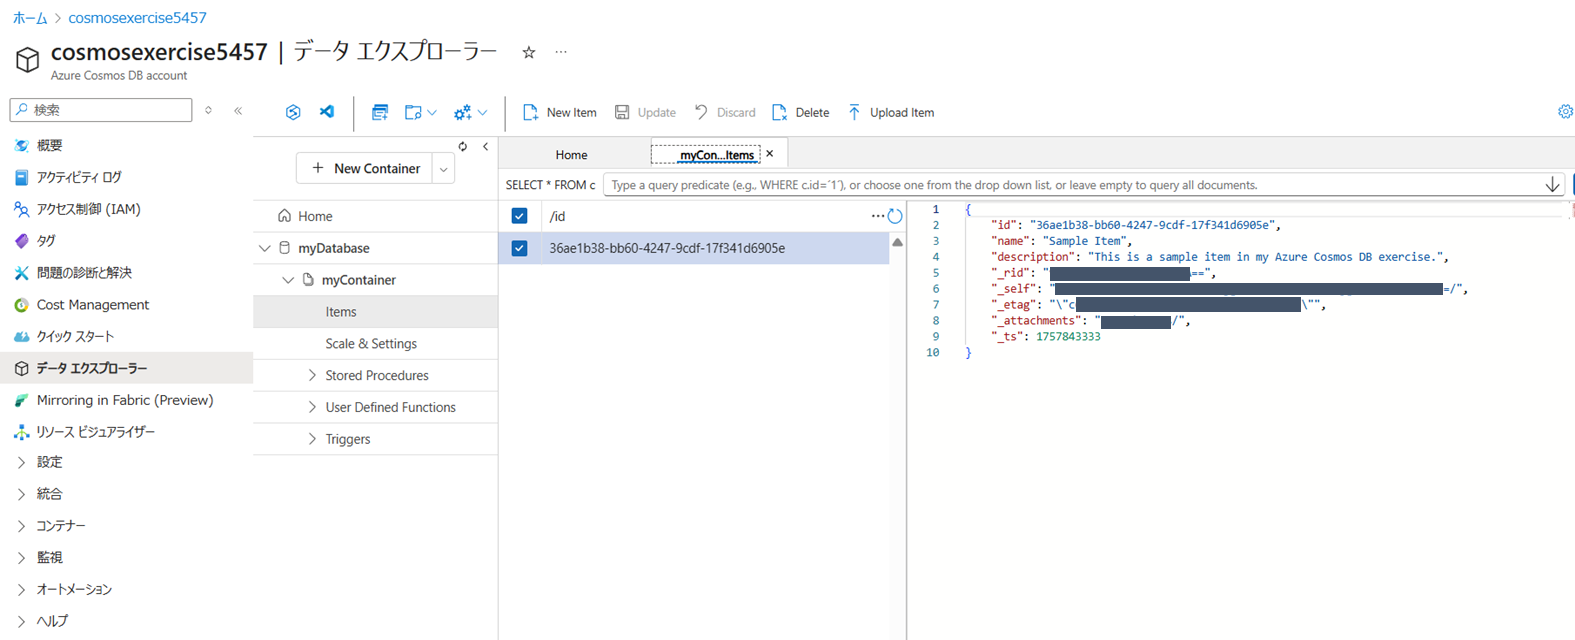
以下のような出力になるCreate or retrieved database: myDatabase Create or retrieved container: myContainer Created item with ID: 36ae1b38-bb60-4247-9cdf-17f341d6905e Response charge: 6.29 RUs -
Azure Portal でアイテムを確認する
Portal から Cosmos DB アカウントを開き、[データエクスプローラー] > [myDatabase] > [myContainer] > [item] を選択し、追加されたアイテムが存在することを確認する
-
リソースのクリーンアップ
演習完了後は、不要な課金を防ぐためリソースグループごと削除してクリーンアップする
Azure Container Registry
演習 - Azure Container Registry タスクを使用してコンテナー イメージをビルドして実行する
概要: アプリケーションコードからコンテナーイメージを作成し、Azure CLI を使用して Azure Container Registry にプッシュする
試験対策: ACRの主要コマンドまとめ
| コマンド | 役割 | 使い方/注意点 |
|---|---|---|
| az acr create | ACRの作成 |
az acr create --resource-group <リソースグループ名> --name <ACR名> --sku Basic で作成。名前は小文字・数値のみで、3~50文字の範囲。 |
| az acr build | ACRにイメージをビルド・プッシュ |
az acr build --image <イメージ名> --registry <ACR名> --file <Dockerfileパス> . でビルド・プッシュ。 |
| az acr repository list | ACR内のリポジトリ一覧表示 |
az acr repository list --name <ACR名> --output table で一覧表示。 |
| az acr repository show-tags | リポジトリ内のタグ一覧表示 |
az acr repository show-tags --name <ACR名> --repository <リポジトリ名> --output table でタグ一覧表示。 |
| az acr run | ACRでイメージを実行 |
az acr run --registry <ACR名> --cmd '$Registry/<イメージ名>' /dev/null でイメージを実行。 |
注意: 無料試用期間のサブスクリプションでは、一部コマンドが実行できない場合があります。
ACRにイメージをビルド・プッシュする手順を見る
-
Azure Container Registry の作成
-
Azure Portal から新しいクラウドシェルを作成し、Bash を選択してクラシックバージョンに移動する(※Azure App Serviceの手順 1 と同様です)
-
リソースグループを作成する
az group create --location japaneast --name myResourceGroup -
Azure Container Registry を作成する
az provider register --namespace Microsoft.ContainerRegistry
az acr create --resource-group myResourceGroup \
     --name acrexercise --sku Basic
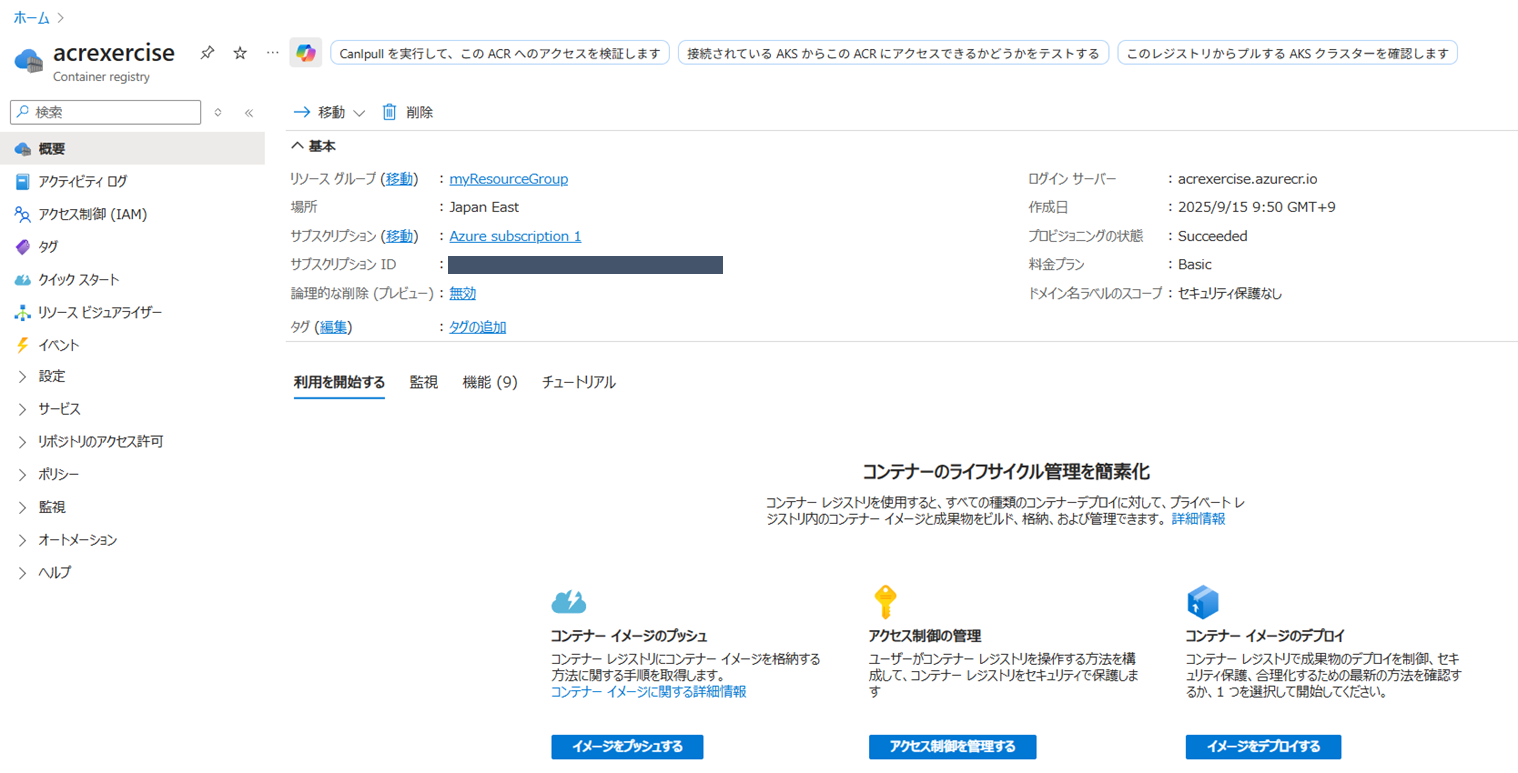
Container Registryの名前は公式ドキュメントでは
myContainerRegistryという名前ですが、小文字・数値のみで、3~50文字の範囲である必要があるため、acrexerciseとしています。 -
-
Dockerfile からイメージをビルドし、ACR にプッシュする
-
Dockerfile を作成する
echo FROM mcr.microsoft.com/hello-world > Dockerfile -
イメージをビルドし、ACR にプッシュする
az acr build --image sample/hello-world:v1  \
  --registry acrexercise \
  --file Dockerfile .
-
-
結果を確認する
- レジストリ内のリポジトリを一覧表示する
az acr repository list --name myContainerRegistry --output tableResult ---------------- sample/hello-world - リポジトリのタグを一覧表示する
az acr repository show-tags --name myContainerRegistry \
  --repository sample/hello-world --output table
Result ---------------- v1
- レジストリ内のリポジトリを一覧表示する
-
ACR でイメージを実行する
-
az acr runでイメージを実行するaz acr run --registry acrexercise \ --cmd '$Registry/sample/hello-world:v1' /dev/null
-
-
リソースのクリーンアップ
演習完了後は、不要な課金を防ぐためリソースグループごと削除してクリーンアップする
Azure Key Vault
演習 - Azure Key Vault からシークレットを作成して取得する
概要: Azure Key Vault を作成し、Azure CLI を使用してシークレットを保存し、Key Vault からシークレットを作成および取得できる .NET コンソール アプリケーションを構築する
試験対策: Key Vaultの主要コマンドまとめ
| コマンド | 役割 | 使い方/注意点 |
|---|---|---|
| az keyvault create | Key Vault の作成 |
az keyvault create --name <KeyVault名> --resource-group <リソースグループ名> --location <リージョン> で作成。 |
| az keyvault secret set | シークレットの保存 |
az keyvault secret set --vault-name <KeyVault名> --name <シークレット名> --value <シークレット値> で保存。 |
| az keyvault secret show | シークレットの取得 |
az keyvault secret show --name <シークレット名> --vault-name <KeyVault名> で取得。 |
Key Vaultにシークレットを保存し、取得する手順を見る
-
Azure Key Vault の作成
- Azure Portal から新しいクラウドシェルを作成し、Bash を選択してクラシックバージョンに移動する(※Azure App Serviceの手順 1 と同様です)
- リソースグループを作成する
az group create --location japaneast --name myResourceGroup - 変数を設定する
resourceGroup=myResourceGroup location=japaneast keyVaultName=mykeyvaultname$RANDOM - Azure Key Vault を作成する
az provider register --namespace Microsoft.KeyVault
az keyvault create --name $keyVaultName \
  --resource-group $resourceGroup \
  --location $location
-
Microsoft Entraユーザー名に役割を割り当てる
- userPrincipalNameを取得する
userPrincipal=$(az rest --method GET --url https://graph.microsoft.com/v1.0/me \ --headers 'Content-Type=application/json' \ --query userPrincipalName --output tsv) - キーコンテナーのリソースIDを取得する
resourceID=$(az keyvault show --resource-group $resourceGroup \ --name $keyVaultName --query id --output tsv) - Key Vault Secrets Officerの役割を割り当てる
az role assignment create --assignee $userPrincipal \
    --role "Key Vault Secrets Officer" \
    --scope $resourceID
Secrets Officerの役割を割り当てることで、シークレットの設定、削除、および一覧表示の権限が付与されます。
Secrets Userの役割では、シークレットの取得と一覧表示が可能です。
::
- userPrincipalNameを取得する
-
シークレットを登録する
- シークレットを登録する
az keyvault secret set --vault-name $keyVaultName \ --name "MySecret" --value "My secret value" - 登録したシークレットを確認する
az keyvault secret show --name "MySecret" --vault-name $keyVaultName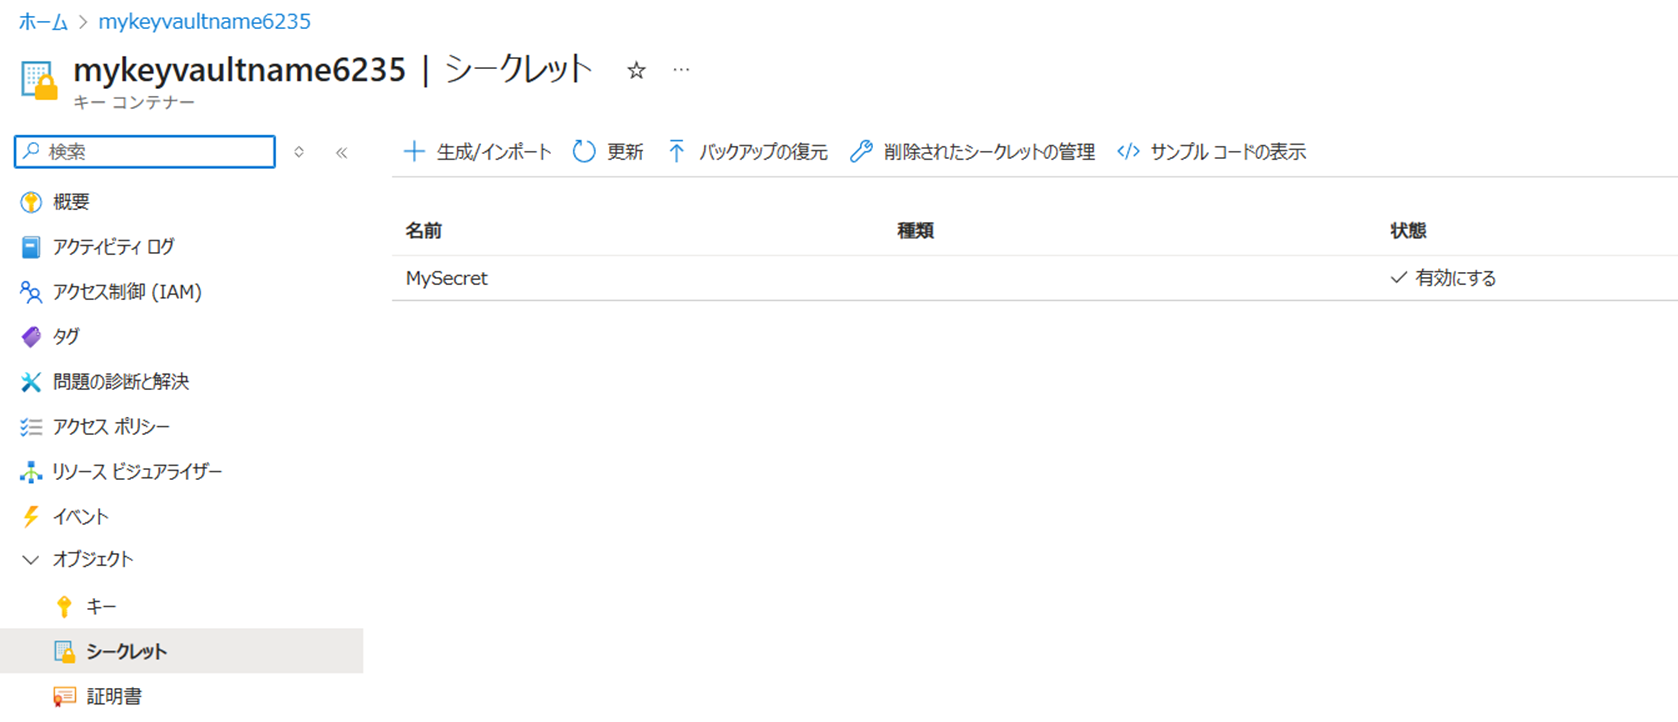
- シークレットを登録する
-
.NET コンソールアプリを作成する
- プロジェクトを作成するディレクトリの作成し、.NET コンソールアプリケーションを作成する
mkdir keyvault cd keyvault dotnet new console - アプリケーションに必要なパッケージを追加する
dotnet add package Azure.Identity
dotnet add package Azure.Security.KeyVault.Secrets
- プロジェクトを作成するディレクトリの作成し、.NET コンソールアプリケーションを作成する
-
プロジェクトにコードを記述する
code Program.csでプログラムファイルを開き、編集する全コードを見る
using Azure.Identity; using Azure.Security.KeyVault.Secrets; // Replace YOUR-KEYVAULT-NAME with your actual Key Vault name string KeyVaultUrl = "https://mykeyvaultname6235.vault.azure.net/"; // ADD CODE TO CREATE A CLIENT // Configure authentication options for connecting to Azure Key Vault DefaultAzureCredentialOptions options = new(){ ExcludeEnvironmentCredential = true, ExcludeManagedIdentityCredential = true }; // Create the Key Vault client using the URL and Authentication Credential var client = new SecretClient(new Uri(KeyVaultUrl), new DefaultAzureCredential(options)); // ADD CODE TO CREATE A MENU SYSTEM // Main application loop - continues untill user types 'quit' while(true){ // Display menu options to the user Console.Clear(); Console.WriteLine("/nPlease select an option"); Console.WriteLine("1. Crate a new secret"); Console.WriteLine("2. List all secrets"); Console.WriteLine("Type `quit` to exit"); Console.Write("Enter your choice: "); // Read user input and convert to lowercase for easier comparison string? input = Console.ReadLine()?.Trim().ToLower(); // Check if user wants to exit the application if (input == "quit"){ Console.WriteLine("Goodbye!"); break; } // Process the user's manu selection switch (input){ case "1": // Call the method to create a new secret await CreateSecretAsync(client); break; case "2": // Call the method to list all existing secrets await ListSecretsAsync(client); break; default: // Handle invalid input Console.WriteLine("Invalid option. Please enter 1, 2, or 'quit"); break; } } // ADD CODE TO CREATE A SECRET async Task CreateSecretAsync(SecretClient client) { try { Console.Clear(); Console.WriteLine("\nCreating a new secret..."); // Get the secret name from user input Console.Write("Enter secret name: "); string? secretName = Console.ReadLine()?.Trim(); // Validate that the secret name is not empty if (string.IsNullOrEmpty(secretName)) { Console.WriteLine("Secret name cannot be empty."); return; } // Get the secret value from user input Console.Write("Enter secret value: "); string? secretValue = Console.ReadLine()?.Trim(); // Validate that the secret value is not empty if (string.IsNullOrEmpty(secretValue)) { Console.WriteLine("Secret value cannot be empty."); return; } // Create a new KeyVaultSecret object with the provided name and value var secret = new KeyVaultSecret(secretName, secretValue); // Store the secret in Azure Key Vault await client.SetSecretAsync(secret); Console.WriteLine($"Secret '{secretName}' created successfully!"); Console.WriteLine("Press Enter to continue..."); Console.ReadLine(); } catch (Exception ex) { // Handle any errors that occur during secret creation Console.WriteLine($"Error creating secret: {ex.Message}"); } } // ADD CODE TO LIST SECRETS async Task ListSecretsAsync(SecretClient client) { try { Console.Clear(); Console.WriteLine("Listing all secrets in the Key Vault..."); Console.WriteLine("----------------------------------------"); // Get an async enumerable of all secret properties in the Key Vault var secretProperties = client.GetPropertiesOfSecretsAsync(); bool hasSecrets = false; // Iterate through each secret property to retrieve full secret details await foreach (var secretProperty in secretProperties) { hasSecrets = true; try { // Retrieve the actual secret value and metadata using the secret name var secret = await client.GetSecretAsync(secretProperty.Name); // Display the secret information to the console Console.WriteLine($"Name: {secret.Value.Name}"); Console.WriteLine($"Value: {secret.Value.Value}"); Console.WriteLine($"Created: {secret.Value.Properties.CreatedOn}"); Console.WriteLine("----------------------------------------"); } catch (Exception ex) { // Handle errors for individual secrets (e.g., access denied, secret not found) Console.WriteLine($"Error retrieving secret '{secretProperty.Name}': {ex.Message}"); Console.WriteLine("----------------------------------------"); } } // Inform user if no secrets were found in the Key Vault if (!hasSecrets) { Console.WriteLine("No secrets found in the Key Vault."); } } catch (Exception ex) { // Handle general errors that occur during the listing operation Console.WriteLine($"Error listing secrets: {ex.Message}"); } Console.WriteLine("Press Enter to continue..."); Console.ReadLine(); } -
Azureにサインインしてアプリを実行する
-
az loginを実行すると、黄文字で指示が出るので従いログインする -
dotnet runを実行する - メニューが表示されるので、1を入力してEnterキーを押す
- シークレット名と値を入力し、Enterキーを押す
- 成功メッセージが表示されるので、Enterキーを押す
- メニューが再度表示されるので、2を入力してEnterキーを押す
- 登録したシークレットが表示されるので、Enterキーを押す
- メニューが再度表示されるので、
quitと入力してEnterキーを押す
-
-
リソースのクリーンアップ
演習完了後は、不要な課金を防ぐためリソースグループごと削除してクリーンアップする
Azure App Configration
演習 - Azure App Configuration から構成設定を取得する
概要: Azure App Configuration リソースを作成し、Azure CLI を使用して構成設定を保存し、ConfigurationBuilderを使用して構成値を取得する .NET コンソール アプリケーションを構築する
試験対策: App Configurationの主要コマンドまとめ
| コマンド | 役割 | 使い方/注意点 |
|---|---|---|
| az appconfig create | App Configuration の作成 |
az appconfig create --name <AppConfig名> --resource-group <リソースグループ名> --location <リージョン> --sku Free で作成。 |
| az appconfig kv set | 構成設定の追加・更新 |
az appconfig kv set --name <AppConfig名> --key <キー名> --value <値> で追加・更新。キーは階層型(名前空間キー)で、コロン (:) を区切り文字として使用可能。 |
| az appconfig kv list | 構成設定の一覧表示 |
az appconfig kv list --name <AppConfig名> --output table で一覧表示。 |
| az appconfig kv show | 構成設定の取得 |
az appconfig kv show --name <AppConfig名> --key <キー名> で取得。 |
App Configurationから構成設定を取得する手順を見る
-
Azure App Configuration の作成
- Azure Portal から新しいクラウドシェルを作成し、Bash を選択してクラシックバージョンに移動する(※Azure App Serviceの手順 1 と同様です)
- リソースグループを作成する
az group create --location japaneast --name myResourceGroup - 変数を設定する
resourceGroup=myResourceGroup location=japaneast appConfigName=appconfigname$RANDOM - Azure App Configuration を作成する
az provider register --namespace Microsoft.AppConfiguration
az appconfig create --name $appConfigName \
  --resource-group $resourceGroup \
  --location $location
  --sku Free
portalで確認すると、リソースグループ配下にApp Configurationが作成されている
-
ユーザーにロールを割り当てる
- アカウントからuserPrincipalNameを取得する
userPrincipal=$(az rest --method GET --url https://graph.microsoft.com/v1.0/me \ --headers 'Content-Type=application/json' \ --query userPrincipalName --output tsv) - App ConfigurationのリソースIDを取得する
resourceID=$(az appconfig show --resource-group $resourceGroup \ --name $appConfigName --query id --output tsv) - App Configuration Data Readerの役割を割り当てる
[App Configration] > [アクセス制御(IAM)] > [マイアクセスの表示]から確認すると、ログインしたアカウントに対してApp Configuration データ閲覧者が割り当てられていることが確認できる
az role assignment create --assignee $userPrincipal \
    --role "App Configuration Data Reader" \
    --scope $resourceID

- アカウントからuserPrincipalNameを取得する
-
- 構成情報を追加する
- App Configurationに構成情報を追加する
az appconfig kv set --name $appConfigName \
    --key Dev:conStr \
    --value connectionString \
    --yes
キーは階層型(名前空間キー)であり、論理階層を表すためにコロン (:) を区切り文字として使用します。
::
-
.NET コンソールアプリを作成する
- プロジェクトを作成するディレクトリの作成し、.NET コンソールアプリケーションを作成する
mkdir appconfig cd appconfig dotnet new console - アプリケーションに必要なパッケージを追加する
dotnet add package Azure.Identity
dotnet add package Microsoft.Extensions.Configuration.AzureAppConfiguration
- プロジェクトを作成するディレクトリの作成し、.NET コンソールアプリケーションを作成する
-
プロジェクトにコードを記述する
code Program.csでプログラムファイルを開き、編集する全コードを見る
using Microsoft.Extensions.Configuration; using Microsoft.Extensions.Configuration.AzureAppConfiguration; using Azure.Identity; // Set the Azure App Configuration endpoint URL string endpoint = "https://appcinfigname13406.azconfig.io"; // Configure which authentication methods to use // DefaultAzureCredential tries multiple auth methods automatically DefaultAzureCredentialOptions credentialOptions = new() { ExcludeEnvironmentCredential = true, ExcludeManagedIdentityCredential = true }; // Create a configuration builder to combine multiple config sources var builder = new ConfigurationBuilder(); // Add Azure App Configuration as a source // This connects to Azure and loads configuration values builder.AddAzureAppConfiguration(options => { options.Connect(new Uri(endpoint), new DefaultAzureCredential(credentialOptions)); }); // Build the final configuration object try { var config = builder.Build(); // Retrieve a configuration value by key name Console.WriteLine(config["Dev:conStr"]); } catch (Exception ex) { Console.WriteLine($"Error connecting to Azure App Configuration: {ex.Message}"); } -
azureにサインインしてアプリを実行する
-
az loginを実行すると、黄文字で指示が出るので従いログインする -
dotnet runを実行する - 構成情報が表示される
connectionString
-
-
リソースのクリーンアップ
演習完了後は、不要な課金を防ぐためリソースグループごと削除してクリーンアップする
Azure API Management
演習 - Azure API Management を使用して API をインポートして構成する
概要: Azure API Management インスタンスを作成し、OpenAPI 仕様のバックエンド API をインポートし、Web サービス URL やサブスクリプション要件などの API 設定を構成し、API 操作をテストして正しく動作することを確認する
試験対策: API Managementの主要コマンドまとめ
| コマンド | 役割 | 使い方/注意点 |
|---|---|---|
| az apim create | API Management インスタンスの作成 |
az apim create -n <APIM名> --location <リージョン> --publisher-email <メールアドレス> --resource-group <リソースグループ名> --publisher-name <発行者名> --sku-name Consumption で作成。 |
API ManagementでAPIをインポートして構成する手順を見る
-
Azure API Management インスタンス の作成
- Azure Portal から新しいクラウドシェルを作成し、Bash を選択してクラシックバージョンに移動する(※Azure App Serviceの手順 1 と同様です)
- リソースグループを作成する
az group create --location japaneast --name myResourceGroup - 変数を設定する
myApiName=import-apim-$RANDOM myLocation=japaneast myEmail=myEmail ※自分のメールアドレスに置き換える - Azure API Management インスタンス を作成する
az provider register --namespace Microsoft.ApiManagement
az apim create -n $myApiName \
    --location $myLocation \
    --publisher-email $myEmail  \
    --resource-group myResourceGroup \
    --publisher-name Import-API-Exercise \
    --sku-name Consumption
-
バックエンドAPIをインポートする
- Azure Portal で API Management インスタンス を開き、[APIs] > [+ Add API] を選択する
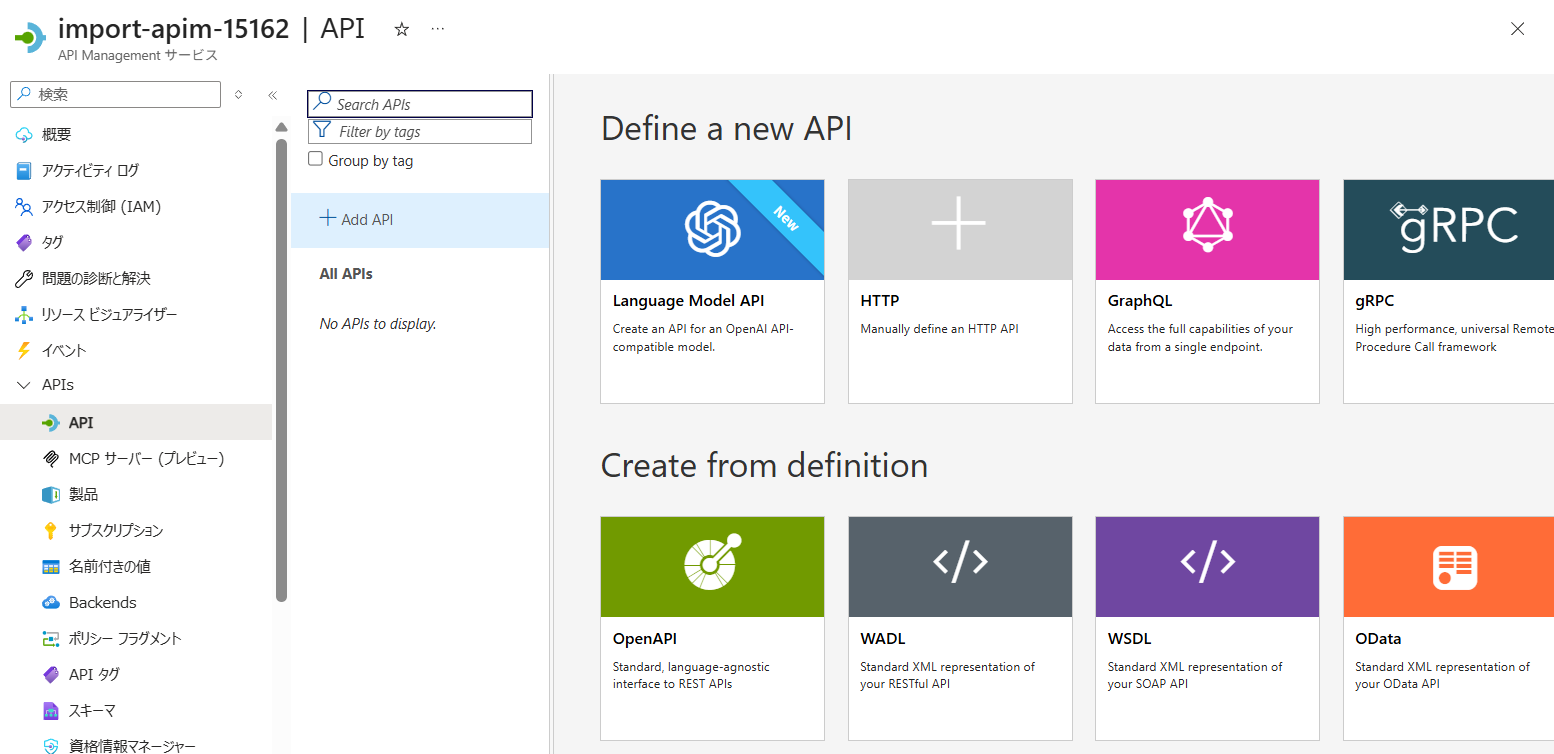
- [OpenAPI] を選択し、次の情報を入力して [作成] を選択する
- [OpenAPI 仕様] :
https://bigconference.azurewebsites.net/ - [URLスキーム] :
HTTPS
- [OpenAPI 仕様] :
- Azure Portal で API Management インスタンス を開き、[APIs] > [+ Add API] を選択する
-
APIの設定を構成する
- [API] > [bigconference] を選択し、[設定] タブを選択する
- [Web サービス URL] を
https://bigconference.azurewebsites.net/に変更する - [サブスクリプション] タブを選択し、[サブスクリプション キーが必要] を [いいえ] に変更し、[保存] を選択する
-
API操作をテストする
-
[API] > [bigconference] > [操作] タブを選択し、[GET /api/conferences] を選択する
-
[テスト] タブを選択し、[送信] を選択する
-
レスポンスが
200 OKであることを確認する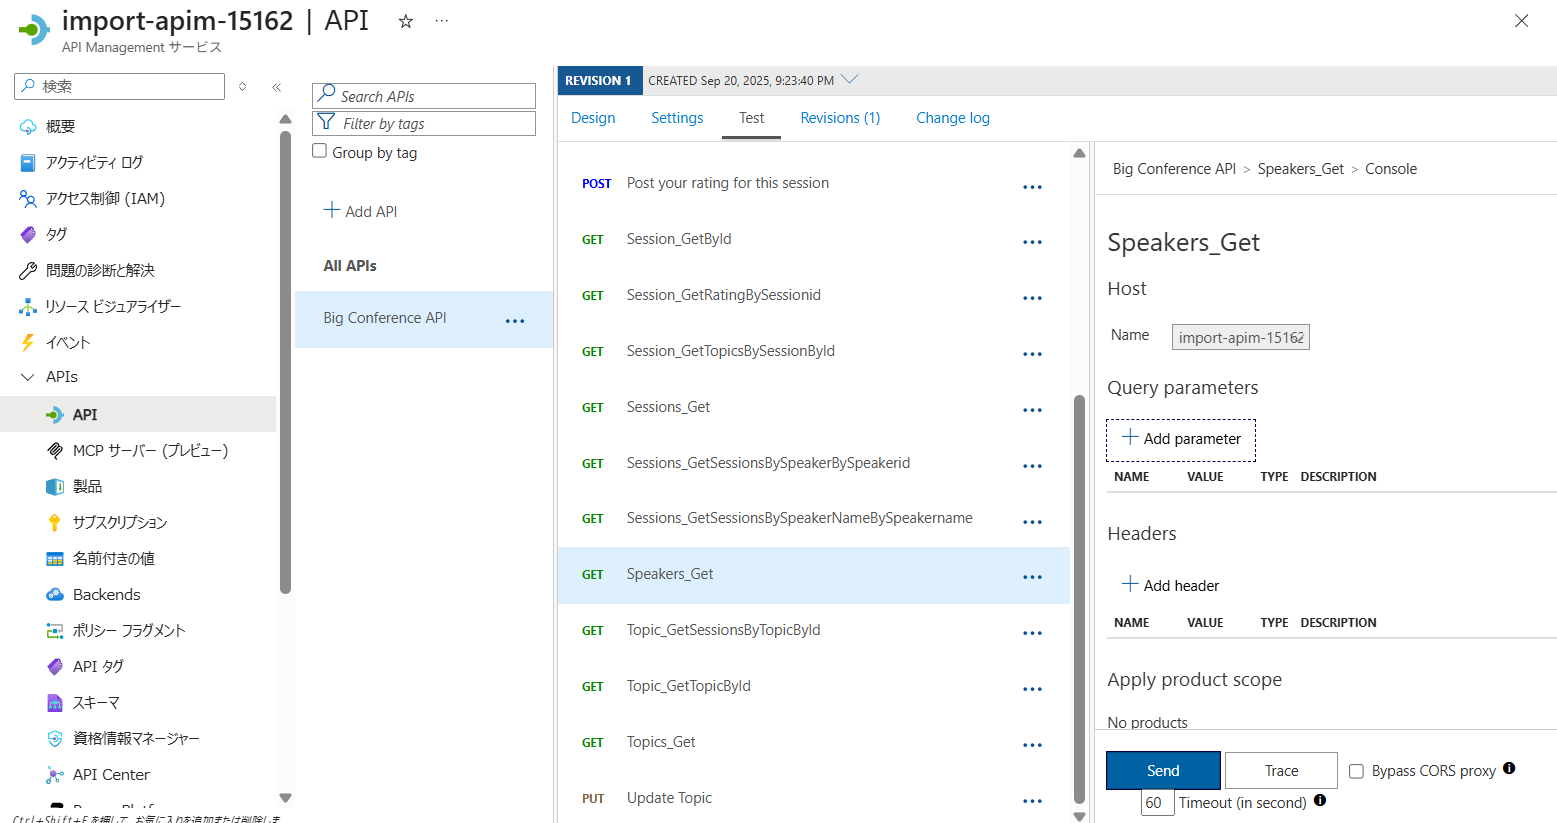
-
-
リソースのクリーンアップ
演習完了後は、不要な課金を防ぐためリソースグループごと削除してクリーンアップする
Azure Event Grid
演習 - Event Grid を使用してカスタム エンドポイントにイベントをルーティングする
概要: Azure Event Grid トピックと Web アプリ エンドポイントを作成し、Event Grid トピックにカスタム イベントを送信する .NET コンソール アプリケーションを構築する
試験対策: Event Gridの主要コマンドまとめ
| コマンド | 役割 | 使い方/注意点 |
|---|---|---|
| az eventgrid topic create | Event Grid トピックの作成 |
az eventgrid topic create --name <トピック名> --location <リージョン> --resource-group <リソースグループ名> で作成。 |
| az eventgrid event-subscription create | Event Grid サブスクリプションの作成 |
az eventgrid event-subscription create --source-resource-id <トピックID> --name <サブスクリプション名> --endpoint <エンドポイントURL> で作成。 |
無料試用期間のサブスクリプションでは、一部コマンドが実行できない場合があります。
Event Gridでカスタムエンドポイントにイベントをルーティングする手順を見る
-
Azure Event Gridリソースの作成
- Azure Portal から新しいクラウドシェルを作成し、Bash を選択してクラシックバージョンに移動する(※Azure App Serviceの手順 1 と同様です)
- リソースグループを作成する
az group create --location japaneast --name myResourceGroup - 変数を設定する
let rNum=$RANDOM$RANDOM
resourceGroup=myResourceGroup
location=japaneast
topicName="mytopic-evgtopic-${rNum}"
siteName="evgsite-${rNum}"
siteURL="https://${siteName}.azurewebsites.net"
-
Azure Event Grid トピックの作成
-
Event Grid トピックを作成する
az provider register --namespace Microsoft.EventGrid
az eventgrid topic create --name $topicName \
    --location $location \
    --resource-group $resourceGroup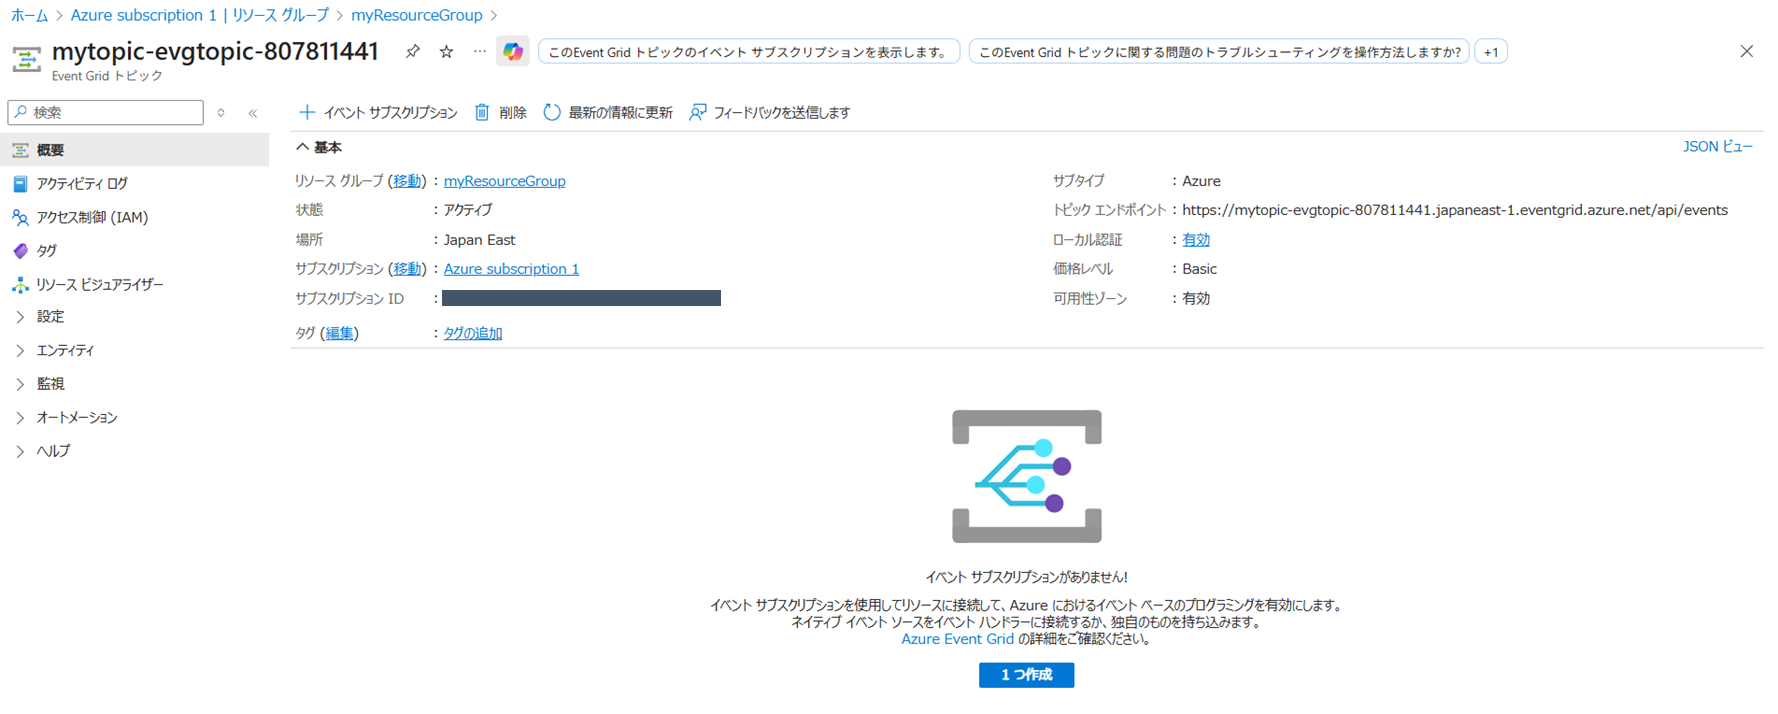
-
-
メッセージエンドポイントを作成する
-
メッセージエンドポイントを作成する
az deployment group create \ --resource-group $resourceGroup \ --template-uri "https://raw.githubusercontent.com/Azure-Samples/azure-event-grid-viewer/main/azuredeploy.json" \ --parameters siteName=$siteName hostingPlanName=viewerhost echo "Your web app URL: ${siteURL}" -
ブラウザで
https://<siteName>.azurewebsites.netにアクセスし、Web アプリが実行中であることを確認する
-
-
Event Grid サブスクリプションの作成
- Event Grid サブスクリプションを作成する
endpoint="${siteURL}/api/updates"
topicId=$(az eventgrid topic show --resource-group $resourceGroup \
    --name $topicName --query "id" --output tsv)

az eventgrid event-subscription create \
    --source-resource-id $topicId \
    --name TopicSubscription \
    --endpoint $endpoint
- Event Grid サブスクリプションを作成する
-
.NET コンソールアプリを作成する
- プロジェクトを作成するディレクトリの作成し、.NET コンソールアプリケーションを作成する
mkdir eventgrid cd eventgrid dotnet new console - アプリケーションに必要なパッケージを追加する
dotnet add package Azure.Messaging.EventGrid
dotnet add package dotenv.net
- プロジェクトを作成するディレクトリの作成し、.NET コンソールアプリケーションを作成する
-
環境変数を設定する
- Event Grid トピックのエンドポイントとキーを取得する
az eventgrid topic show --name $topicName -g $resourceGroup --query "endpoint" --output tsv az eventgrid topic key list --name $topicName -g $resourceGroup --query "key1" --output tsv - プロジェクトのルートディレクトリに
.envファイルを作成し、以下の内容を追加するTOPIC_ENDPOINT=<上記で取得したエンドポイント> TOPIC_KEY=<上記で取得したキー>
- Event Grid トピックのエンドポイントとキーを取得する
-
プロジェクトにコードを記述する
code Program.csでプログラムファイルを開き、編集する全コードを見る
using dotenv.net; using Azure.Messaging.EventGrid; // Load environment variables from .env file DotEnv.Load(); var envVars = DotEnv.Read(); // Start the asynchronous process to send an Event Grid event ProcessAsync().GetAwaiter().GetResult(); async Task ProcessAsync() { // Retrieve Event Grid topic endpoint and access key from environment variables var topicEndpoint = envVars["TOPIC_ENDPOINT"]; var topicKey = envVars["TOPIC_ACCESS_KEY"]; // Check if the required environment variables are set if (string.IsNullOrEmpty(topicEndpoint) || string.IsNullOrEmpty(topicKey)) { Console.WriteLine("Please set TOPIC_ENDPOINT and TOPIC_ACCESS_KEY in your .env file."); return; } // Create an EventGridPublisherClient to send events to the specified topic EventGridPublisherClient client = new EventGridPublisherClient (new Uri(topicEndpoint), new Azure.AzureKeyCredential(topicKey)); // Create a new EventGridEvent with sample data var eventGridEvent = new EventGridEvent( subject: "ExampleSubject", eventType: "ExampleEventType", dataVersion: "1.0", data: new { Message = "Hello, Event Grid!" } ); // Send the event to Azure Event Grid await client.SendEventAsync(eventGridEvent); Console.WriteLine("Event sent successfully."); } -
azureにサインインしてアプリを実行する
-
az loginを実行すると、黄文字で指示が出るので従いログインする -
dotnet runを実行する - ブラウザで
https://<siteName>.azurewebsites.netにアクセスし、イベントが送信されていることを確認する
-
-
リソースのクリーンアップ
演習完了後は、不要な課金を防ぐためリソースグループごと削除してクリーンアップする
Azure Event Hubs
演習 - Azure Event Hubs からイベントを送信および取得する
概要: Azure Event Hubs リソースを作成し、イベントを送受信する .NET コンソール アプリを構築
試験対策: Event Hubsの主要コマンドまとめ
| コマンド | 役割 | 使い方/注意点 |
|---|---|---|
| az eventhubs namespace create | Event Hubs 名前空間の作成 |
az eventhubs namespace create --name <名前空間名> --resource-group <リソースグループ名> --location <リージョン> で作成。 |
| az eventhubs eventhub create | Event Hub の作成 |
az eventhubs eventhub create --name <イベントハブ名> --resource-group <リソースグループ名> --namespace-name <名前空間名> で作成。 |
| az role assignment create | ロールの割り当て |
az role assignment create --assignee <ユーザー名> --role <ロール名> --scope <リソースID> で割り当て。 |
Event Hubsでイベントを送信および取得する手順を見る
-
Azure Event Hubsリソースの作成
- Azure Portal から新しいクラウドシェルを作成し、Bash を選択してクラシックバージョンに移動する(※Azure App Serviceの手順 1 と同様です)
- リソースグループを作成する
az group create --location japaneast --name myResourceGroup - 変数を設定する
resourceGroup=myResourceGroup location=japaneast namespaceName=eventhubsns$RANDOM$RANDOM - Azure Event Hubs 名前空間の作成
az provider register --namespace Microsoft.EventHub az eventhubs namespace create --name $namespaceName --resource-group $resourceGroup -l $location - Event Hub の作成
ポータルで確認すると、Event Hubs 名前空間の概要の最下部にEvent Hubが作成されていることが確認できる
az eventhubs eventhub create --name myEventHub --resource-group $resourceGroup \
  --namespace-name $namespaceName

-
Entra ID ユーザーにロールを割り当てる
-
userPrincipalNameを取得する
userPrincipal=$(az rest --method GET --url https://graph.microsoft.com/v1.0/me \ --headers 'Content-Type=application/json' \ --query userPrincipalName --output tsv) -
Event Hubs 名前空間のリソースIDを取得する
resourceID=$(az eventhubs namespace show --resource-group $resourceGroup \ --name $namespaceName --query id --output tsv) -
Azure Event Hubs データ所有者ロールを割り当てる
az role assignment create --assignee $userPrincipal \
    --role "Azure Event Hubs Data Owner" \
    --scope $resourceID
Azure Event Hubs データ所有者の役割を割り当てることで、イベント ハブとそのコンシューマー グループに対するすべてのデータ操作が可能になります。
Azure Event Hubs データ送信者の役割では、イベント ハブに対するデータの送信のみが可能です。
Azure Event Hubs データ受信者の役割では、イベント ハブからのデータの受信のみが可能です。
::
-
-
.NET コンソールアプリを作成する
- プロジェクトを作成するディレクトリの作成し、.NET コンソールアプリケーションを作成する
mkdir eventhubs cd eventhubs dotnet new console - アプリケーションに必要なパッケージを追加する
dotnet add package Azure.Messaging.EventHubs
dotnet add package Azure.Identity
- プロジェクトを作成するディレクトリの作成し、.NET コンソールアプリケーションを作成する
-
プロジェクトにコードを記述する
code Program.csでプログラムファイルを開き、編集する全コードを見る
using Azure.Messaging.EventHubs; using Azure.Messaging.EventHubs.Producer; using Azure.Messaging.EventHubs.Consumer; using Azure.Identity; using System.Text; // TO-DO: Replace YOUR_EVENT_HUB_NAMESPACE with your actual Event Hub namespace string namespaceURL = "eventhubsns1295024797.servicebus.windows.net"; string eventHubName = "myEventHub"; // Create a DefaultAzureCredentialOptions object to exclude certain credentials DefaultAzureCredentialOptions options = new() { ExcludeEnvironmentCredential = true, ExcludeManagedIdentityCredential = true }; // Number of events to be sent to the event hub int numOfEvents = 3; // CREATE A PRODUCER CLIENT AND SEND EVENTS // Create a producer client to send events to the event hub EventHubProducerClient producerClient = new EventHubProducerClient( namespaceURL, eventHubName, new DefaultAzureCredential(options)); // Create a batch of events using EventDataBatch eventBatch = await producerClient.CreateBatchAsync(); // Adding a random number to the event body and sending the events. var random = new Random(); for (int i = 1; i <= numOfEvents; i++) { int randomNumber = random.Next(1, 101); // 1 to 100 inclusive string eventBody = $"Event {randomNumber}"; if (!eventBatch.TryAdd(new EventData(Encoding.UTF8.GetBytes(eventBody)))) { // if it is too large for the batch throw new Exception($"Event {i} is too large for the batch and cannot be sent."); } } try { // Use the producer client to send the batch of events to the event hub await producerClient.SendAsync(eventBatch); Console.WriteLine($"A batch of {numOfEvents} events has been published."); Console.WriteLine("Press Enter to retrieve and print the events..."); Console.ReadLine(); } finally { await producerClient.DisposeAsync(); } // CREATE A CONSUMER CLIENT AND RECEIVE EVENTS // Create an EventHubConsumerClient await using var consumerClient = new EventHubConsumerClient( EventHubConsumerClient.DefaultConsumerGroupName, namespaceURL, eventHubName, new DefaultAzureCredential(options)); Console.Clear(); Console.WriteLine("Retrieving all events from the hub..."); // Get total number of events in the hub by summing (last - first + 1) for all partitions // This count is used to determine when to stop reading events long totalEventCount = 0; string[] partitionIds = await consumerClient.GetPartitionIdsAsync(); foreach (var partitionId in partitionIds) { PartitionProperties properties = await consumerClient.GetPartitionPropertiesAsync(partitionId); if (!properties.IsEmpty && properties.LastEnqueuedSequenceNumber >= properties.BeginningSequenceNumber) { totalEventCount += (properties.LastEnqueuedSequenceNumber - properties.BeginningSequenceNumber + 1); } } // Start retrieving events from the event hub and print to the console int retrievedCount = 0; await foreach (PartitionEvent partitionEvent in consumerClient.ReadEventsAsync(startReadingAtEarliestEvent: true)) { if (partitionEvent.Data != null) { string body = Encoding.UTF8.GetString(partitionEvent.Data.Body.ToArray()); Console.WriteLine($"Retrieved event: {body}"); retrievedCount++; if (retrievedCount >= totalEventCount) { Console.WriteLine("Done retrieving events. Press Enter to exit..."); Console.ReadLine(); return; } } } -
azureにサインインしてアプリを実行する
-
az loginを実行すると、黄文字で指示が出るので従いログインする -
dotnet runを実行する - イベントが送信され、取得されることを確認する
Retrieving all events from the hub...
Retrieved event: Event 78
Retrieved event: Event 92
Retrieved event: Event 33
Done retrieving events. Press Enter to exit...
メッセージを3回送受信していることがPortalから確認できる

-
-
リソースのクリーンアップ
演習完了後は、不要な課金を防ぐためリソースグループごと削除してクリーンアップする
Azure Queue Storage
演習 - Azure Queue Storage からメッセージを送受信する
概要: Azure Queue Storage リソースを作成し、 メッセージを送受信する .NET アプリを構築する
試験対策: Queue Storageの主要コマンドまとめ
| コマンド | 役割 | 使い方/注意点 |
|---|---|---|
| az storage account create | ストレージアカウントの作成 |
az storage account create --name <ストレージアカウント名> --resource-group <リソースグループ名> --location <リージョン> --sku Standard_LRS で作成。 |
Queue Storageでメッセージを送受信する手順を見る
-
Azure Storageアカウントの作成
- Azure Portal から新しいクラウドシェルを作成し、Bash を選択してクラシックバージョンに移動する(※Azure App Serviceの手順 1 と同様です)
- リソースグループを作成する
az group create --location japaneast --name myResourceGroup - 変数を設定する
resourceGroup=myResourceGroup location=japaneast storAcctName=storactname$RANDOM$RANDOM - Azure Storageアカウントを作成する
az storage account create --resource-group $resourceGroup \
    --name $storAcctName --location $location --sku Standard_LRS
-
Entra ID ユーザーにロールを割り当てる
- userPrincipalNameを取得する
userPrincipal=$(az rest --method GET --url https://graph.microsoft.com/v1.0/me \ --headers 'Content-Type=application/json' \ --query userPrincipalName --output tsv) - StorageアカウントのリソースIDを取得する
resourceID=$(az storage account show --resource-group $resourceGroup \ --name $storAcctName --query id --output tsv) - ストレージ キューデータの共同作成者ロールを割り当てる
az role assignment create --assignee $userPrincipal \
    --role "Storage Queue Data Contributor" \
    --scope $resourceID
- userPrincipalNameを取得する
-
.NET コンソールアプリを作成する
- プロジェクトを作成するディレクトリの作成し、.NET コンソールアプリケーションを作成する
mkdir queuestor cd queuestor dotnet new console - アプリケーションに必要なパッケージを追加する
dotnet add package Azure.Storage.Queues
dotnet add package Azure.Identity
- プロジェクトを作成するディレクトリの作成し、.NET コンソールアプリケーションを作成する
-
プロジェクトにコードを記述する
code Program.csでプログラムファイルを開き、編集する全コードを見る
using Azure; using Azure.Identity; using Azure.Storage.Queues; using Azure.Storage.Queues.Models; using System; using System.Threading.Tasks; // Create a unique name for the queue string queueName = "myqueue-" + Guid.NewGuid().ToString(); string storageAccountName = "storactname671129592"; // ADD CODE TO CREATE A QUEUE CLIENT AND CREATE A QUEUE // Create a DefaultAzureCredentialOptions object to exclude certain credentials DefaultAzureCredentialOptions options = new() { ExcludeEnvironmentCredential = true, ExcludeManagedIdentityCredential = true }; // Instantiate a QueueClient to create and interact with the queue QueueClient queueClient = new QueueClient( new Uri($"https://{storageAccountName}.queue.core.windows.net/{queueName}"), new DefaultAzureCredential(options)); Console.WriteLine($"Creating queue: {queueName}"); // Create the queue await queueClient.CreateAsync(); Console.WriteLine("Queue created, press Enter to add messages to the queue..."); Console.ReadLine(); // ADD CODE TO SEND AND LIST MESSAGES // Send several messages to the queue with the SendMessageAsync method. await queueClient.SendMessageAsync("Message 1"); await queueClient.SendMessageAsync("Message 2"); // Send a message and save the receipt for later use SendReceipt receipt = await queueClient.SendMessageAsync("Message 3"); Console.WriteLine("Messages added to the queue. Press Enter to peek at the messages..."); Console.ReadLine(); // Peeking messages lets you view the messages without removing them from the queue. foreach (var message in (await queueClient.PeekMessagesAsync(maxMessages: 10)).Value) { Console.WriteLine($"Message: {message.MessageText}"); } Console.WriteLine("\nPress Enter to update a message in the queue..."); Console.ReadLine(); // ADD CODE TO UPDATE A MESSAGE AND LIST MESSAGES // Update a message with the UpdateMessageAsync method and the saved receipt await queueClient.UpdateMessageAsync(receipt.MessageId, receipt.PopReceipt, "Message 3 has been updated"); Console.WriteLine("Message three updated. Press Enter to peek at the messages again..."); Console.ReadLine(); // Peek messages from the queue to compare updated content foreach (var message in (await queueClient.PeekMessagesAsync(maxMessages: 10)).Value) { Console.WriteLine($"Message: {message.MessageText}"); } Console.WriteLine("\nPress Enter to delete messages from the queue..."); Console.ReadLine(); // ADD CODE TO DELETE MESSAGES AND THE QUEUE // Delete messages from the queue with the DeleteMessagesAsync method. foreach (var message in (await queueClient.ReceiveMessagesAsync(maxMessages: 10)).Value) { // "Process" the message Console.WriteLine($"Deleting message: {message.MessageText}"); // Let the service know we're finished with the message and it can be safely deleted. await queueClient.DeleteMessageAsync(message.MessageId, message.PopReceipt); } Console.WriteLine("Messages deleted from the queue."); Console.WriteLine("\nPress Enter key to delete the queue..."); Console.ReadLine(); // Delete the queue with the DeleteAsync method. Console.WriteLine($"Deleting queue: {queueClient.Name}"); await queueClient.DeleteAsync(); Console.WriteLine("Done"); -
azureにサインインしてアプリを実行する
-
az loginを実行すると、黄文字で指示が出るので従いログインする -
dotnet runを実行する - メッセージの送受信が行われることを確認する
Creating queue: myqueue-4f8c8e3e-2f3b-4d1e-9f4e-2c9f0c6e5b6a
Queue created, press Enter to add messages to the queue...

Messages added to the queue. Press Enter to peek at the messages...

Message: Message 1
Message: Message 2
Message: Message 3

Press Enter to update a message in the queue...

Message three updated. Press Enter to peek at the messages again...

Message: Message 1
Message: Message 2
Message: Message 3 has been updated
この時点で [ストレージアカウント] > [データストレージ] > [キュー] に移動すると、キューが作成され、メッセージが追加・更新されていることが確認できる

Press Enter to delete messages from the queue...

Deleting message: Message 1
Deleting message: Message 2
Deleting message: Message 3 has been updated
Messages deleted from the queue.

Press Enter key to delete the queue...
Deleting queue: myqueue-4f8c8e3e-2f3b-4d1e-9f4e-2c9f0c6e5b6a
Done
再度Portalで確認すると、キューが削除されていることが確認できる
-
-
リソースのクリーンアップ
演習完了後は、不要な課金を防ぐためリソースグループごと削除してクリーンアップする
Application Insights
演習 - 自動インストルメンテーションを使用してアプリケーションを監視する
概要: Application Insights を有効にした Azure App Service Web アプリを作成し、コードを変更せずに自動インストルメンテーションを構成し、Blazor アプリケーションを作成してデプロイし、Application Insights でアプリケーションのメトリックとエラーデータを表示する
試験対策: Application Insightsの主要コマンドまとめ
| コマンド | 役割 | 使い方/注意点 |
|---|---|---|
| az webapp create | Webアプリの作成 | `az webapp create --name --resource-group <リソースグループ名> --plan --runtime "DOTNET |
| az webapp deploy | Webアプリのデプロイ |
az webapp deploy --name <Webアプリ名> --resource-group <リソースグループ名> --src-path <zipファイルパス> でデプロイ。 |
無料試用期間のサブスクリプションでは、リソースの作成でエラーになる場合があります。
Application Insightsでアプリケーションを監視する手順を見る
-
PortalからApplication Insightsを有効にしたWebアプリを作成する
- Azure Portal から[+ リソースの作成] > [Web アプリ] を選択する
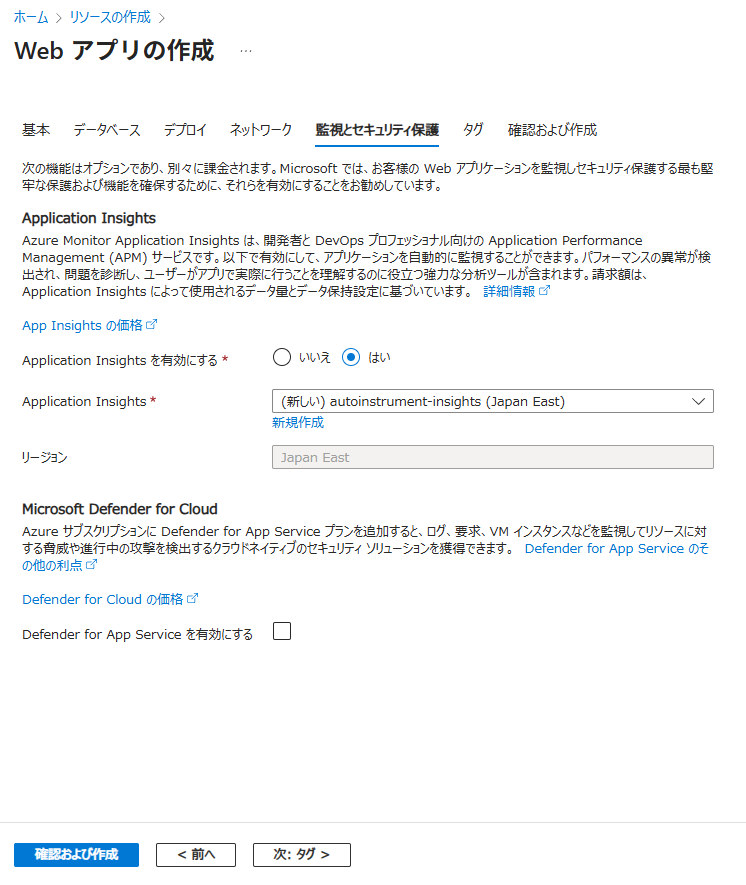
基本情報 監視とセキュリティ保護 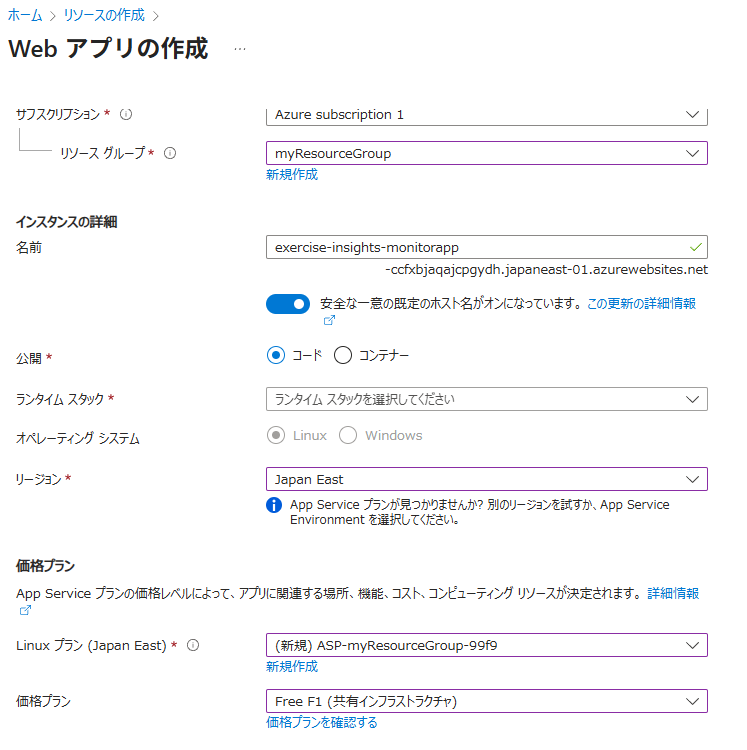
- [確認および作成] を選択し、内容を確認して [作成] を選択する
-
計測設定を構成する
- 作成したWebアプリへ移動する
- 左側のメニューから [監視] > [Application Insights] を選択する
- [アプリケーションのインストルメント] で [.NET core] を選択する
- [コレクションレベル] で [推奨] を選択する
- [適用] を選択する
-
Blazorアプリを作成してデプロイする
- クラウドシェルを作成し、Bash を選択してクラシックバージョンに移動する(※Azure App Serviceの手順 1 と同様です)
- Blazorアプリを作成するディレクトリの作成し、Blazorアプリを作成する
mkdir blazor cd blazor dotnet new blazor - アプリケーションをビルドし、作成中に問題が発生しなかったことを確認する
dotnet build
4.アプリをApp Serviceにデプロイする
- アプリを公開ディレクトリに公開する
bash dotnet publish -c Release -o ./publish
- 公開アプリのzipファイルを作成する
bash cd publish zip -r ../app.zip . cd ..
- アプリをApp Serviceにデプロイする
bash az webapp deploy --name YOUR-WEB-APP-NAME \ --resource-group YOUR-RESOURCE-GROUP \ --src-path ./app.zip
-
Application Insightsでメトリックを表示する
- Portal の Application Insightsへ移動する
- 失敗したリクエスト
- サーバー応答時間
- サーバーリクエスト
- 可用性
などが確認できる
- Portal の Application Insightsへ移動する
-
リソースのクリーンアップ
演習完了後は、不要な課金を防ぐためリソースグループごと削除してクリーンアップする
まとめ
AZ204の公式ドキュメントの演習をまとめました。
Azureの各サービスを実際に操作しながら学習できるので、試験対策として非常に有効だと思います。
ぜひ一度試してみてください。