概要
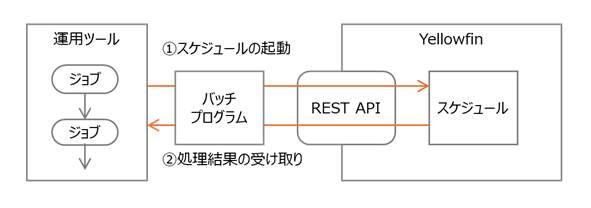
システム運用ツールとジョブの依存関係
システム運用ツールを利用して、各システムのバッチ処理の流れを管理する場合、運用ツール側でバッチ処理に関わるジョブを作成し、これらジョブの依存関係を定義します。例えば、「ジョブ A が正常終了した後、ジョブ B、C、D を並行で実行し、B、C、D が全て正常終了したら、継続のジョブ E を実行する」といった処理の流れを運用ツール側で定義します。
この場合、運用ツールのジョブがトリガーとなって、業務システムに対するバッチ処理が開始され、またその処理結果(正常終了、異常終了)を運用ツールが受け取る必要があります。
Yellowfin をジョブの依存関係に組み込み
Yellowfin にはスケジュール管理を行う機能が実装されています。キャッシュフィルターの更新やシグナル解析の実行など、Yellowfin のバッチ処理をスケジュール実行する機能です。
REST API を活用すれば、Yellowfin のスケジュールを、外部のバッチプログラムから起動することができます。従って、運用ツールにこのバッチプログラムを起動するジョブを作成すれば、ジョブの依存関係に Yellowfin の処理を組み込むことができます。
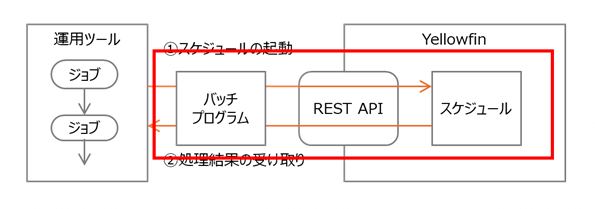
本記事で取り扱う範囲
本記事の中では、下の赤枠で囲った部分の処理を取り扱います。
Yellowfin でスケジュールを作成し、それを REST API 経由で起動するバッチプログラムを作成する部分が該当します。
環境構築
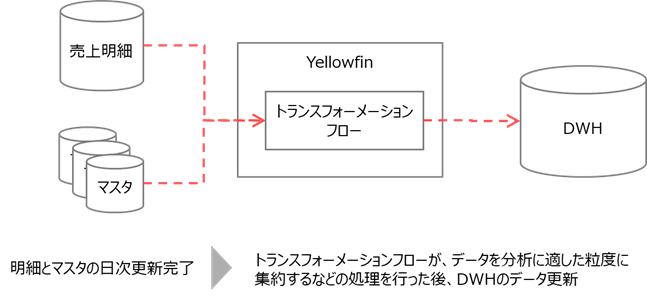
トランスフォーメーションフロー
以降の手順では、トランスフォーメーションフローのスケジュール実行を、REST API を介して行います。
なお、トランスフォーメーションフローは、Yellowfin が持つ ETL 機能です。下記のイメージのように、業務システムのデータを分析用の構造に作り替える時などに利用します。
トランスフォーメーションフローの作成
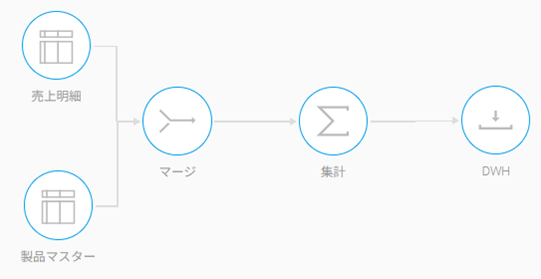
まずは、こちらの手順を参考に、トランスフォーメーションフローを作成します。先のイメージに合わせて、業務システムの売り上げ明細と製品マスターテーブルからデータを読み込み、両者をマージ (JOIN) 、集計した後、分析用テーブルを更新するというとても簡単な処理を作成しました。なお、トランスフォーメーションフローの処理内容自体は、後続の手順には一切関係しません。
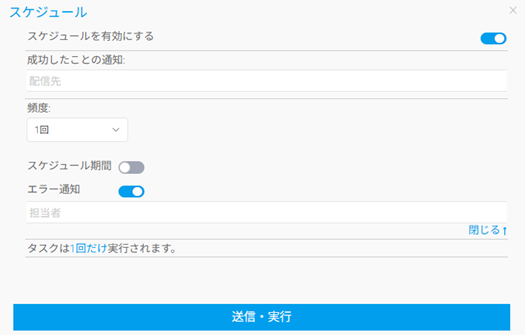
スケジュールの作成
続いて、トランスフォーメーションフロービルダーから、トランスフォーメーションフロー実行するためのスケジュールを作成します。

後述のプログラム処理的には、スケジュールの内容は何でも構いません。ただ、運用上は 1 回だけの実行に設定しておかないと、ジョブの依存関係と関係ないタイミングで処理が走ってしまいます。
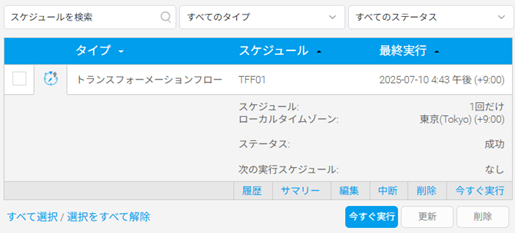
スケジュール管理の画面から、スケジュールが作成されたことが確認できます。
コーディング
バッチ処理概要
バッチ処理プログラムは PHP で記述します。
-
Get_schedule.phpスケジュールの UUID を確認します(UUID:リソースを一意に識別するための識別子)。この処理は初回に 1 回のみ実施します。 -
UUID を取得した後の処理イメージは以下の通りです。
-
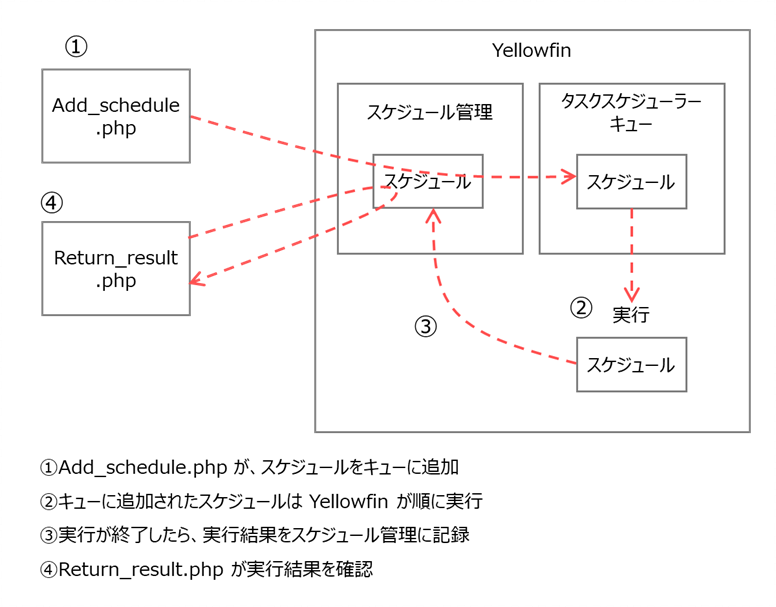
Add_schedule.php先の手順で作成したスケジュールをタスクスケジューラーキューに追加します(①)。 -
キューに追加したスケジュールは Yellowfin が順に実行し(②)、実行結果をスケジュール管理に記録します(③)。
-
Return_result.php実行状況と実行結果を確認し(④)、結果を運用ツールに受け渡します。
アクセストークンの取得
続いて、それぞれのプログラムの内容を説明します。
Get_schedule.php、Add_schedule.php、Return_schedule.php の全てに共通して、リソースにアクセスするためのアクセストークンの取得が必要です。どのプログラムも、冒頭でアクセストークンを取得する処理を記述します。
アクセストークンは下記のコードで取得することができます。コードの詳細な説明は、こちらをご確認ください。
/////////////////////////////////////////////////////
/// リソースにアクセスするためのアクセストークンの取得 ///
/////////////////////////////////////////////////////

//変数の宣言
$adminId = 'admin@yellowfin.com.au';
$adminPassword = 'test';
$time = ceil(microtime(true)*1000);
$url = 'http://localhost:8080/api/refresh-tokens';
$url2 = 'http://localhost:8080/api/access-tokens';
$refreshToken = "";
$accessToken = "";

//リフレッシュトークン:HEADERデータ作成
$header = array(
	'Authorization:YELLOWFIN ts='.$time.', nonce=123',
	'Accept:application/vnd.yellowfin.api-v4+json',
	'Content-Type:application/json;charset=UTF-8'
);

//リフレッシュトークン:BODYデータ作成
$body = array(
	'userName'=>$adminId,
	'password'=>$adminPassword
);
$body_json = json_encode($body, JSON_PRETTY_PRINT);

//リフレッシュトークン:Yellowfinにトークンを要求
$ch = curl_init();
curl_setopt($ch, CURLOPT_HTTPHEADER, $header);
curl_setopt($ch, CURLOPT_CUSTOMREQUEST, 'POST');
curl_setopt($ch, CURLOPT_POSTFIELDS, $body_json);
curl_setopt($ch, CURLOPT_RETURNTRANSFER, true);
curl_setopt($ch, CURLOPT_URL, $url);
$result = curl_exec($ch);
$json_result = json_decode($result);
$refreshToken = $json_result->securityToken;
curl_close($ch);

//アクセストークン:HEADERデータ作成
$header2 = array(
	'Authorization:YELLOWFIN ts='.$time.', nonce=123, token='.$refreshToken,
	'Accept:application/vnd.yellowfin.api-v4+json',
	'Content-Type:application/json'
);

//アクセストークン:Yellowfinにトークンを要求
$ch2 = curl_init();
curl_setopt($ch2, CURLOPT_HTTPHEADER, $header2);
curl_setopt($ch2, CURLOPT_CUSTOMREQUEST, 'POST');
curl_setopt($ch2, CURLOPT_POSTFIELDS, '');
curl_setopt($ch2, CURLOPT_RETURNTRANSFER, true);
curl_setopt($ch2, CURLOPT_URL, $url2);
curl_close($ch);
$result2 = curl_exec($ch2);
$json_result2 = json_decode($result2);
$accessToken=$json_result2->securityToken;
スケジュール UUID の取得
Yellowfin の各リソースには、リソースを一意に識別するための UUID が付与されています。バッチプログラムが処理する対象を指定するために、該当するトランスフォーメーションフローの UUID を取得します。この処理は 1 回実施するのみで、日常運用のバッチ処理に含める必要はありません。
/////////////////////////////////////////////////////
///             スケジュール情報の取得              ///
/////////////////////////////////////////////////////

//変数の宣言
$url3='http://localhost:8080/api/schedules/';

//HEADERデータ作成
$header3 = array(
	'Authorization:YELLOWFIN ts='.$time.', nonce=123, token='.$accessToken,
	'Accept:application/vnd.yellowfin.api-v2+json'
);

//スケジュール情報の取得
$ch3 = curl_init();
curl_setopt($ch3, CURLOPT_URL, $url3);
curl_setopt($ch3, CURLOPT_HTTPHEADER, $header3);
curl_setopt($ch3, CURLOPT_CUSTOMREQUEST, 'GET');
curl_setopt($ch3, CURLOPT_SSL_VERIFYPEER, false);
curl_setopt($ch3, CURLOPT_SSL_VERIFYHOST, false);
curl_setopt($ch3, CURLOPT_RETURNTRANSFER, true);
$result3 = curl_exec($ch3);
$result3_json = json_encode(json_decode($result3), JSON_PRETTY_PRINT);
curl_close($ch3);

//取得した情報の確認
echo $result3_json;
-
スケジュールに関する情報は /api/schedules/ API に対して GET で要求して取得します。
-
GET 処理では BODY情報は必要ありません。UNIX 時間とアクセストークンを含んだ HEADER 情報を作成し、CURL で上記 API に対して GET 要求を行います。
-
全スケジュールに関する情報が JSON の形で取得できます。
echo $result3_jsonで表示される JSON の中身は以下の通りです。
{
    "items": [
        {
            "transformationId": 101227,
            "failureNotificationGroups": [],
            "scheduleStartDate": "7 10, 2025",
            "scheduleEndDate": "12 31, 9999",
            "scheduleTypeCode": "TRANSFORMATIONFLOW",
            "scheduleTypeName": "\u30c8\u30e9\u30f3\u30b9\u30d5\u30a9\u30fc\u30e1\u30fc\u30b7\u30e7\u30f3\u30d5\u30ed\u30fc",
            "scheduleUUID": "5da98a59-11fb-4923-bf3b-ec4d21db6358",
            "scheduleActive": true,
            "lastRunStatus": "SUCCESS",
            "lastRunError": "Process was run successfully\nAll notifications sent successfully.",
            "lastRunDateTimeGMT": "7 11, 2025",
            "scheduleDescription": "TFF01",
            "frequency": {
                "localTimezoneCode": "ASIA\/TOKYO",
                "localRunTime": 0,
                "frequencyTypeCode": "ONCE"
            },
    <<中略>>
    }
}
- 該当する item の scheduleUUID の情報を後述のプログラムで使用します。
"scheduleUUID": "5da98a59-11fb-4923-bf3b-ec4d21db6358"
スケジュールをタスクスケジューラーキューに追加
ここから先が、日常運用で必要な処理となります。まずはスケジュールをタスクスケジューラーキューに追加する処理です。言い換えると、スケジュールの実行を開始する処理です。
/////////////////////////////////////////////////////
///      スケジュールをキューに追加(すぐに実行)     ///
/////////////////////////////////////////////////////

//変数の宣言
$scheduleUUID = '5da98a59-11fb-4923-bf3b-ec4d21db6358';
$url3='http://localhost:8080/api/schedule-queue?scheduleUUID='.$scheduleUUID;

//HEADERデータ作成
$header3 = array(
	'Authorization:YELLOWFIN ts='.$time.', nonce=123, token='.$accessToken,
	'Accept:application/vnd.yellowfin.api-v2+json'
);

//キューへのスケジュール追加処理
$ch3 = curl_init();
curl_setopt($ch3, CURLOPT_HTTPHEADER, $header3);
curl_setopt($ch3, CURLOPT_CUSTOMREQUEST, 'POST');
curl_setopt($ch3, CURLOPT_RETURNTRANSFER, true);
curl_setopt($ch3, CURLOPT_URL, $url3);
$result3 =curl_exec($ch3);
curl_close($ch3);
- /api/schedule-queue API に POST で scheduleUUID={scheduleUUID} をクエリーパラメータとして引き渡すことで、該当スケジュールをタスクスケジューラーキューに追加することができます。
- なお、スケジュールをタスクスケジューラーキューに追加するという処理は、スケジュール管理画面から「今すぐ実行」ボタンを押下するのと同じ処理です。
キューに追加したスケジュールの状況を取得
続いてスケジュールの実行状況を確認します。
/////////////////////////////////////////////////////
///          スケジュールの実行状況を確認            ///
/////////////////////////////////////////////////////

//変数の宣言
$scheduleUUID = '5da98a59-11fb-4923-bf3b-ec4d21db6358';
$url3='http://localhost:8080/api/schedule-queue/'.$scheduleUUID;

//HEADERデータ作成
$header3 = array(
	'Authorization:YELLOWFIN ts='.$time.', nonce=123, token='.$accessToken,
	'Accept:application/vnd.yellowfin.api-v4+json'
);

//実行中のスケジュールの状況をポーリング
$scheduleStatus="INITIATED";
While($scheduleStatus=="INITIATED" || $scheduleStatus=="ALLOCATED" || $scheduleStatus=="QUEUED" || $scheduleStatus=="RUNNING"){
	$ch3 = curl_init();
	curl_setopt($ch3, CURLOPT_URL, $url3);
	curl_setopt($ch3, CURLOPT_HTTPHEADER, $header3);
	curl_setopt($ch3, CURLOPT_CUSTOMREQUEST, 'GET');
	curl_setopt($ch3, CURLOPT_SSL_VERIFYPEER, false);
	curl_setopt($ch3, CURLOPT_SSL_VERIFYHOST, false);
	curl_setopt($ch3, CURLOPT_RETURNTRANSFER, true);
	$result3 = curl_exec($ch3);
	$result3_json = json_decode($result3, true);
	curl_close($ch3);
	$scheduleStatus=$result3_json["scheduleStatus"];
	if ($scheduleStatus != "INITIATED" && $scheduleStatus != "ALLOCATED"  && $scheduleStatus != "QUEUED"  && $scheduleStatus != "RUNNING") break;
	print($scheduleStatus."\n");
	sleep(3);
}
- /api/schedule-queue/{scheduleUUID} API に対して、キューに追加したスケジュールの処理状況を GET で要求します。
- 他にキューに溜まったスケジュールがない場合は、キューに追加されたスケジュールは即座に処理開始 (scheduleStatus = RUNNING) となります。
- 上記の例では 3 秒に 1 回の頻度で上記APIにポーリングをかけながら、処理が継続しているか終了したかを確認しながら、処理が終了した時点で Loop を抜ける処理にしています。
スケジュールの処理結果を取得
スケジュールの実行が終了したら、次にスケジュールの処理結果を取得します。
/////////////////////////////////////////////////////
///                 処理結果の確認                 ///
/////////////////////////////////////////////////////

//変数の宣言
$url4='http://localhost:8080/api/schedules/'.$scheduleUUID;

//HEADERデータ作成
$header4 = $header3;

//スケジュール管理から処理結果を取得
$ch4 = curl_init();
curl_setopt($ch4, CURLOPT_URL, $url4);
curl_setopt($ch4, CURLOPT_HTTPHEADER, $header4);
curl_setopt($ch4, CURLOPT_CUSTOMREQUEST, 'GET');
curl_setopt($ch4, CURLOPT_SSL_VERIFYPEER, false);
curl_setopt($ch4, CURLOPT_SSL_VERIFYHOST, false);
curl_setopt($ch4, CURLOPT_RETURNTRANSFER, true);
$result4 = curl_exec($ch4);
$result4_json = json_decode($result4, true);
curl_close($ch4);
$lastRunStatus=$result4_json["lastRunStatus"];

//取得した情報の確認
echo($lastRunStatus);
- 処理が完了したスケジュールの処理結果は、/api/schedules/{scheduleUUID} API に対して GET で要求します。
- lastRunStatus 項目の情報を取得して、最後に実行したスケジュールの処理結果が成功 (SUCCESS) であったのか、失敗 (FAILURE) であったのかを確認します。
- 継続処理に受け渡すことができるように、処理結果を $lastRunStatus に格納します。
プログラム全容
ここまでで説明した各プログラムの全容です。
Get_schedule.php
/////////////////////////////////////////////////////
/// リソースにアクセスするためのアクセストークンの取得 ///
/////////////////////////////////////////////////////

//変数の宣言
$adminId = 'admin@yellowfin.com.au';
$adminPassword = 'test';
$time = ceil(microtime(true)*1000);
$url = 'http://localhost:8080/api/refresh-tokens';
$url2 = 'http://localhost:8080/api/access-tokens';
$refreshToken = "";
$accessToken = "";

//リフレッシュトークン:HEADERデータ作成
$header = array(
	'Authorization:YELLOWFIN ts='.$time.', nonce=123',
	'Accept:application/vnd.yellowfin.api-v2+json',
	'Content-Type:application/json;charset=UTF-8'
);

//リフレッシュトークン:BODYデータ作成
$body = array(
	'userName'=>$adminId,
	'password'=>$adminPassword
);
$body_json = json_encode($body, JSON_PRETTY_PRINT);

//リフレッシュトークン:Yellowfinにトークンを要求
$ch = curl_init();
curl_setopt($ch, CURLOPT_HTTPHEADER, $header);
curl_setopt($ch, CURLOPT_CUSTOMREQUEST, 'POST');
curl_setopt($ch, CURLOPT_POSTFIELDS, $body_json);
curl_setopt($ch, CURLOPT_RETURNTRANSFER, true);
curl_setopt($ch, CURLOPT_URL, $url);
$result = curl_exec($ch);
$json_result = json_decode($result);
$refreshToken = $json_result->securityToken;
curl_close($ch);

//アクセストークン:HEADERデータ作成
$header2 = array(
	'Authorization:YELLOWFIN ts='.$time.', nonce=123, token='.$refreshToken,
	'Accept:application/vnd.yellowfin.api-v2+json',
	'Content-Type:application/json'
);

//アクセストークン:Yellowfinにトークンを要求
$ch2 = curl_init();
curl_setopt($ch2, CURLOPT_HTTPHEADER, $header2);
curl_setopt($ch2, CURLOPT_CUSTOMREQUEST, 'POST');
curl_setopt($ch2, CURLOPT_POSTFIELDS, '');
curl_setopt($ch2, CURLOPT_RETURNTRANSFER, true);
curl_setopt($ch2, CURLOPT_URL, $url2);
curl_close($ch);
$result2 = curl_exec($ch2);
$json_result2 = json_decode($result2);
$accessToken=$json_result2->securityToken;

/////////////////////////////////////////////////////
///             スケジュール情報の取得              ///
/////////////////////////////////////////////////////

//変数の宣言
$url3='http://localhost:8080/api/schedules/';

//HEADERデータ作成
$header3 = array(
	'Authorization:YELLOWFIN ts='.$time.', nonce=123, token='.$accessToken,
	'Accept:application/vnd.yellowfin.api-v2+json'
);

//スケジュール情報の取得
$ch3 = curl_init();
curl_setopt($ch3, CURLOPT_URL, $url3);
curl_setopt($ch3, CURLOPT_HTTPHEADER, $header3);
curl_setopt($ch3, CURLOPT_CUSTOMREQUEST, 'GET');
curl_setopt($ch3, CURLOPT_SSL_VERIFYPEER, false);
curl_setopt($ch3, CURLOPT_SSL_VERIFYHOST, false);
curl_setopt($ch3, CURLOPT_RETURNTRANSFER, true);
$result3 = curl_exec($ch3);
$result3_json = json_encode(json_decode($result3), JSON_PRETTY_PRINT);
curl_close($ch3);

//取得した情報の確認
echo $result3_json;
Add_schedule.php
/////////////////////////////////////////////////////
/// リソースにアクセスするためのアクセストークンの取得 ///
/////////////////////////////////////////////////////

//変数の宣言
$adminId = 'admin@yellowfin.com.au';
$adminPassword = 'test';
$time = ceil(microtime(true)*1000);
$url = 'http://localhost:8080/api/refresh-tokens';
$url2 = 'http://localhost:8080/api/access-tokens';
$refreshToken = "";
$accessToken = "";

//リフレッシュトークン:HEADERデータ作成
$header = array(
	'Authorization:YELLOWFIN ts='.$time.', nonce=123',
	'Accept:application/vnd.yellowfin.api-v2+json',
	'Content-Type:application/json;charset=UTF-8'
);

//リフレッシュトークン:BODYデータ作成
$body = array(
	'userName'=>$adminId,
	'password'=>$adminPassword
);
$body_json = json_encode($body, JSON_PRETTY_PRINT);

//リフレッシュトークン:Yellowfinにトークンを要求
$ch = curl_init();
curl_setopt($ch, CURLOPT_HTTPHEADER, $header);
curl_setopt($ch, CURLOPT_CUSTOMREQUEST, 'POST');
curl_setopt($ch, CURLOPT_POSTFIELDS, $body_json);
curl_setopt($ch, CURLOPT_RETURNTRANSFER, true);
curl_setopt($ch, CURLOPT_URL, $url);
$result = curl_exec($ch);
$json_result = json_decode($result);
$refreshToken = $json_result->securityToken;
curl_close($ch);

//アクセストークン:HEADERデータ作成
$header2 = array(
	'Authorization:YELLOWFIN ts='.$time.', nonce=123, token='.$refreshToken,
	'Accept:application/vnd.yellowfin.api-v2+json',
	'Content-Type:application/json'
);

//アクセストークン:Yellowfinにトークンを要求
$ch2 = curl_init();
curl_setopt($ch2, CURLOPT_HTTPHEADER, $header2);
curl_setopt($ch2, CURLOPT_CUSTOMREQUEST, 'POST');
curl_setopt($ch2, CURLOPT_POSTFIELDS, '');
curl_setopt($ch2, CURLOPT_RETURNTRANSFER, true);
curl_setopt($ch2, CURLOPT_URL, $url2);
curl_close($ch);
$result2 = curl_exec($ch2);
$json_result2 = json_decode($result2);
$accessToken=$json_result2->securityToken;

/////////////////////////////////////////////////////
///      スケジュールをキューに追加(すぐに実行)     ///
/////////////////////////////////////////////////////

//変数の宣言
$scheduleUUID = '5da98a59-11fb-4923-bf3b-ec4d21db6358';
$url3='http://localhost:8080/api/schedule-queue?scheduleUUID='.$scheduleUUID;

//HEADERデータ作成
$header3 = array(
	'Authorization:YELLOWFIN ts='.$time.', nonce=123, token='.$accessToken,
	'Accept:application/vnd.yellowfin.api-v2+json'
);

//キューへのスケジュール追加処理
$ch3 = curl_init();
curl_setopt($ch3, CURLOPT_HTTPHEADER, $header3);
curl_setopt($ch3, CURLOPT_CUSTOMREQUEST, 'POST');
curl_setopt($ch3, CURLOPT_RETURNTRANSFER, true);
curl_setopt($ch3, CURLOPT_URL, $url3);
$result3 =curl_exec($ch3);
curl_close($ch3);
Return_result.php
/////////////////////////////////////////////////////
/// リソースにアクセスするためのアクセストークンの取得 ///
/////////////////////////////////////////////////////

//変数の宣言
$adminId = 'admin@yellowfin.com.au';
$adminPassword = 'test';
$time = ceil(microtime(true)*1000);
$url = 'http://localhost:8080/api/refresh-tokens';
$url2 = 'http://localhost:8080/api/access-tokens';
$refreshToken = "";
$accessToken = "";

//リフレッシュトークン:HEADERデータ作成
$header = array(
	'Authorization:YELLOWFIN ts='.$time.', nonce=123',
	'Accept:application/vnd.yellowfin.api-v4+json',
	'Content-Type:application/json;charset=UTF-8'
);

//リフレッシュトークン:BODYデータ作成
$body = array(
	'userName'=>$adminId,
	'password'=>$adminPassword
);
$body_json = json_encode($body, JSON_PRETTY_PRINT);

//リフレッシュトークン:Yellowfinにトークンを要求
$ch = curl_init();
curl_setopt($ch, CURLOPT_HTTPHEADER, $header);
curl_setopt($ch, CURLOPT_CUSTOMREQUEST, 'POST');
curl_setopt($ch, CURLOPT_POSTFIELDS, $body_json);
curl_setopt($ch, CURLOPT_RETURNTRANSFER, true);
curl_setopt($ch, CURLOPT_URL, $url);
$result = curl_exec($ch);
$json_result = json_decode($result);
$refreshToken = $json_result->securityToken;
curl_close($ch);

//アクセストークン:HEADERデータ作成
$header2 = array(
	'Authorization:YELLOWFIN ts='.$time.', nonce=123, token='.$refreshToken,
	'Accept:application/vnd.yellowfin.api-v4+json',
	'Content-Type:application/json'
);

//アクセストークン:Yellowfinにトークンを要求
$ch2 = curl_init();
curl_setopt($ch2, CURLOPT_HTTPHEADER, $header2);
curl_setopt($ch2, CURLOPT_CUSTOMREQUEST, 'POST');
curl_setopt($ch2, CURLOPT_POSTFIELDS, '');
curl_setopt($ch2, CURLOPT_RETURNTRANSFER, true);
curl_setopt($ch2, CURLOPT_URL, $url2);
curl_close($ch);
$result2 = curl_exec($ch2);
$json_result2 = json_decode($result2);
$accessToken=$json_result2->securityToken;

/////////////////////////////////////////////////////
///          スケジュールの実行状況を確認            ///
/////////////////////////////////////////////////////

//変数の宣言
$scheduleUUID = '5da98a59-11fb-4923-bf3b-ec4d21db6358';
$url3='http://localhost:8080/api/schedule-queue/'.$scheduleUUID;

//HEADERデータ作成
$header3 = array(
	'Authorization:YELLOWFIN ts='.$time.', nonce=123, token='.$accessToken,
	'Accept:application/vnd.yellowfin.api-v4+json'
);

//実行中のスケジュールの状況をポーリング
$scheduleStatus="INITIATED";
While($scheduleStatus=="INITIATED" || $scheduleStatus=="ALLOCATED" || $scheduleStatus=="QUEUED" || $scheduleStatus=="RUNNING"){
	$ch3 = curl_init();
	curl_setopt($ch3, CURLOPT_URL, $url3);
	curl_setopt($ch3, CURLOPT_HTTPHEADER, $header3);
	curl_setopt($ch3, CURLOPT_CUSTOMREQUEST, 'GET');
	curl_setopt($ch3, CURLOPT_SSL_VERIFYPEER, false);
	curl_setopt($ch3, CURLOPT_SSL_VERIFYHOST, false);
	curl_setopt($ch3, CURLOPT_RETURNTRANSFER, true);
	$result3 = curl_exec($ch3);
	$result3_json = json_decode($result3, true);
	curl_close($ch3);
	$scheduleStatus=$result3_json["scheduleStatus"];
	if ($scheduleStatus != "INITIATED" && $scheduleStatus != "ALLOCATED"  && $scheduleStatus != "QUEUED"  && $scheduleStatus != "RUNNING") break;
	print($scheduleStatus."\n");
	sleep(3);
}

/////////////////////////////////////////////////////
///                 処理結果の確認                 ///
/////////////////////////////////////////////////////

//変数の宣言
$url4='http://localhost:8080/api/schedules/'.$scheduleUUID;

//HEADERデータ作成
$header4 = $header3;

//スケジュール管理から処理結果を取得
$ch4 = curl_init();
curl_setopt($ch4, CURLOPT_URL, $url4);
curl_setopt($ch4, CURLOPT_HTTPHEADER, $header4);
curl_setopt($ch4, CURLOPT_CUSTOMREQUEST, 'GET');
curl_setopt($ch4, CURLOPT_SSL_VERIFYPEER, false);
curl_setopt($ch4, CURLOPT_SSL_VERIFYHOST, false);
curl_setopt($ch4, CURLOPT_RETURNTRANSFER, true);
$result4 = curl_exec($ch4);
$result4_json = json_decode($result4, true);
curl_close($ch4);
$lastRunStatus=$result4_json["lastRunStatus"];

//取得した情報の確認
echo($lastRunStatus);
最後に
BI ツールに関わるバッチ処理は、通常、業務システムのバッチ処理が完了した後に実施されます。そのため、業務システムのバッチ処理終了時間が読み切れない場合、時間指定のスケジュール実行はリスクを抱えることもあります。
ジョブの依存関係に BI 関連のバッチ処理を組み込むことは、上記リスクを大きく低減させることにもつながります。
是非、本記事の内容をシステムの運用設計にお役立てください。
では皆様、良いデータ分析を!