はじめに
Yellowfin の REST API 経由で、複数ユーザーをまとめて登録する PHP プログラムを紹介します。
GUI の管理画面からもまとめて登録することは可能ですが、ディレクトリサービスから出力するユーザー情報を、バッチ処理で Yellowfin に登録する場合などには、プログラムで処理できる必要があります。
ユーザーを追加するにあたり、各ユーザーに付与するロールをロール ID で指定します。ロール ID の取得方法に関しては、『Yellowfin 情報参照プログラム PHP + REST API でロール / ユーザー / グループなどの情報を取得』 の記事に説明があります。事前に目を通しておいてください。
登録するユーザー情報の準備
登録するユーザー情報を、下記例のように JSON の形式で記述します。各項目の詳細に関しては、開発者ドキュメントの Create one or more users in the current organization の個所で詳細を確認してください。なお、roleCode で指定しているのがロール ID です。
[
	{
		"userId": "suzuki.taro@yellowfin.bi",
		"emailAddress": "suzuki.taro@yellowfin.bi",
		"roleCode": "YFREPORTCONSUMER",
		"password": "test",
		"firstName": "太郎",
		"lastName": "鈴木",
		"languageCode": "ja",
		"timeZoneCode": "ASIA/TOKYO"
	},
	{
		"userId": "hanako.tanaka@yellowfin.bi",
		"emailAddress": "hanako.tanaka@yellowfin.bi",
		"roleCode": "YFREPORTCONSUMER",
		"password": "test",
		"firstName": "花子",
		"lastName": "田中",
		"languageCode": "ja",
		"timeZoneCode": "ASIA/TOKYO"
	}
]
アクセストークンの取得
Yellowfin のリソースにアクセスするために、2 種類のトークンを使用します。
1 つ目はリフレッシュトークンです。有効期限の無いトークンで、アクセストークンを取得するために必ず必要です。refresh-tokens API に対してリフレッシュトークンをPOSTで要求し取得します。
2 つ目はアクセストークンです。access-tokens API に対して入手済みのリフレッシュトークンを使って、POSTで要求し取得します。
アクセストークンの有効期限は 20 分間です。この間に、リソースにアクセスし、必要な処理を実施します。有効期限が切れたら、リフレッシュトークンを使ってアクセストークンを再入手します。
サンプルプログラムの中では、プログラムの処理が分かりやすいように、Admin の ID やパスワードはべた書きしています。その他 HEADER や BODY に必要な情報は、開発者ドキュメントの Creates a new refresh token と Gets an access token that can be used to access a resource の個所で詳細を確認してください。
下記プログラムの前半でリフレッシュトークンを取得し、後半でアクセストークンを取得しています。作成した HEADER や BODY 情報を使ってトークンを要求する処理には、curl を使っています。要求に対して返ってくるレスポンスの中から、アクセストークンを $accessToken 変数に取り込んでいます。
//変数の宣言
$adminId = 'admin@yellowfin.com.au';
$adminPassword = 'test';
$time = ceil(microtime(true)*1000);
$url = 'http://localhost:8080/api/refresh-tokens';
$url2 = 'http://localhost:8080/api/access-tokens';
$refreshToken = "";
$accessToken = "";

//リフレッシュトークン:HEADERデータ作成
$header = array(
    'Authorization:YELLOWFIN ts='.$time.', nonce=123',
    'Accept:application/vnd.yellowfin.api-v2+json',
    'Content-Type:application/json;charset=UTF-8'
);

//リフレッシュトークン:BODYデータ作成
$body = array(
    'userName'=>$adminId,
    'password'=>$adminPassword
);
$body_json = json_encode($body, JSON_PRETTY_PRINT);

//リフレッシュトークン:Yellowfinにトークンを要求
$ch = curl_init();
curl_setopt($ch, CURLOPT_HTTPHEADER, $header);
curl_setopt($ch, CURLOPT_CUSTOMREQUEST, 'POST');
curl_setopt($ch, CURLOPT_POSTFIELDS, $body_json);
curl_setopt($ch, CURLOPT_RETURNTRANSFER, true);
curl_setopt($ch, CURLOPT_URL, $url);
$result = curl_exec($ch);
$json_result = json_decode($result);
$refreshToken = $json_result->securityToken;
curl_close($ch);

//アクセストークン:HEADERデータ作成
$header2 = array(
    'Authorization:YELLOWFIN ts='.$time.', nonce=123, token='.$refreshToken,
    'Accept:application/vnd.yellowfin.api-v2+json',
    'Content-Type:application/json'
);

//アクセストークン:Yellowfinにトークンを要求
$ch2 = curl_init();
curl_setopt($ch2, CURLOPT_HTTPHEADER, $header2);
curl_setopt($ch2, CURLOPT_CUSTOMREQUEST, 'POST');
curl_setopt($ch2, CURLOPT_POSTFIELDS, '');
curl_setopt($ch2, CURLOPT_RETURNTRANSFER, true);
curl_setopt($ch2, CURLOPT_URL, $url2);
curl_close($ch);
$result2 = curl_exec($ch2);
$json_result2 = json_decode($result2);
$accessToken=$json_result2->securityToken;
ユーザー登録
先の手順で取得したトークンを用いて、POST でユーザーをまとめて登録します。HEADER や BODY に必要な情報に関しては、開発者用ドキュメントの Create one or more users in the current organization の個所で詳細を確認してください。
以下のサンプルコードでは、作成した HEADER 情報と読み込んだユーザー情報を使って、curl で登録処理を行っています。
//変数の宣言
$url3 = 'http://localhost:8080/api/admin/users/';

//ユーザー登録:HEADERデータ作成
$header3 = array(
	'Authorization:YELLOWFIN ts='.$time.', nonce=123, token='.$accessToken,
	'Accept:application/vnd.yellowfin.api-v2+json',
	'Content-Type:application/json'
);

//ユーザー登録:ユーザーデータ読込
ob_start();
include("users.json");
$userData = ob_get_clean();

//ユーザー登録:Yellowfinに新規ユーザー登録
$ch3 = curl_init();
curl_setopt($ch3, CURLOPT_HTTPHEADER, $header3);
curl_setopt($ch3, CURLOPT_CUSTOMREQUEST, 'POST');
curl_setopt($ch3, CURLOPT_POSTFIELDS, $userData);
curl_setopt($ch3, CURLOPT_RETURNTRANSFER, true);
curl_setopt($ch3, CURLOPT_URL, $url3);
$result3 =curl_exec($ch3);
curl_close($ch3);
ユーザー情報登録プログラム全容
ユーザー情報登録プログラムの全容は以下の通りです。
//変数の宣言
$adminId = 'admin@yellowfin.com.au';
$adminPassword = 'test';
$time = ceil(microtime(true)*1000);
$url = 'http://localhost:8080/api/refresh-tokens';
$url2 = 'http://localhost:8080/api/access-tokens';
$refreshToken = "";
$accessToken = "";

//リフレッシュトークン:HEADERデータ作成
$header = array(
    'Authorization:YELLOWFIN ts='.$time.', nonce=123',
    'Accept:application/vnd.yellowfin.api-v2+json',
    'Content-Type:application/json;charset=UTF-8'
);

//リフレッシュトークン:BODYデータ作成
$body = array(
    'userName'=>$adminId,
    'password'=>$adminPassword
);
$body_json = json_encode($body, JSON_PRETTY_PRINT);

//リフレッシュトークン:Yellowfinにトークンを要求
$ch = curl_init();
curl_setopt($ch, CURLOPT_HTTPHEADER, $header);
curl_setopt($ch, CURLOPT_CUSTOMREQUEST, 'POST');
curl_setopt($ch, CURLOPT_POSTFIELDS, $body_json);
curl_setopt($ch, CURLOPT_RETURNTRANSFER, true);
curl_setopt($ch, CURLOPT_URL, $url);
$result = curl_exec($ch);
$json_result = json_decode($result);
$refreshToken = $json_result->securityToken;
curl_close($ch);

//アクセストークン:HEADERデータ作成
$header2 = array(
    'Authorization:YELLOWFIN ts='.$time.', nonce=123, token='.$refreshToken,
    'Accept:application/vnd.yellowfin.api-v2+json',
    'Content-Type:application/json'
);

//アクセストークン:Yellowfinにトークンを要求
$ch2 = curl_init();
curl_setopt($ch2, CURLOPT_HTTPHEADER, $header2);
curl_setopt($ch2, CURLOPT_CUSTOMREQUEST, 'POST');
curl_setopt($ch2, CURLOPT_POSTFIELDS, '');
curl_setopt($ch2, CURLOPT_RETURNTRANSFER, true);
curl_setopt($ch2, CURLOPT_URL, $url2);
curl_close($ch);
$result2 = curl_exec($ch2);
$json_result2 = json_decode($result2);
$accessToken=$json_result2->securityToken;

//変数の宣言
$url3 = 'http://localhost:8080/api/admin/users/';

//ユーザー登録:HEADERデータ作成
$header3 = array(
	'Authorization:YELLOWFIN ts='.$time.', nonce=123, token='.$accessToken,
	'Accept:application/vnd.yellowfin.api-v2+json',
	'Content-Type:application/json'
);

//ユーザー登録:ユーザーデータ読込
ob_start();
include("users.json");
$userData = ob_get_clean();

//ユーザー登録:Yellowfinに新規ユーザー登録
$ch3 = curl_init();
curl_setopt($ch3, CURLOPT_HTTPHEADER, $header3);
curl_setopt($ch3, CURLOPT_CUSTOMREQUEST, 'POST');
curl_setopt($ch3, CURLOPT_POSTFIELDS, $userData);
curl_setopt($ch3, CURLOPT_RETURNTRANSFER, true);
curl_setopt($ch3, CURLOPT_URL, $url3);
$result3 =curl_exec($ch3);
curl_close($ch3);
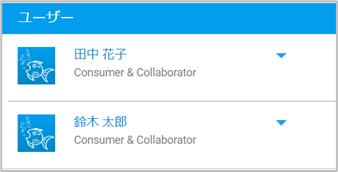
PHP プログラムをコンソール上で実行してみます。
PS > php regUsers.php
Yellowfin に2 人のユーザーが新規で登録されました。
最後に
Yellowfin REST API を使えば、様々な処理をバッチ化することが可能です。
基本的な処理のサンプルコードを、このような形で継続的に提供していこうと思います。あとは皆様の環境に合わせて実運用に使えるものに修正していただければと思います。
何はともあれ、皆様、良いデータ分析を! See you then! Cheers! Santé! Skål!