本稿は続きものです。
前回でpollsのアプリケーションの機能を追加して投票アプリとして動くものとなりました。
最後にテストを行いバグの直しに差し掛かって前回は終わりました。
今回はDjangoチュートリアル5~7の内容をさらっていきます。
包括的なテストの実施
前回作成したテストでwas_published_recentlyのバグを修正しましたが、このバグ修正によって他の部分に影響してしまっては元も子もないので、それがないかをテストします。
以下を新たにtests.pyのQuestionModelTestsクラスの下に書き足します。
def test_was_published_recently_with_old_question(self):
    #ギリギリ昨日を表す
    time = timezone.now() - datetime.timedelta(days=1, seconds=1)
    old_question = Question(pub_date=time)
    self.assertIs(old_question.was_published_recently(), False)

def test_was_published_recently_with_recent_question(self):
    #ギリギリ今日を表す
    time = timezone.now() - datetime.timedelta(hours=23, minutes=59, seconds=59)
    recent_question = Question(pub_date=time)
    self.assertIs(recent_question.was_published_recently(), True)
was_published_recently()は昨日以上で今以下のものをTrueで返すので、test_was_published_recently_with_old_question()はFalseになってtest_was_published_recently_with_recent_question()はTrueで帰ってくるはずです。
この予想がself.assertIsに入っていますので、その通りになるかチェックしていきます。
(Django) C:\User\mysite>python manage.py test polls
Creating test database for alias 'default'...
System check identified no issues (0 silenced).
...
----------------------------------------------------------------------
Ran 3 tests in 0.002s

OK
Destroying test database for alias 'default'...
ということでRan 3 tests in 0.002sが表示され、前回に書いた分を合わせて3つのテストが成功したことがわかります。
ビューのテスト
チュートリアルによるとなんとこの投票アプリまだバグがあるみたいです。
それはwas_published_recentlyで問題となっていた部分とも重なりますが、未来の日時でpub_dateされていた質問でもビューでは表示されてしまうというものです。
今回は対話シェルを使ってテスト環境を構築します。
>>> from django.test import Client
>>> # create an instance of the client for our use
>>> client = Client()
>>> from django.urls import reverse
>>> response = client.get(reverse('polls:index'))
これでテスト用のクライアントの設置は終わりました。
チュートリアルにではclient.get('/')をその前に行いエラーの検出を行っていますがここでは割愛。
そんでもってresponseには何が入っているかというと、、、
>>> response.status_code
200
>>> response.content </ul>\n'
b'\n <ul>\n \n <li><a href="/polls/1/">What's new?</a></li>\n \n </ul>\n'
>>> response.context['latest_question_list']
<QuerySet [<Question: What's new?>]>
こんな感じです。
response.contentの中身はどこから引いているのでしょうか。
公式ドキュメントを読みましたが、ちょっとわからなかったです。
htmlらしきものをどっかから引いていることはわかるのですが逆に言えばそれしかわかりません。
ビューの改良
気を取り直してビューの改良です。
未来の日時で登録された質問を表示しないように改良します。
class IndexView(generic.ListView):
    template_name = 'polls/index.html'
    context_object_name = 'latest_question_list'

# この関数を書き換えている
    def get_queryset(self):
# 以下差分
         return Question.objects.filter(
        pub_date__lte=timezone.now()
    ).order_by('-pub_date')[:5]
pub_date__lte = timezone.now()は現在日時よりも以前の日時のpub_dateを指します。
__lteはless than equalのことでつまりはpub_date <= timezone.now()みたいなことになっていると言い換えられるんじゃないでしょうか。
ビューのテストコードを書く
was_published_recentlyの時に書いたようなテスト用コードを作って簡単にテストできるように準備をしていきます。
def create_question(question_text, days):

    time = timezone.now() + datetime.timedelta(days=days)
    return Question.objects.create(question_text=question_text, pub_date=time)


class QuestionIndexViewTests(TestCase):
    def test_no_questions(self):

        response = self.client.get(reverse('polls:index'))
        self.assertEqual(response.status_code, 200)
        self.assertContains(response, "No polls are available.")
        self.assertQuerysetEqual(response.context['latest_question_list'], [])

    def test_past_question(self):

        create_question(question_text="Past question.", days=-30)
        response = self.client.get(reverse('polls:index'))
        self.assertQuerysetEqual(
            response.context['latest_question_list'],
            ['<Question: Past question.>']
        )

    def test_future_question(self):

        create_question(question_text="Future question.", days=30)
        response = self.client.get(reverse('polls:index'))
        self.assertContains(response, "No polls are available.")
        self.assertQuerysetEqual(response.context['latest_question_list'], [])

    def test_future_question_and_past_question(self):

        create_question(question_text="Past question.", days=-30)
        create_question(question_text="Future question.", days=30)
        response = self.client.get(reverse('polls:index'))
        self.assertQuerysetEqual(
            response.context['latest_question_list'],
            ['<Question: Past question.>']
        )

    def test_two_past_questions(self):

        create_question(question_text="Past question 1.", days=-30)
        create_question(question_text="Past question 2.", days=-5)
        response = self.client.get(reverse('polls:index'))
        self.assertQuerysetEqual(
            response.context['latest_question_list'],
            ['<Question: Past question 2.>', '<Question: Past question 1.>']
        )
長めのコードになりましたが、その内容は質問がない場合のtest_no_question()、過去の時間で追加された質問の場合のtest_past_question、未来の時間で追加された質問の場合のtest_future_question()、追加された時間が過去と未来の2つの質問がある場合のtest_future_question_and_past_question、2つとも過去に追加された質問の場合のtest_two_past_questions()の4つのパターンをテストするように書かれています。
create_questionはテストの中で質問を作成する過程を関数として定義したものになります。
うまくいけば、以下のように成功します。一度FAILが出るとそのあとコードを直しても同じターミナルだとうまくいきませんでした。なので、ミスった後のやり直しの際は別のターミナルを上げて行うのがよいかもしれません。
(Django) C:\User\mysite>python manage.py test polls
Creating test database for alias 'default'...
System check identified no issues (0 silenced).
..........
----------------------------------------------------------------------
Ran 8 tests in 0.044s

OK
Destroying test database for alias 'default'...
DetailViewのテスト
さっきまでのテストで改善したのはIndexViewで未来に投稿された質問は表示されなくなるもの、URLで引くとDetailViewのほうはまだ表示されてしまいます。ということでこの問題の解決を行います。
まずはDetailViewクラスにIndexViewに足したのと同様にget_queryset()メソッドを追加します。
class DetailView(generic.DetailView):
    model = Question
    template_name = 'polls/detail.html'
    def get_queryset(self):

        return Question.objects.filter(pub_date__lte=timezone.now())
このあとチュートリアルがなぜか英語になってしまっていますが、書いてあることとしてはpub_dateが過去のものは表示して、未来のものは表示しないということをチェックするためのテストを追加しなければいけないということです。
class QuestionDetailViewTests(TestCase):
    def test_future_question(self):

        future_question = create_question(question_text='Future question.', days=5)
        url = reverse('polls:detail', args=(future_question.id,))
        response = self.client.get(url)
        self.assertEqual(response.status_code, 404)

    def test_past_question(self):

        past_question = create_question(question_text='Past Question.', days=-5)
        url = reverse('polls:detail', args=(past_question.id,))
        response = self.client.get(url)
        self.assertContains(response, past_question.question_text)
これもIndexViewの時と同じような解釈ができます。test_future_questionはpub_dateが未来のものがDetailViewとして出てこないことを確認し、test_past_questionではpub_dateが過去のものがDetailViewで表示されるかどうかを確認します。
これもテストすると以下のようになります。
今までのテストは合計で10個になりましたのでテストの結果でも10個のテストが行われているはずなので結果でもRan 10 testsとなるはずです。
(Django) C:\User\mysite>python manage.py test polls
Creating test database for alias 'default'...
System check identified no issues (0 silenced).
..........
----------------------------------------------------------------------
Ran 10 tests in 0.058s

OK
Destroying test database for alias 'default'...
ここまで見るとこのままResultViewのテストも作れそうですね。
チュートリアルでは提案で留まっていましたがここはひとつ書いてみましょう。
class QuestionResultViewTests(TestCase):
    def test_future_question(self):

        future_question = create_question(question_text='Future question.', days=5)
        url = reverse('polls:results', args=(future_question.id,))
        response = self.client.get(url)
        self.assertEqual(response.status_code, 404)

    def test_past_question(self):

        past_question = create_question(question_text='Past Question.', days=-5)
        url = reverse('polls:results', args=(past_question.id,))
        response = self.client.get(url)
        self.assertContains(response, past_question.question_text)
実はDetailViewのときとほぼ変わらんのです。変化したところはurl = reverse('polls:results', args=..)のところのだけです。
あとviews.pyのResultsViewにもget_querysetをちゃんと入れておきましょう。
こんな感じで
class ResultsView(generic.DetailView):
    model = Question
    template_name = 'polls/results.html'
    def get_queryset(self):

        return Question.objects.filter(pub_date__lte=timezone.now())
これでチュートリアルでのテストは終わりですが、DjangoにはHTMLが作る画面のふるまいをテストする機能もあるみたいです。本当に高機能です。
静的ファイルの管理
ここからチュートリアルの6に入ります。
ここまでWebページを作るうえでよく出てくるCSSとかJavaScriptとかを使ってきませんでしたが、Djangoでもこれらはしっかり使えます。Djangoはこうしたファイルを静的ファイルとして扱っています。
django.contrib.staticfilesは各アプリケーションこうした静的ファイルを集約して管理することができるみたいですね。
アプリ構造のカスタマイズ
Djangoが静的ファイルを扱うためのstaticフォルダをpollsの下に作ります。templateフォルダを作ったときと同様にstaticの下にさらにpollsフォルダを作ります。
そしたら以下のCSSを書いていきます。
li a {
    color: green;
}
そしたらindex.htmlのほうにもCSSへの参照を追加します。
{% load static %}

<link rel="stylesheet" type="text/css" href="{% static 'polls/style.css' %}">
この文はファイルの一番上に記述しておきましょう。{% static %}は静的ファイルの場所を示すDjangoのテンプレートタグです。
確認すると、、、
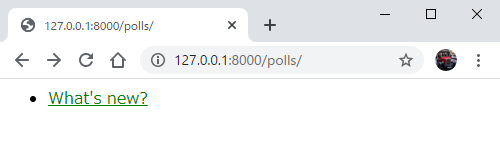
確かに緑になっていますが、違いが微妙すぎる(笑)
背景画像の追加
背景画像の追加を行うためにstyle.cssに設定を追加していきます。
body {
    background: white url("images/background.png") no-repeat;
}
リンクでわかると思われますが、mysite/polls/static/polls/image/フォルダの下にあるbackground.pngという画像を参照しているので、そこに該当するファイルをあらかじめ置いておかないと画像は表示されないです。
ということで、いらすとやから適当な画像を持ってきた結果がこちらです。

いい感じに表示されましたね!
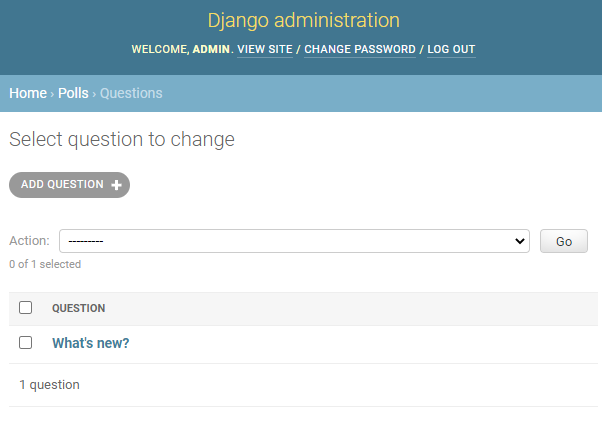
adminフォームのカスタマイズ
何個か前のところで管理者画面からQuestionの追加などができることを確認しましたが(EP1-2)、Djangoではその画面さえもカスタマイズできます。
チュートリアルより質問のカスタマイズの画面をいじるコードを試してみます。
from django.contrib import admin
from .models import Question

# Register your models here
class QuestionAdmin(admin.ModelAdmin):
    fieldsets = [
        (None, {'fields': ['question_text']}),
        ('Date information', {'fields': ['pub_date']}),
    ]

admin.site.register(Question, QuestionAdmin)
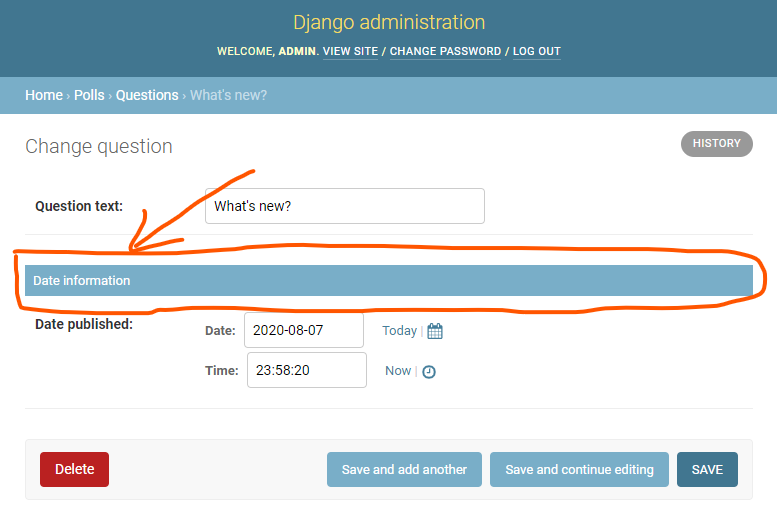
変更点はQuestionAdminクラスの追加とadmin.site.register()の引数にQuestionAdminを追加したことです。
これで管理者としてログインして質問の変更画面に入ってみると以下のようにフィールドの区切りができています。
今は質問のみ見ることができていますが、質問についている各選択肢も表示させることができます。
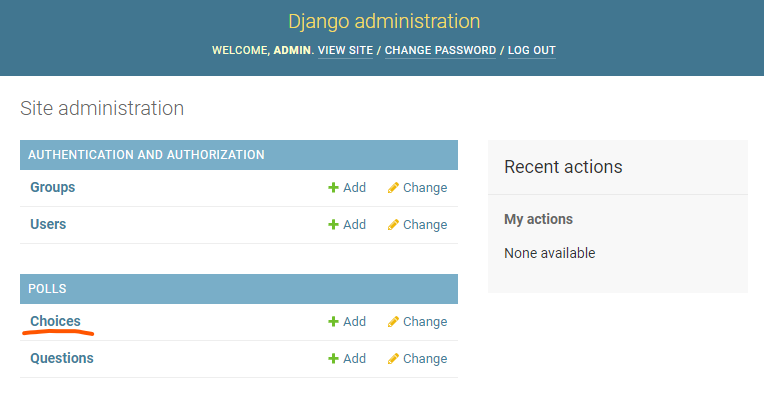
from .models import Choice, Question

admin.site.register(Choice)
変更したところは、modelsからChoiceもimportしたことと、admin.site.register(Choice)を加えたところです。
確認してみると、まずこのように最初のところでChoiceが選べるようになっています
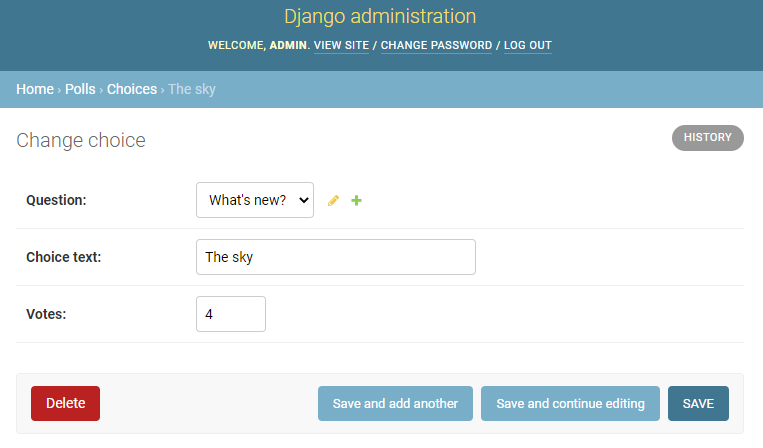
そしてChoiceを選択してその中の選択肢の設定の画面に入ります。そうすると以下のような設定画面にたどり着けます。
これでも十分いい感じになっていますが、ChoiceはQuestionに紐づいているので一緒に編集できるようになるともっと使い勝手がよさそうな感じがしませんか?
そのためにadmin.site.register(Choice)をやめてもっと改造します。
class ChoiceInline(admin.StackedInline):
    model = Choice
    extra = 3


class QuestionAdmin(admin.ModelAdmin):
    fieldsets = [
        (None,               {'fields': ['question_text']}),
        ('Date information', {'fields': ['pub_date'], 'classes': ['collapse']}),
    ]
    inlines = [ChoiceInline]
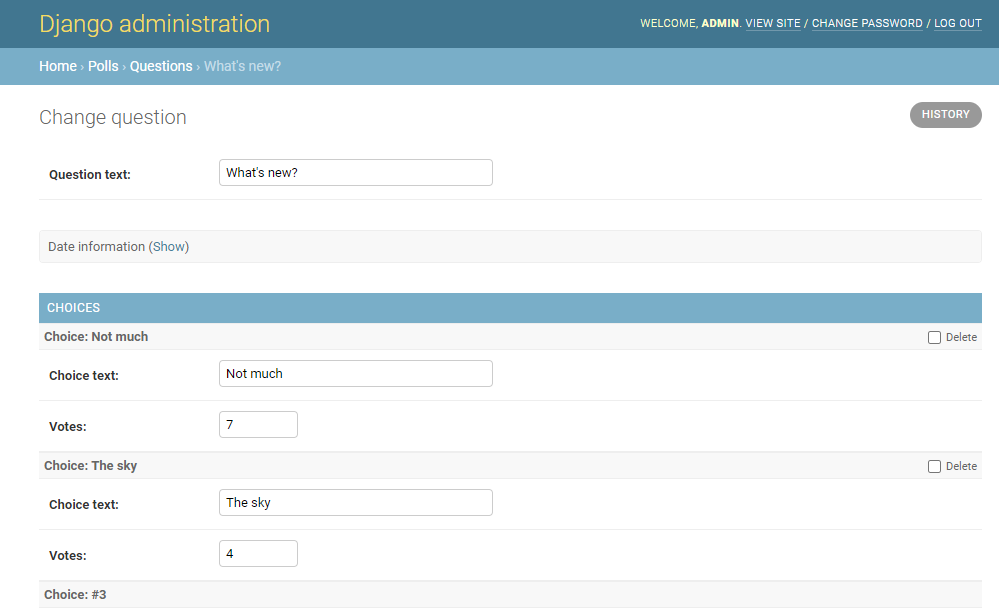
ChoiceInlineクラスを追加してQuestionAdminクラスの中にそれを受ける部分を追加します。admin.site.register(Choice)は消しておきます。
そうすると以下のようにQuestionの画面でChoiceも編集できるようになります。
続いてQuestionの設定画面の一つ前のポイントであるこの画面を使いやすくしていきます。
別にそんな使いづらさを感じていたわけではないんですが、まあさらに便利なものにしていくためにadmin.pyとmodels.pyに新たなコードを追加します。
class QuestionAdmin(admin.ModelAdmin):
    fieldsets = [
        (None,               {'fields': ['question_text']}),
        ('Date information', {'fields': ['pub_date'], 'classes': ['collapse']}),
    ]
    inlines = [ChoiceInline]
# 以下追加文
    list_display = ('question_text', 'pub_date', 'was_published_recently')
    list_filter = ['pub_date']
    search_fields = ['question_text']
class Question(models.Model):
    question_text = models.CharField(max_length=200)
    pub_date = models.DateTimeField('date published')
    def __str__(self) -> str:
        return self.question_text
    def was_published_recently(self):
        now = timezone.now()
        return now - datetime.timedelta(days=1) <= self.pub_date <= now
# 以下追加文
    was_published_recently.admin_order_field = 'pub_date'
    was_published_recently.boolean = True
    was_published_recently.short_description = 'Published recently?'
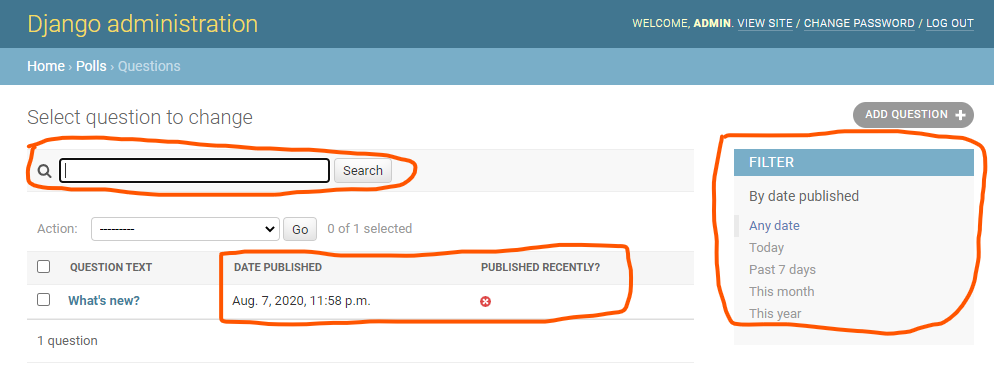
list_displayで表示する内容の拡張をし、list_filterでサイドバーでのフィルタが効くようになり、search_fieldsでの検索もできるようになりました。(囲ったところが主な変更箇所です)
管理者画面をさらにカスタマイズ
管理者画面もIndexViewの時と同様にhtmlファイルを使ってカスタマイズすることが可能です。
正直デフォルトでも十分なのですがいずれ使えると便利なのかもしれません。
まずはsetting.pyにこのプロジェクトが参照してくれるtemplateのパスを伝えます。
TEMPLATES = [
    {
        'BACKEND': 'django.template.backends.django.DjangoTemplates',
        'DIRS': [os.path.join(BASE_DIR, 'templates')], #この行!!!
        'APP_DIRS': True,
        'OPTIONS': {
            'context_processors': [
                'django.template.context_processors.debug',
                'django.template.context_processors.request',
                'django.contrib.auth.context_processors.auth',
                'django.contrib.messages.context_processors.messages',
            ],
        },
    },
]
実はここチュートリアルのコードのコピペでは失敗しました。
チュートリアルでは'DIRS': [BASE_DIR / 'templates'],となっていますがこれだと文字列型の計算とみなされ、当然文字列の割り算はできないためエラーになってしまいます。
ということでos.path.join(BASE_DIR, 'templates')],とすることでパスを明記しエラーを回避しました。
英語のほうのチュートリアルを読んでもここについての解は得られませんでした。チュートリアルが間違っているとかあるんでしょうか?多分私の見落としだと思うのですが、、、
そして管理者画面のTemplateをDjangoソースファイルから引っ張ってきます。
なんとDjangoのパッケージの中にはTemplateの例も入っているんですね。優しい。
Djangoのソースファイルがどこにあるのかは以下のコードで確認ができます。
(Django) C:\Users\mysite> python -c "import django; print(django.__path__)"
場所がわかったらそこをエクスプローラーとかで開いてあげたのちbase_site.htmlをmysite/templates/adminの下に置いてあげましょう。
templatesフォルダとその下のadminフォルダはここで新たに作っておいてください。
(base_site.htmlはソースファイル内のdjango/contrib/admin/templates/admin内にいます)
そしたら、base_site.htmlを少し編集します。
{% block branding %}
<h1 id="site-name"><a href="{% url 'admin:index' %}">管理者画面</a></h1>
{% endblock %}
変更箇所だけ抜き出すとここになります。<a><\a>タグの中に適当に文字を入れるとそれがページの頭のところに出ます。
デフォルトでは{{ site_header|default:_('Django administration') }}が入っています。
そしてその変更が以下のように反映されているか確認しましょう。
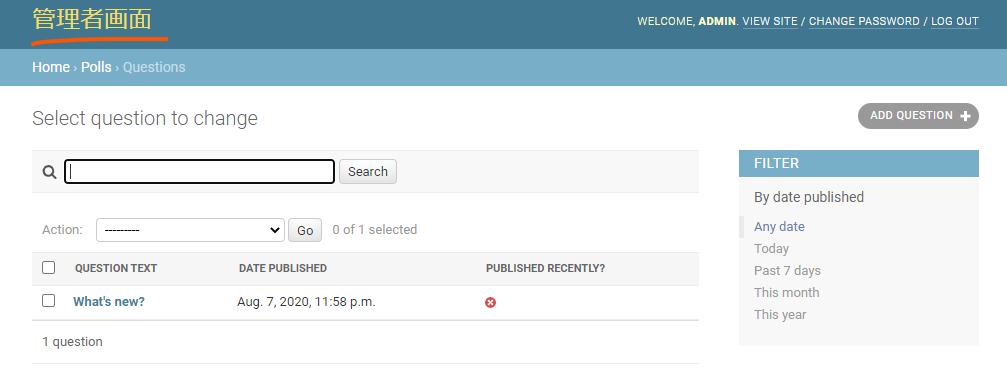
ちゃんと変わっていますね!!
これでDjangoチュートリアルは一通り終わりになります。
結構量がありましたね。
正直ここまで来てもまだ手放しでは全く無理ですね(笑)
ですが基本がわかればこれ以降の勉強も大きく前進すると思います。それくらいの歯ごたえのある内容でした。
なんかこの後に高度なチュートリアルがありますがそれはさすがにまだやりません(笑)
必要になったときにね、、、
次はDjangoをもう少し回しながらGitの勉強をしていくのでよろしくお願いします。