

はじめに
Roborazziを使ってComposeのスクリーンショットテスト(画像回帰テスト)を行う際、デフォルトではシステムバーが含まれません。
この記事では、テスト時に擬似的なシステムバーを描画し、スクリーンショットの対象に含める方法を紹介します。
なぜシステムバーを含めるのか?
-
systemBarsPadding()などの実装ミスに気が付きやすくなる - 他職種(デザイナー等)へスクリーンショット共有する際、実機に近い自然な見た目になる
実装手順
大まかな方針は以下の通りです。
-
DeviceConfigurationOverride.WindowInsetsで擬似的なWindowInsetを設定 - ステータスバー・ナビゲーションバーに相当するデザインを独自に実装
- テスト範囲の
ComposableにModifier.testTag("root")を指定し、スクリーンショットを撮る
WindowInsets のモックを用意
システムバーの高さに相当する擬似的な Insets を定義します。ここでは、ステータスバーは上部に24 dp、ナビゲーションバーは下部に24 dpとして定義します。
@Composable
fun windowInsets() =
    with(LocalDensity.current) {
        WindowInsetsCompat.Builder()
            .setInsets(
                WindowInsetsCompat.Type.statusBars(),
                Insets.of(0, 24.dp.roundToPx(), 0, 0),
            )
            .setInsets(
                WindowInsetsCompat.Type.navigationBars(),
                Insets.of(0, 0, 0, 24.dp.roundToPx()),
            )
            .build()
    }
システムバーのUIを作成する
自然に見えるように、時間やバッテリー、インジケーター等を配置したシステムバーのモックUIを作成します。
@Composable
fun SystemUi() {
    Column {
        // ステータスバー
        Row(
            verticalAlignment = Alignment.Bottom,
            modifier = Modifier
                .fillMaxWidth()
                .height(24.dp)
                .padding(horizontal = 4.dp),
        ) {
            Text(
                text = "15:00",
                style = TextStyle(),
                fontSize = with(LocalDensity.current) { 16.dp.toSp() },
                color = Color.Gray,
            )
            Spacer(modifier = Modifier.weight(1f))
            Icon(
                painter = painterResource(id = R.drawable.ic_cell_bar),
                contentDescription = null,
                tint = Color.Gray,
            )
            Spacer(modifier = Modifier.width(4.dp))
            Icon(
                painter = painterResource(id = R.drawable.ic_wifi),
                contentDescription = null,
                tint = Color.Gray,
            )
            Spacer(modifier = Modifier.width(4.dp))
            Icon(
                painter = painterResource(id = R.drawable.ic_battery),
                contentDescription = null,
                tint = Color.Gray,
            )
        }

        Spacer(modifier = Modifier.weight(1f))

        // ナビゲーションバー
        Box(
            contentAlignment = Alignment.Center,
            modifier = Modifier
                .fillMaxWidth()
                .height(24.dp),
        ) {
            Box(
                modifier = Modifier
                    .size(width = 100.dp, height = 4.dp)
                    .background(color = Color.Gray, shape = CircleShape),
            )
        }
    }
}
テストコードの実装
DeviceConfigurationOverride を用いて、作成した windowInsets() を注入します。
テスト対象の Composable と作成した SystemUi() を Box で囲み、onNodeWithTag("root") を指定することで、スクリーンショットの対象を設定します。
@RunWith(RobolectricTestRunner::class)
@GraphicsMode(GraphicsMode.Mode.NATIVE)
class Test {
    @get:Rule
    val composeTestRule = createAndroidComposeRule<ComponentActivity>()

    @Config(qualifiers = "w414dp-h736dp-xxhdpi")
    @Test
    fun test() {
        composeTestRule.setContent {
            DeviceConfigurationOverride(
                override = DeviceConfigurationOverride.WindowInsets(windowInsets = windowInsets()),
            ) {
                // 主要なComposableとシステムバーをテスト対象にする
                Box(modifier = Modifier.testTag("root")) {
                    // 主なテスト対象のComposable
                    Box(
                        modifier = Modifier
                            .fillMaxSize()
                            .background(Color(0xFFE0E0E0))
                            .systemBarsPadding()
                            .background(Color(0xFFE8E8E8))
                    ) {
                        Text(text = "text")
                    }

                    // システムバーを描画
                    SystemUi()
                }
            }
        }

        composeTestRule
            .onNodeWithTag(testTag = "root")
            .captureRoboImage(filePath = "image.png")
    }
}
結果
前節までで紹介したサンプルコードで撮影できるスクリーンショットは次のようになります。
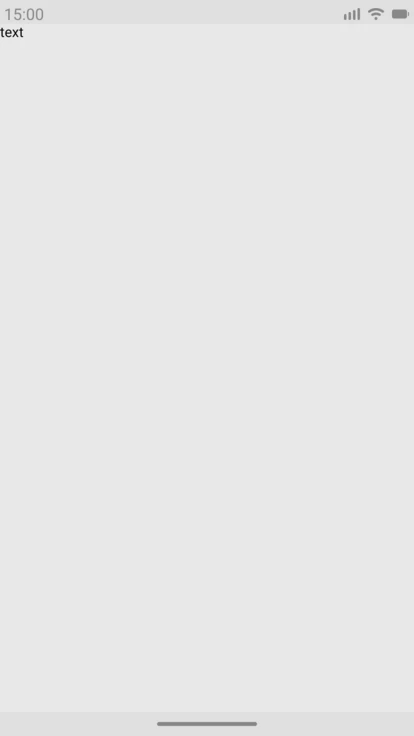
まとめ
-
DeviceConfigurationOverride.WindowInsetsを利用することで、Roborazziのスクリーンショットテストに擬似的なシステムバーを簡単に組み込むことができる -
systemBarsPadding()などによるインセット周りのレイアウト変更も検知できるようになる