画像アップロード周りの実装を直近で担当することが多かったので、まとめてみました。
S3のsdkだけで実装する方が汎用性も高い気はしているのですが、今回はgem shrineを使って実装するパターンを想定して記事を書きました。
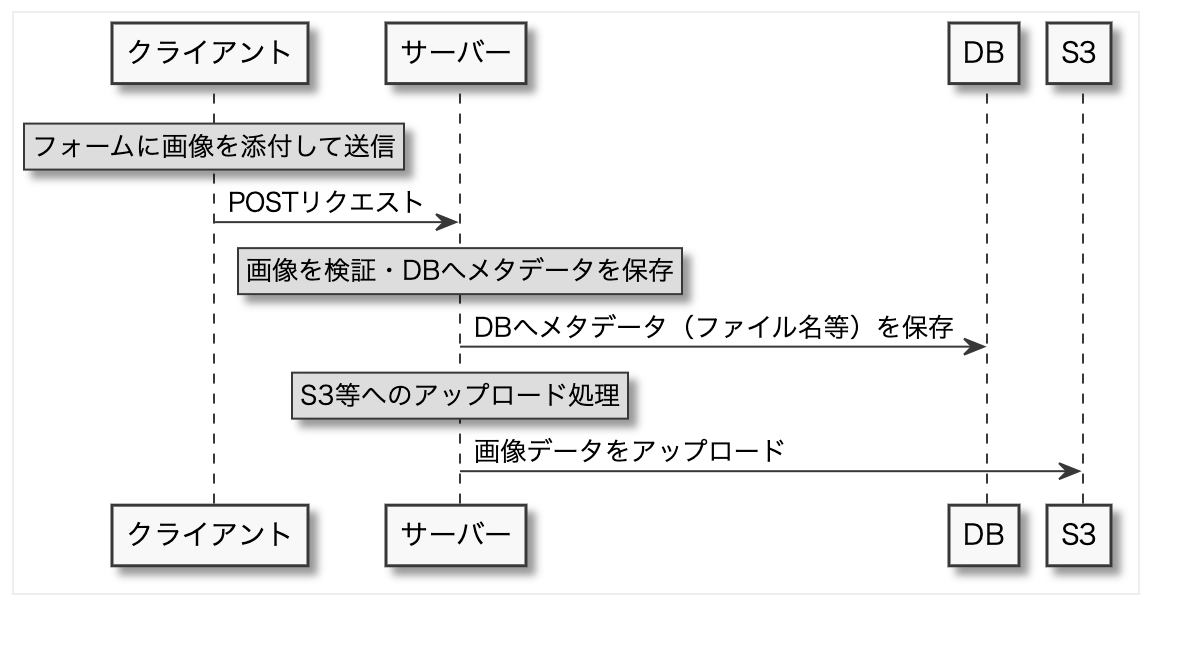
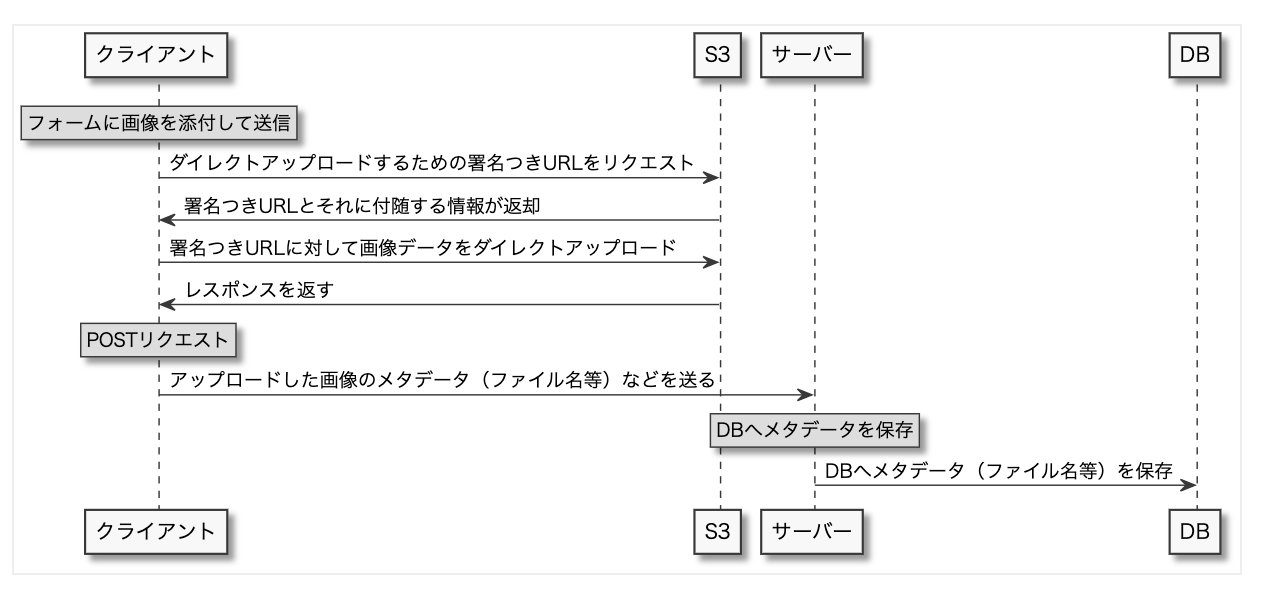
ダイレクトアップロード/バックエンドからのアップロードのシーケンス図
基本的な仕組みについて、以下のように整理しています。
- バックエンドからのアップロード
- shrineもそうだが、よくある画像アップロード用のライブラリのデフォルトは
/public/uploadsみたいなローカルのディレクトリに画像データが保存される挙動が多いが、実際本番ではその運用はもちろんしない。(画像のデータはAWS S3等に保存するようにオプションで設定することがほとんど) - DBにはファイル名とかメタデータだけ保存して、画像を表示するときに「画像が格納されてるパス(S3へのパスなど)」と「DBに保存されているファイル名」を使って呼び出すという構成がベーシック。DBにファイル名ではなく画像データを保存してしまうと、DBの容量が圧迫されるのでもちろんそれもしない。
- サーバーで画像データを受け取ってS3へアップロード処理を行うので、大容量の画像とかが来た場合にサーバーでの負荷が上がってしまうことがある。
- shrineもそうだが、よくある画像アップロード用のライブラリのデフォルトは
- ダイレクトアップロード
- クライアントからサーバーを介さずに直接S3等に画像データをアップロードし、完了後にファイルパスなどの情報のみサーバーに返すという実装パターン。
- DBにはファイル名とかメタデータだけ保存して、画像を表示するときに「画像が格納されてるパス(S3へのパスなど)」と「DBに保存されているファイル名」を使って呼び出すという構成はバックエンドからのアップロードと同じ
- バックエンドからのアップロードのようにサーバーが処理をしている間、クライアントを待たせるというようなことがないし、サーバーへの負荷も少ない
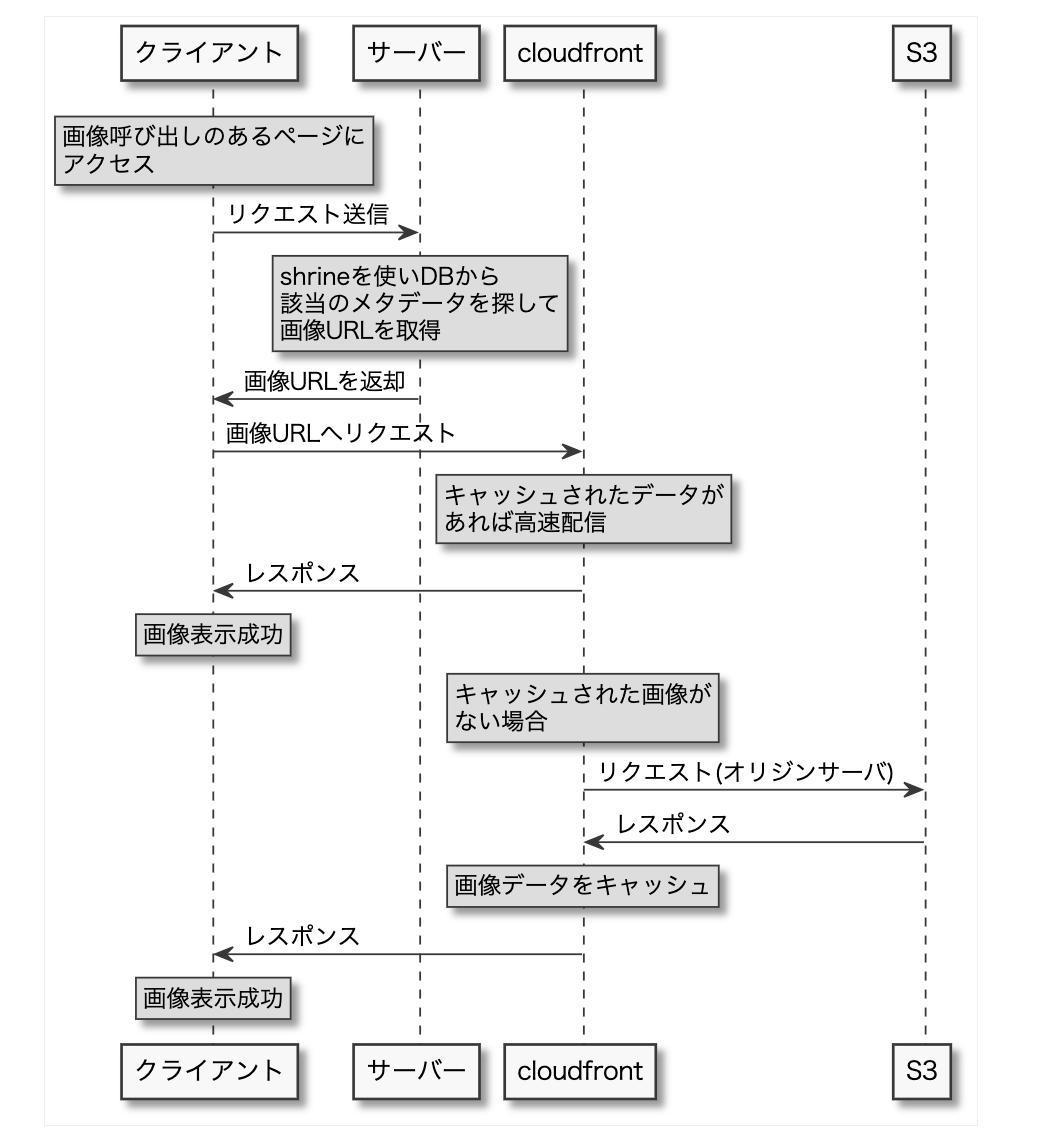
画像の呼び出し(表示)時の処理(例: cloudfrontを使っている場合)
参考: https://docs.aws.amazon.com/ja_jp/AmazonCloudFront/latest/DeveloperGuide/HowCloudFrontWorks.html
- DBに保存されているファイル名などを元に表示する画像を探して表示する
shrine公式
https://shrinerb.com/docs/storage/s3
https://shrinerb.com/docs/direct-s3
https://shrinerb.com/rdoc/classes/Shrine/Storage/S3.html#method-c-new
AWS SDK
gem shrineの他に使用するgemはこちらになります。
ダイレクトアップロードする場合
概略
- バックエンドアップロードでも、ダイレクトアップロードでも、DBにはshrineの公式で決めれれた形式でメタデータを送りテーブルに保存するところは変わらない(例: imageテーブルにimage_dataカラム(text型)を作りそこにメタデータをJSON 文字列(例:
image_data: "{\"id\":\"cache/4aa1a1a971faef8029bf847a83f7845f\",\"storage\":\"cache\",\"metadata\":{\"size\":69904,\"filename\":\"2a0ef40a1968defc32c11fcdae38e6a6_t.jpg\",\"mime_type\":\"image/jpeg\"}}")みたいな形式で保存 - 公式通りの形式でDBに保存すると、imageインスタンスからshrineのメソッドを使ってS3から呼び出すための#image_urlを呼び出したりが可能になる
以下公式抜粋
Next decide how you will name the attachment attribute on your model, and run a migration that adds an <attachment>_data text or JSON column, which Shrine will use to store all information about the attachment:
ダイレクトアップロード用のURLを取得
- gem shrineの
plugin :presign_endpointを使う - #presign_responseでダイレクトアップロードに必要な情報を取得
{
  "message": "Get Signed URL",
  "data": {
    "method": "post",
    "url": "https://sample-bucket.s3-ap-northeast-1.amazonaws.com",
    "fields": {
      "key": "b7d575850ba61b44c8a9ff111111111111111111111111111111",
      "policy": "eyJleHBpcmF0aW9uIjoi11111111111111111111111111...",
      "x-amz-credential": "hogehoge/20151024/eu-west-1/s3/aws4_request",
      "x-amz-algorithm": "AWS4-HMAC-SHA256",
      "x-amz-date": "20151024T001129Z",
      "x-amz-signature": "c1eb634f83f96b69bd675f5311111111111111111111111"
    }
  }
}
画像をS3へフロントエンドからダイレクトアップロード
- 取得したダイレクトアップロード用のURLへダイレクトアップロード
- 実際にアプリ側でダイレクトアップロードを行う処理
以下、処理の参考コード例です。ヘルパーの一部を抜粋しているので色々省略していますが、流れが伝わってくれればと思っています。(jsで書いています。)
// axios使っていますが、なんでもいいと思います。
import axios from 'axios'


// ↓このメソッドが大枠の処理の流れを表現している
// ①S3へダイレクトアップロードするための署名つきURLを取得
// ②署名つきURLに対してダイレクトにpostしてS3へ画像データをアップロードする
export const DirectUploadImage = async(image) => {
  const preSignUrlData = await getPreSignUrl() // 非同期通信で受け取る署名付きURLに関するデータをawaitで待ち受けて受け取る
  await directPostImage(preSignUrlData, image) // 非同期通信でダイレクトアップロード
  return preSignUrlData
}


// ①S3へダイレクトアップロードするための署名つきURLを取得
const getPreSignUrl = async() => {
  const headers = {
        accept: 'application/json'
      }
  return await axios.get(`${署名付きURLを発行するAPIのURL}`, { headers }).catch((e) => {
          alert(e) // 署名URLの取得に失敗した場合のアラート出力
        })
}


// ②署名つきURLに対してダイレクトにpostしてS3へ画像データをアップロードする
// 引数から注入する署名つきURLのデータを使って実際の画像データをダイレクトアップロードしている
const directPostImage = async(preSignUrlData, image) => {
  const headers = {
  'Content-Type': 'multipart/form-data'
}
  const params = new FormData()
  params.append('key', extractObjectDataFromResponse(preSignUrlData).fields.key)
  params.append('policy', extractObjectDataFromResponse(preSignUrlData).fields.policy)
  params.append('x-amz-credential', extractObjectDataFromResponse(preSignUrlData).fields['x-amz-credential'])
  params.append('x-amz-algorithm', extractObjectDataFromResponse(preSignUrlData).fields['x-amz-algorithm'])
  params.append('x-amz-date', extractObjectDataFromResponse(preSignUrlData).fields['x-amz-date'])
  params.append('x-amz-signature', extractObjectDataFromResponse(preSignUrlData).fields['x-amz-signature'])
  params.append('file', image)
  await axios.post(`${extractObjectDataFromResponse(preSignUrlData).url}`, params, { headers }).catch((e) => {
            alert(e) // S3へのダイレクトアップロードに失敗した時のエラー出力(DB保存への失敗はdispatchの中でハンドリング)
            })
}


// メタデータとしてサーバー側に送ってDBに保存する形式を定義
export const imageMetaData = (imageKey, image) => {
  const imageMetaData = {
    id: imageKey,
    storage: "cache",
    metadata: {
      size: image.size,
      filename: image.name,
      mime_type: 'image/jpeg'
      }
  }
  return imageMetaData
}

// レスポンスデータを使える形に整形
export const extractObjectDataFromResponse = (response) => {
  const data = response.data?.data
    if (data) {
      return data
    } else {
      return response.data || {}
    }
  }
※注意点
- S3にダイレクトアップロードを行うときはキーなどの情報をパラメータで送らない。( https://developer.mozilla.org/ja/docs/Web/API/URL/searchParams )
- S3では
Content-Type: multipart/form-dataで受け取るようになっているため、パラメータで送るとキーなどが勝手にエンコードされてしまい失敗する。 - キーなどの署名の情報はFormData()の形式で送るようにする。
投稿のデータとともに画像のメタデータもDBに保存
- 画像をストレージに保存するときに取得できるメタデータをフロントエンドから送りDBにJSON文字列で保存
- DBとS3で必ず同期が取れる状態にしている。
"images": {
        "image": {
          "id": "f9675719576870a9",
          "storage": "storage",
          "metadata": {
            "size": 108080,
            "filename": "hoge.png",
            "mime_type": "image/png"
          }
        }
ストレージへ保存した画像の表示用URLなどを取得
-
#<attachment>_urlで取得できるURLはデフォルトではS3の署名つきURLになっている。 -
imageインスタンスに対して、#image_urlで取得できる
irb(main):001:0> PostImage.first.image_url
  PostImage Load (0.5ms)  SELECT `post_images`.* FROM `post_images` ORDER BY `post_images`.`id` ASC LIMIT 1
[Aws::S3::Client 0 0.004033 0 retries] get_object(bucket:"public-image-bucket",key:"f9675719576870a9")

=> "http://minio:9000/public-image-bucket/f9675719576870a9?X-Amz-Algorithm=AWS4-HMAC-SHA256&X-Amz-Credential=minio_access_key%2F20211123%2Fap-northeast-1%2Fs3%2Faws4_request&X-Amz-Date=20211123T141201Z&X-Amz-Expires=900&X-Amz-SignedHeaders=host&X-Amz-Signature=5e4865e311111111111111111111111111111111111"
irb(main):001:0> PostImage.first.image_url
I, [2021-11-23T23:14:56.270454 #2676]  INFO -- : [Aws::S3::Client 0 0.001282 0 retries] get_object(bucket:"loupe-staging-image",key:"70aaaad899c6487bf7283b9773d4c8e0")

=> "https://loupe-staging-image.s3.ap-northeast-1.amazonaws.com/11111111111111111111?X-Amz-Algorithm=AWS4-HMAC-SHA256&X-Amz-Credential=hogehogehoge%2F20211123%2Fap-northeast-1%2Fs3%2Faws4_request&X-Amz-Date=20211123T141456Z&X-Amz-Expires=900&X-Amz-SignedHeaders=host&X-Amz-Signature=11111111111111111111111111111111111111111111111111111111111111"
Once a file is uploaded and attached to the record, you can retrieve a URL to the uploaded file with #<attachment>_url and display it on the page:
最終的にはデフォルトのS3署名のURLではなく、cloudfrontからのパブリック配信のURLにしたい。設定方法は後述。
例: https://hogehogehoge.cloudfront.net/70aa1111111111111111111111111
署名の概念全般の話
s3で署名URL発行
-
基本はSDKやCLIなどプログラムで発行する
-
マネジメントコンソールからも発行可能
-
S3のポリシーをcloudfrontからのアクセスのみに制限していても、S3発行の署名URLを踏めばcloudfrontを経由せずにS3に直接アクセスできてしまうので注意が必要。
- 逆にcloudfront経由での構成の場合は、cloudfrontで署名を発行しないと、S3へのアクセスはcloudfrontの署名なしURLでアクセスできてしまうので、プライベートな配信にならないことに注意
cloudfrontで署名URL発行
-
SDKなどでプログラムで発行する方法
こちらの記事が参考になりました。(ありがとうございます。) -
S3のポリシーをcloudfront経由でのアクセスのみに制限していればcloudfrontで署名URLを発行すれば、プライベート配信とすることができる。(この場合でもS3署名URLを一時的に発行すればS3に直接アクセスできる点に注意。)
shrine設定関連
アップローダーがらみの設定
こちらの記事が参考になりました。(ありがとうございます。)
https://qiita.com/okuramasafumi/items/488b535ad8889ef22b72#db%E3%82%B9%E3%82%AD%E3%83%BC%E3%83%9E
credential関係
s3:
  access_key: hogehoge(IAM)
  access_key_secret: hugahuga(IAM)
  region: ap-northeast-1
  bucket: hogehogehoge
  host: https://hogehoge.com(ドメイン)
cloudfront:
  img_url: https://hogehuga.cloudfront.net
config
require 'shrine'
require 'shrine/storage/file_system'
require 'shrine/storage/s3'

s3_options = {
  access_key_id: Rails.application.credentials.s3.fetch(:access_key),
  secret_access_key: Rails.application.credentials.s3.fetch(:access_key_secret),
  region: Rails.application.credentials.s3.fetch(:region),
  bucket: Rails.application.credentials.s3.fetch(:bucket)
}

Shrine.storages = {
  cache: Shrine::Storage::S3.new(prefix: 'cache', **s3_options),
  storage: Shrine::Storage::S3.new(prefix: 'storage', **s3_options)
}

Shrine.plugin :activerecord
Shrine.plugin :cached_attachment_data
Shrine.plugin :presign_endpoint
Shrine.plugin :download_endpoint, host: Rails.application.credentials.s3.fetch(:host)
Shrine.plugin :column
unless Rails.env.development? || Rails.env.test?
  Shrine.plugin :url_options,
                storage: { host: Rails.application.credentials.cloudfront.fetch(:image_url), public: true }
end
shrineにおけるcacheについて
公式: https://shrinerb.com/docs/getting-started#clearing-cache
Shrine doesn't automatically delete files uploaded to temporary storage, instead you should set up a separate recurring task that will automatically delete old cached files.
Most Shrine storage classes come with a #clear! method, which you can call in a recurring script. For FileSystem and S3 storage it would look like this:
-
cacheに保存する処理を書いていれば、そのリクエストが発生するときにcacheディレクトリにデータを保存する
-
cached_attachment_dataプラグインなどを追加導入して、フォーム中で= f.hidden_field :image, value: current_user.cached_image_dataのように、shrineの機構などからキャッシュデータを明示的に送信するなどをしないとディレクトリ配下にデータは保存されない。
プラグイン紹介
Public uploads
公式: https://shrinerb.com/docs/storage/s3#public-uploads
- shrineのデフォルトはS3の署名つきURLでのアクセス
By default, uploaded S3 objects will have private visibility, meaning they can only be accessed via signed expiring URLs generated using your private S3 credentials.
default_storage
公式: https://shrinerb.com/docs/plugins/default_storage
the default is :cache and :store
- 設定すると変えられる。基本はcacheとstorageという命名でやることが多そう。
Shrine.storages = {
  cache: Shrine::Storage::S3.new(prefix: 'cache', **s3_options),
  storage: Shrine::Storage::S3.new(prefix: 'storage', **s3_options)
}
presign_endpoint
公式: https://shrinerb.com/docs/plugins/presign_endpoint
The presign_endpoint plugin provides a Rack endpoint which generates the URL, fields, and headers that can be used to upload files directly to a storage service. On the client side it's recommended to use Uppy for asynchronous uploads. Storage services that support direct uploads include Amazon S3, Google Cloud Storage, Microsoft Azure Storage and more.
The plugin adds a Shrine.presign_endpoint method which, given a storage identifier, returns a Rack application that accepts GET requests and generates a presign for the specified storage. You can run this Rack application inside your app:
Active Record
公式: https://shrinerb.com/docs/plugins/activerecord
cached_attachment_data
公式: https://github.com/shrinerb/shrine/blob/master/doc/plugins/cached_attachment_data.md
The cached_attachment_data plugin adds the ability to retain the cached file across form redisplays, which means the file doesn't have to be reuploaded in case of validation errors.
Download Endpoint
公式: https://shrinerb.com/docs/plugins/download_endpoint
The download_endpoint plugin provides a Rack app for downloading uploaded files from specified storages. This can be useful when files from your storage isn't accessible over URL (e.g. database storages) or if you want to authenticate your downloads.
column
公式: https://shrinerb.com/docs/plugins/column
The column plugin provides interface for serializing and deserializing attachment data in format suitable for persisting in a database column (JSON by default).
URL Options
公式:
https://shrinerb.com/docs/plugins/url_options
https://shrinerb.com/docs/storage/s3#url-host
url_optionsプラグインを使用すると、指定したストレージのアップロードされたファイルにデフォルトで適用されるURLオプションを指定できます。 url_optionsは、ストレージサービスに固有のパラメーターです。
url_optionsオプションを使わず、デフォルトでS3の署名付きURLでの画像配信にする場合
例: https://loupe-development-image.s3.ap-northeast-1.amazonaws.com/44bcce8e9525f6396cf661bee374facf?X-Amz-Algorithm=AWS4-HMAC-SHA256&X-Amz-Credential=hogehoge%2F20220120%2Fap-northeast-1%2Fs3%2Faws4_request&X-Amz-Date=20220120T041258Z&X-Amz-Expires=900&X-Amz-SignedHeaders=host&X-Amz-Signature=14f290bb346081111111111111111111111111111
Shrine.storages = {
  cache: Shrine::Storage::S3.new(prefix: 'cache', **s3_options),
  storage: Shrine::Storage::S3.new(prefix: 'storage', **s3_options)
}
S3ストレージに保存された画像をパブリックに配信する場合(S3の署名なしURLにできる)
※注意:推奨される方法ではないので実務でこれをすることはあまりないと思います
-
public: trueをストレージの設定に追加(url_optionsは使わない)
Shrine.storages = {
  cache: Shrine::Storage::S3.new(public: true, **s3_options),
  storage: Shrine::Storage::S3.new(public: true, **s3_options),
}
以下のようなURLになる
例: https://loupe-development-image.s3.ap-northeast-1.amazonaws.com/public-image-bucket/fakfhdashfakshfka
cloudfront経由でからの呼び出しで、S3の署名をURLにくっつける場合
- url_optionsプラグインを使用する
Shrine.storages = {
  cache: Shrine::Storage::S3.new(prefix: 'cache', **s3_options),
  storage: Shrine::Storage::S3.new(prefix: 'storage', **s3_options)
}

Shrine.plugin :url_options,
                storage: { host: 'http://abc123.cloudfront.net' }

# urlの部分は実際に作ったcloudfrontのディストリビューションから取ってくる。変数にして環境ごとに呼び出し
-
以下のようなURLで呼び出すようになる。cloudfrontのドメイン + S3の署名がくっつく形になる。(cloudfront経由になる)
例:http://abc123.cloudfront.net/f9675719576870a9?X-Amz-Algorithm=AWS4-HMAC-SHA256&X-Amz-Credential=minio_access_key%2F20220120%2Fap-northeast-1%2Fs3%2Faws4_request&X-Amz-Date=20220120T070745Z&X-Amz-Expires=900&X-Amz-SignedHeaders=host&X-Amz-Signature=dd1a55f1111111111111111111111111111111111 -
cloudfrontのドメイン + S3の署名がくっつく形じゃなく、S3の署名だけ手動で外して以下のURL形式でも呼びだだせる。
例:http://abc123.cloudfront.net/skjhsdafhashskh- S3とcloudfrontを紐付けている場合はcloudfrontのドメインからのアクセスではS3の署名は外してもアクセスできるので、cloudfront経由のS3アクセスの場合ではS3の署名だけではパブリックな配信になっているとは言えない(不十分なので、cloudfront経由でのプライベート配信はこの後のcloudfrontで署名つきURLを発行するケースがベスプラになる)
cloudfront経由でからの呼び出しURLで、S3署名をURLにくっつけない場合(cloudfrontからpublicに配信)
url_optionsプラグインを使用して、public: trueをつける
Shrine.storages = {
  cache: Shrine::Storage::S3.new(prefix: 'cache', **s3_options),
  storage: Shrine::Storage::S3.new(prefix: 'storage', **s3_options)
}

Shrine.plugin :url_options,
                storage: { host: 'http://abc123.cloudfront.net', public: true }

# public: trueをつけると署名なしでURLが公開される
- 以下のURL形式で呼び出せるようになる。(S3の署名が外れている)
例:http://abc123.cloudfront.net/f9675719576870a9
cloudfront経由からの呼び出しURLで、cloudfrontに署名者を紐付けて署名を発行する場合(cloudfrontからのプライベート配信)
こちらの記事が参考になりました。(ありがとうございます。)
https://zenn.dev/may_solty/articles/807dbad3a30de8
- cloudfrontのディストリビューションで署名者を設定しキーペアを発行すると、そのディストリビューションへのアクセスはcloudfrontの署名つきURLでしか受け付けないようになる。
require "aws-sdk-cloudfront"

signer = Aws::CloudFront::UrlSigner.new(
  key_pair_id:      "cf-keypair-id",
  private_key_path: "./cf_private_key.pem",
)

Shrine::Storage::S3.new(signer: signer.method(:signed_url))
- URLはcloudfrontドメインで署名はcloudfrontでの署名になる。
バックエンドからアップロードする場合
流れ
サーバーサイドへ投げるパラメータ
- image_dataカラムとして定義している場合は、フロントからは
{ image: 画像fileのデータ }で送る。
要は以下のhtmlにセットされた画像ファイルデータをフロントで取り出してそのまま送る
<input type="file" accept="image/png, image/jpeg">

サーバーサイドで受け取るパラメータは以下のよう(特に"image"=>のところ)
#<ActionController::Parameters {"title"=>"oおおおおおお", "body"=>"おおおおおおおおおお", "status"=>"draft", "image"=>#<ActionDispatch::Http::UploadedFile:0x00007fb699cfb1b8 @tempfile=#<Tempfile:/tmp/RackMultipart20220201-1-z9tpa0.jpg>, @original_filename="2a0ef40a1968defc32c11fcdae38e6a6_t.jpg", @content_type="image/jpeg", @headers="Content-Disposition: form-data; name=\"image\"; filename=\"2a0ef40a1968defc32c11fcdae38e6a6_t.jpg\"\r\nContent-Type: image/jpeg\r\n">} permitted: true>
ちなみにcacheをs3保存するためにput_objectを走らせるのはnewしてインスタンスを作った瞬間だった
[Aws::S3::Client 200 0.098933 0 retries] put_object(body:#<ActionDispatch::Http::UploadedFile:0x00007fb699cfb1b8 @tempfile=#<Tempfile:/tmp/RackMultipart20220201-1-z9tpa0.jpg>, @original_filename="2a0ef40a1968defc32c11fcdae38e6a6_t.jpg", @content_type="image/jpeg", @headers="Content-Disposition: form-data; name=\"image\"; filename=\"2a0ef40a1968defc32c11fcdae38e6a6_t.jpg\"\r\nContent-Type: image/jpeg\r\n">,content_type:"image/jpeg",content_disposition:"inline; filename=\"2a0ef40a1968defc32c11fcdae38e6a6_t.jpg\"; filename*=UTF-8''2a0ef40a1968defc32c11fcdae38e6a6_t.jpg",bucket:"public-image-bucket",key:"cache/cbbfb0e65134b9d14f42a8a10f1c81be.jpg")
インスタンスに対する実行結果
imgageのurl
=> resource.image_url
[Aws::S3::Client 0 0.012552 0 retries] get_object(bucket:"public-image-bucket",key:"cache/cbbfb0e65134b9d14f42a8a10f1c81be.jpg")

"http://minio:9000/public-image-bucket/cache/cbbfb0e65134b9d14f42a8a10f1c81be.jpg?X-Amz-Algorithm=AWS4-HMAC-SHA256&X-Amz-Credential=minio_access_key%2F20220201%2Fap-northeast-1%2Fs3%2Faws4_request&X-Amz-Date=20220201T005202Z&X-Amz-Expires=900&X-Amz-SignedHeaders=host&X-Amz-Signature=4816f009dcb9002673358e3a111111111111111111111111111111111111111111111"


imageインスタンス
=>resource.image
#<CmsMediaUploader::UploadedFile storage=:cache id="cbbfb0e65134b9d14f42a8a10f1c81be.jpg" metadata={"filename"=>"2a0ef40a1968defc32c11fcdae38e6a6_t.jpg", "size"=>69904, "mime_type"=>"image/jpeg"}>
レコードを削除するとs3のオブジェクトも削除される
=> Hoge.first.destroy
  Hoge Load (0.7ms)  SELECT `hoges`.* FROM `hoges` ORDER BY `hoges`.`id` ASC LIMIT 1
  TRANSACTION (0.5ms)  BEGIN
  Hoge Destroy (5.9ms)  DELETE FROM `hoges` WHERE `Hoge`.`id` = 1
  TRANSACTION (12.4ms)  COMMIT

// ↓s3オブジェクトのdeleteが走っているのがわかる
[Aws::S3::Client 204 0.07069 0 retries] delete_object(bucket:"public-image-bucket",key:"store/875d6020a086579cd3245cd40cb37c76.jpg")
インスタンスをsaveするとレコードが保存され、S3へはcopy_objectが走ってストレージに保存される
resource.save

// ↓以下が走っていた
[Aws::S3::Client 200 0.064826 0 retries] copy_object(metadata_directive:"REPLACE",content_type:"image/jpeg",content_disposition:"inline; filename=\"2a0ef40a1968defc32c11fcdae38e6a6_t.jpg\"; filename*=UTF-8''2a0ef40a1968defc32c11fcdae38e6a6_t.jpg",bucket:"public-image-bucket",key:"store/d0a76d2a7298b26d474317d8fe0920b3.jpg",copy_source:"public-image-bucket/cache/22756cdcbc746232c311ac41a7e1709d.jpg")
いかがでしょうか??何か参考になる点があれば幸いです。


