はじめに
今までの(1)〜(2)記事で「iOSアプリの基本設計を考える」とか恥ずかしいタイトルをあえて付けてきました。それはこれらの記事で言いたいのは決して関数の組み合わせでこんなことができるよ、ということではないからです。実際、使っている関数も機能も誰でも知っていることだと思います。
書きたかったその心は、どうすれば画面遷移のソースコードの「再利用性を高め、可読性を高める」ことができるのかを考えたいなということでした。
今回のお題
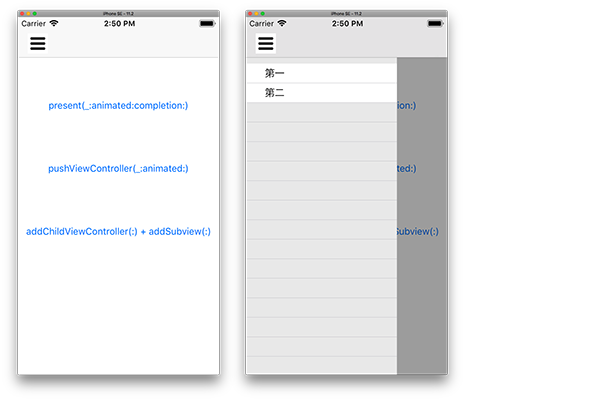
「iOSアプリの基本設計を考える:「UIViewController」画面遷移(1)」でUIViewControllerの画面遷移の方法を下記のように3つあげました。
上の2つはiOSのフレームワークが直接画面遷移を実行しますが、3番目のaddChildViewController(:) + addSubview(:)はそうではありません。
addChildViewController(:)と、addSubview(:)の二つの関数を組み合わせて画面遷移を実現します。
| Class | 表示 | 非表示 |
|---|---|---|
| UIViewController | present(_:animated:completion:) | dismiss(animated:completion:) |
| UINavigationController | pushViewController(_:animated:) | popViewController(animated:) |
| UIViewController + UIView | addChildViewController(:) + addSubview(:) | removeFromParentViewController() + removeFromSuperview() |
このaddChildViewController(:)と、addSubview(:)を使った「再利用性が高く、可読性が高い」UIViewControllerのサブクラスを整備していくことで、ハンバーガーメニューが割と簡単に作成できることを書いていきます。
ちなみにハンバーガーメニューはこんなものです。
closureで画面遷移を管理する
まずは「iOSアプリの基本設計を考える:「UIViewController」画面遷移(1)」で紹介したclosureで画面遷移を管理するUIViewControllerのサブクラスCoreViewControllerを定義します。
前回までのソースコードとは少し変更を加えています。
一番悩んだのは、ResultですがT?とすることでResult.success(nil)というデフォルト値を持てるようにして、deinitではこれを返却するような方法を取ることにしました。これによってresultを設定しないで動作するような結果に興味がない画面も容易に扱えるようになったと思います。
import UIKit

// 画面の戻り値が必要ない場合はこちら
typealias StdCoreViewController = CoreViewController<StdResult, NoErr>

// closureで画面遷移を管理するUIViewControllerのサブクラス
class CoreViewController<T, E:Error>: UIViewController, IdentifierGettable
{
    // 完了closure
    var completion: ((_ obj: CoreViewController, _ result: Result<T?, E>, _ animation: Bool) -> Void)? = nil
    // ナビゲーションバーの戻るボタン "<" で画面を終了する場合のResultを指定する
    var result: Result<T?, E>? = Result.success(nil)
    // 完了時指定がない場合のアニメーション有無
    var animateBeforeCompleted: Bool = false
    /// クラス名を取得する(サブクラス名も)
    var identifier: String { return String(describing: type(of: self)) }

    private var onceDismissed: Bool = false    // 一度だけ終了時に実行する

    /// 表示を終了する
    ///
    /// - Parameters:
    ///   - result: 結果値
    ///   - animation: 終了のアニメーションの有無
    final func dismiss(result: Result<T?, E>, animation: Bool)
    {
        guard !onceDismissed else { return }
        onceDismissed = true

        self.result = result                    // 結果更新
        completion?(self, result, animation)    // 終了時のclosureを呼び出す
        completion = nil
    }

    final func dismiss(result: Result<T?, E>)
    {
        dismiss(result: result, animation: animateBeforeCompleted)
    }

    final func dismiss()
    {
        if let _result = self.result
        {
            dismiss(result: _result, animation: animateBeforeCompleted)
        }
        else
        {
            logger.fatal("結果値が初期化されていません", className: identifier)
        }
    }

    // ナビゲーションバーの戻るボタン "<" で画面を終了する場合
    deinit
    {
        dismiss()
    }
}
CoreViewController はcompletionを設定することで呼び出し元の画面で完了時の処理を定義することができます。使用する場合はこのクラスを直接使うことはなくて、サブクラスを定義して使うことになります。
Result型はスタンダードな結果を戻すための型になります。
成功時にはsuccessを返し、失敗時にはfailureを返します。
GenericsとAssociated Valueを使っており、Associated Valueはenum型に値を格納することが可能なのでsuccess、failureにはそれぞれT型、またはE型のGenericsで記述した型オブジェクトを格納して返すことができます。
下記にその定義を記述します。
/// 結果通知用定義
///
/// - success       成功の場合 オブジェクトを返す
/// - failure       失敗の場合  Error型を返す
enum Result<T, E:Error>
{
    case success(T)     // .successの場合はT型
    case failure(E)     // .failureの場合はError型
}

enum StdResult : Int{ case ok, cancel }
enum NoErr : Error{ case none }
extension NoErr: LocalizedError{ // 省略 }
extension NoErr : CustomStringConvertible{ // 省略 }
結果がどうでもよい画面もあるので、そのような画面では余計なGenericsが見えないようにStdResultとNoErrを定義して
typealias StdCoreViewController = CoreViewController<StdResult, NoErr>
を利用できるようにしています。
表示と非表示の関数
closureで画面遷移を管理することができるために、表示と非表示の関数を下記のように簡潔に記述することができます。
1)非表示closureを設定する
2)addChildViewController()でUIViewControllerの上にUIViewControllerを重ねる
3)addSubview()でUIViewの上にUIViewを重ねる
4)上記のUIViewのConstraintを設定する
という流れです。
    /// withParentViewControllerで指定したUIViewControllerの上に表示する
    ///
    /// - Parameters:
    ///   - pvc: 親UIViewController
    ///   - parentView: 親UIView
    ///   - created: 生成時closure
    ///   - completion: 終了時closure
    final func show(with pvc: UIViewController,
                    on parentView: UIView,
                    created: ((_ obj: ChildViewController) -> Void)?,
                    completion:((_ obj: CoreViewController<T, E>, _ result: Result<T?, E>) -> Void)?)
    {
        self.parentView = parentView
        self.created = created
        self.completion = { vc, result, animation in
            self.hide(withDuration: self.duration) // アニメーション関数
            {
                // logger.debug("非表示完了 \(self.identifier)")

                completion?(vc, result)

                // Viewを親から解除
                self.view.removeFromSuperview()

                // 呼び出し元の参照が無ければここで自インスタンスは消滅する
                // 呼び出し元の参照が残っている場合は、completionの中でnilを設定する

                if self.parent != nil
                {
                    // ViewControllerを親から解除
                    self.removeFromParentViewController()
                }
            }
        }

        self.view.frame = self.parentView.bounds

        pvc.addChildViewController(self) // UIViewController(pvc)の上に自分を追加します。

        self.parentView.addSubview(self.view) // self.parentViewの上に自分のViewを追加します。
        self.parentView.addConstraint(toChildView: self.view)  // <--- Constraintを設定する
    }
下はConstraintを左右上下にぴったりに設定するためのextensionです。
extension UIView {

    func addConstraint(toChildView childView:UIView)
    {
        childView.translatesAutoresizingMaskIntoConstraints = false;

        self.addConstraints([NSLayoutConstraint(item: childView, attribute:.top, relatedBy:.equal, toItem: self, attribute: .top, multiplier: 1.0, constant: 0),
                             NSLayoutConstraint(item: childView, attribute:.bottom, relatedBy:.equal, toItem: self, attribute: .bottom, multiplier: 1.0, constant: 0),
                             NSLayoutConstraint(item: childView, attribute:.left, relatedBy:.equal, toItem: self, attribute: .left, multiplier: 1.0, constant: 0),
                             NSLayoutConstraint(item: childView, attribute:.right, relatedBy:.equal, toItem: self, attribute: .right, multiplier: 1.0, constant: 0)])
    }
}
上記のようにclosureを使った画面遷移の関数を用いることで呼び出し側は非常にシンプルなコードにすることができます。
さらに下記のようなgetInstance()クラス関数を各UIViewControllerに持たせることで呼び出し側はさらにシンプルになります。
   // CoreViewControllerのサブクラス(ストリーボードとリンクされている)に記述

    // ストリーボードからインスタンを生成
    static func getInstance() -> SecondViewController?
    {
        let storyboardInstance = UIStoryboard(name: "Main", bundle: nil)
        let vc = storyboardInstance.instantiateViewController(withIdentifier: String(describing: self))
        return vc as? SecondViewController
    }
アニメーションを追加する
ここまでのソースコードにアニメーションを追加します。
下記AnimationTypeではalpha値を変更してフェードイン/フェードアウトするアニメーション、スライドして現れるアニメーション、またはその両方のアニメーションを定義しています。
enum AnimationType
{
    case none
    case alpha
    case layout
    case alpha_layout
}

let AnimationTranceparency_0: CGFloat = 0.0    // 消える
let AnimationTranceparency_100: CGFloat = 1.0  // 現れる
show(withDuration:completion:)、 hide(withDuration:completion:)関数でAnimationTypeで指示されたアニメーションを実行します。
    /// 表示
    ///
    /// - Parameters:
    ///   - duration: アニメーション期間
    ///   - layout: レイアウトを変更するclosure
    ///   - completion: 完了closure
    private func show(withDuration duration : TimeInterval = 0.0, completion:(() -> Void)? = nil)
    {
        if self.animationType == .none { completion?(); return }

        let value: CGFloat = AnimationTranceparency_100

        self.view.setNeedsUpdateConstraints()
        if self.animationType != .alpha
        {
            self.animationConstraint?.constant = 0
        }

        if duration > 0
        {
            UIView.animate(withDuration: duration, animations: {
                if self.animationType != .layout
                {
                    self.animationView?.alpha = value
                }
                self.view.layoutIfNeeded()
            }, completion: { (finished) in
                completion?()
            })
        }
        else
        {
            if self.animationType != .layout
            {
                self.animationView?.alpha = value
            }
            completion?()
        }
    }

    /// 非表示
    ///
    /// - Parameters:
    ///   - duration: アニメーション期間
    ///   - layout: レイアウトを変更するclosure
    ///   - completion: 完了closure
    private func hide(withDuration duration : TimeInterval = 0.0, completion:(() -> Void)? = nil)
    {
        if self.animationType == .none { completion?(); return }

        let value: CGFloat = AnimationTranceparency_0

        self.view.setNeedsUpdateConstraints()
        if self.animationType != .alpha
        {
            self.animationConstraint?.constant = -((self.animationView?.frame.size.width)!)
        }

        if duration > 0
        {
            UIView.animate(withDuration: duration, animations: {
                if self.animationType != .layout
                {
                    self.animationView?.alpha = value
                }
                self.view.layoutIfNeeded()
            }, completion: { (finished) in
                completion?()
            })
        }
        else
        {
            if self.animationType != .layout
            {
                self.animationView?.alpha = value
            }
            completion?()
        }
    }
これらのアニメーション関数show(withDuration:completion:)、 hide(withDuration:completion:)を
func viewWillAppear()
func viewDidAppear()
show(with: on: created:completion:)関数のcompletionの中から呼び出します。
show(with: on: created:completion:)関数はもうすでに記載しているので、viewWillAppear、viewDidAppearのみ記載します。
// 表示カウンター
private var counter : Int = 0;
// インスタンス生成通知closure(To 呼び出し元)
private var created: ((_ obj: ChildViewController) -> Void)?

override func viewWillAppear(_ animated : Bool)
	{
		super.viewWillAppear(animated)

        // アニメーション準備
        hide() // 即時非表示
	}

    override func viewDidAppear(_ animated: Bool)
    {
        super.viewDidAppear(animated)

        // アニメーション実施
        show(withDuration: duration) {

            if self.counter == 0
            {
                // 最初の実行
                self.created?(self)   // 本インスタンスの呼び出し元に初期化が完了したことを通知する(レイアウトが完了しているタイミング)
                self.created=nil
            }
            else
            {
                // 二度目以降の実行
            }
            self.counter += 1
        }
    }
ソースコードを下記にアップしています。
https://github/BlueEventHorizon/SwiftProtoApp/tree/show
記事では説明しきれていませんが、ソースコードをBuildすると、ハンバーガーメニューのように動作することが分かると思います。baseViewをもう少し幅を短くして、メニューを付けると大体ハンバーガーメニューのベースは完成です。
バックグラウンドのタッチによる非表示処理など少し手を加えることでハンバーガーメニューが作成できると思います。