はじめに
仕事の都合でJupyter on OpenShiftを試したくなったので、複数回に分けてその過程を紹介してゆきます。
本稿は、2本目です。
1本目:CentOSのインストールとCRCのインストール
2本目:NFSサーバのインストールとJupyterHubのデプロイ ★本稿
3本目:JupyterLabへの永続ボリュームの割当てとJupyterLabイメージの切替え設定
本稿で紹介すること
- できあがりの構成
- NFSサーバのインストール
- JupyterHubのデプロイ
参考記事
以下の記事を見て、手元PCで進めてゆきます。
できあがりの構成
以下のイメージ図を目標としています。
JupyterHubにまずは接続してログイン認証をして、その後にJupyterLabに接続してNotebook実行をしてゆくかたちです。
(JupyterHubがJupyterLabを起動しており、JupyterLabが起動すると自動的にリダイレクトされます。確か。)
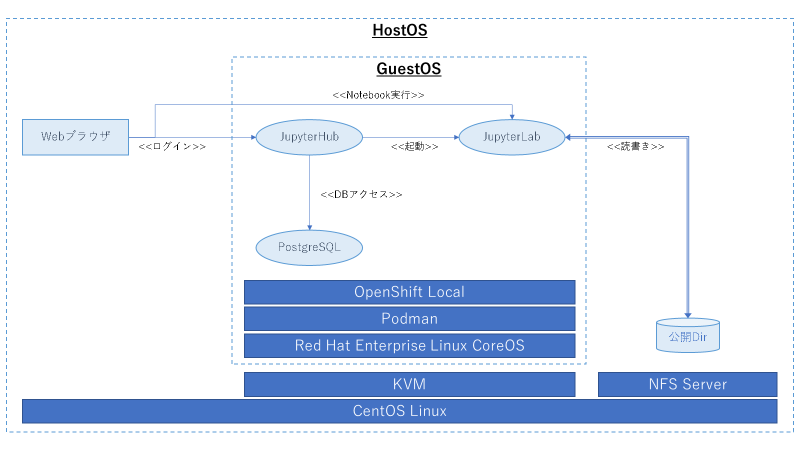
以下、IPAddrです。
- HostOS:192.168.68.19
- GuestOS:192.168.130.11
GuestOSのIPAddrはCRCとしての既定値の模様で、以下コマンドでも確認できます。
[cent@centos7 ~]$ crc ip
192.168.130.11
イメージ図中の各コンポーネントですが、WebブラウザはCentOSビルトインのFirefoxを使います。
それ以外、実際にOpenShift Local上にコンテナとして存在するのですが、採用したコンテナイメージを記載します。
JupyterLabは用途に応じて切り替えて使うべく、コンテナイメージも3つ採用しています。
- JupyterHub:quay.io/jupyteronopenshift/jupyterhub:3.4.01
- PostgreSQL:postgres:9.62
- JupyterLab:quay.io/jupyteronopenshift/s2i-minimal-notebook-py36:2.5.13
- JupyterLab:quay.io/thoth-station/s2i-minimal-py38-notebook:v1.0.04
- JupyterLab:jupyter/pyspark-notebook:python-3.85
NFSサーバのインストール
JupyterLabで作ったNotebookファイルが起動・停止の度にクリアされては困るため、コンテナ(厳密にはPod?)に対して永続ボリュームを割り当てます。
そのためには、NFSサーバが必要になる、という論法です。
CentOS上で全て完結するように、NFSサーバ機能もCentOSに持たせました。
テスト・開発用途であれば、これで十分でしょう。
まずはNFSサーバ機能に必要なパッケージをインストールします。
yum install -y rpcbind nfs-utils
公開ディレクトリのRootを作ります。
mkdir -p /var/share/nfs
公開ディレクトリに対する接続許可設定(アクセス元や権限)をします。とりあえず、以下のような記載としています。
[root@centos7 ~]# cat /etc/exports
/var/share/nfs 192.168.68.0/24(rw,sync,no_subtree_check,insecure,no_root_squash) 192.168.130.0/24(rw,sync,no_subtree_check,insecure,no_root_squash)
設定を反映して、状態を確認します。
exportfs -ra
exportfs -v
最後に、NFSサーバを含めたサービス群を起動します。ついでに、NFSサーバのサービスを自動起動にします。
systemctl start rpcbind
systemctl start nfs-server
systemctl start nfs-lock
systemctl start nfs-idmap
systemctl enable nfs-server
CRC環境の実体、GuestOSにSSH接続して、HostOSの公開ディレクトリがマウントできるようになっていればOKです。
ssh -i ~/.crc/machines/crc/id_ecdsa core@192.168.130.11
mkdir -p /mnt/nfs
mount -t nfs 192.168.68.19:/var/share/nfs /mnt/nfs
umount /mnt/nfs
JupyterHubのデプロイ
参考記事に挙げたGitHubの情報を参照して進めればOKです。
Loading the JupyterHub Templates6で公開されているうちの1つ、jupyterhub-deployer.jsonを使ってゆきます。
そのままではうまく動かないので、ちょいと手直しつつで利用します。オリジナルからの変更点の説明は活愛しますが、GitHubで公開しています。
他にもいくつかJSONファイルを準備しますが、同じく説明は割愛してGitHubで公開していますのでそちらを参照ください。
筆者は以下のコマンドを実行しました。
CRCのインストール完了後に表示されていた、資格情報を用いてOpenShift管理コンソールに接続した上で、種々の操作を実行してゆきます。
JSONファイルの記法エラーがなければ、サクサクと進むと思います。エラーが出たら、カッコやカンマなどに記載誤りがないかチェックしましょう。
# Login to OpenShift
oc login -u kubeadmin -p xxxxx-xxxxx-xxxxx-xxxxx https://api.crc.testing:6443

# Creating Project.
oc new-project jupyter

# Creating PV for jupyterhub-db.
oc apply -f jupyterhub-deployer_pv.json

# Creating PV and PVC for users.
oc apply -f jupyterhub_pv_admin.json
oc apply -f jupyterhub_pv_jupyter.json
oc apply -f jupyterhub_pvc_jupyter.json
oc apply -f jupyterhub_pvc_admin.json

# Creating Template.
oc apply -f jupyterhub-deployer_template.json
以下のようにPV、PVC、Templateとして登録されていることを確認しましょう。
PVの1つ、pv-jupyterhub-dbは呼応するPVCが存在せず使われていない状態のため、状態がAvailableとなっています。
[cent@centos7 ~]$ oc get pv,pvc,template
NAME                                                        CAPACITY   ACCESS MODES   RECLAIM POLICY   STATUS      CLAIM                                                 STORAGECLASS                   REASON   AGE
persistentvolume/pv-admin                                   1Gi        RWO            Retain           Bound       jupyter/pvc-admin                                                                             25h
persistentvolume/pv-jupyter                                 1Gi        RWO            Retain           Bound       jupyter/pvc-jupyter                                                                           25h
persistentvolume/pv-jupyterhub-db                           1Gi        RWO            Retain           Available   jupyter/pvc-jupyterhub-db                                                                     25h
persistentvolume/pvc-50372074-2c2b-4600-a4f1-c0bbc6917dd0   30Gi       RWX            Delete           Bound       openshift-image-registry/crc-image-registry-storage   crc-csi-hostpath-provisioner            41d

NAME                                      STATUS   VOLUME             CAPACITY   ACCESS MODES   STORAGECLASS                   AGE
persistentvolumeclaim/pvc-admin           Bound    pv-admin           1Gi        RWO            crc-csi-hostpath-provisioner   25h
persistentvolumeclaim/pvc-jupyter         Bound    pv-jupyter         1Gi        RWO            crc-csi-hostpath-provisioner   25h

NAME                                                 DESCRIPTION                                     PARAMETERS     OBJECTS
template.template.openshift.io/jupyterhub-deployer   Template for deploying a JupyterHub instance.   10 (1 blank)   9
次に、Dockerに対して環境設定をします。
躓きポイントです。
OpenShiftのRegistryに対する通信が暗号化されていない(≒HTTP通信)場合、DockerコンテナイメージをPushする際にエラーが出ます。
そのため、以下の流れでHTTP通信でアクセスするRegistryであることをDockerサービスに認識できるように設定します。
/etc/docker/daemon.jsonのファイルを以下のような記載にして保存します。
[root@centos7 ~]# cat /etc/docker/daemon.json
{"insecure-registries": ["default-route-openshift-image-registry.apps-crc.testing:443"]}
設定を反映して、Dockerサービスを再起動します。
[root@centos7 ~]# systemctl daemon-reload
[root@centos7 ~]# systemctl restart docker
以下のようにInsecure Registries:として登録されていることを確認しましょう。
[root@centos7 ~]# docker info 2> /dev/null | tail -5
 Insecure Registries:
  default-route-openshift-image-registry.apps-crc.testing:443
  127.0.0.0/8
 Live Restore Enabled: false
そして、できあがりの構成/Temmplateで必要なコンテナイメージ群をOpenShift(の事前作成済みのプロジェクト≒名前空間)に登録してゆきます。
# Pull ContainerImages.
docker pull quay.io/jupyteronopenshift/jupyterhub:3.4.0
docker pull postgres:9.6
docker pull quay.io/jupyteronopenshift/s2i-minimal-notebook-py36:2.5.1
docker pull quay.io/thoth-station/s2i-minimal-py38-notebook:v1.0.0
docker pull jupyter/pyspark-notebook:python-3.8

# Creating ImageStreams.
oc whoami -t | docker login -u kubeadmin --password-stdin https://default-route-openshift-image-registry.apps-crc.testing:443
docker tag quay.io/jupyteronopenshift/jupyterhub:3.4.0 default-route-openshift-image-registry.apps-crc.testing:443/jupyter/jupyterhub:3.4.0
docker tag postgres:9.6 default-route-openshift-image-registry.apps-crc.testing:443/jupyter/postgres:9.6
docker tag quay.io/jupyteronopenshift/s2i-minimal-notebook-py36:2.5.1 default-route-openshift-image-registry.apps-crc.testing:443/jupyter/s2i-minimal-notebook-py36:2.5.1
docker tag quay.io/thoth-station/s2i-minimal-py38-notebook:v1.0.0 default-route-openshift-image-registry.apps-crc.testing:443/jupyter/s2i-minimal-py38-notebook:v1.0.0
docker tag jupyter/pyspark-notebook:python-3.8 default-route-openshift-image-registry.apps-crc.testing:443/jupyter/pyspark-notebook:python-3.8
docker push default-route-openshift-image-registry.apps-crc.testing:443/jupyter/jupyterhub:3.4.0
docker push default-route-openshift-image-registry.apps-crc.testing:443/jupyter/postgres:9.6
docker push default-route-openshift-image-registry.apps-crc.testing:443/jupyter/s2i-minimal-notebook-py36:2.5.1
docker push default-route-openshift-image-registry.apps-crc.testing:443/jupyter/s2i-minimal-py38-notebook:v1.0.0
docker push default-route-openshift-image-registry.apps-crc.testing:443/jupyter/pyspark-notebook:python-3.8
docker logout https://default-route-openshift-image-registry.apps-crc.testing:443
以下のようにImageStreamとして登録されていることを確認しましょう。
[cent@centos7 ~]$ oc get is
NAME                                                       IMAGE REPOSITORY                                                                            TAGS         UPDATED
imagestream.image.openshift.io/jupyterhub                  default-route-openshift-image-registry.apps-crc.testing/jupyter/jupyterhub                  3.4.0        25 hours ago
imagestream.image.openshift.io/postgres                    default-route-openshift-image-registry.apps-crc.testing/jupyter/postgres                    9.6          25 hours ago
imagestream.image.openshift.io/pyspark-notebook            default-route-openshift-image-registry.apps-crc.testing/jupyter/pyspark-notebook            python-3.8   25 hours ago
imagestream.image.openshift.io/s2i-minimal-notebook-py36   default-route-openshift-image-registry.apps-crc.testing/jupyter/s2i-minimal-notebook-py36   2.5.1        25 hours ago
imagestream.image.openshift.io/s2i-minimal-py38-notebook   default-route-openshift-image-registry.apps-crc.testing/jupyter/s2i-minimal-py38-notebook   v1.0.0       25 hours ago
それでは、いよいよです。改めてWebブラウザでOpenShift管理コンソールにログインします。
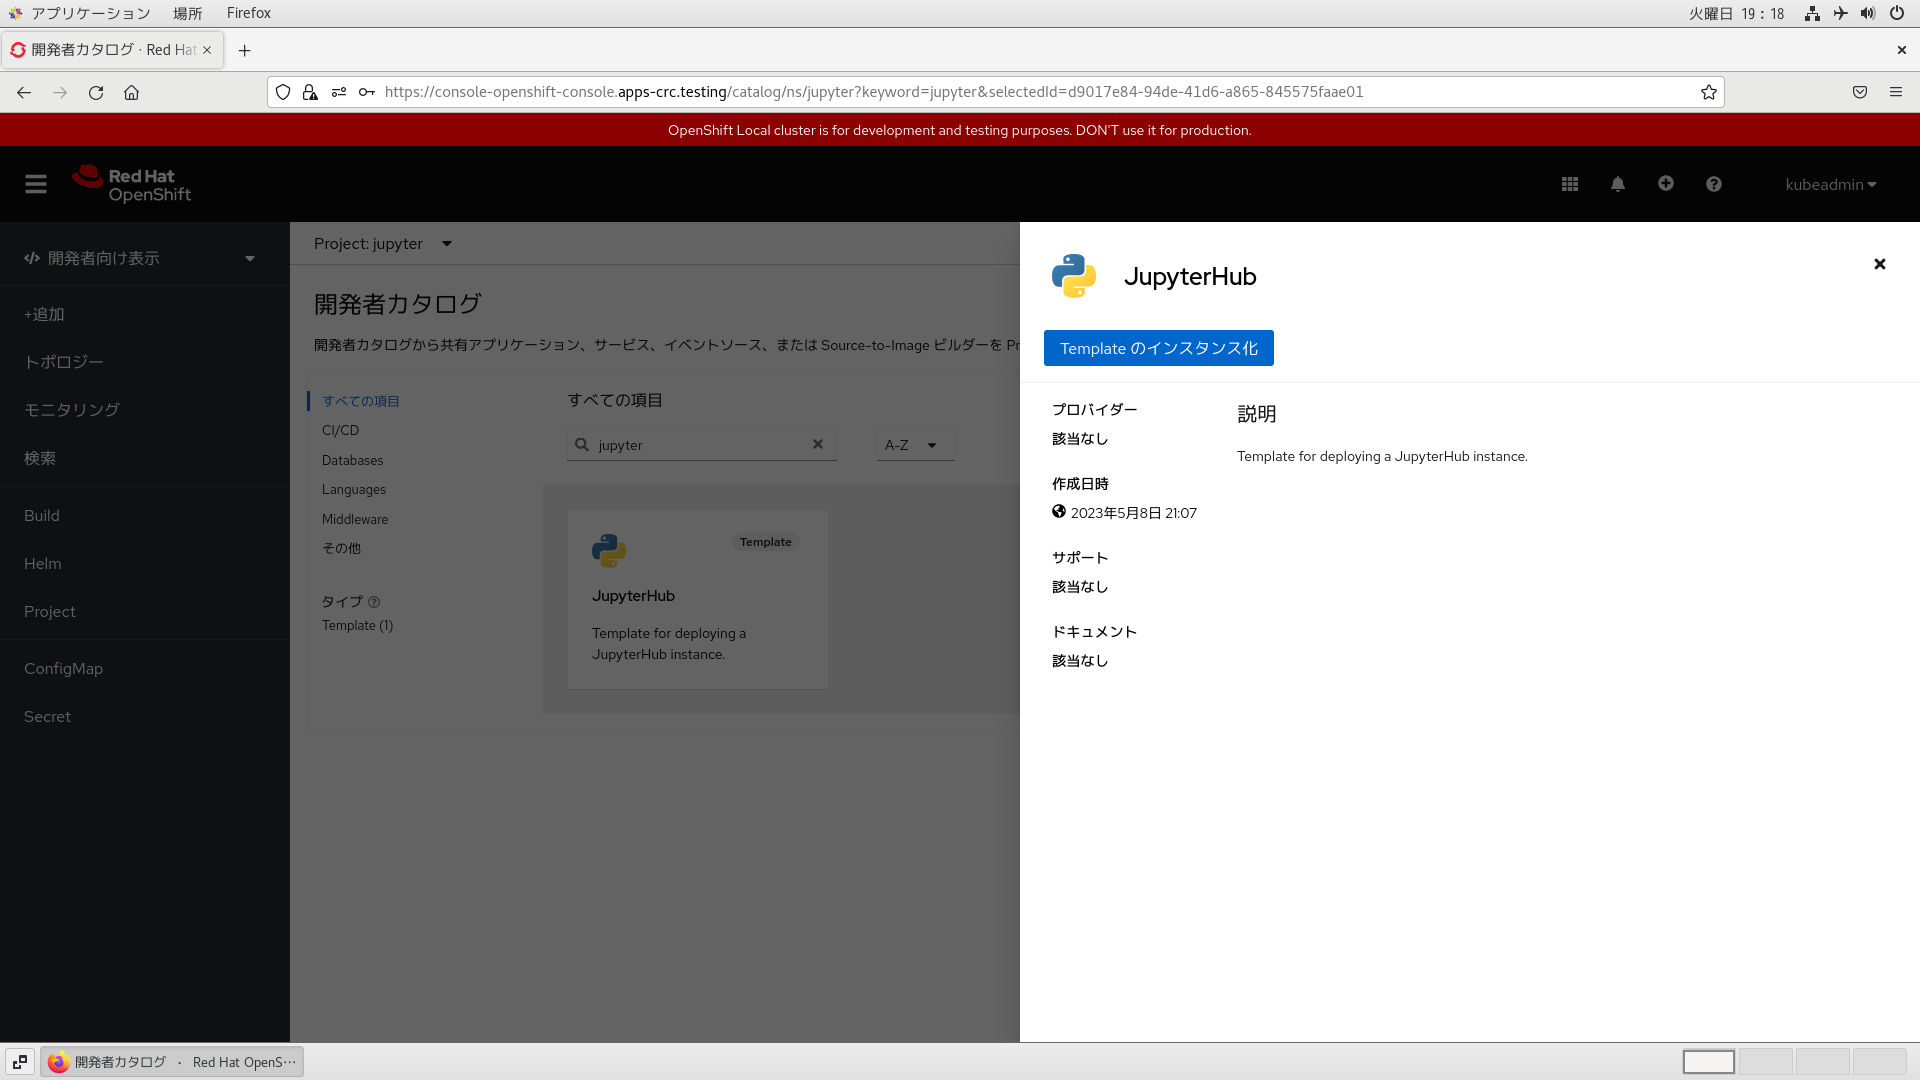
以下を順に辿って、予め登録したTemplateを選択します。
「開発者向け表示」
→「+追加」
→「開発者カタログ>すべてのサービス」
→「JupyterHub」 ※キーワードに”ju”と入力すればHitするはず
→「Templateのインスタンス化」
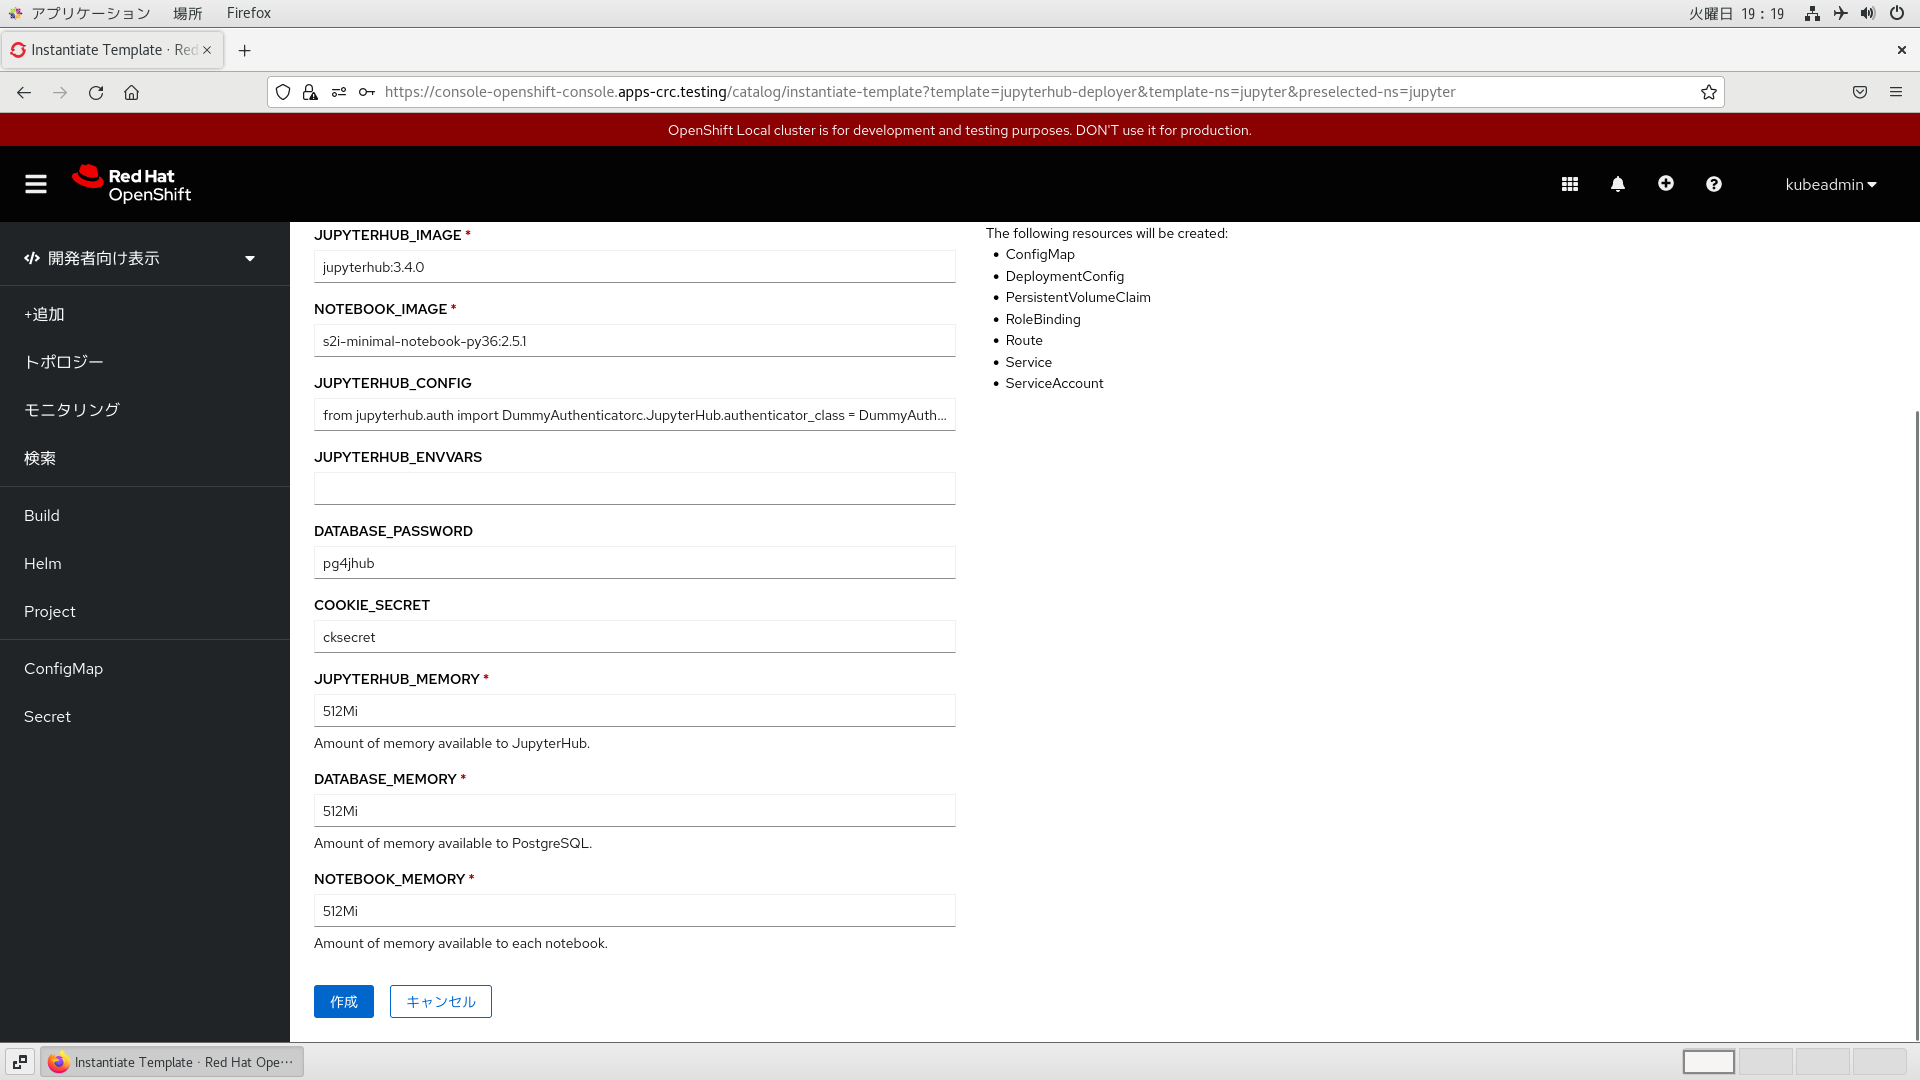
続く画面では、特に手を加えることなく、画面下部までスクロールして、「作成」ボタンを押下します。
すると、「トポロジー」ビューに画面遷移しますので、そのままでアイコンの周囲を青い帯が囲むまでしばらく待ちます。
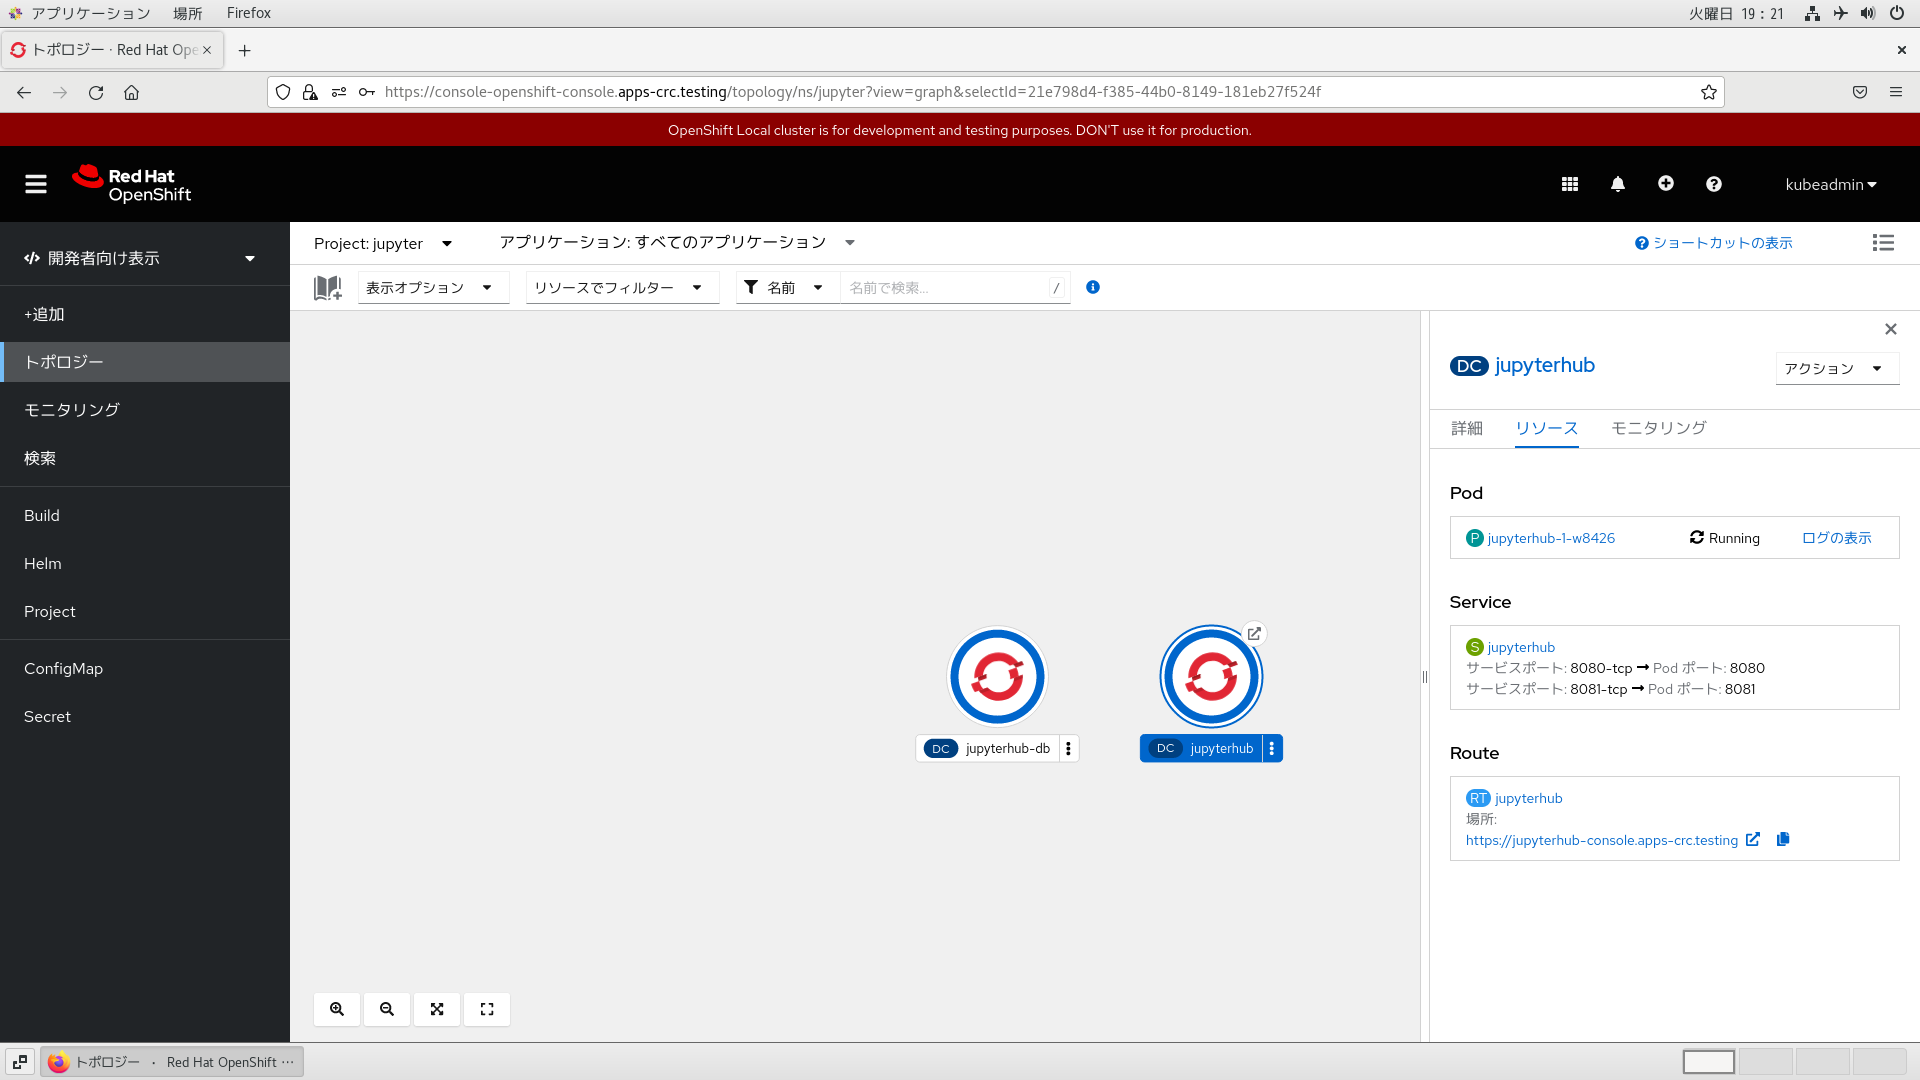
DC/jupyterhubのRouteに記載のあるURLをクリックします(自動的に別タブがOpenして表示される)。
例では、https://jupyterhub-console.apps-crc.testing
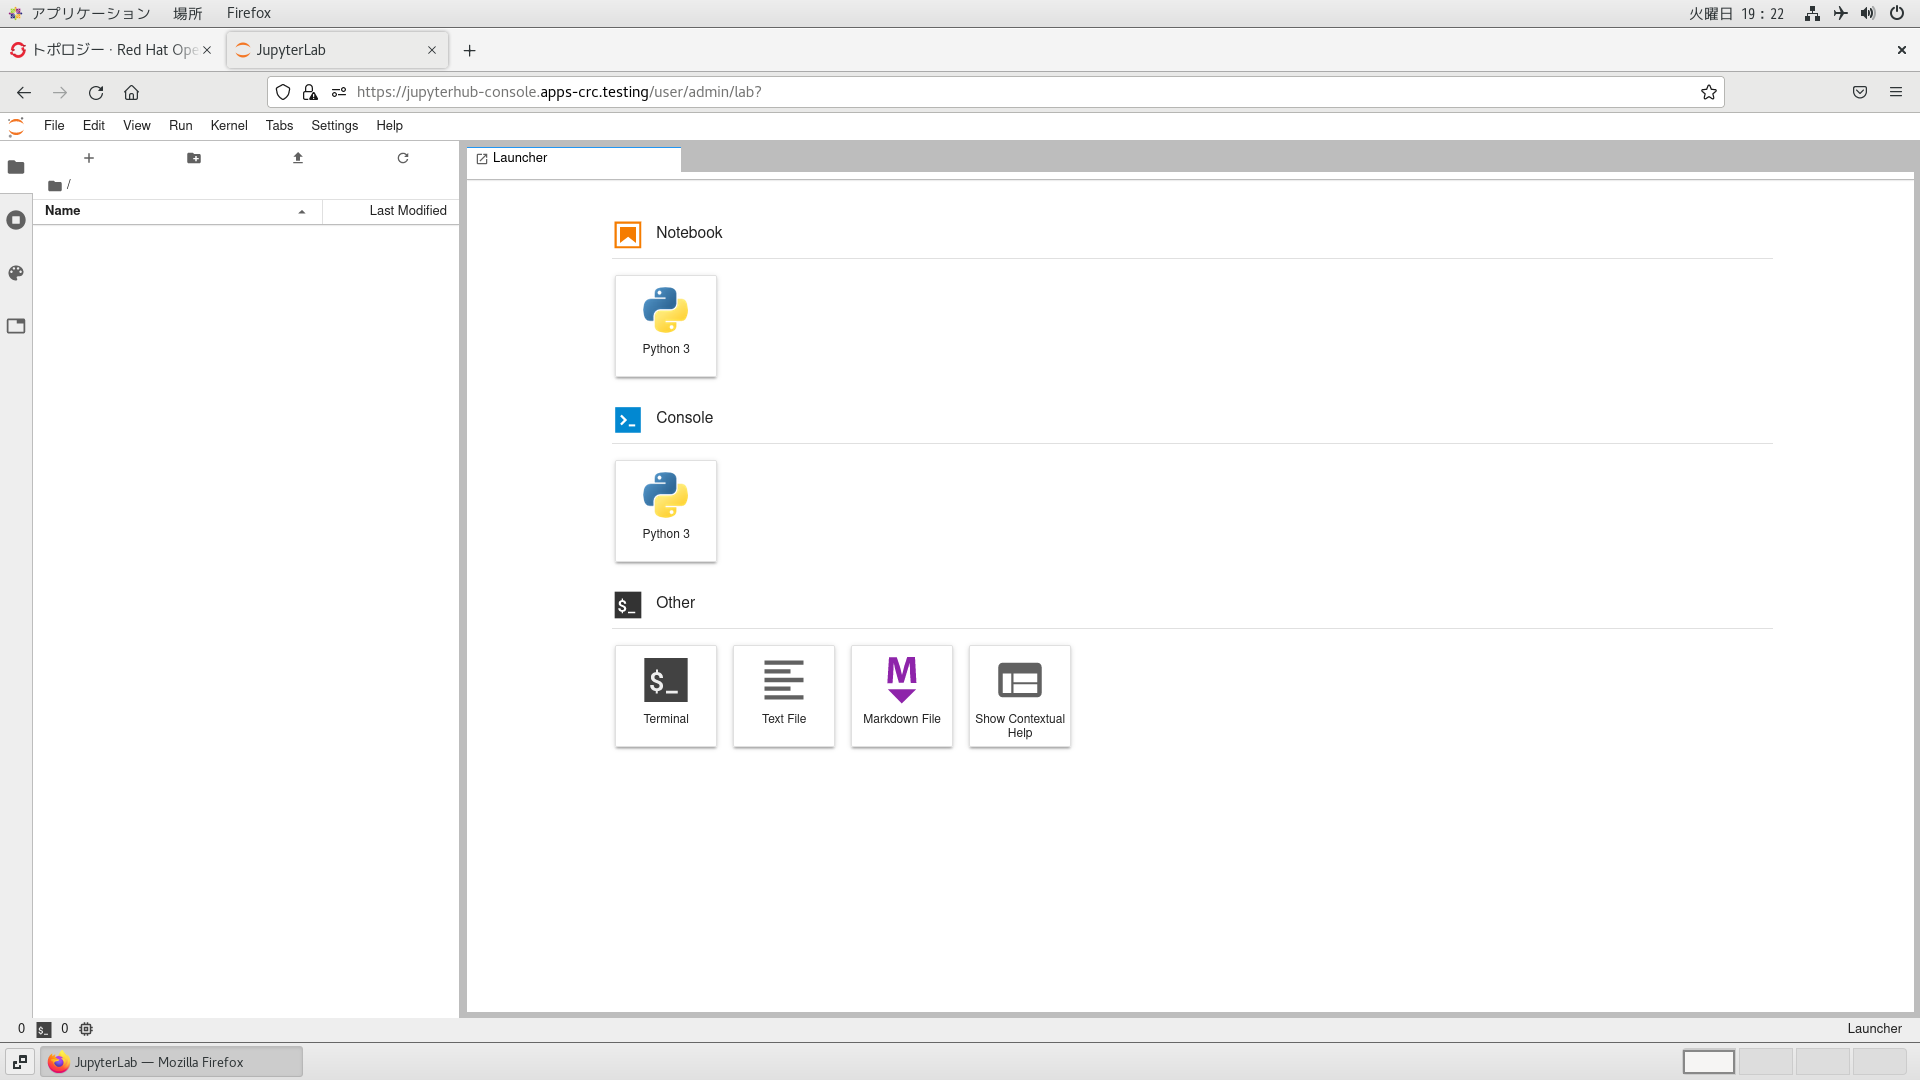
Dummu認証(どんなID/PWを入力してもOK)ですが、adminを入力して「Sign In」ボタンを押下します。

すると、無事、JupyterLabの見慣れた画面が現れます。
とりあえず最低限はクリアしたので、ココまで。
永続ボリュームを割り当てたり、用途に応じたイメージの切り替えたりは、また今度。。。
まとめ
本稿ではNFSサーバのインストールおよびJupyterHubのデプロイを進めました。
PCのSpecの都合、Largeリソースを割り当てたり、複数のJupyterLabコンテナを起動したり、は難しいですが、OpenShiftクラスタでJupyterHub/JupyterLabを試すには十分すぎる環境だと思われます。
-
jupyteronopenshift/jupyterhub - Quay | https://quay.io/repository/jupyteronopenshift/jupyterhub?tab=tags ↩
-
postgres - Official Image | https://hub.docker.com/_/postgres ↩
-
jupyteronopenshift/s2i-minimal-notebook-py36 - Quay | https://quay.io/repository/jupyteronopenshift/s2i-minimal-notebook-py36?tab=tags ↩
-
thoth-station/s2i-minimal-py38-notebook - Quay | https://quay.io/repository/thoth-station/s2i-minimal-py38-notebook?tab=tags ↩
-
jupyter/pyspark-notebook - Docker Image | https://hub.docker.com/r/jupyter/pyspark-notebook ↩
-
Loading the JupyterHub Templates | https://github.com/jupyter-on-openshift/jupyterhub-quickstart#loading-the-jupyterhub-templates ↩