0
0

Delete article

Deleted articles cannot be recovered.

Draft of this article would be also deleted.

Are you sure you want to delete this article?

More than 1 year has passed since last update.

Raspberry PiのGPIOピン接続の3.5インチタッチスクリーンのdpiを上げる方法

Last updated at Posted at 2024-06-10

まず、ラズパイとGPIOピンでスクリーンを接続します。
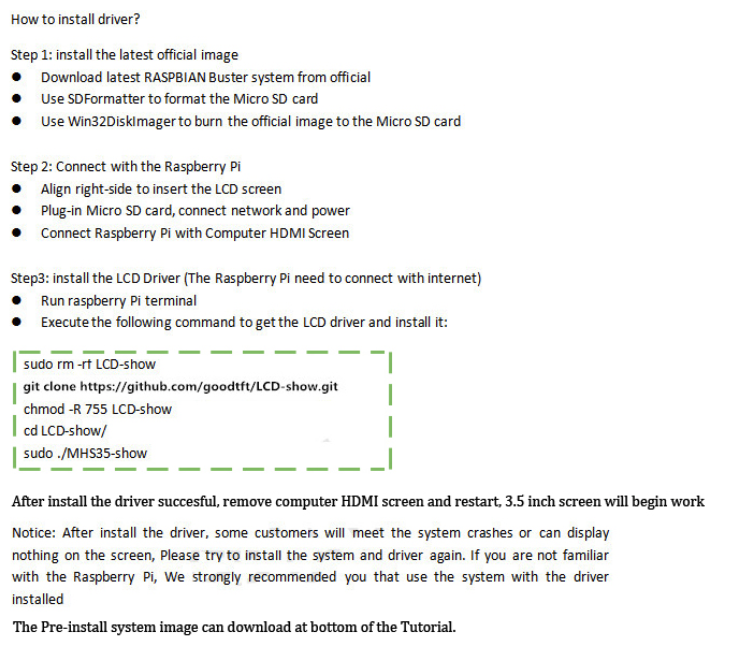
スクリーンショット 2024-06-10 21.26.41.png

ドライバのインストールは以上のように

そこから、DPIの設定を行います。
コマンドラインに以下のコードを打ってください

sudo nano /boot/config.txt

すると下の方にスクリーンに関する記述があります。
その下に以下のコードを追加してください

dpi_group=2
dpi_mode=86
framebuffer_width=480
framebuffer_height=320
dpi_output_format=519
hdmi_timings=480 0 10 16 10 320 0 2 1 2 0 0 0 60 0 9600000 3

今回は480360のスクリーンなのでwidth=480 height=360で設定しましたが、dpiを上げたい場合はこの数字を大きくすると上がります。(1080720のように)

この後、コントロール+Xで閉じる、yで保存、エンターを押し、その後sudo rebootのコマンドで再起動してください。

追記:上記ドライバをインストールしたなら、以下のtipもご査収ください。
スクリーンショット 2024-06-10 21.36.51.png

0
0
0

Register as a new user and use Qiita more conveniently

  1. You get articles that match your needs
  2. You can efficiently read back useful information
  3. You can use dark theme
What you can do with signing up
0
0

Delete article

Deleted articles cannot be recovered.

Draft of this article would be also deleted.

Are you sure you want to delete this article?