はじめに
この記事は Qt Advent Calendar 2019 の16日目の記事です。
タイトルどおりの内容で捻りも何も無いですが、QML側でDelegateModelを使うとListViewのdelegateプロパティが機能しなくなる辺りでちょっと残念な気持ちになったりしたので自分のメモ書き程度に。Qt5.6を使用しています。
実装
早速実装いきます。
モデル
main.cppでモデルを構築してQML側へcontextPropertyとして登録しておきます。今回はモデルの中身にはこだわらないのでQStandardItemModelでささっと作っておきます。
モデルの中身をQML側から見るとこんなカンジです。
- {display: "item_1"}
- {display: "item_1_1", decoration: Qt.red}
- {display: "item_1_2", decoration: Qt.green}
- (中略)
- {display: "item_1_1000", decoration: Qt.darkCyan}
- {display: "item_2"}
- {display: "item_2_1", decoration: Qt.red}
- {display: "item_3_2", decoration: Qt.green}
- (中略)
- {display: "item_3_1000", decoration: Qt.darkCyan}
- (中略)
- {display: "item_100"}
- {display: "item_100_1", decoration: Qt.red}
- (後略)
    // [1] サンプル用のツリー構造のモデルを作る
    QStandardItemModel model;
    for (int i = 0; i < 100; ++i) {
        auto row = new QStandardItem(QString("item_%1").arg(i+1));
        QList<QStandardItem*> children;
        for (int j = 0; j < 1000; ++j) {
            auto child = new QStandardItem(QString("item_%1_%2").arg(i+1).arg(j+1));
            child->setData(QColor(static_cast<Qt::GlobalColor>((j % 10) + Qt::red)), Qt::DecorationRole);
            children.append(child);
        }
        row->appendRows(children);
        model.appendRow(row);
    }
    view.rootContext()->setContextProperty("dataModel", &model);
    // [1] ここまで
QML
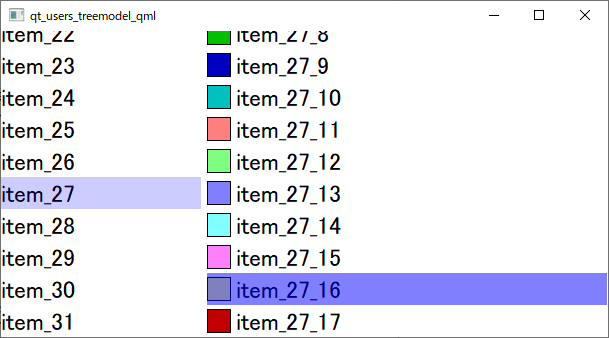
ツリー構造の親子を見せるためにListViewを横並びに2つ並べました。
左の ListView で全親アイテムを表示し、左の ListView で選択されたアイテムの子アイテムを右の ListView に表示します。
ポイントは右の ListView の model プロパティに DelegateModel を使っているところで、 rootIndex プロパティによって元のモデルのどこを見せるのかを制御できます。 QAbstractItemView::setRootIndexはどこに行ったんだよ
DelegateModel を使うと右の ListView の デリゲートは DelegateModel の delegate プロパティで指定することになります。 ListView の delegate プロパティにセットしたコンポーネントは使われないことに注意が必要です。
// 右側のリスト
ListView {
    id: rightList
    Layout.fillHeight: true
    Layout.preferredWidth: 400
    // [2] modelにDelegateModelを使う
    model: DelegateModel {
        rootIndex: leftList.model.index(leftList.currentIndex, 0) // [2] rootIndex指定
        model: leftList.model
        delegate: rightDelegate // [2] DelegateModel.delegate でデリゲート指定
        onRootIndexChanged: rightList.positionViewAtBeginning()
    }
    // delegate: rightDelegate // [3] 効かない
    highlight: highlight
    highlightMoveDuration: 200
    Keys.onUpPressed: decrementCurrentIndex()
    Keys.onDownPressed: incrementCurrentIndex()
    Keys.onLeftPressed: leftList.focus = true
    keyNavigationWraps: true
}
実行結果
こうなります。100×1000で100000アイテム程度なら、中身も単純なのでストレスなく動きます。
ソースコード
ソースコードは github に公開しています。
おわりに
QMLのListViewにDelegateModelを使用してrootIndexを指定すればツリー構造のデータを表示できます。 DelegateModel.modelIndex と DelegateModel.parentModelIndex を使うとファイルマネージャーのフォルダ移動のようなことも実装できるんじゃないかな、かな。