前回までのあらすじ
API通信が出来るようになったよ! やったね!
記事一覧
- 初学者によるubuntuでのRails + React で駅案内システム作り①~下準備編~
- 初学者によるubuntuでのRails + React で駅案内システム作り②~Rails+ReactでAPI通信編~
-
初学者によるubuntuでのRails + React で駅案内システム作り③~Scaffold機能を使わずCRUD~
- 今回はこちら!
- 初学者によるubuntuでのRails + React で駅案内システム作り④~1:1、1:mで対応したモデルの登録更新、JSON出力~
新規テーブルのCRUDを実装
前回の記事で駅一覧のCRUDをScaffold機能でサクッと作成しました。確かに便利ではあったんですが、不要なjbuilderファイルが入っていたりとセキュリティの観点からひやひやしたので今回は地道にrailsのコマンドを叩いてModel、View、Controllerを作成していくことにしました。
今回作りたいテーブル
駅があればその駅は何かしらの路線に所属しているはずです。例えば根室駅は花咲線(正確には根室本線)に所属していますし、釧路駅は花咲線、根室本線、そして便宜上釧網本線に所属しているといっても良いでしょう。一方で花咲線には根室駅、釧路駅を始めとしていくつかの駅が所属していると考えることもできます。つまり、1:多やm:多ではなく、多:多の関係になっているということになります。
Railsでテーブル間を関連付ける(リレーションを貼る)時に、1:多やその逆だとその相互のテーブルでリレーションを貼ればいいのですが、多:多だと中間テーブルを設けてやる必要が出てきそうです。
また、その路線で何番目の駅かという情報も欲しいですよね? 例えば釧路駅は花咲線の1番目の駅で、根室駅は20番目位の駅、とのように順番づけて登録したいとなるとただの中間テーブルだとよくなさそう。ということで、has_many throughのアソシエーションを構成するのが一番よさそうです。
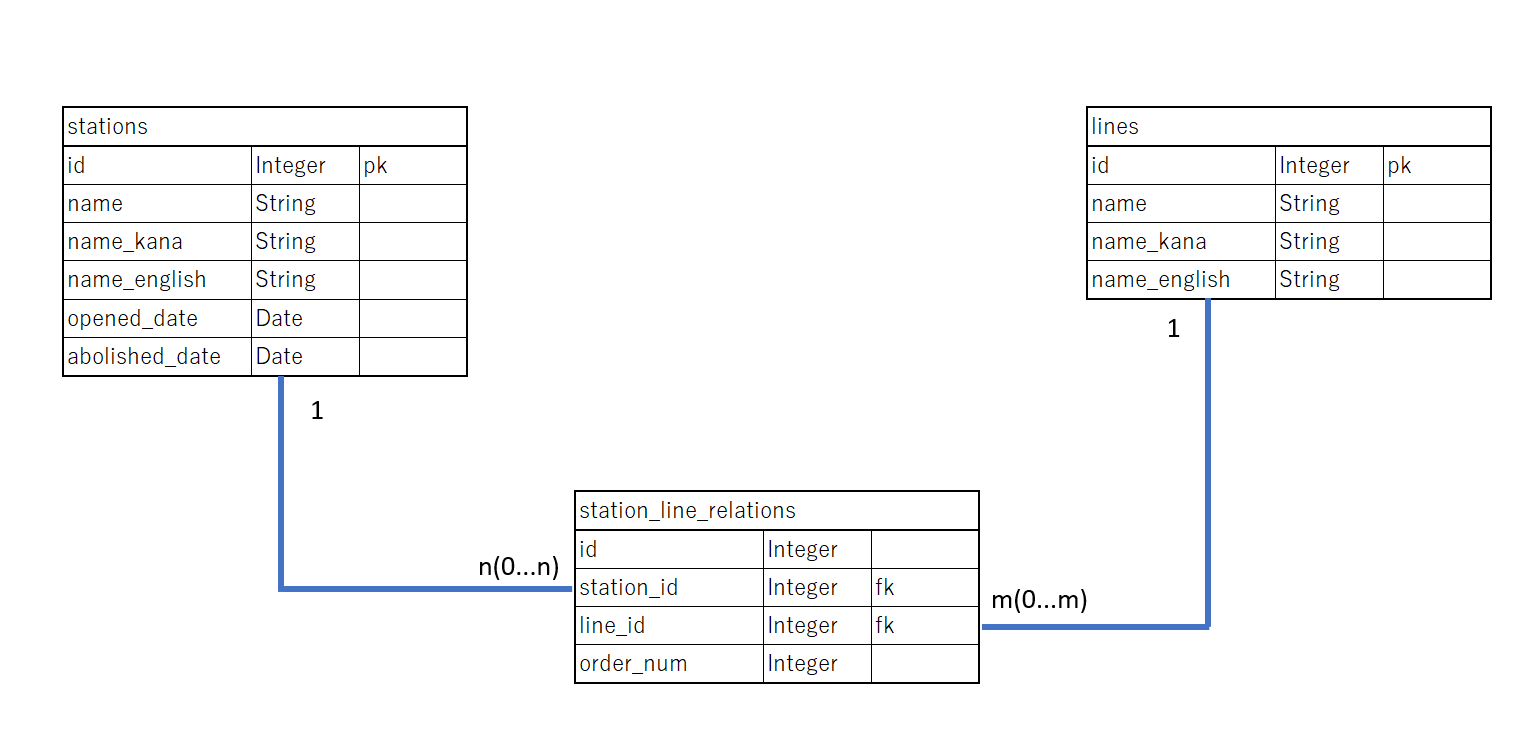
ということはひとまず路線テーブルは先にリレーションを考慮せず作っちゃっても問題なさそう。
Model作成(路線テーブル)
ということで路線テーブルを作成しました。
$ rails g model <model名> <カラム名>:<データ型>
ここでmodel名は単数形に(linesではなくline)とのこと。
$ rails g model line name:string name_kana:
string name_english:string
      invoke  active_record
      create    db/migrate/20230121172132_create_lines.rb
      create    app/models/line.rb
      invoke    test_unit
      create      test/models/line_test.rb
      create      test/fixtures/lines.yml
今回初めてmodelをコマンドを叩いて作ったので、一応migrationファイルの中身も見ておきました。
class CreateLines < ActiveRecord::Migration[7.0]
  def change
    create_table :lines do |t|
      t.string :name
      t.string :name_kana
      t.string :name_english

      t.timestamps
    end
  end
end
ということで中身も問題なさそうなので
$ rails db:migrate
== 20230121172132 CreateLines: migrating ======================================
-- create_table(:lines)
   -> 0.0275s
== 20230121172132 CreateLines: migrated (0.0276s) =============================
Controller作成(路線Controller)
お次は路線のCRUDを行うためのControllerを作成します。
$ rails g controller lines
      create  app/controllers/lines_controller.rb
      invoke  erb
      create    app/views/lines
      invoke  test_unit
      create    test/controllers/lines_controller_test.rb
      invoke  helper
      create    app/helpers/lines_helper.rb
      invoke    test_unit
ルーティングはresourcesを使用して一括指定をします。
Rails.application.routes.draw do
  resources :stations
  # 今回下の1行を追加
  resources :lines
  # Define your application routes per the DSL in https://guides.rubyonrails.org/routing.html

  # Defines the root path route ("/")
  # root "articles#index"
  namespace :api, { format: 'json' } do
    namespace :reactapi do #Reactアプリ用のAPI
      resources :stations
    end
  end
end
resourcesは非常に便利で、この1行を指定するだけで下のルーティングを一括で指定してくれます。(下のルーティング一覧は抜粋)
    lines GET    /lines(.:format)
   lines#index
          POST   /lines(.:format)
   lines#create
 new_line GET    /lines/new(.:format)
   lines#new
 edit_line GET    /lines/:id/edit(.:format)
   lines#edit
     line GET    /lines/:id(.:format)
   lines#show
          PATCH  /lines/:id(.:format)
   lines#update
          PUT    /lines/:id(.:format)
   lines#update
          DELETE /lines/:id(.:format)
   lines#destroy
ということでルーティング指定が終わったところでControllerファイルを編集していきます。
class LinesController < ApplicationController
  before_action :set_line, only: %i[ show edit update destroy ]

  # GET /lines
  def index
    @lines = Line.all
  end

  # GET /lines/1
  def show
  end

  # GET /lines/new
  def new
    @line = Line.new
  end

  # GET /lines/1/edit
  def edit
  end

  # POST /lines
  def create
    @line = Line.new(line_params)

    respond_to do |format|
      if @line.save
        format.html { redirect_to line_url(@line), notice: "路線の登録に成功しました." }
      else
        format.html { render :new, status: :unprocessable_entity }
      end
    end
  end

  # PATCH/PUT /lines/1
  def update
    respond_to do |format|
      if @line.update(line_params)
        format.html { redirect_to line_url(@line), notice: "路線の更新に成功しました." }
      else
        format.html { render :edit, status: :unprocessable_entity }
      end
    end
  end

  # DELETE /lines/1
  def destroy
    @line.destroy

    respond_to do |format|
      format.html { redirect_to lines_url, notice: "路線の削除に成功しました." }
    end
  end

  private
    # Use callbacks to share common setup or constraints between actions.
    def set_line
      @line = Line.find(params[:id])
    end

    # Only allow a list of trusted parameters through.
    def line_params
      params.require(:line).permit(:name, :name_kana, :name_english)
    end
end
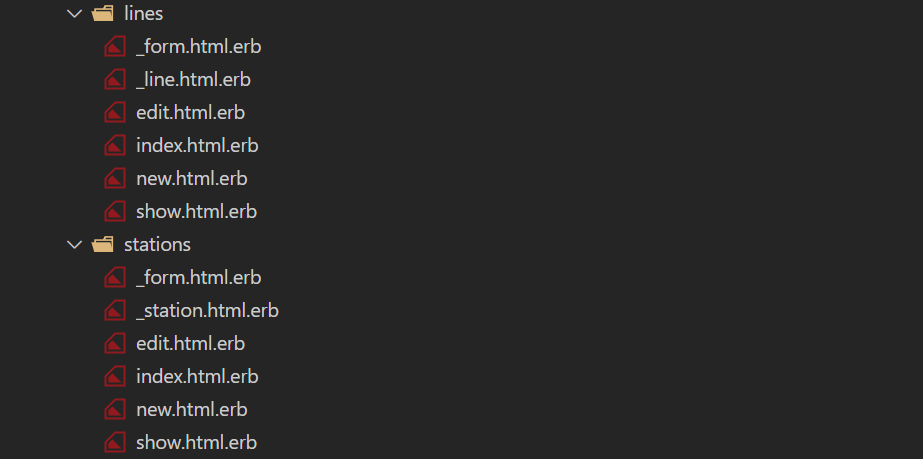
View作成(路線CRUDのView)
いよいよ残るはView、見てくれになります。こちらもフォームや一覧系で共通パーツも作っちゃいます。あとja.yml(Activerecord、View)の追加もお忘れなく。Viewファイルの各ファイルの中身は先にstationsで作ったものを踏襲しました。
完了したら早速localhost:3000/linesへアクセスしてみると
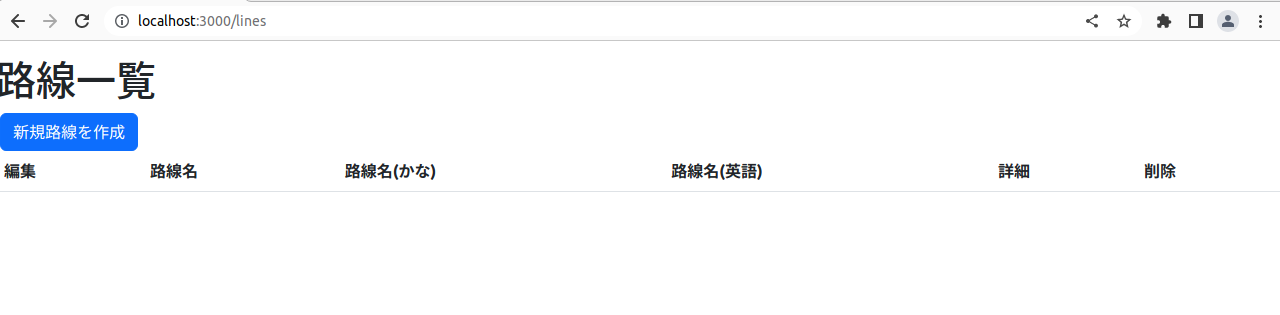
このように無事表示されました!一連のCRUDを行っても特に問題はなさそうです。
中間テーブル作成~has_many through アソシエーション~
続いて間に挟むstation_line_relationsモデル周りの作成になります。作成方法はほかのモデルと変わらず、そしてControllerやViewもLineモデル周りの作成で行ったように作っていきました。
ここで作成していて他記事を見ていたのですが、どうやって中間テーブルの登録するんだ???となったのでまず試しにstation_line_relationsで一連のCRUDを作成しました。
アソシエーション設定
さて、アソシエーションの設定周りです。どうも簡単らしい。最近ご無沙汰していたので試しに行ってみました。
こちらに従ってリレーションを貼るならば、
class Station < ApplicationRecord
  has_many :station_line_relations
  has_many :lines, through: :station_line_relations
end
class Line < ApplicationRecord
  has_many :station_line_relations
  has_many :stations, through: :station_line_relations
end
class StationLineRelation < ApplicationRecord
  belongs_to :station
  belongs_to :line
end
これで、試しに駅と路線関連付け一覧表示で試しにリレーションが表示できるかviewファイルを編集して確認してみます。
<p style="color: green"><%= notice %></p>

<h1>駅順番一覧</h1>
<%= link_to "新規駅順番登録", new_station_line_relation_path, {class: "btn btn-primary mx-1 col-2 ms-3"} %>
<div class="row ms-2 mt-2">
  <%= link_to "駅一覧", stations_path, {class: "btn btn-primary mx-1 col-2 ms-2"} %>
  <%= link_to "路線一覧", lines_path, {class: "btn btn-primary mx-1 col-2 ms-2"} %>
</div>
<div id="stations">
  <table class="table">
    <thead>
      <th>編集</th>
      <th>駅名</th>
      <th>路線名</th>
      <th>駅順番</th>
      <th>詳細</th>
      <th>削除</th>
    </thead>
    <tbody>
      <% @station_line_relations.each do |station_line_relation| %>
        <tr class="table-info">
          <td>
            <%= link_to "編集", edit_station_line_relation_path(station_line_relation), {class: "btn btn-success mx-1"} %>
          </td>
          <%= render station_line_relation %>
          <td>
            <%= link_to "詳細", station_line_relation, {class: "btn btn-info mx-1"} %>
          </td>
          <td>
            <%= button_to "削除", station_line_relation, {method: :delete, class: "btn btn-danger mx-1"} %>
          </td>
        </tr>
      <% end %>
    </tbody>
  </table>
</div>
<td class="align-middle"><%= station_line_relation.station.name %></td>
<td class="align-middle"><%= station_line_relation.line.name %></td>
<td class="align-middle"><%= station_line_relation.order_num %></td>
このstation_line_relation.line.nameのように書くだけで値が拾ってこれるのは便利。これでいくつかデータを登録してみると、
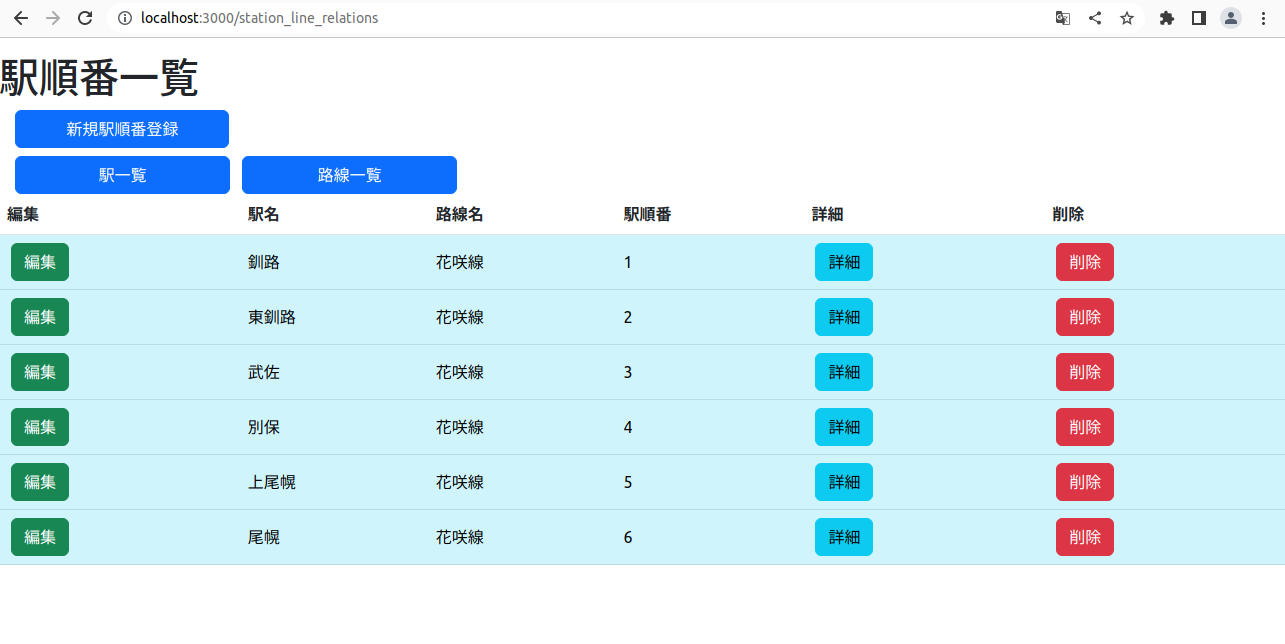
良い感じに表示されてますね!
あとはわざわざthroughを設定したからには試してみないと。ということで試しに路線テーブルに編集を加えてみます。
<td class="align-middle"><%= line.name %></td>
<td class="align-middle"><%= line.name_kana %></td>
<td class="align-middle"><%= line.name_english %></td>
<td class="align-middle"><%= line.name_russian %></td>
<td class="align-middle">
  <table>
    <tbody>
      <% line.stations.each do |station| %>
        <tr>
          <td><%= station.name %></td>
          <td><%= station.name_english %></td>
        </tr>
      <% end %>
    </tbody>
  </table>
</td>
あとは路線一覧画面で表示してみると、
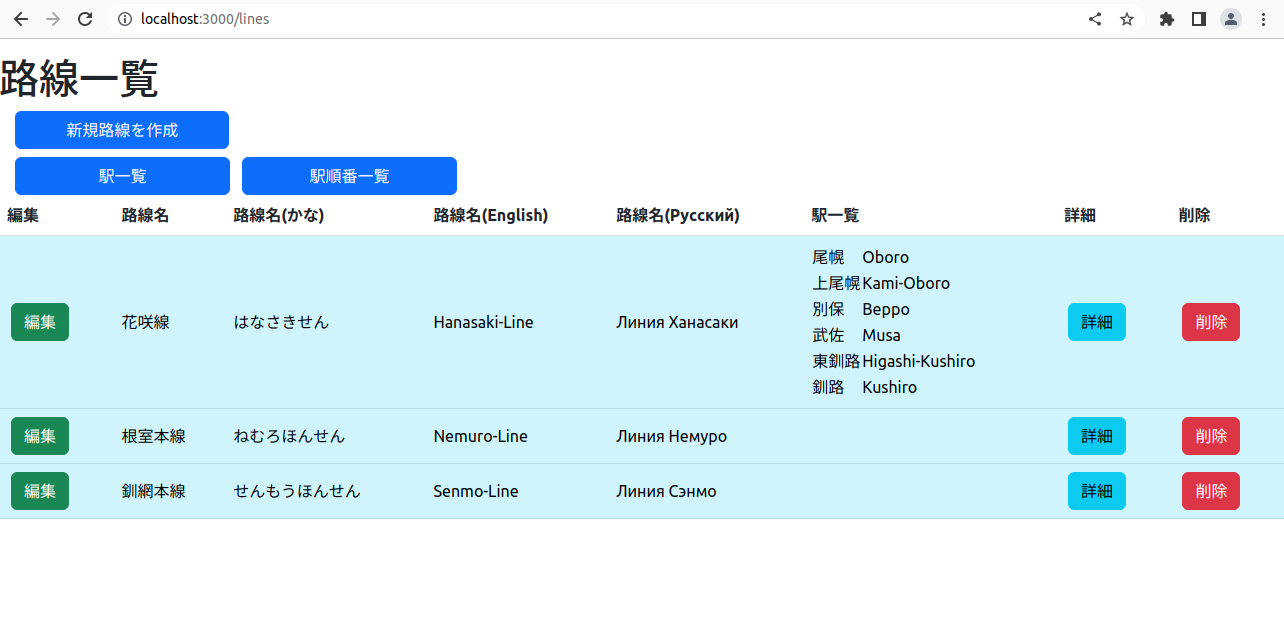
良い感じですね!こんな感じでリレーションも含めた一連のCRUDが出来てそうですね。
色々やりたいことはたくさんありますが、今回はこの簡単なCRUD実装とアソシエーション実装までで止めたいと思います。
次回はたぶんフロント側の話になると思います。それではまた!