動作環境
GeForce GTX 1070 (8GB)
ASRock Z170M Pro4S [Intel Z170chipset]
Ubuntu 16.04.4 LTS desktop amd64
TensorFlow v1.7.0
cuDNN v5.1 for Linux
CUDA v8.0
Python 3.5.2
IPython 6.0.0 -- An enhanced Interactive Python.
gcc (Ubuntu 5.4.0-6ubuntu1~16.04.4) 5.4.0 20160609
GNU bash, version 4.3.48(1)-release (x86_64-pc-linux-gnu)
scipy v0.19.1
geopandas v0.3.0
MATLAB R2017b (Home Edition)
ADDA v.1.3b6
gnustep-gui-runtime v0.24.0-3.1
PyMieScatt v1.7.0
関連
- Ref1. geometry (3D) > 正四角錐の内部を格子状のdipoleで埋め尽くす > volfil_tetrahedron_180519.py > v0.1 | 結果の可視化 (Tinkercad: Shape Generator) | v0.2: Numpy用ファイル出力
- Ref2. 可視化(3D) > GitHub > STL > Cubeの表示 > STL Writer使用 > 方向によっては面が表示されない > 描画されない条件: 頂点が時計回り
- Ref3. 可視化(3D) > GitHub > STL > Cubeの表示 > STL Writer使用
GitHub STLレンダリング
Ref1で実装した結果を環境によらずにレンダリングしたい。
Unityを使ったレンダリングは52万個までは試したことがある。
Unity / geometry > droxtalの表示 > v0.4 > 13万個のdroxtal表示 / 52万個
しかしながら、Unityがない環境でも閲覧できる方が将来の参照性が高い。
GitHub STLレンダリングなら閲覧できる環境の選択肢が広くなる。
処理概要
-
Ref1のv0.2を使って、正四角錐のdipoleによるvolumetric fillingファイルを生成する
- 出力ファイル: dipole_180520.res
- 後述のコードによりSTLファイル形式にする
- 出力ファイル: cubeGroup_180520_t0950.stl
- STLファイルをGitHubリポジトリにpushする
手順1の出力ファイル: dipole_180520.res
以下の形式とする。
run
$ head dipole_180520.res
-9.0000000 -9.0000000 9.0000000
-9.0000000 -6.0000000 6.0000000
-9.0000000 -3.0000000 3.0000000
-9.0000000 0.0000000 0.0000000
-9.0000000 3.0000000 -3.0000000
volumetric fillingしている各dipoleの座標を表す。
STLファイルへの変換
STLファイルへの変換にはSTL Writerを使う。
ただし、STL WriterそのままではGitHub上のレンダリングに問題があるので、修正している(Ref.2参照)
STL Writer使用の例はRef.3を参照されたし。
make_cubeGroup_180520.py
import numpy as np
import sys

import STLWriter as STLWR
# STLWriter
# code from
# http://code.activestate.com/recipes/578246/
# by Manfred Moitzi
# (renamed as STLWriter.py from recipe-578246-1.py)

#

'''
v0.1 May, 20, 2018
  - read dipole positions from [IN_FILE]
  - add python_list_add()
  - get_cube() takes [size] arg
  - add make_cubeGroup()
'''


def python_list_add(in1, in2):
    wrk = np.array(in1) + np.array(in2)
    return wrk.tolist()


def make_cubeGroup():
    def get_cube(size=3, origin=[0, 0, 0]):
        # cube corner points
        s = size
        p1 = python_list_add(origin, (0, 0, 0))
        p2 = python_list_add(origin, (0, 0, s))
        p3 = python_list_add(origin, (0, s, 0))
        p4 = python_list_add(origin, (0, s, s))
        p5 = python_list_add(origin, (s, 0, 0))
        p6 = python_list_add(origin, (s, 0, s))
        p7 = python_list_add(origin, (s, s, 0))
        p8 = python_list_add(origin, (s, s, s))

        print(p1)

        # define the 6 cube faces
        # faces just lists of 3 or 4 vertices
        #
        # [NOTE]
        # vertices must be defined [anticlockwise] to be seen on GitHub
        # otherwise, the face is not drawn
        #
        return [
            [p1, p3, p7, p5],  # bottom
            [p1, p5, p6, p2],
            [p5, p7, p8, p6],
            [p7, p3, p4, p8],  # rear
            [p1, p2, p4, p3],  # left
            [p2, p6, p8, p4],
        ]

    IN_FILE = 'dipole_180520.res'  # from [volfil_tetrahedron_180519.py] v0.2
    OUT_FILE = 'cubeGroup_180520_t0950.stl'
    DIPOLE_SIZE = 5

    with open(IN_FILE, 'rb') as rfp:
        dipoles = np.genfromtxt(IN_FILE)

    with open(OUT_FILE, 'wb') as wfp:
        writer = STLWR.Binary_STL_Writer(wfp)

        for adipole in dipoles:
            cube = get_cube(DIPOLE_SIZE, adipole)
            writer.add_faces(cube)

        writer.close()
    print('OUT:', OUT_FILE)

if __name__ == '__main__':
    make_cubeGroup()
実行例
run
$ python3 make_cubeGroup_180520.py
...
[9.0, 0.0, 0.0]
[9.0, 3.0, 3.0]
[9.0, 6.0, 6.0]
[9.0, 9.0, 9.0]
OUT: cubeGroup_180520_t0950.stl
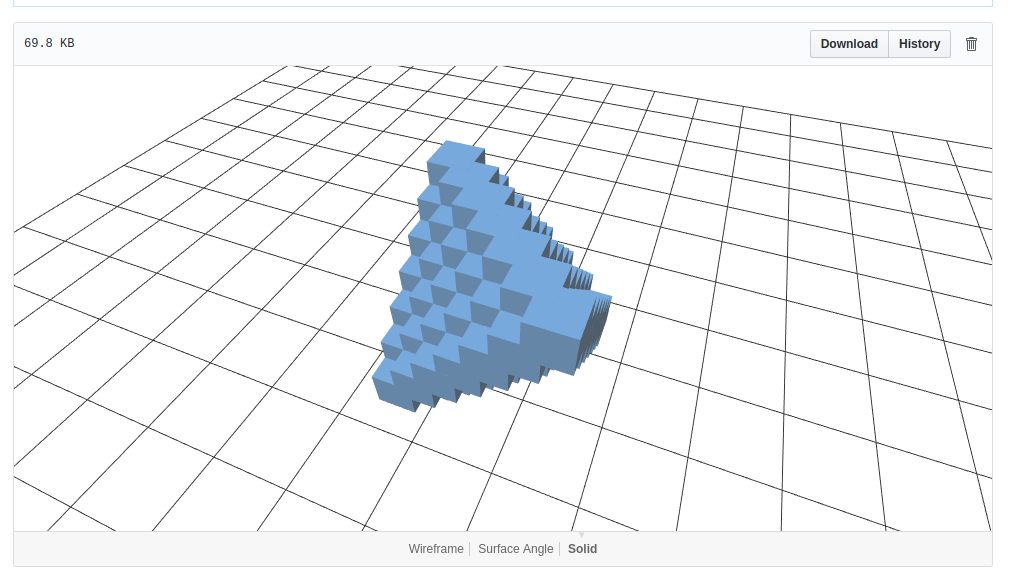
作成されたファイルは下記にpushした。
cubeGroup_180520_t0950.stl @ GitHub
dipoleの数は119。
こちらの環境(冒頭に記載)では回転操作時の応答は速い。