はじめに
社内で Linux の検証環境がほしくて、AlmaLinux9 を Hyper-V 上に新規構築した時のおはなし。
前提条件
・Hyper-V の環境が整っていること
Hyper-V の有効化は こちら の記事を参照してください
仮想マシンの構築は こちら の記事を参照してください
・AlamaLinux9 のインストールメディア(ISO)をダウンロードしてあること
インストールメディア(ISO)のダウンロードは こちら から
・仮想マシンにインストールメディア(ISO)がマウントされていること
インストールしていくよ
1.Hyper-V マネージャーを起動して、仮想マシンに接続します
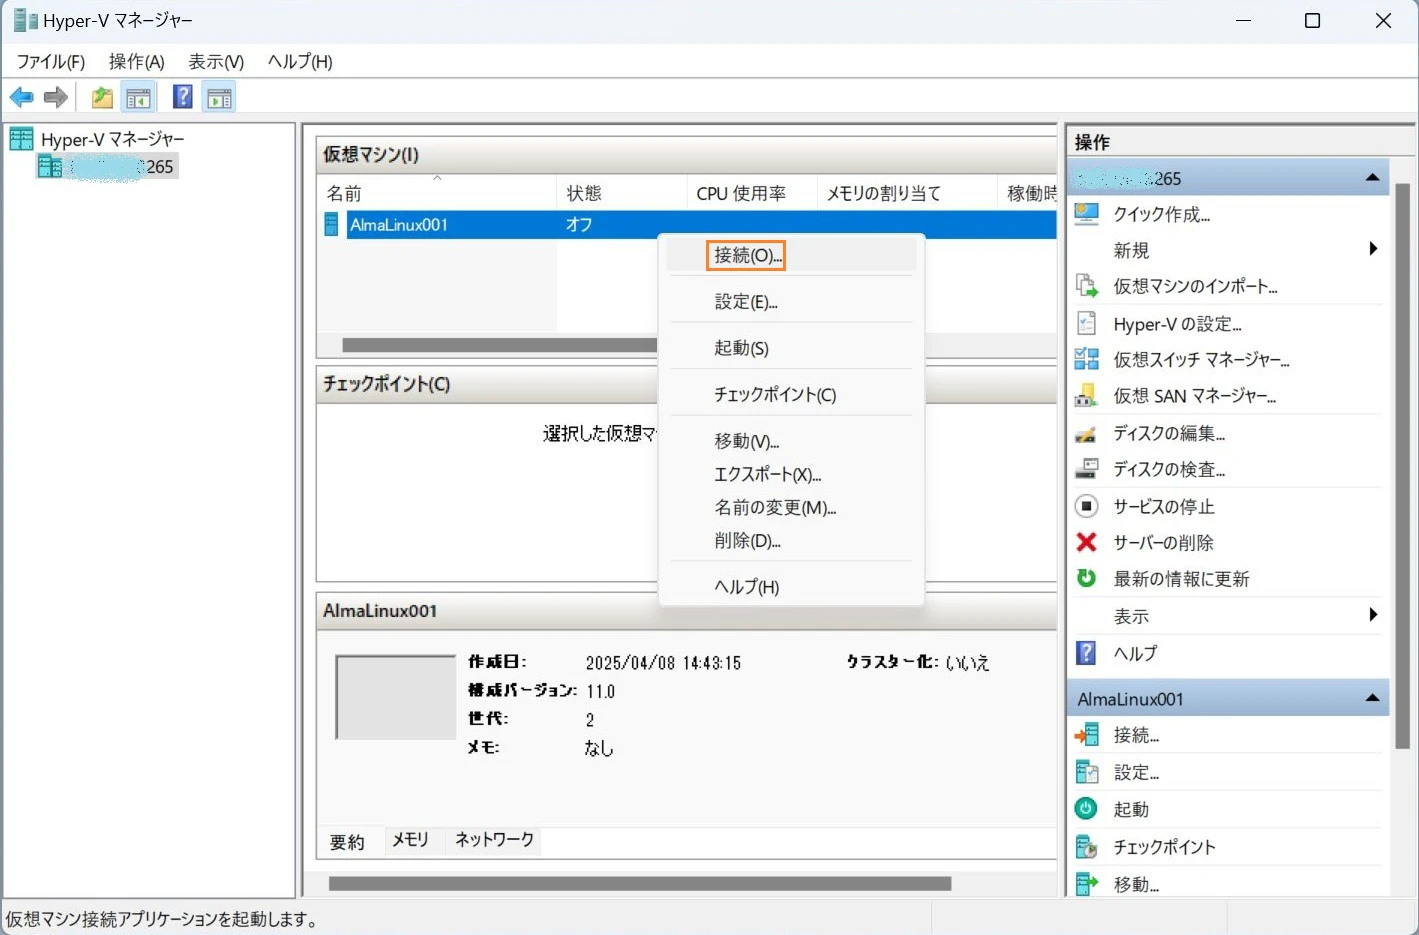
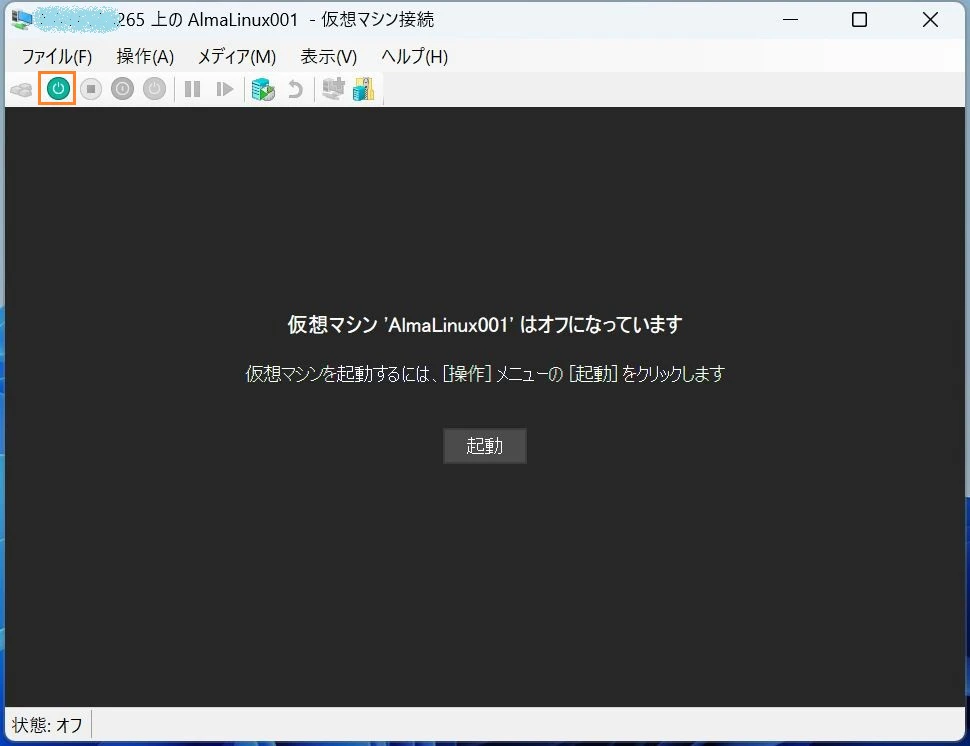
2.仮想マシンを起動します
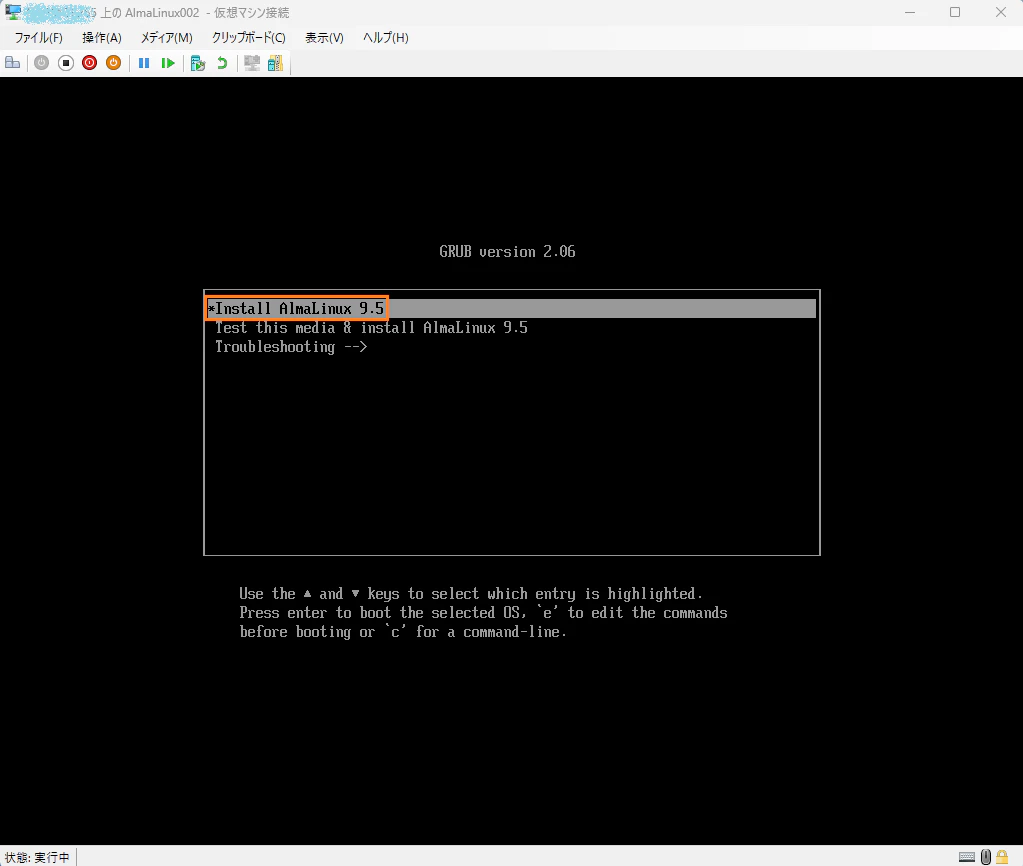
3.AlmaLinux9のインストーラが起動し、以下の画面が表示されます
デフォルトでは「Test this media & Install Almalinux 9.5」が選択されているので、「Install AlmaLinux 9.5」を選択してエンターキーを押します
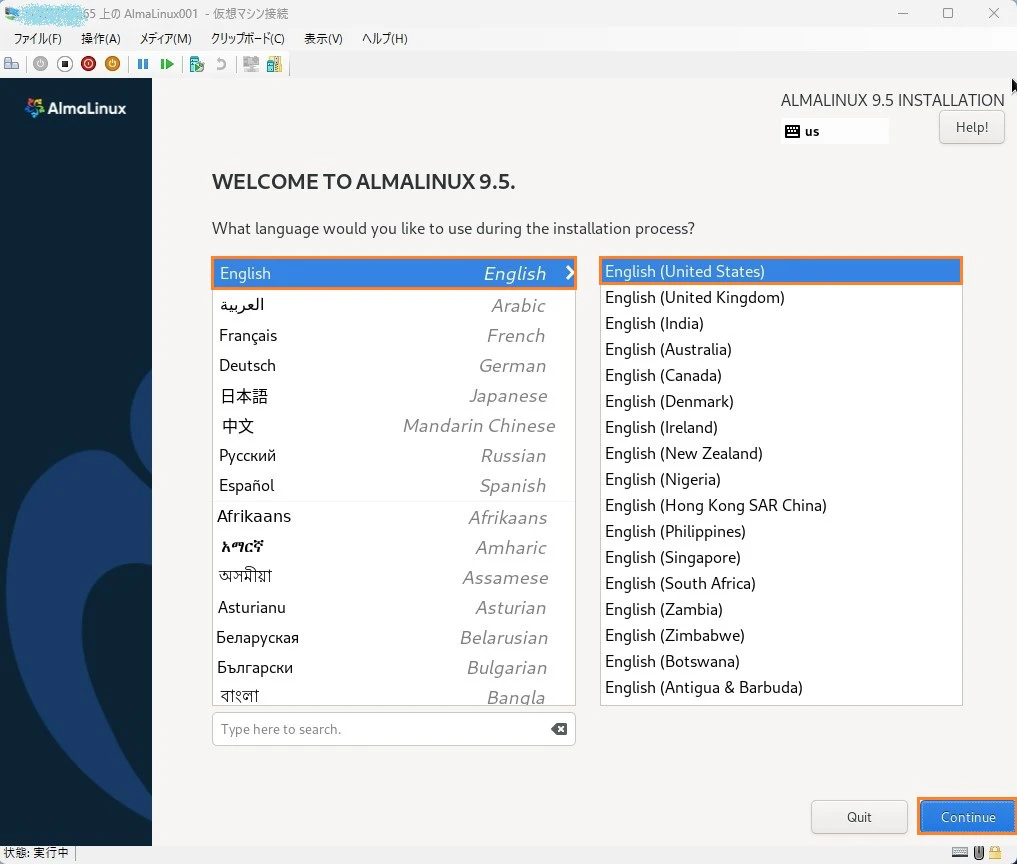
4.インストール中の表示言語の選択画面になりますので、任意の言語を選択します
ここでは English を選択して進めます
5.各種設定画面が表示されます。
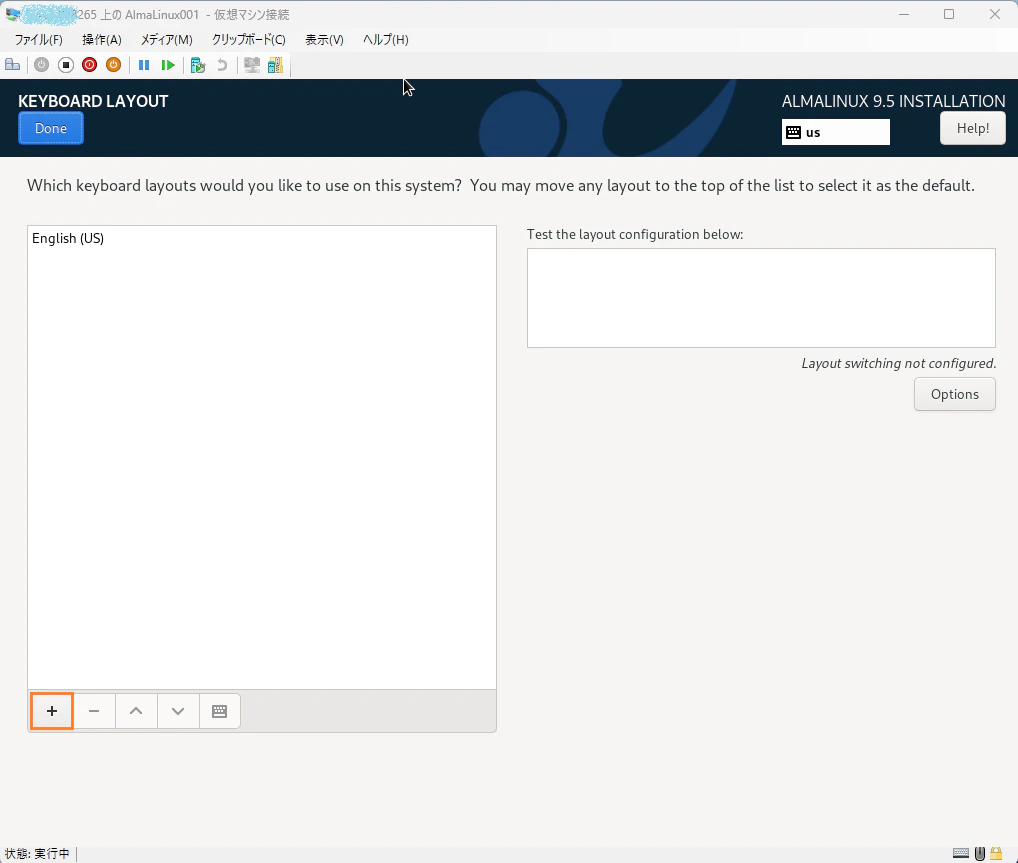
左側 LOCALIZATION の Keyboard から設定してきます
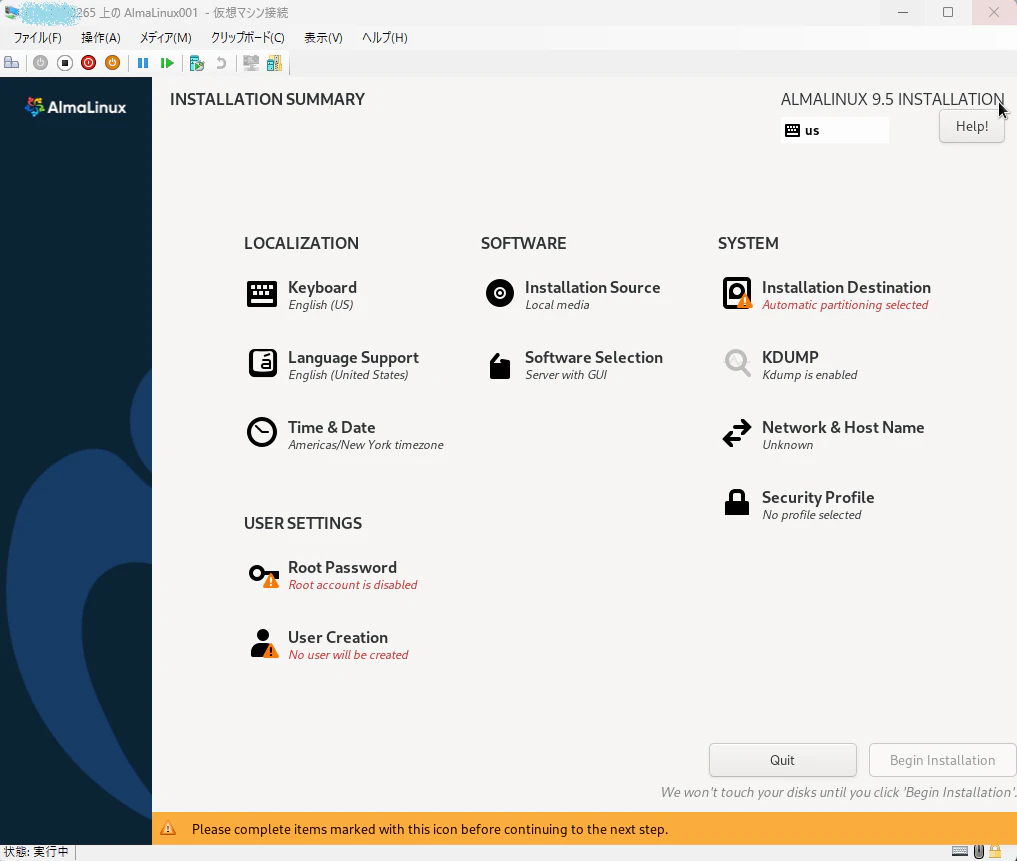
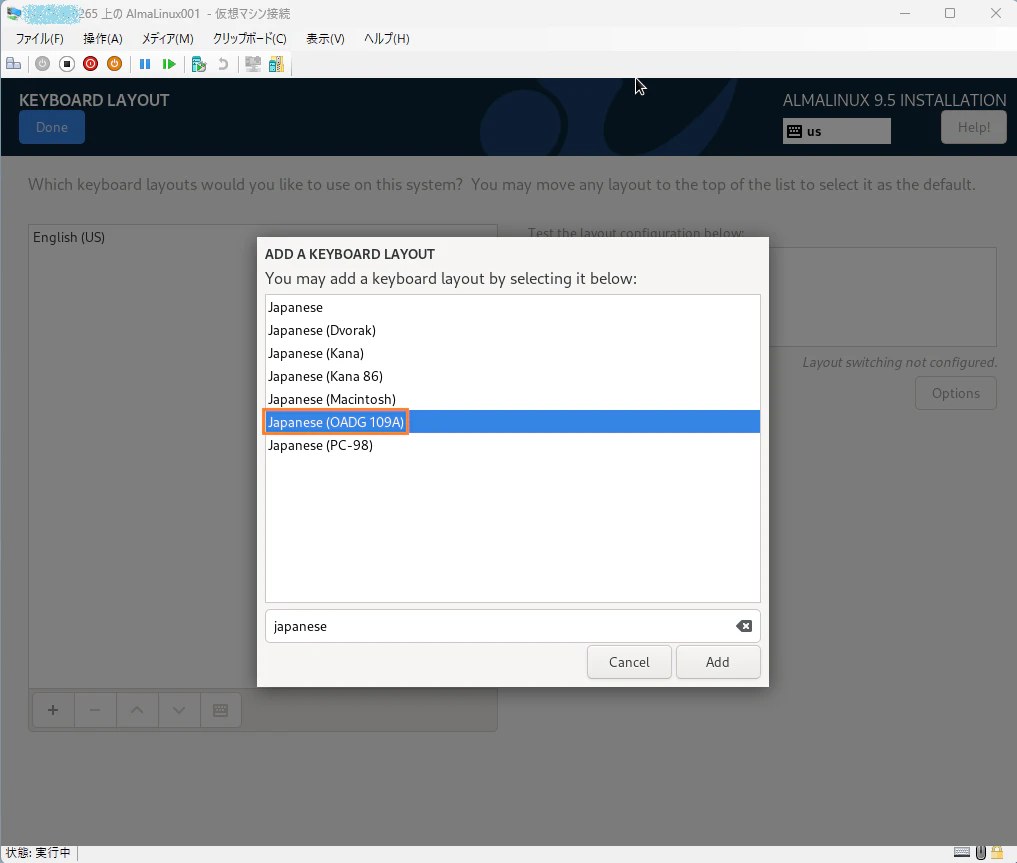
左下の + ボタンをクリックして、日本語キーボード Japanese (OADG 109A) を追加します
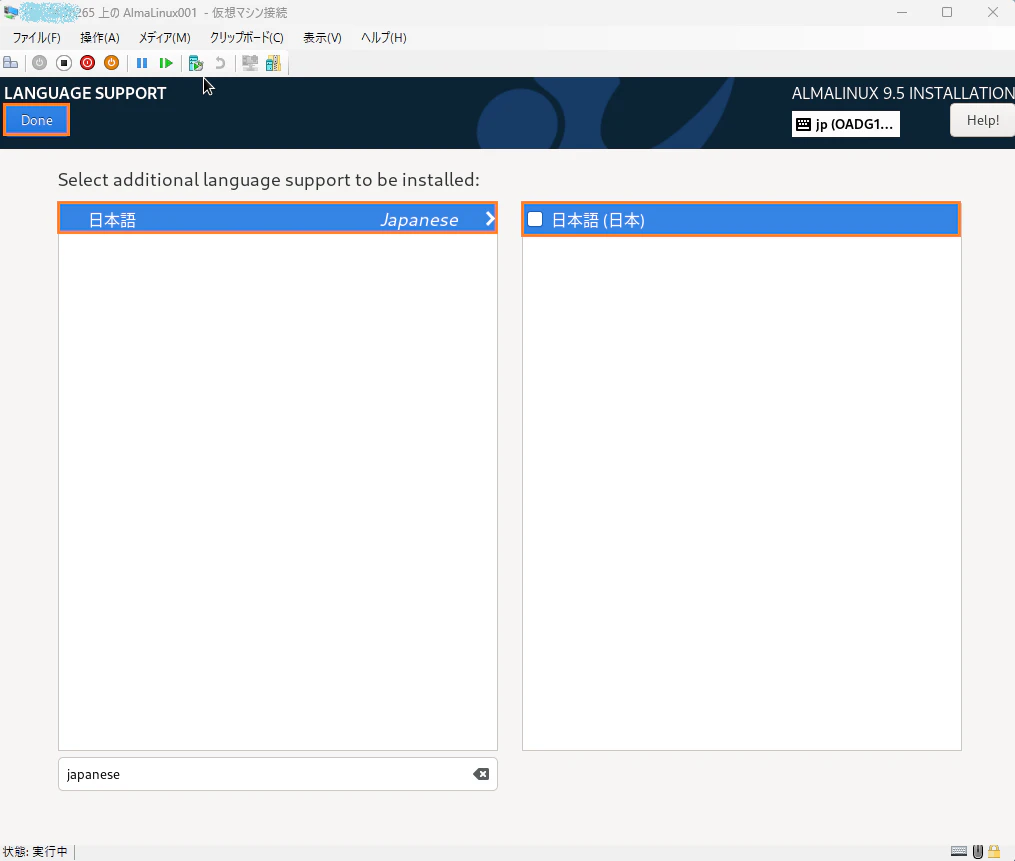
6.続いて Language Support をクリックします
こちらも日本語を追加します
7.続いて Time & Date をクリックします
Region は Asia を、City は Tokyo を選択します

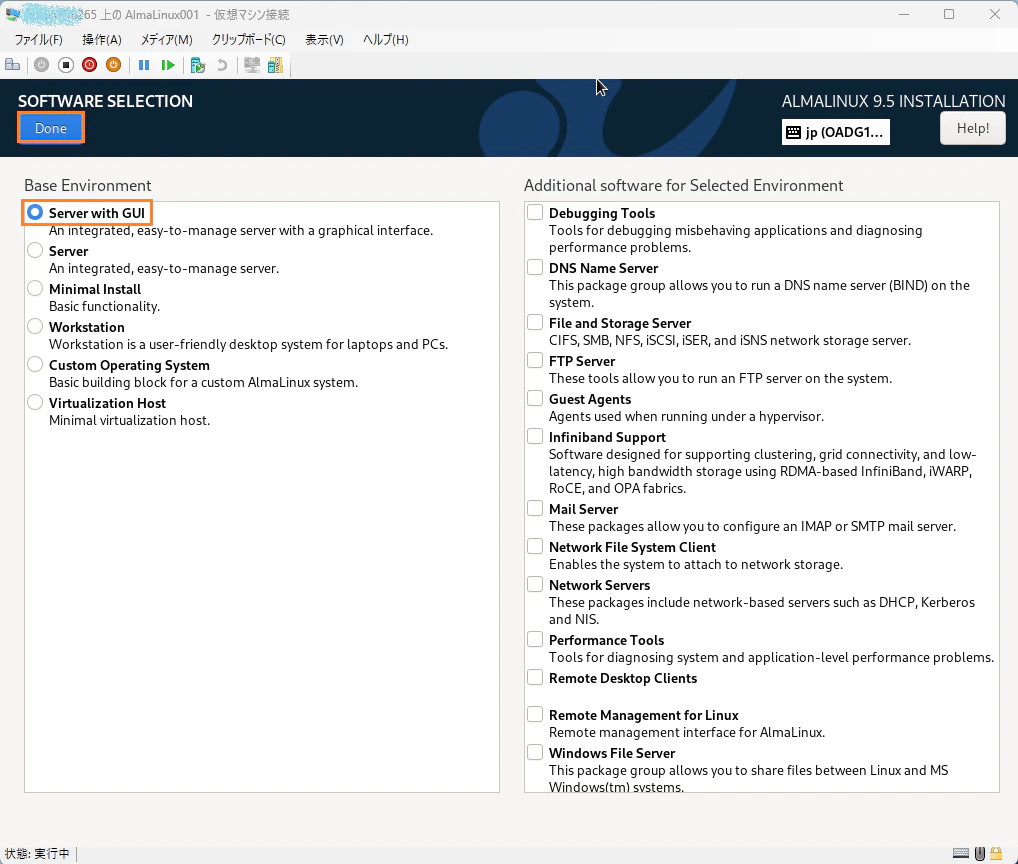
8.各種設定画面中央の SOFTWARE の Software Selection をクリックします
今回は Server with GUI を選択します
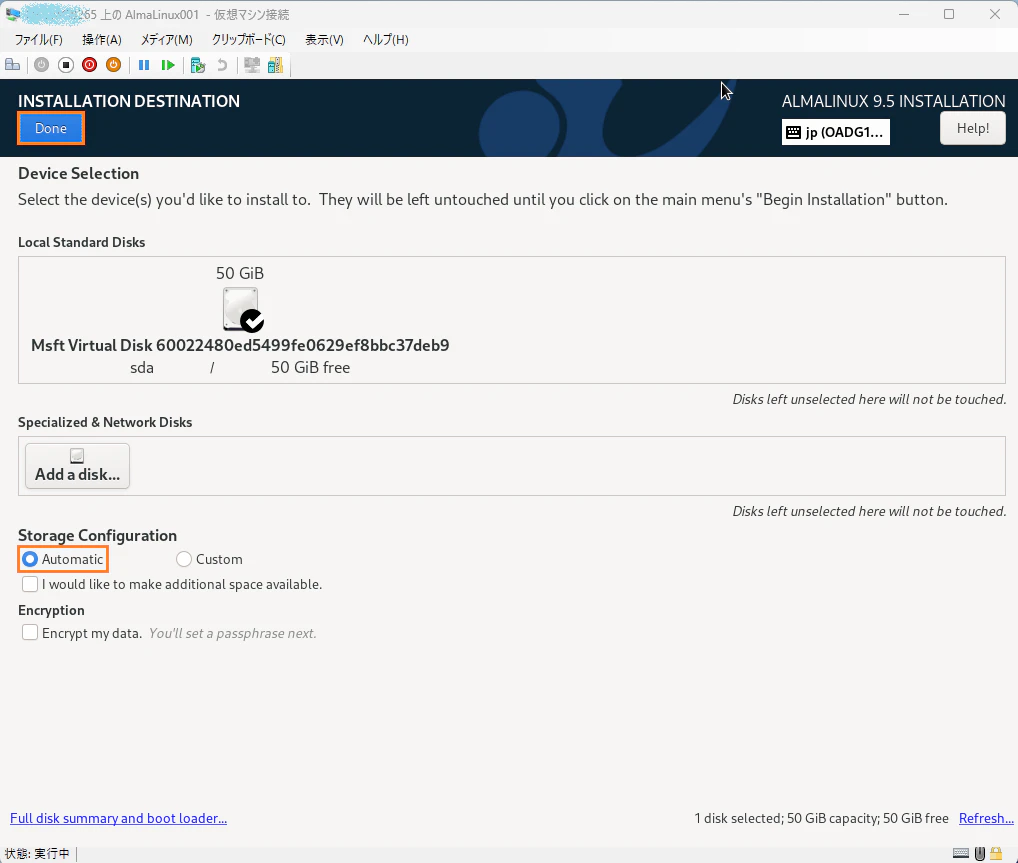
9.各種設定画面右側の Installation Destination をクリックします
今回は検証環境なので、デフォルトのまま Autmatic が選択された状態で進めます
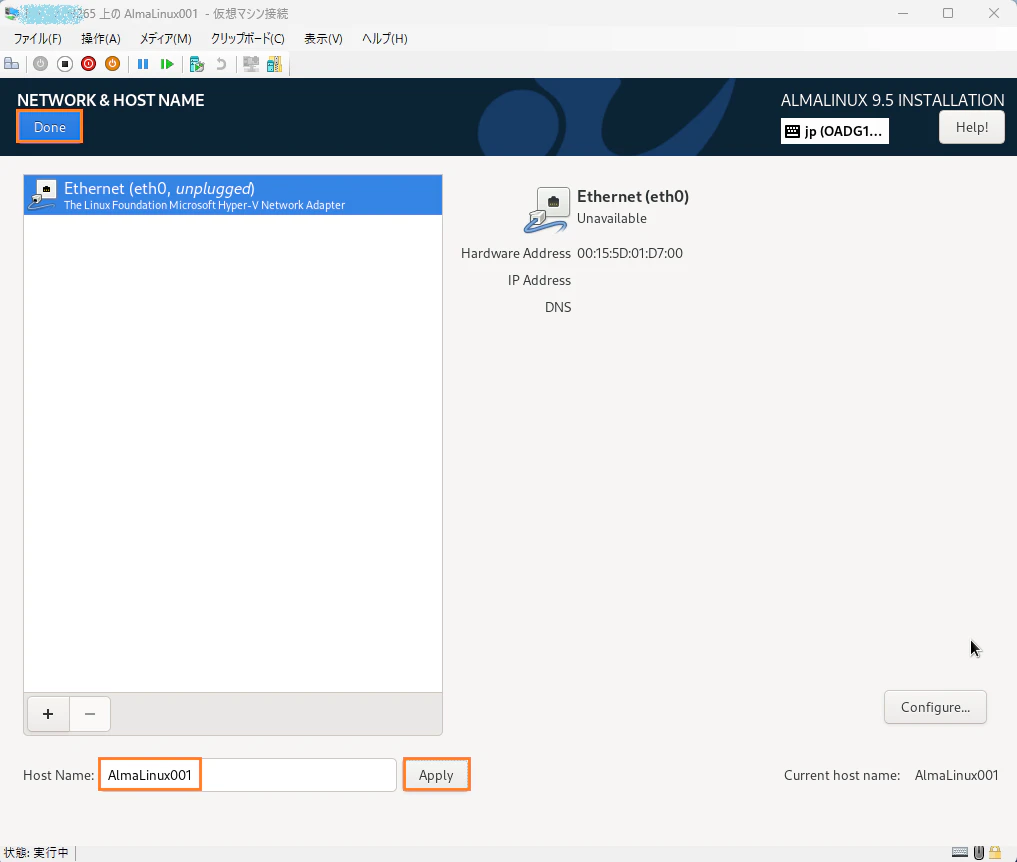
10.続いて Network & HostName をクリックします
ここでは Hostname に AlmaLinux001 を入力し、Apply ボタンをクリックします
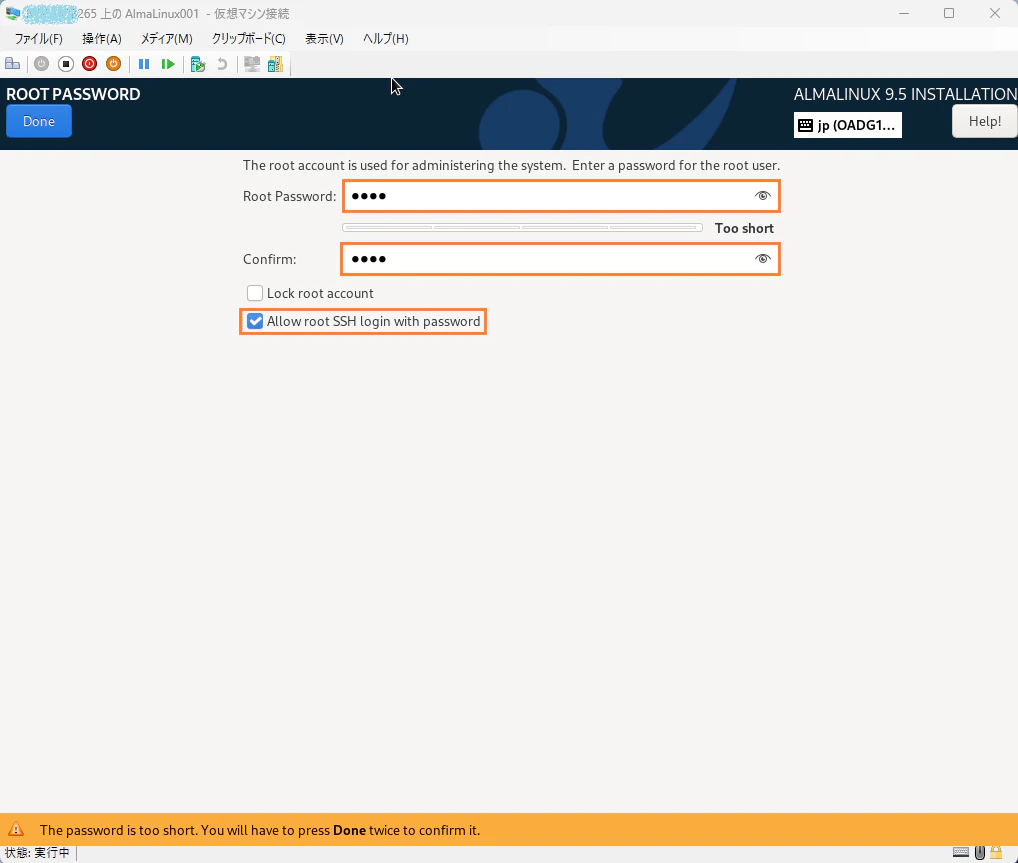
11.続いて左下の USER SETTINGS の Root Password をクリックします
root ユーザのパスワードを指定します
検証環境なのでパスワード認証での SSH 接続も許可しています
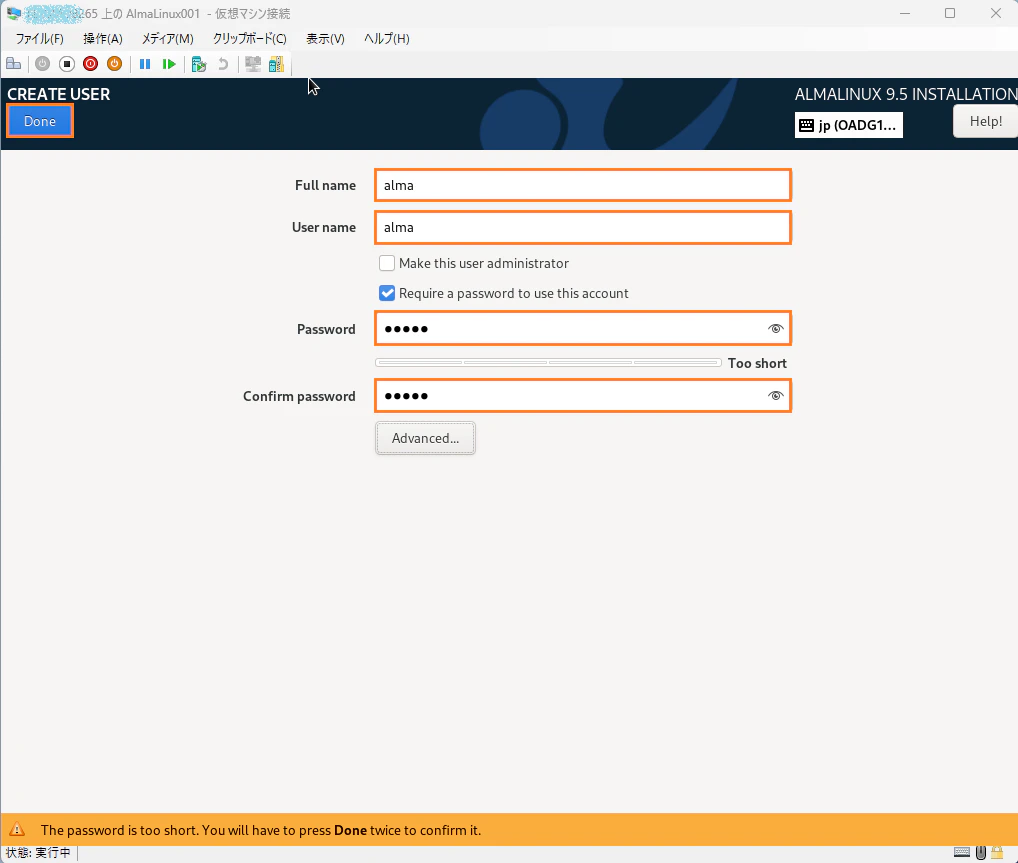
12.続いて User Creation をクリックします
ここでは alma というユーザを作成しました
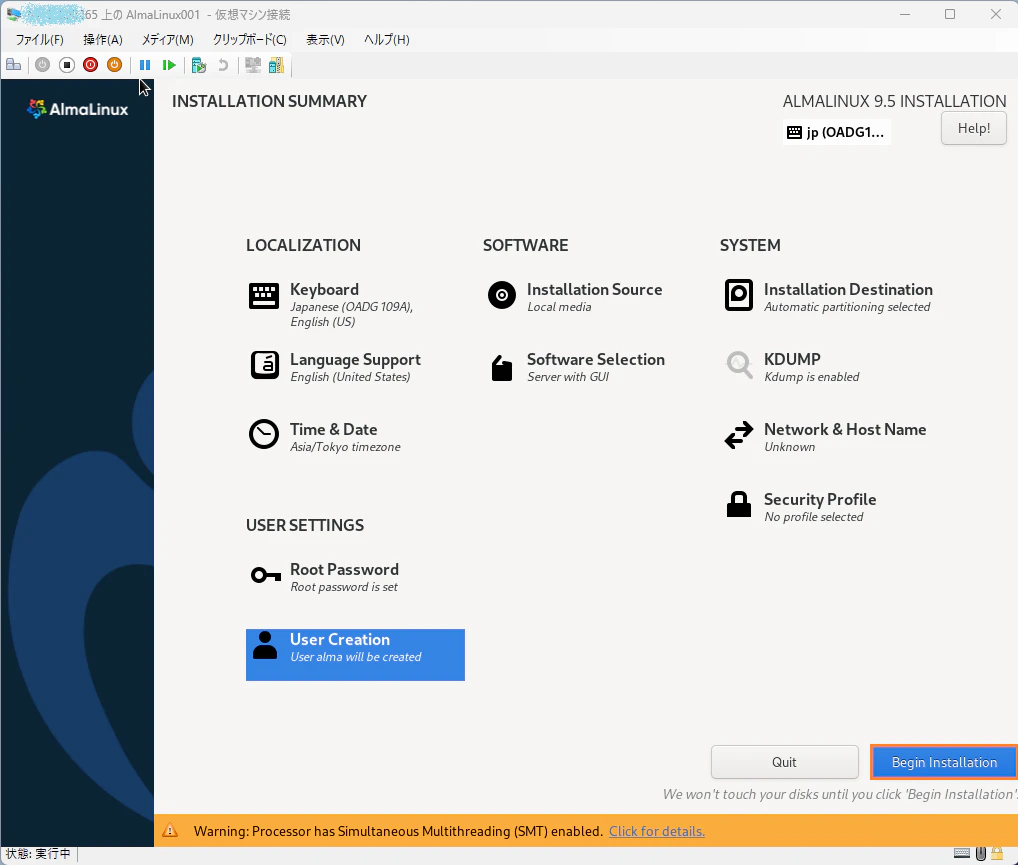
13.一通り設定を行ったら、Begin Installation ボタンをクリックします
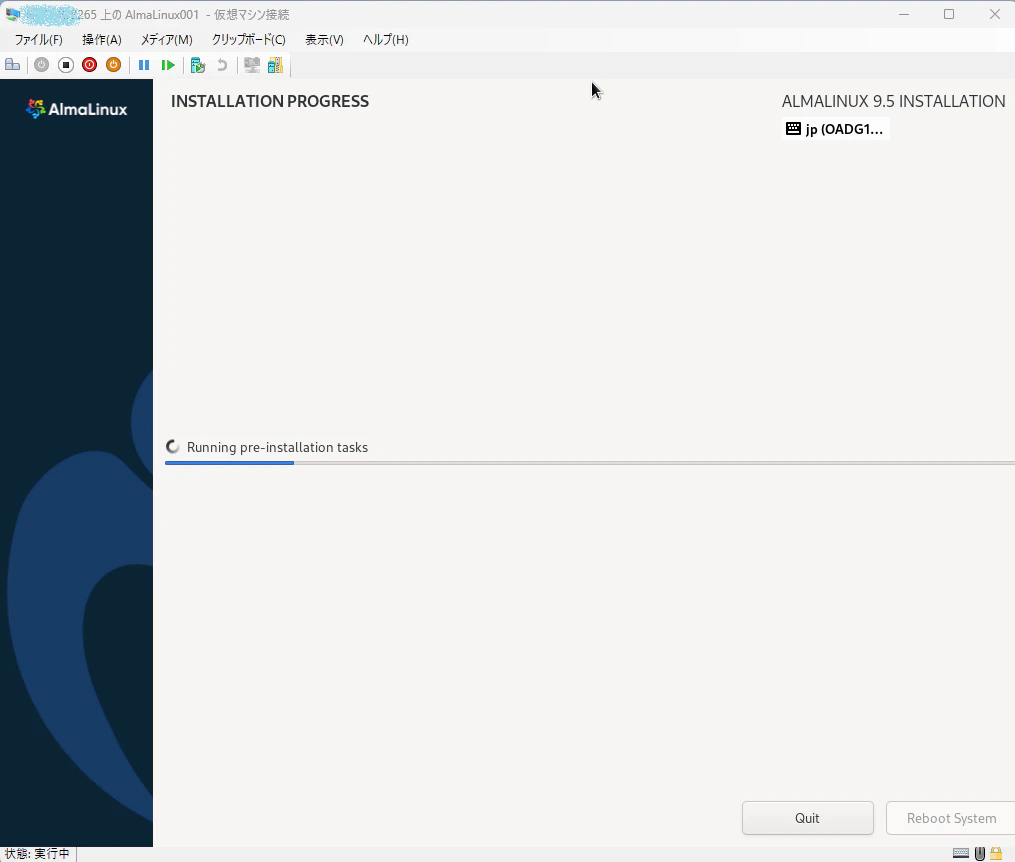
14.インストールが始まります
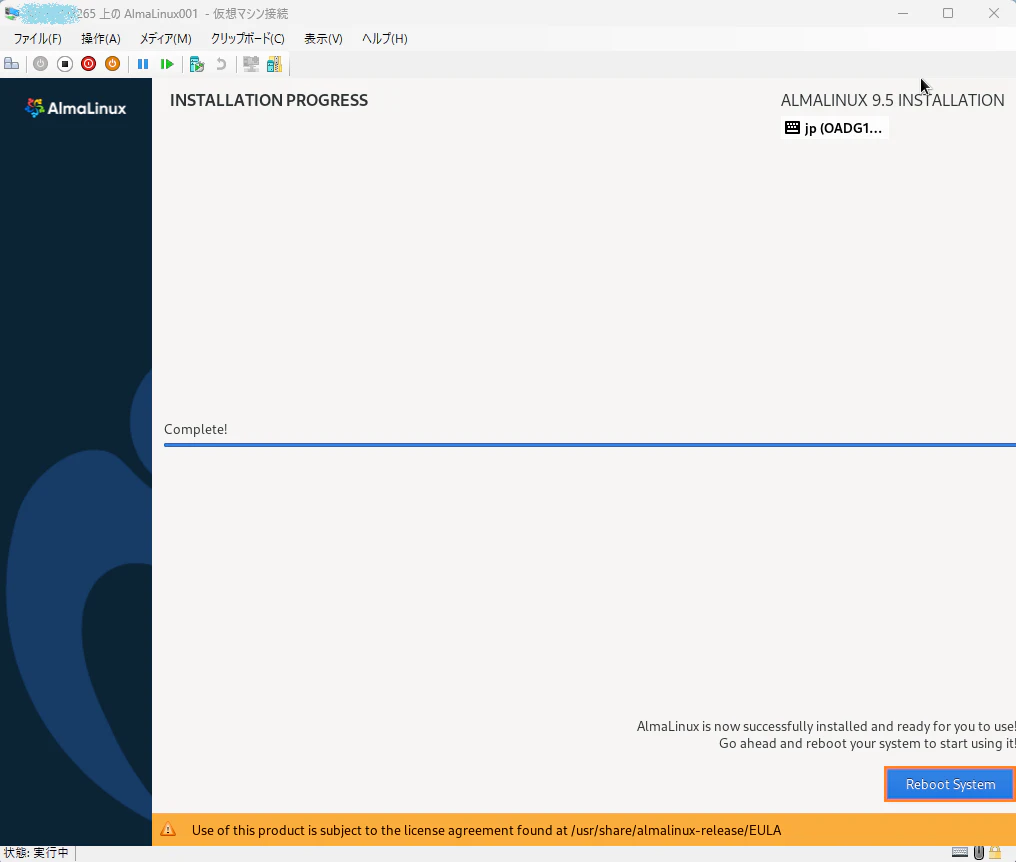
インストールが完了すると再起動を求められるので、Reboot System ボタンをクリックします
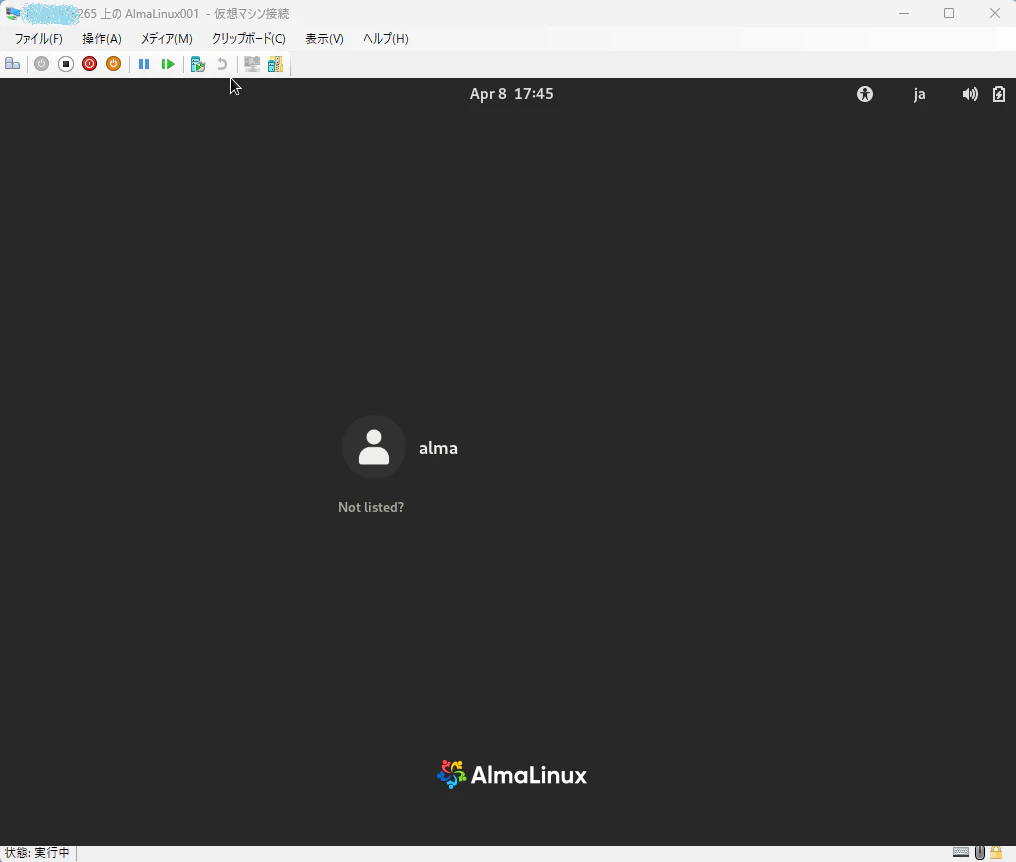
15.再起動が完了すると作成したユーザが表示されています
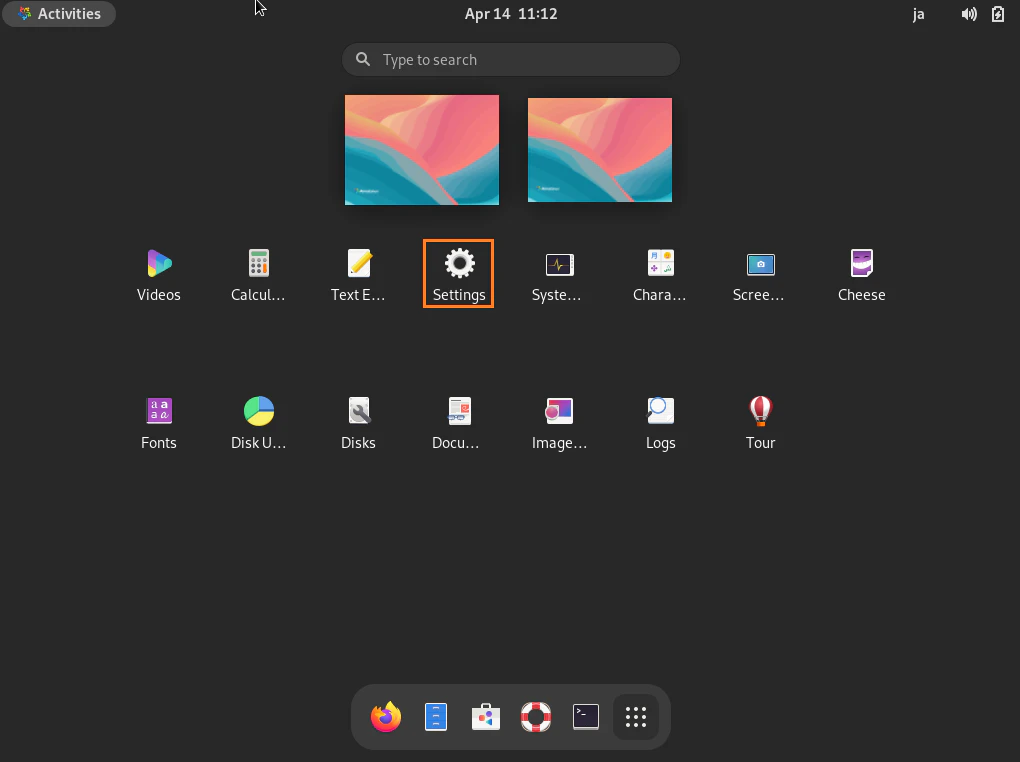
初期設定していくよ
ネットワークの設定
Hyper-V上のネットワークアダプタを指定していても、OSのデフォルトで接続されていないので、ネットワークを接続します
Settings を起動し、左側より Network を選択します
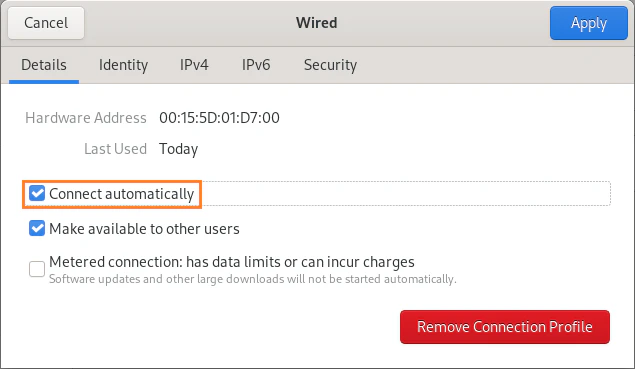
画面右側の Wired の歯車マークをクリックします
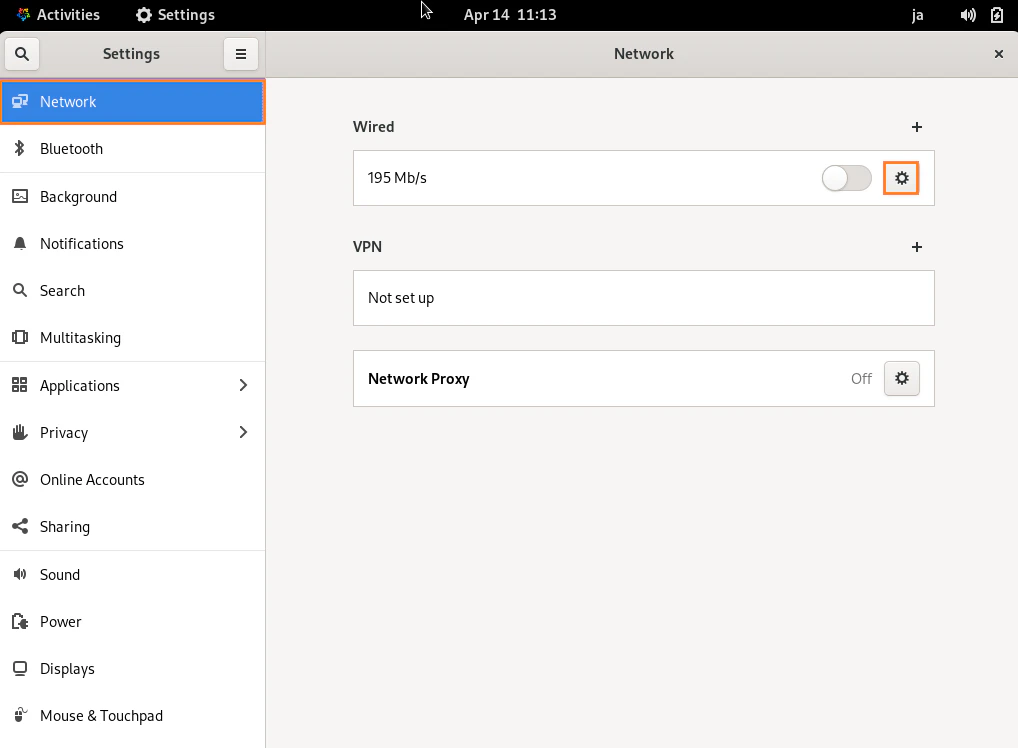
Details のタブで Connect automatically にチェックを入れます
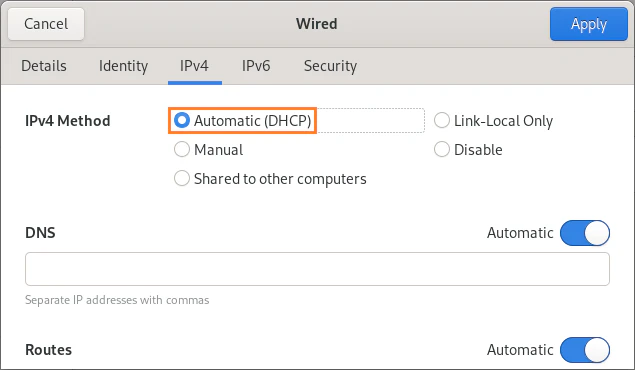
IPv4 のタブで IPアドレス や DNS 、 Routes を指定します
今回は DHCP を選択しました
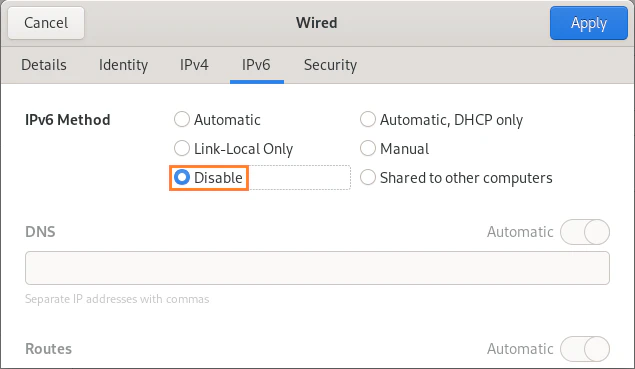
IPv6 のタブで Disable を選択します
一般ユーザの追加
一般ユーザを追加するには useradd コマンドと、passwd コマンドを使用します
[root@almalinux001 ~]# useradd user001          @@@ ユーザ user001 を追加
[root@almalinux001 ~]# passwd user001           @@@ ユーザ user001 のパスワードを設定
Changing password for user user001.
New password:                                   @@@ user001のパスワードを入力
Retype new password:                            @@@ パスワードを再入力
passwd: All authentication tokens updated successfully.
[root@almalinux001 ~]#
一般ユーザの削除
一般ユーザを削除するには userdel コマンドを使用します
[root@almalinux001 ~]# userdel user001          @@@ ユーザアカウントのみ削除
[root@almalinux001 ~]# userdel -r user001       @@@ ホームディレクトリも合わせて削除
rootユーザにスイッチ可能なユーザを限定する
特定のユーザを Wheel グループに所属させ、Wheel グループのみ root ユーザにスイッチできるように設定します
[root@almalinux001 ~]# usermod -aG Wheel user001         @@@ user001 を wheelグループへ所属
[root@almalinux001 ~]# vi /etc/pam.d/su                  @@@ /etc/pam.d/suファイルを編集

#%PAM-1.0
auth            required        pam_env.so
auth            sufficient      pam_rootok.so
# Uncomment the following line to implicitly trust users in the "wheel" group.
#auth           sufficient      pam_wheel.so trust use_uid
# Uncomment the following line to require a user to be in the "wheel" group.
#auth           required        pam_wheel.so use_uid     @@@ この行のコメントアウトを削除する
auth            substack        system-auth
auth            include         postlogin
account         sufficient      pam_succeed_if.so uid = 0 use_uid quiet
account         include         system-auth
password        include         system-auth
session         include         system-auth
session         include         postlogin
session         optional        pam_xauth.so
ファイアウォール
ファイアウォールサービスはデフォルトで起動しています
今回は検証機なのでサービスを停止します
[root@AlmaLinux001 ~]# systemctl status firewalld.service       @@@ サービスの状態確認(実行中)
● firewalld.service - firewalld - dynamic firewall daemon
     Loaded: loaded (/usr/lib/systemd/system/firewalld.service; enabled; preset: enabled)
     Active: active (running) since Mon 2025-04-14 11:10:18 JST; 21min ago
       Docs: man:firewalld(1)
   Main PID: 758 (firewalld)
      Tasks: 2 (limit: 23004)
     Memory: 40.6M
        CPU: 266ms
     CGroup: /system.slice/firewalld.service
             mq758 /usr/bin/python3 -s /usr/sbin/firewalld --nofork --nopid

[root@almalinux001 ~]# systemctl stop firewalld.service         @@@ サービスの停止
[root@almalinux001 ~]# systemctl disable firewalld.service      @@@ 自動起動を無効化
[root@almalinux001 ~]# systemctl start firewalld.service        @@@ サービスの開始
[root@almalinux001 ~]# systemctl enable firewalld.service       @@@ 自動起動を有効化
SELinux
SELinux の現在の状態を確認するには getenforce コマンドを使用します
コマンドの実行結果が Enforcing であれば、SELinuxは有効な状態です
[root@almalinux001 ~]# getenforce
Enforcing
今回は社内のみで使用する検証機なので、SELinuxは無効にします
[root@almalinux001 ~]# grubby --update-kernel ALL --args selinux=0       @@@ SELinuxを無効にする
[root@almalinux001 ~]# reboot                                            @@@ 再起動して設定を反映させます
[root@almalinux001 ~]# grubby --update-kernel ALL --remove-args selinux  @@@ SELinuxを再度有効化する
サービスの設定
サービスの状態確認や、無効化・有効化を行う場合は systemctl コマンドを使用します
[root@AlmaLinux001 ~]# systemctl -t service                    @@@ 稼働中のサービス一覧
  UNIT                                                  LOAD   ACTIVE SUB     DESCRIPTION                           >
  accounts-daemon.service                               loaded active running Accounts Service
  atd.service                                           loaded active running Deferred execution scheduler
  auditd.service                                        loaded active running Security Auditing Service
  avahi-daemon.service                                  loaded active running Avahi mDNS/DNS-SD Stack
  colord.service                                        loaded active running Manage, Install and Generate Color Pro>
  crond.service                                         loaded active running Command Scheduler
  .....

[root@AlmaLinux001 ~]# systemctl list-unit-files -t service    @@@ 全てのサービス一覧
UNIT FILE                                  STATE           PRESET
accounts-daemon.service                    enabled         enabled
alsa-restore.service                       static          -
alsa-state.service                         static          -
arp-ethers.service                         disabled        disabled
atd.service                                enabled         enabled
auditd.service                             enabled         enabled
autovt@.service                            alias           -
avahi-daemon.service                       enabled         enabled
blk-availability.service                   disabled        disabled
.....
[root@AlmaLinux001 ~]# systemctl stop rsyslog.service              @@@ サービスの停止
[root@AlmaLinux001 ~]# systemctl disable rsyslog.service           @@@ サービスの無効化
[root@AlmaLinux001 ~]# systemctl disable --now rsyslog.service     @@@ 停止と無効化を1ライナーで記述

[root@AlmaLinux001 ~]# systemctl start rsyslog.service             @@@ サービスの開始
[root@AlmaLinux001 ~]# systemctl enable rsyslog.service            @@@ サービスの有効化
[root@AlmaLinux001 ~]# systemctl enable --now rsyslog.service      @@@ 開始と有効化を1ライナーで記述
システムを最新化する
検証機ですがシステムは最新化しておきましょう!!
[root@AlmaLinux001 ~]# dnf -y upgrade
AlmaLinux 9 - AppStream                                                              6.1 MB/s |  16 MB     00:02
AlmaLinux 9 - BaseOS                                                                 105 kB/s |  18 MB     02:56
AlmaLinux 9 - Extras                                                                 9.0 kB/s |  13 kB     00:01
Dependencies resolved.
=====================================================================================================================
 Package                                Architecture  Version                                 Repository        Size
=====================================================================================================================
Installing:
 kernel                                 x86_64        5.14.0-503.35.1.el9_5                   baseos           2.0 M
Upgrading:
 NetworkManager                         x86_64        1:1.48.10-8.el9_5                       baseos           2.3 M
 NetworkManager-adsl                    x86_64        1:1.48.10-8.el9_5                       baseos            33 k
 NetworkManager-bluetooth               x86_64        1:1.48.10-8.el9_5                       baseos            59 k
 NetworkManager-config-server           noarch        1:1.48.10-8.el9_5                       baseos            18 k
.....
リポジトリを追加
外部リポジトリを追加するには、dnf コマンドを使用します
この記事では EPEL と EPEL-NEXT リポジトリを追加します
[root@AlmaLinux001 ~]# dnf -y install epel-release
Last metadata expiration check: 1:11:38 ago on Mon 14 Apr 2025 11:49:57 AM JST.
Dependencies resolved.
=====================================================================================================================
 Package                        Architecture             Version                      Repository                Size
=====================================================================================================================
Installing:
 epel-release                   noarch                   9-9.el9                      extras                    18 k

Transaction Summary
=====================================================================================================================
Install  1 Package

Total download size: 18 k
Installed size: 26 k
Downloading Packages:
epel-release-9-9.el9.noarch.rpm                                                       60 kB/s |  18 kB     00:00
---------------------------------------------------------------------------------------------------------------------
Total                                                                                 16 kB/s |  18 kB     00:01
Running transaction check
Transaction check succeeded.
Running transaction test
Transaction test succeeded.
Running transaction
  Preparing        :                                                                                             1/1
  Installing       : epel-release-9-9.el9.noarch                                                                 1/1
  Running scriptlet: epel-release-9-9.el9.noarch                                                                 1/1
Many EPEL packages require the CodeReady Builder (CRB) repository.
It is recommended that you run /usr/bin/crb enable to enable the CRB repository.

  Verifying        : epel-release-9-9.el9.noarch                                                                 1/1

Installed:
  epel-release-9-9.el9.noarch

Complete!
[root@AlmaLinux001 ~]#
[root@AlmaLinux001 ~]# dnf -y install epel-next-release
Extra Packages for Enterprise Linux 9 - x86_64                                       7.2 MB/s |  23 MB     00:03
Extra Packages for Enterprise Linux 9 openh264 (From Cisco) - x86_64                 1.0 kB/s | 2.5 kB     00:02
Dependencies resolved.
=====================================================================================================================
 Package                             Architecture             Version                   Repository              Size
=====================================================================================================================
Installing:
 epel-next-release                   noarch                   9-9.el9                   epel                   7.9 k

Transaction Summary
=====================================================================================================================
Install  1 Package

Total download size: 7.9 k
Installed size: 2.8 k
Downloading Packages:
epel-next-release-9-9.el9.noarch.rpm                                                  34 kB/s | 7.9 kB     00:00
---------------------------------------------------------------------------------------------------------------------
Total                                                                                 15 kB/s | 7.9 kB     00:00
Extra Packages for Enterprise Linux 9 - x86_64                                       1.6 MB/s | 1.6 kB     00:00
Importing GPG key 0x3228467C:
 Userid     : "Fedora (epel9) <epel@fedoraproject.org>"
 Fingerprint: FF8A D134 4597 106E CE81 3B91 8A38 72BF 3228 467C
 From       : /etc/pki/rpm-gpg/RPM-GPG-KEY-EPEL-9
Key imported successfully
Running transaction check
Transaction check succeeded.
Running transaction test
Transaction test succeeded.
Running transaction
  Preparing        :                                                                                             1/1
  Installing       : epel-next-release-9-9.el9.noarch                                                            1/1
  Verifying        : epel-next-release-9-9.el9.noarch                                                            1/1

Installed:
  epel-next-release-9-9.el9.noarch

Complete!
[root@AlmaLinux001 ~]#
追加したリポジトリが有効となっていることを確認します
/etc/yum.repos.d/epel.repo ファイルを開き、enabled=1 であることを確認します
/etc/yum.repos.d/epel-next.repo ファイルも同様に確認します
[root@AlmaLinux001 ~]# vi /etc/yum.repos.d/epel.repo

[epel]
name=Extra Packages for Enterprise Linux 9 - $basearch
# It is much more secure to use the metalink, but if you wish to use a local mirror
# place its address here.
#baseurl=https://download.example/pub/epel/9/Everything/$basearch/
metalink=https://mirrors.fedoraproject.org/metalink?repo=epel-9&arch=$basearch&infra=$infra&content=$contentdir
enabled=1                                                @@@ enabled=1 リポジトリ有効、enabled=0 リポジトリ無効です
gpgcheck=1
countme=1
gpgkey=file:///etc/pki/rpm-gpg/RPM-GPG-KEY-EPEL-9

[epel-debuginfo]
name=Extra Packages for Enterprise Linux 9 - $basearch - Debug
# It is much more secure to use the metalink, but if you wish to use a local mirror
# place its address here.
#baseurl=https://download.example/pub/epel/9/Everything/$basearch/debug/
metalink=https://mirrors.fedoraproject.org/metalink?repo=epel-debug-9&arch=$basearch&infra=$infra&content=$contentdir
enabled=0
gpgkey=file:///etc/pki/rpm-gpg/RPM-GPG-KEY-EPEL-9
gpgcheck=1

[epel-source]
name=Extra Packages for Enterprise Linux 9 - $basearch - Source
# It is much more secure to use the metalink, but if you wish to use a local mirror
# place its address here.
#baseurl=https://download.example/pub/epel/9/Everything/source/tree/
metalink=https://mirrors.fedoraproject.org/metalink?repo=epel-source-9&arch=$basearch&infra=$infra&content=$contentdir
enabled=0
gpgkey=file:///etc/pki/rpm-gpg/RPM-GPG-KEY-EPEL-9
gpgcheck=1
enabled=0 で通常は無効化しているリポジトリを一時的に有効にしてインストールを行う場合は、dnf コマンドの --enablerepo オプションを使用します
[root@AlmaLinux001 ~]# dnf --enablerepo=epel,epel-next install [Package]
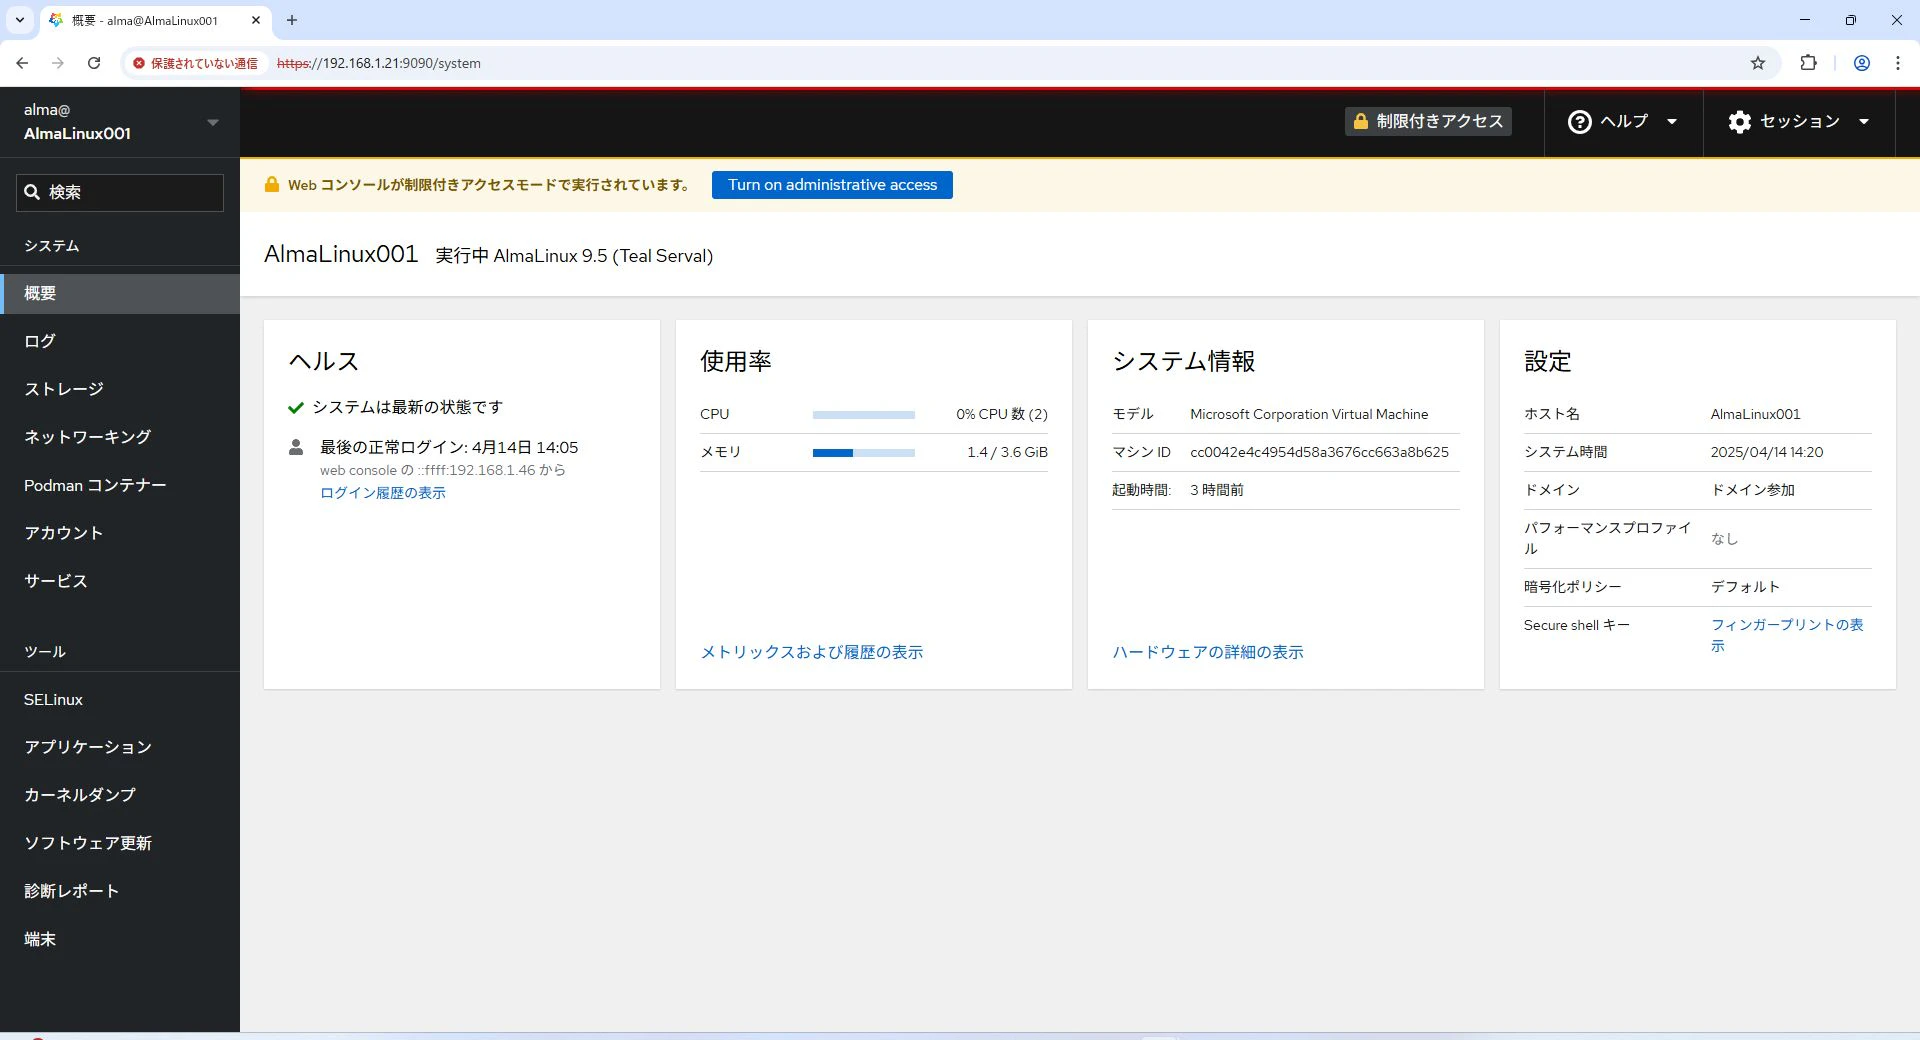
Web 管理コンソールを利用する
AlmaLinux9 をインストール時に Server を選択すると、Cockpit が含まれてインストールされるので、Web 管理コンソールを設定します
Firewall を有効にしている場合は、通信ポートの許可設定が必要になる場合があります
[root@AlmaLinux001 ~]# systemctl enable --now cockpit.socket
Created symlink /etc/systemd/system/sockets.target.wants/cockpit.socket → /usr/lib/systemd/system/cockpit.socket.
[root@AlmaLinux001 ~]# firewall-cmd --list-service         @@@ firewall の設定確認
dhcpv6-client ssh
[root@AlmaLinux001 ~]# firewall-cmd --add-service=cockpit  @@@ Firewall の設定を追加
success
[root@AlmaLinux001 ~]# firewall-cmd --runtime-to-permanent @@@ ルールを設定ファイルに反映
success
[root@AlmaLinux001 ~]# firewall-cmd --list-service         @@@ firewall のルールに cockpit が追加されたことを確認
cockpit dhcpv6-client ssh
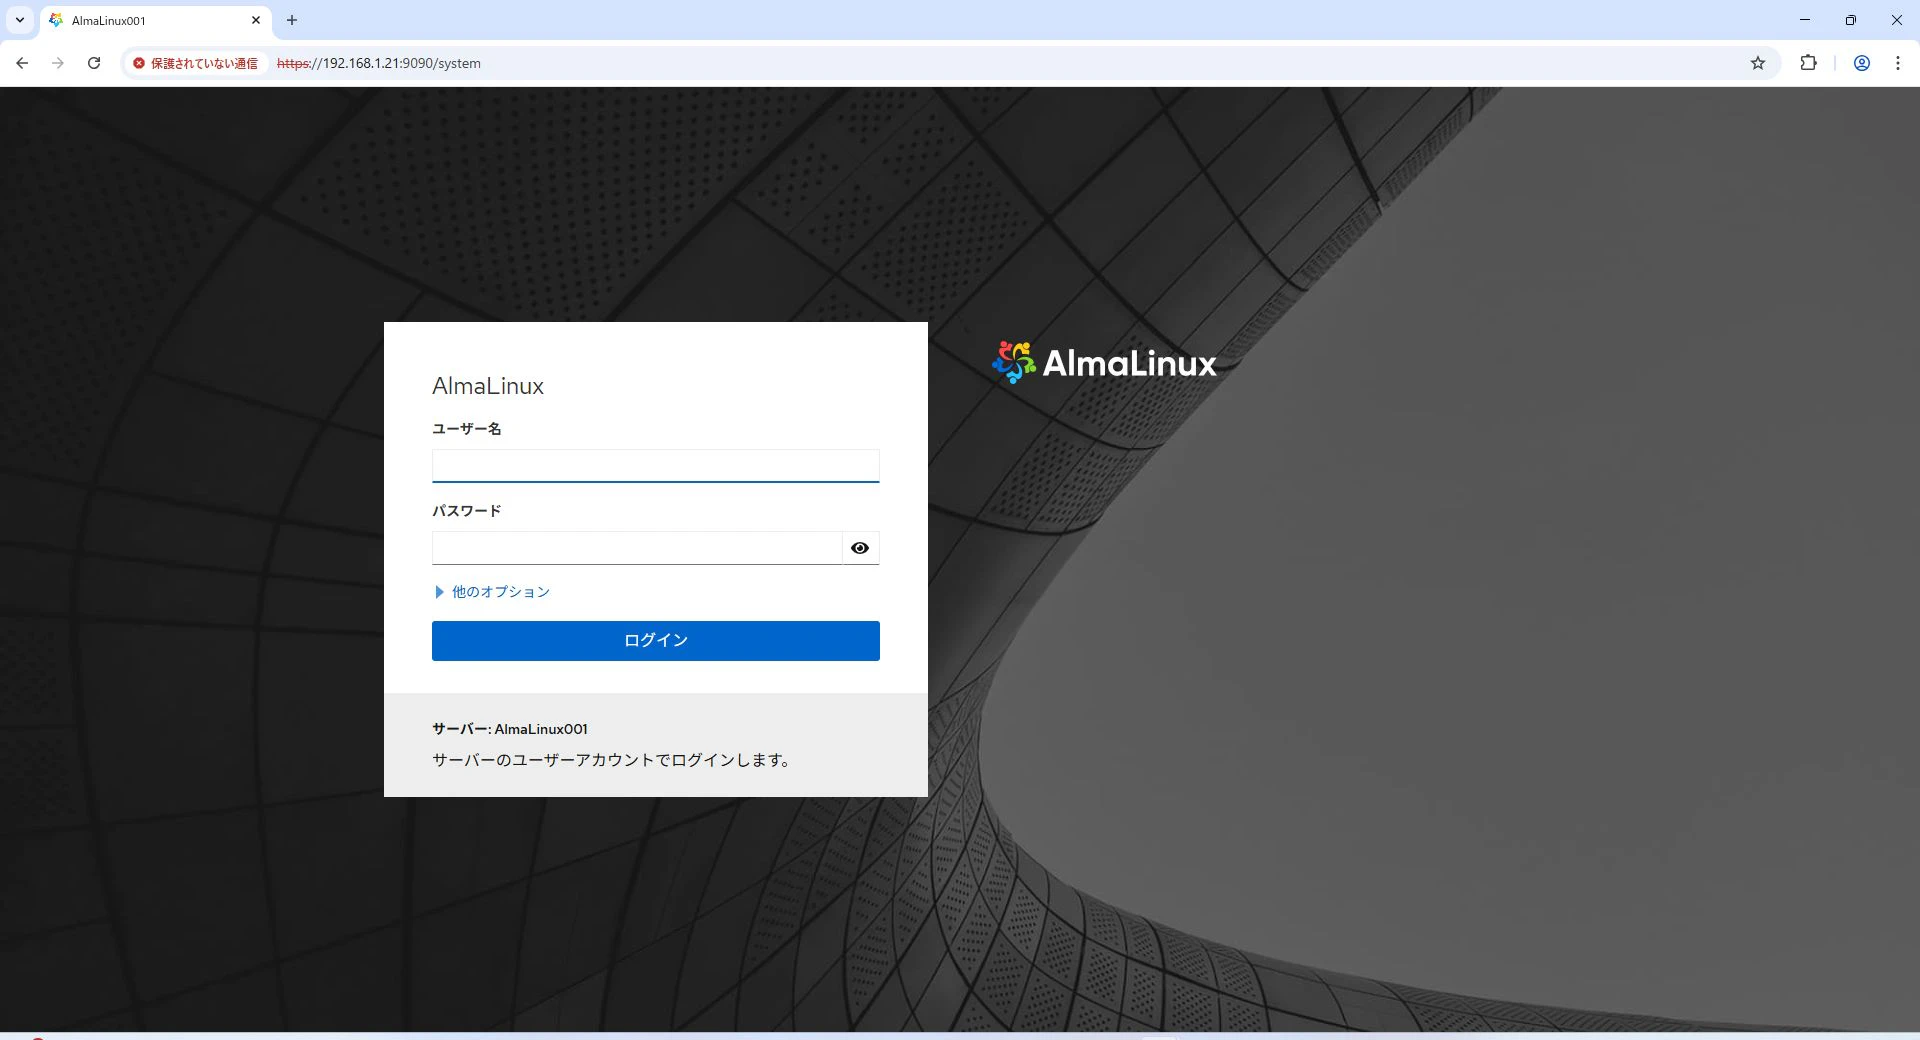
Cockpit はポート番号 9090 をリッスンするので、ブラウザから https://[IPアドレス]:9090 でアクセスすると Web 管理コンソールに接続できます
root ではログインできません
root でログインを許可する場合は、/etc/cockpit/disallowed-users ファイルを編集して、root ユーザの行を削除してください
sudo の設定
今回は検証機なので細かく設定することはありませんが、備忘録として記載します
[alma@AlmaLinux001 ~]$ sudo visudo

@@@ ファイルの最終行に追記する(alma ユーザは root 権限をすべて利用できる)
alma  ALL=(ALL)  ALL

# alma ユーザで動作確認
[alma@AlmaLinux001 ~]$ visudo
visudo: /etc/sudoers: Permission denied     @@@ 正常に拒否される

[alma@AlmaLinux001 ~]$ sudo visudo          @@@ 実行できた

We trust you have received the usual lecture from the local System
Administrator. It usually boils down to these three things:

    #1) Respect the privacy of others.
    #2) Think before you type.
    #3) With great power comes great responsibility.

[sudo] password for alma:                   @@@ alma ユーザのパスワードを入力
## Sudoers allows particular users to run various commands as
## the root user, without needing the root password.
.....
まとめ
今回は社内の検証機なので、root ユーザでの SSH 接続を有効、Firewall や SELinux を無効にしましたが、適宜設定を変更してください。
特に本番機として利用する際には、セキュリティホールにもなりますので、ご注意ください。
参考文献