スマホでVPNトンネルを掘る!
なぜ掘るのか
そこに回線があるから
スマホとConoHa間でVPNトンネルを掘って速度を安定させます。
VPNを掘ることのメリットは
- アクセスサイトごとの速度制限を設けている場合どれだけ回線が空いていても最高速が出ない
主にこれを目的としてトンネルを掘っていきます
デメリットは
- トンネルの中を通る通信は全てVPN先との通信になる
すなわちコンテンツフリーの対象外通信となる
契約していない人には関係無いですが。
なぜConoHaなのか
- 回線速度がそこそこ出ます
今さらっと計って64Mbps程は出ます
スマホの通常利用なら余裕です - OS起動から初期設定までの更新作業が
サーバー自体の速度もなかなかに速いので
待ち発生が少なくなって正直楽 - 既存VPSをVPS割引切符に切り替えたので
若干クーポンが余ってる
ちょっとアドベントカレンダーで消費しようかなと
- ConoHaちゃんかわいい
オフィシャルの壁紙ヤバない? 2020冬版とか死人が出るレベル いつものジャケットもいいけどコートとかもふもふとか 軽く尊死するやつ(早口
さっさと建てます
VPS立ち上げ
今回はサッと建てて環境をガッと作って確認したいので
最低構成で立ち上げます
何やら公式がCentOS8のサポートがどうとかこうとか
CentOS Streamへ移行がどうとかこうとかしていますがCentOSで行きます

ConoHaのCentOS StreamになったらOSテンプレどうなるんでしょうかねー
パスワードもきちっとジェネレーターで適当に作成保存してしまいます

SSHキーはご自由に
あった方がいいとは思います
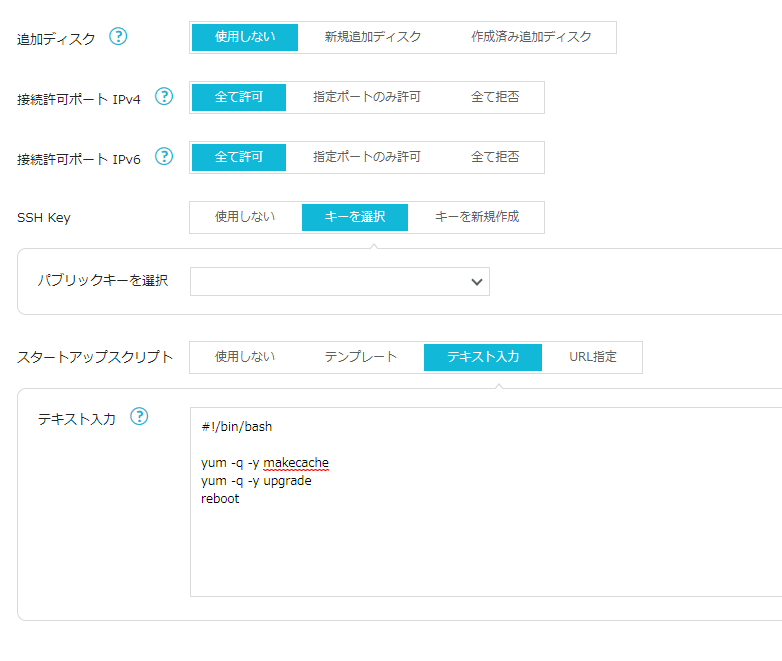
あとスタートアップスクリプト使ってみます。
# !/bin/bash
yum -q -y makecache
yum -q -y upgrade

yum install epel-release -y
yum --enablerepo=epel -y install openvpn easy-rsa

reboot
入力している物はテンプレートにあった物に openvpn インストールと reboot を加えた物です
作成開始して少し待つとVPSが上がってきます
作成日に書いてあるとおり平日残業土曜出勤だったので担当日に駆け込みで書いてますハイ。
SSH接続
いつも通りrloginでサクッと繋ぎます
ConoHaコンソールでもいいです
立ち上げ直後ですがアップデートが後ろで走ってるようです
# ps alxww | grep yum
4     0    1246    1210  20   0 885888 82332 -      S    ?          1:30 /usr/libexec/platform-python /usr/bin/yum -q -y upgrade
0     0   28270    1273  20   0 221904   968 -      R+   pts/0      0:00 grep --color=auto yum
psでチェックしないと終わったのがわからないですが
ps で監視しつつ終わったら自動的にリブートします
(SSHだと勝手に切断されます、コンソールだとリブートプロセスが見えます)
この更新作業にHDDとSSDの差が大きく出る…
オールSSDのConoHaちゃんマジ速い
OpenVPNインストール
スタートアップスクリプトに入れていない場合はここでインストールします
# yum install epel-release -y
# yum --enablerepo=epel -y install openvpn easy-rsa
# yum list installed | grep openvpn
openvpn.x86_64                       2.4.9-1.el8                             @epel
# yum list installed | grep easy-rsa
easy-rsa.noarch                      3.0.8-1.el8                             @epel
openvpn 2.4.9-1.el8
easy-rsa 3.0.8-1.el8
が落ちていました
2020/12/13現在最新は2.5.0が出てるのでひとつ前の物がパッケージ登録されてるようですね
認証局作成
# mkdir /etc/openvpn/easy-rsa
# cp /usr/share/easy-rsa/3/* /etc/openvpn/easy-rsa/ -R
# cd /etc/openvpn/easy-rsa
# ./easyrsa init-pki

init-pki complete; you may now create a CA or requests.
Your newly created PKI dir is: /etc/openvpn/easy-rsa/pki


# ./easyrsa build-ca
Using SSL: openssl OpenSSL 1.1.1g FIPS  21 Apr 2020

Enter New CA Key Passphrase: (パスフレーズ)
Re-Enter New CA Key Passphrase: (再パスフレーズ)
Generating RSA private key, 2048 bit long modulus (2 primes)
...+++++
.................................................................................+++++
e is 65537 (0x010001)
You are about to be asked to enter information that will be incorporated
into your certificate request.
What you are about to enter is what is called a Distinguished Name or a DN.
There are quite a few fields but you can leave some blank
For some fields there will be a default value,
If you enter '.', the field will be left blank.
-----
Common Name (eg: your user, host, or server name) [Easy-RSA CA]: (ドメインとか名前とか)

CA creation complete and you may now import and sign cert requests.
Your new CA certificate file for publishing is at:
/etc/openvpn/easy-rsa/pki/ca.crt


# cp pki/ca.crt /etc/openvpn/server/
# cp pki/ca.crt ~/
# ./easyrsa build-server-full server nopass
Using SSL: openssl OpenSSL 1.1.1g FIPS  21 Apr 2020
Generating a RSA private key
.....................+++++
..................................................................................+++++
writing new private key to '/etc/openvpn/easy-rsa/pki/easy-rsa-1362.AOu0fI/tmp.QhGysb'
-----
Using configuration from /etc/openvpn/easy-rsa/pki/easy-rsa-1362.AOu0fI/tmp.ROfRAQ
Enter pass phrase for /etc/openvpn/easy-rsa/pki/private/ca.key: (パスフレーズ)
Check that the request matches the signature
Signature ok
The Subjects Distinguished Name is as follows
commonName            :ASN.1 12:'server'
Certificate is to be certified until Mar 18 06:56:10 2023 GMT (825 days)

Write out database with 1 new entries
Data Base Updated

# cp pki/issued/server.crt /etc/openvpn/server/
# cp pki/private/server.key /etc/openvpn/server/
# ./easyrsa build-client-full client nopass
Using SSL: openssl OpenSSL 1.1.1g FIPS  21 Apr 2020
Generating a RSA private key
..............+++++
................+++++
writing new private key to '/etc/openvpn/easy-rsa/pki/easy-rsa-1566.aYaqYS/tmp.ej23V0'
-----
Using configuration from /etc/openvpn/easy-rsa/pki/easy-rsa-1566.aYaqYS/tmp.4gYKxz
Enter pass phrase for /etc/openvpn/easy-rsa/pki/private/ca.key:
Check that the request matches the signature
Signature ok
The Subject s Distinguished Name is as follows
commonName            :ASN.1 12:'client'
Certificate is to be certified until Mar 18 08:10:37 2023 GMT (825 days)

Write out database with 1 new entries
Data Base Updated

# cp pki/issued/client.crt ~/
# cp pki/private/client.key ~/
# ./easyrsa gen-dh
Using SSL: openssl OpenSSL 1.1.1g FIPS  21 Apr 2020
Generating DH parameters, 2048 bit long safe prime, generator 2
This is going to take a long time
................+.....................+.....++*++*++*++*

DH parameters of size 2048 created at /etc/openvpn/easy-rsa/pki/dh.pem
# cp pki/dh.pem /etc/openvpn/
IPフォアード入れておきます
# vi /etc/sysctl.d/10-ipv4_forward.conf
net.ipv4.ip_forward = 1
# sysctl --system
VPN設定入れていきます
# openvpn --genkey --secret /etc/openvpn/ta.key
# cp /etc/openvpn/ta.key ~/
# cp /usr/share/doc/openvpn/sample/sample-config-files/server.conf /etc/openvpn/server/
# vi /etc/openvpn/server/server.conf
- dh dh2048.pem
+ dh dh.pem

- server 10.8.0.0 255.255.255.0
+ server 192.168.64.0 255.255.255.0

# back to the OpenVPN server.
;push "route 192.168.10.0 255.255.255.0"
;push "route 192.168.20.0 255.255.255.0"
+ push "route 0.0.0.0 0.0.0.0"

- ;user nobody
- ;group nobody
+ user nobody
+ group nobody

- ;log-append  openvpn.log
+ log-append  /var/log/openvpn.log
# systemctl enable --now openvpn-server@server
# firewall-cmd --add-port=1194/udp --permanent
# firewall-cmd --reload
.ovpnファイルの作成
# vi hedader
client
dev tun
proto udp
remote サーバーアドレス 1194
resolv-retry infinite
nobind
persist-key
persist-tun
remote-cert-tls server
tls-client
key-direction 1
cipher AES-256-CBC
verb 3
tun-mtu 1500
# vi makeovpn.sh
# !/bin/bash

cat ./header
echo '<ca>'
cat ./ca.crt
echo '</ca>'
echo '<key>'
cat ./client.key
echo '</key>'
echo '<cert>'
grep -A 30 'BEGIN CERTIFICATE' ./client.crt
echo '</cert>'
echo '<tls-auth>'
cat ./ta.key
echo '</tls-auth>'
# chmod +x makeovpn.sh
# ./makeovpn.sh > client.ovpn
作成したovpnファイルを
スマホにコピーして
OpenVPNクライアントにインポートして接続!
