はじめに
MVCのサンプルプログラムをEclipseで作ってみよう。
開発環境
Windows 10 Pro 1709(16299.192)
Eclipse pleiades-4.7.3
java 1.8.0_162
手順
1.Eclipse Pleiades All in One のインストール
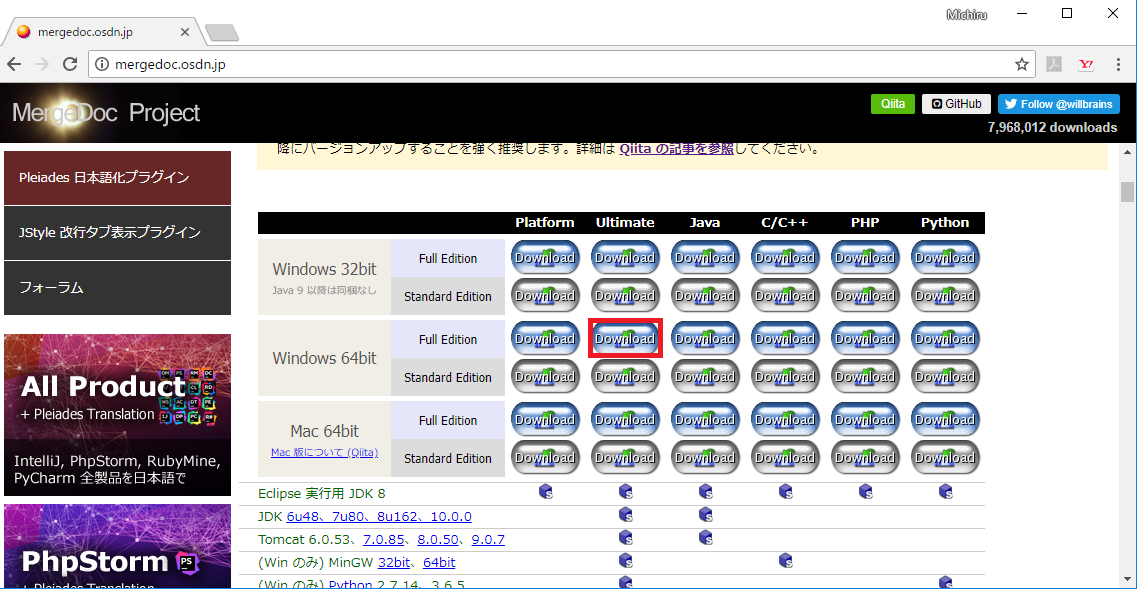
のちのち他言語でも使いたいので、フルバージョンをインストールします。
「Ultimate」:Java以外でも開発可能(C/C++、Python...)
「Full Edition」:コンパイラや実行環境を含む
2.動的Webプロジェクトの作成
3.Servletで"Hello World"
4.MVCで"従業員一覧表示"
M(Model): JavaBeans (Javaクラス)
V(View) : JSP
C(Controller) : サーブレット (Javaクラス)
1.Eclipse Pleiades All in One のインストール
URL
http://mergedoc.osdn.jp/
インストール手順
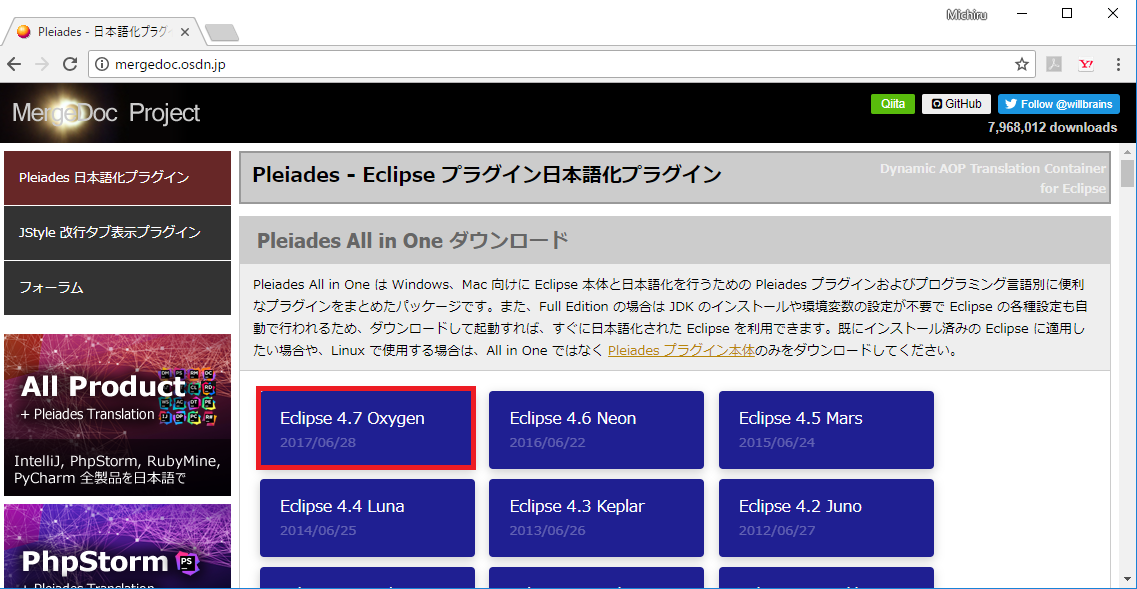
1. 「Eclipse 4.7 Oxygen」クリック
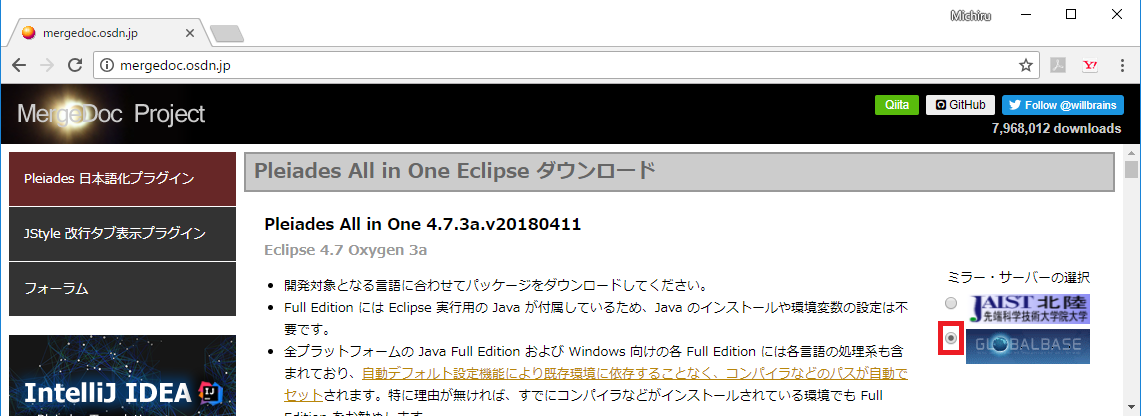
2. ミラー・サーバを変更する ( 3.でタイムアウトしてしまう場合があるので。)
3. Windws 64bitの「Ultimate」「Full Edition」をクリック
4.ダウンロードファイルを作業フォルダーに解凍する
2.動的Webプロジェクトの作成
Eclipse起動
1. 「eclipse.exe」ダブルクリック
2. 「起動」ボタンクリック
※次回起動時に、このダイアログを表示しないのであれば、「この選択を...」にチェック

新規プロジェクト生成
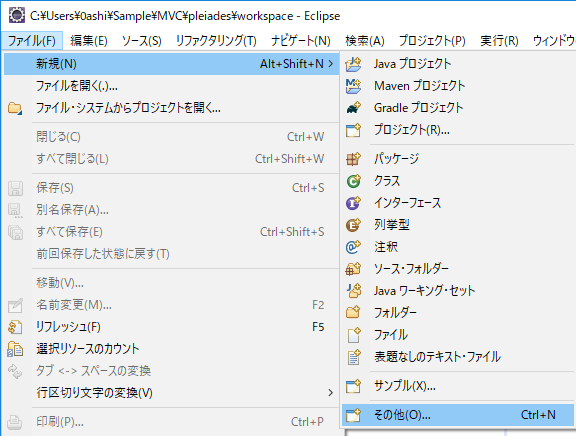
3. 「ファイル」->「新規」->「その他」メニュ選択
4. 「動的Webプロジェクト」を選択し、「次へ」ボタンクリック
5. 「プロジェクト名」を入力し、「Tomcat8」を選択、「次へ」ボタンクリック
6. 「次へ」ボタンクリック
7. 「web.xmlデプロイメント記述子の生成」をチェックし、「完了」ボタンクリック
3.Servletで"Hello World"
1) Servlet作成
1. 「ファイル」->「新規」->「その他」メニュ選択
2. 「サーブレット」を選択し、「次へ」ボタンクリック
3. 「Javaパッケージ」と「クラス名」を入力し、「完了」ボタンクリック
4. 作成したサーブレットクラスを開き、1行追加
response.getWriter().append("\nHello World !!");
2) 動作確認
1. 「実行」->「実行」->「サーバーで実行」メニュ選択
2. 「Tomcat8.0 サーバー」を選択、「このプロジェクトを実行するときは常にこのサーバを使用」にチェックし、「完了」ボタンクリック
3. ブラウザ上にURLを入力
http://localhost:8080/SampleMVC/ShowHelloWorld
4. URLのパス(http://localhost/SampleMVC/ShowHelloWorld)の定義確認
SampleMVC : 使用するサーバー選択時に、プロジェクト名がTomcatの設定ファイルに定義される
ShowHelloWorld : サーブレットJavaファイル作成時のURLマッピングが、@WebServlet("/ShowHelloWorld")と定義される
4.MVCで"従業員一覧表示"
0) JSTLダウンロード
1. taglibs-standard-impl-1.2.5.jar、taglibs-standard-jstlel-1.2.5.jar、taglibs-standard-spec-1.2.5.jarのダウンロード
http://tomcat.apache.org/download-taglibs.cgi
2. プロジェクトのWEB-INF\libにコピー
1) Model(JavaBeans)作成
1. 「ファイル」->「新規」->「クラス」メニュ選択
2. 「Javaパッケージ」と「クラス名」を入力し、「完了」ボタンクリック
3. コード作成
package emp;

public class EmployeeBean {
    private String id            = "";
    private String name          = "";
    private String email         = "";

    public void setId(String id){
        this.id = id;
    }

    public String getId(){
        return this.id;
    }

    public void setName(String name){
        this.name = name;
    }

    public String getName(){
        return this.name;
    }

    public void setEmail(String email){
        this.email = email;
    }

    public String getEmail(){
        return this.email;
    }
}
2) Servlet(Controller)作成
1. 「ファイル」->「新規」->「その他」メニュ選択
2. 「サーブレット」を選択し、「次へ」ボタンクリック
3. 「Javaパッケージ」と「クラス名」を入力し、「次へ」ボタンクリック
4. サーブレット配備識別子名を設定し、URLマッピングを確認、「完了」ボタンクリック
5. コード生成
package emp;

import java.io.IOException;
import java.util.ArrayList;
import java.util.HashMap;
import java.util.List;
import java.util.Map;

import javax.servlet.ServletException;
import javax.servlet.annotation.WebServlet;
import javax.servlet.http.HttpServlet;
import javax.servlet.http.HttpServletRequest;
import javax.servlet.http.HttpServletResponse;


/**
 * Servlet implementation class EmployeeServlet
 */
@WebServlet(name = "EmpList", urlPatterns = { "/EmpList" })
public class EmployeeServlet extends HttpServlet {
	private static final long serialVersionUID = 1L;

    /**
     * @see HttpServlet#HttpServlet()
     */
    public EmployeeServlet() {
        super();
        // TODO Auto-generated constructor stub
    }

	/**
	 * @see HttpServlet#doGet(HttpServletRequest request, HttpServletResponse response)
	 */
	protected void doGet(HttpServletRequest request, HttpServletResponse response) throws ServletException, IOException {
	    // Modelの生成
		List<EmployeeBean> employeeList = new ArrayList<EmployeeBean>();
		EmployeeBean bean = new EmployeeBean();
	    bean.setId("00001");
	    bean.setName("Hayako Sato");
	    bean.setEmail("hanako@abc.com");
	    employeeList.add(bean);

	    bean =  new EmployeeBean();
	    bean.setId("00002");
	    bean.setName("Taro Suzuki");
	    bean.setEmail("taro@abc.com");
	    employeeList.add(bean);

	    bean =  new EmployeeBean();
	    bean.setId("00003");
	    bean.setName("Ryo Ikeda");
	    bean.setEmail("ryo@abc.com");
	    employeeList.add(bean);

	    // ViewへModelを渡す
	    request.setAttribute("employeeList", employeeList);

	    // Viewを表示
	    this.getServletContext()
	        .getRequestDispatcher("/employeeList.jsp")
	        .forward(request, response);
	}

	/**
	 * @see HttpServlet#doPost(HttpServletRequest request, HttpServletResponse response)
	 */
	protected void doPost(HttpServletRequest request, HttpServletResponse response) throws ServletException, IOException {
		// Modelの生成
		Map<String, EmployeeBean> employeeMap = new HashMap<String, EmployeeBean>();
		EmployeeBean bean = new EmployeeBean();
	    bean.setId("00001");
	    bean.setName("Hayako Sato");
	    bean.setEmail("hanako@abc.com");
	    employeeMap.put(bean.getId(), bean);

	    bean =  new EmployeeBean();
	    bean.setId("00002");
	    bean.setName("Taro Suzuki");
	    bean.setEmail("taro@abc.com");
	    employeeMap.put(bean.getId(), bean);

	    bean =  new EmployeeBean();
	    bean.setId("00003");
	    bean.setName("Ryo Ikeda");
	    bean.setEmail("ryo@abc.com");
	    employeeMap.put(bean.getId(), bean);

		String id = request.getParameter("id");
		List<EmployeeBean> employeeList = new ArrayList<EmployeeBean>();
		if (id.isEmpty()) {
			for (Map.Entry<String, EmployeeBean> entry : employeeMap.entrySet()) {
				employeeList.add(entry.getValue());
			}

		}
		else {
			employeeList.add(employeeMap.get(id));
		}

	    // ViewへModelを渡す
		request.setAttribute("employeeList", employeeList);


		// Viewを表示
	    this.getServletContext()
	        .getRequestDispatcher("/employeeList.jsp")
	        .forward(request, response);

	}

}
3) View(JSP)作成
1. 「ファイル」->「新規」->「その他」メニュ選択
2. 「JSPファイル」を選択し、「次へ」ボタンクリック
4. 「フォルダー」と「ファイル名」を入力し、「完了」ボタンクリック
5. コード生成
<%@ page language="java" contentType="text/html; charset=UTF-8"
    pageEncoding="UTF-8"%>
<%@ taglib prefix="c" uri="http://java.sun.com/jsp/jstl/core" %>
<!DOCTYPE html PUBLIC "-//W3C//DTD HTML 4.01 Transitional//EN" "http://www.w3.org/TR/html4/loose.dtd">
<html>
	<head>
		<meta http-equiv="Content-Type" content="text/html; charset=UTF-8">
		<title>従業員一覧</title>
	</head>
	<body>

		<form action="EmpList" method="post">
			<p>
				ID:<input type="text" name="id">
			</p>
			<p>
				<input type="submit" value="送信する">
				<input type="reset" value="入力内容をリセットする">
			</p>
		</form>


		<table>
			<caption>
				<strong>従業員一覧</strong>
			</caption>
			<thead>
				<tr>
					<th>ID</th>
					<th>NAME</th>
					<th>EMAIL</th>
				</tr>
			</thead>
			<tbody>
				<c:forEach items="${employeeList}" var="emp" >
					<tr>
						<th><c:out value="${emp.id}" /></th>
						<td><c:out value="${emp.name}" /></td>
						<td><c:out value="${emp.email}" /></td>
					</tr>
				</c:forEach>
			</tbody>
		</table>

	</body>
</html>
4) 動作確認
1. 「実行」->「実行」->「サーバで実行」メニュ選択
2. ブラウザ上にURLを入力
http://localhost:8080/SampleMVC/EmpList
3. IDで検索できる
4. ID未入力の場合は、全件表示
おわりに
-
EmployeeBean のアクセサ(setXxx()、getXxx())は、lombokを使って省略できます。
-
URL(
http://localhost:8080/SampleMVC/EmpList)を入力したときは、EmployeeServlet.doGet()メソッドをCallします。 -
「送信」ボタンをクリックしたときは、EmployeeServlet.doPost()メソッドをCallします。
-
HashMapクラスは、putした順に要素を取り出すことはできません。LinkedHashMapを使用すると挿入された順番に取り出すことができます。


