背景・目的
以前、下記の記事でS3 Tablesを整理しましたが今回は実際に試してみます。
Using Amazon S3 Tables with AWS analytics services
下記を基に整理します。
How the integration works
-
コンソールでテーブルバケットを作成すると、S3は下記のアクションにより、選択したリージョン内のテーブルバケットをAWS分析サービスと統合する
- Lake Formation(LFn)に全てのテーブルバケットへのアクセスを許可するIAMサービスロールを咲くショウする
- サービスロールを使用してLFnは、現在のリージョンにテーブルバケットを登録する
- 現在のリージョンのAWS Glueデータカタログに
s3tablescatalogを追加する
-
LFnはそのリージョンの現在、及び将来のすべてのテーブルバケットへのアクセス、権限、ガバナンスを管理できる
-
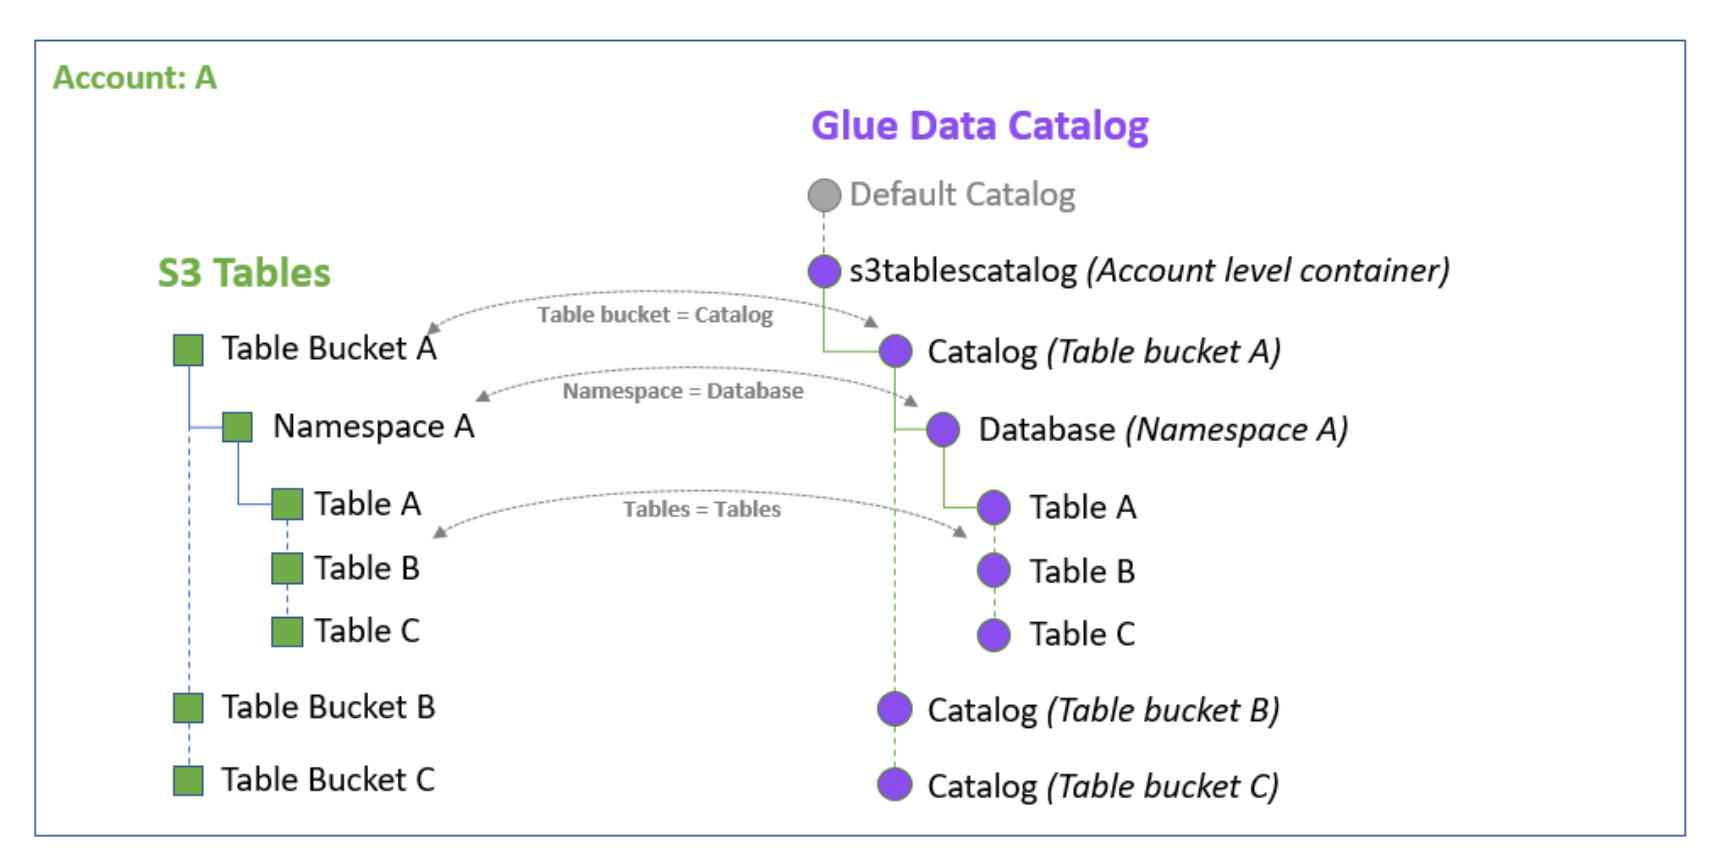
下記にs3tablescatalogが現在のリージョンのテーブルバケット、名前空間、テーブルをデータカタログ内の対応するオブジェクトとして自動的に入力する方法を示す
- テーブルバケットはサブカタログとして入力される
- テーブルバケット内の名前空間は、それぞれのサブカタログ内のDBとして入力される
- テーブルは、それぞれのデータベース内のテーブルとして入力される
Prerequisites for integration
- 下記の前提条件が必要
- テーブルバケットの作成
- glue:PassConnection IAMプリンシパルが必要
- AWSLakeFormationDataAdmin をIAMプリンシパルにアタッチして、そのユーザをデータレイク管理者にする
- lakeformation:RegisterResourceオペレーションの権限を追加する
実践
下記を元に試します。
- AWSにサインインします
前提
AWS CLIのセットアップ
下記を参考に、最新のAWS CLIをダウンロードしておきます。
-
s3tablesのサブコマンドが認識されませんでした
% aws s3tables create-namespace usage: aws [options] <command> <subcommand> [<subcommand> ...] [parameters] To see help text, you can run: aws help aws <command> help aws <command> <subcommand> help aws: error: argument command: Invalid choice, valid choices are: -
ダウンロードします
% curl "https://awscli.amazonaws.com/AWSCLIV2.pkg" -o "AWSCLIV2.pkg" % ls -ltr AWSCLIV2.pkg -rw-r--r-- 1 XXXX XXXX 40953488 2 2 09:05 AWSCLIV2.pkg % -
インストールします
% sudo installer -pkg ./AWSCLIV2.pkg -target / Password: installer: Package name is AWS Command Line Interface installer: Upgrading at base path / installer: The upgrade was successful. % -
バージョンを確認します
% which aws /usr/local/bin/aws % aws --version aws-cli/2.23.11 Python/3.12.6 Darwin/23.6.0 exe/x86_64 % -
s3tablesサブコマンドは認識されたようです% aws s3tables create-namespace usage: aws [options] <command> <subcommand> [<subcommand> ...] [parameters] To see help text, you can run: aws help aws <command> help aws <command> <subcommand> help aws: error: the following arguments are required: --table-bucket-arn, --namespace %
Athena Workspaceのセットアップ
クエリ結果の保存場所を保存するS3バケットを作成し、Athenaで設定します。
- ①.「Location of query result」に上記で作成したS3バケットを選択し、「保存」をクリックします
S3バケットの作成
- S3バケットに移動し、作成します
AthenaのWorkspaceの設定
- Athenaに移動します
- 「設定」タブをクリックします
- 「管理」をクリックします
- クエリを

Step 1: Create a table bucket and integrate it with AWS analytics services
-
S3に移動します
-
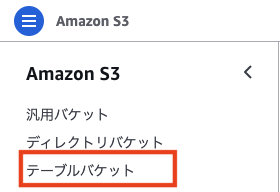
ナビゲーションペインで「テーブルバケット」にクリックします
-
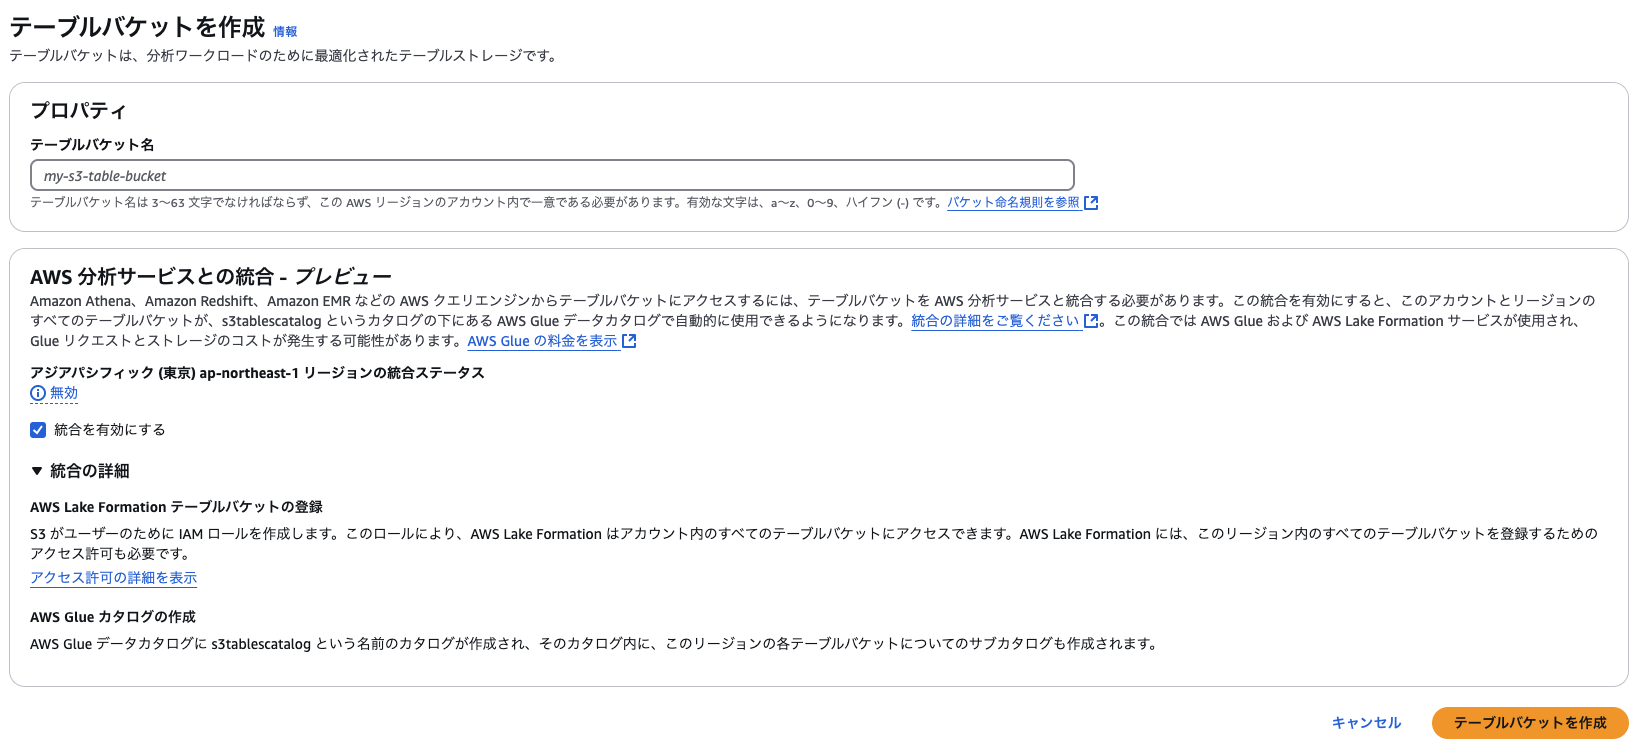
「テーブルバケットを作成」をクリックします
-
下記を入力し、「テーブルバケットを作成」をクリックします
- バケット名
- 統合を有効にする
Step 2: Create a table namespace and a table using the AWS CLI
namespaceの作成
- テーブルバケットに新しいnamespaceを作成します
% aws s3tables create-namespace \ --table-bucket-arn arn:aws:s3tables:ap-northeast-1:XXXXXX:bucket/XXXXX \ --namespace my_namespace { "tableBucketARN": "arn:aws:s3tables:ap-northeast-1:XXXXXX:bucket/XXXXXX", "namespace": [ "my_namespace" ] } % - 作成後、確認します
% aws s3tables list-namespaces \
> --table-bucket-arn arn:aws:s3tables:ap-northeast-1:XXXXXX:bucket/XXXXXX
{
    "namespaces": [
        {
            "namespace": [
                "my_namespace"
            ],
            "createdAt": "2025-02-02T00:33:09.477910+00:00",
            "createdBy": "XXXXXX",
            "ownerAccountId": "XXXXXX"
        }
    ]
}
%
テーブルの作成
- mytabledefinition.jsonを作成します
% cat mytabledefinition.json { "tableBucketARN": "arn:aws:s3tables:ap-northeast-1:XXXXXX:bucket/XXXXXX", "namespace": "my_namespace", "name": "my_table", "format": "ICEBERG", "metadata": { "iceberg": { "schema": { "fields": [ {"name": "id", "type": "int","required": true}, {"name": "name", "type": "string"}, {"name": "value", "type": "int"} ] } } } } % -
mytabledefinition.jsonを基に、テーブルを作成します% aws s3tables create-table --cli-input-json file://mytabledefinition.json { "tableARN": "arn:aws:s3tables:ap-northeast-1:XXXXXX:bucket/XXXXXX/table/XXXXXX", "versionToken": "XXXXXX" } % - 作成されたテーブルをlistで確認します
% aws s3tables list-tables --table-bucket-arn arn:aws:s3tables:ap-northeast-1:XXXXXX:bucket/XXXXXX { "tables": [ { "namespace": [ "my_namespace" ], "name": "my_table", "type": "customer", "tableARN": "arn:aws:s3tables:ap-northeast-1:XXXXXX:bucket/XXXXXX/table/XXXXXX", "createdAt": "2025-02-02T00:40:19.209543+00:00", "modifiedAt": "2025-02-02T00:40:19.209543+00:00" } ] } % - テーブルの詳細を確認します
% aws s3tables get-table --table-bucket-arn arn:aws:s3tables:ap-northeast-1:XXXXXX:bucket/XXXXXX \
> --namespace my_namespace \
> --name my_table
{
    "name": "my_table",
    "type": "customer",
    "tableARN": "arn:aws:s3tables:ap-northeast-1:XXXXXX:bucket/XXXXXX/table/XXXXXX",
    "namespace": [
        "my_namespace"
    ],
    "versionToken": "XXXXXX",
    "metadataLocation": "s3://XXXXXX/metadata/XXXXXX.metadata.json",
    "warehouseLocation": "s3://XXXXXX",
    "createdAt": "2025-02-02T00:40:19.209543+00:00",
    "createdBy": "XXXXXX",
    "modifiedAt": "2025-02-02T00:40:19.209543+00:00",
    "ownerAccountId": "XXXXXX",
    "format": "ICEBERG"
}
%
Step 3: Grant Lake Formation permissions on your table
-
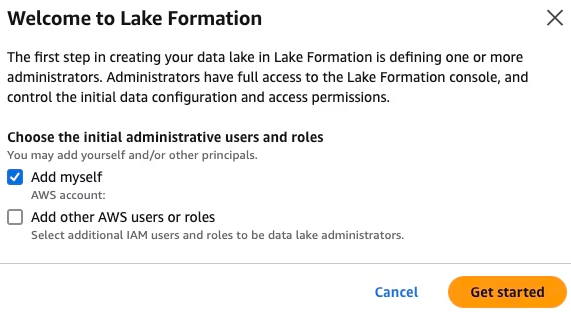
Lake Formationに移動します
-
最初にポップアップが表示されるので、「Get started」をクリックします
-
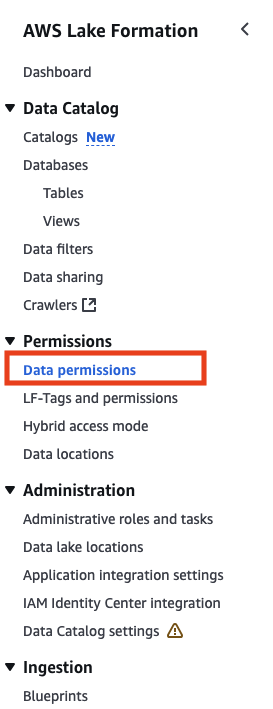
ナビゲーションペインで「Data permissions」をクリックします
-
「Grant」をクリックします
-
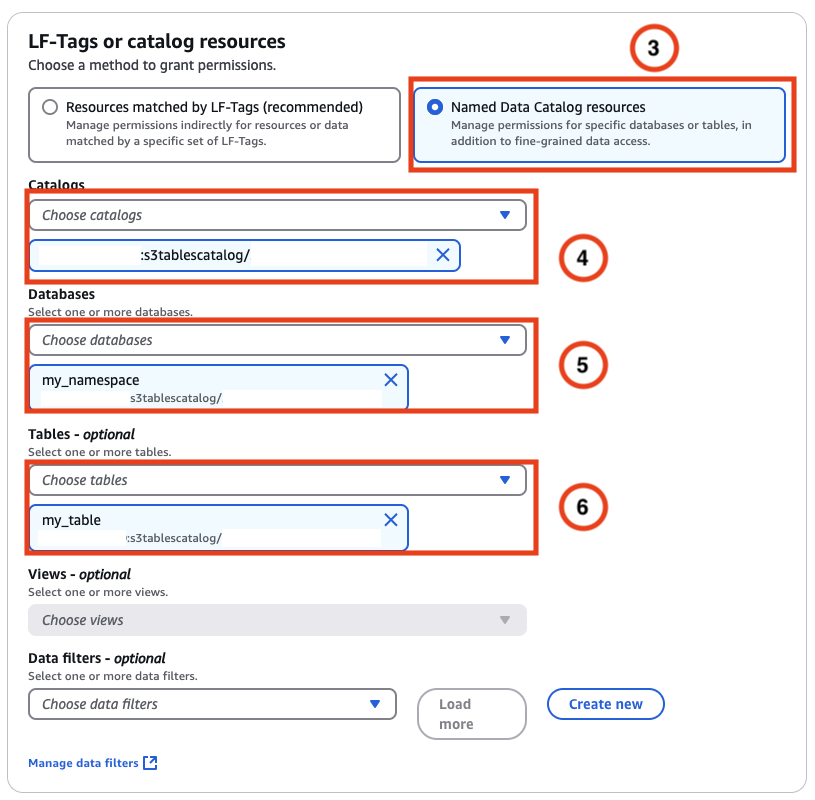
下記を指定します
- ①.Principal:IAM users and roles
- ②.IAM users and roles: IAMロールにクエリを実行するユーザのロールを指定

-
下記を指定します
- ③.Named Data Catalog resourcesを指定
- ④.Ctalogs:データカタログを指定します
- ⑤.Databases: 作成したnamespace
- ⑥.Tables:作成したtable
-
⑦.SUperを指定し、「Grant」をクリックします

-
できました

Step 4: Query data with SQL in Athena
-
Athenaに移動します
-
「エディタ」タブをクリックします
-
データで下記を指定できるようになっていました
- データソース:AWSDataCatalog
- カタログ:作成したカタログ(S3バケット)
- データベース:my_namespace
- テーブルとビュー:my_table

-
クエリエディタに、下記のクエリを指定し実行します。クエリ自体は成功しました
select * from my_table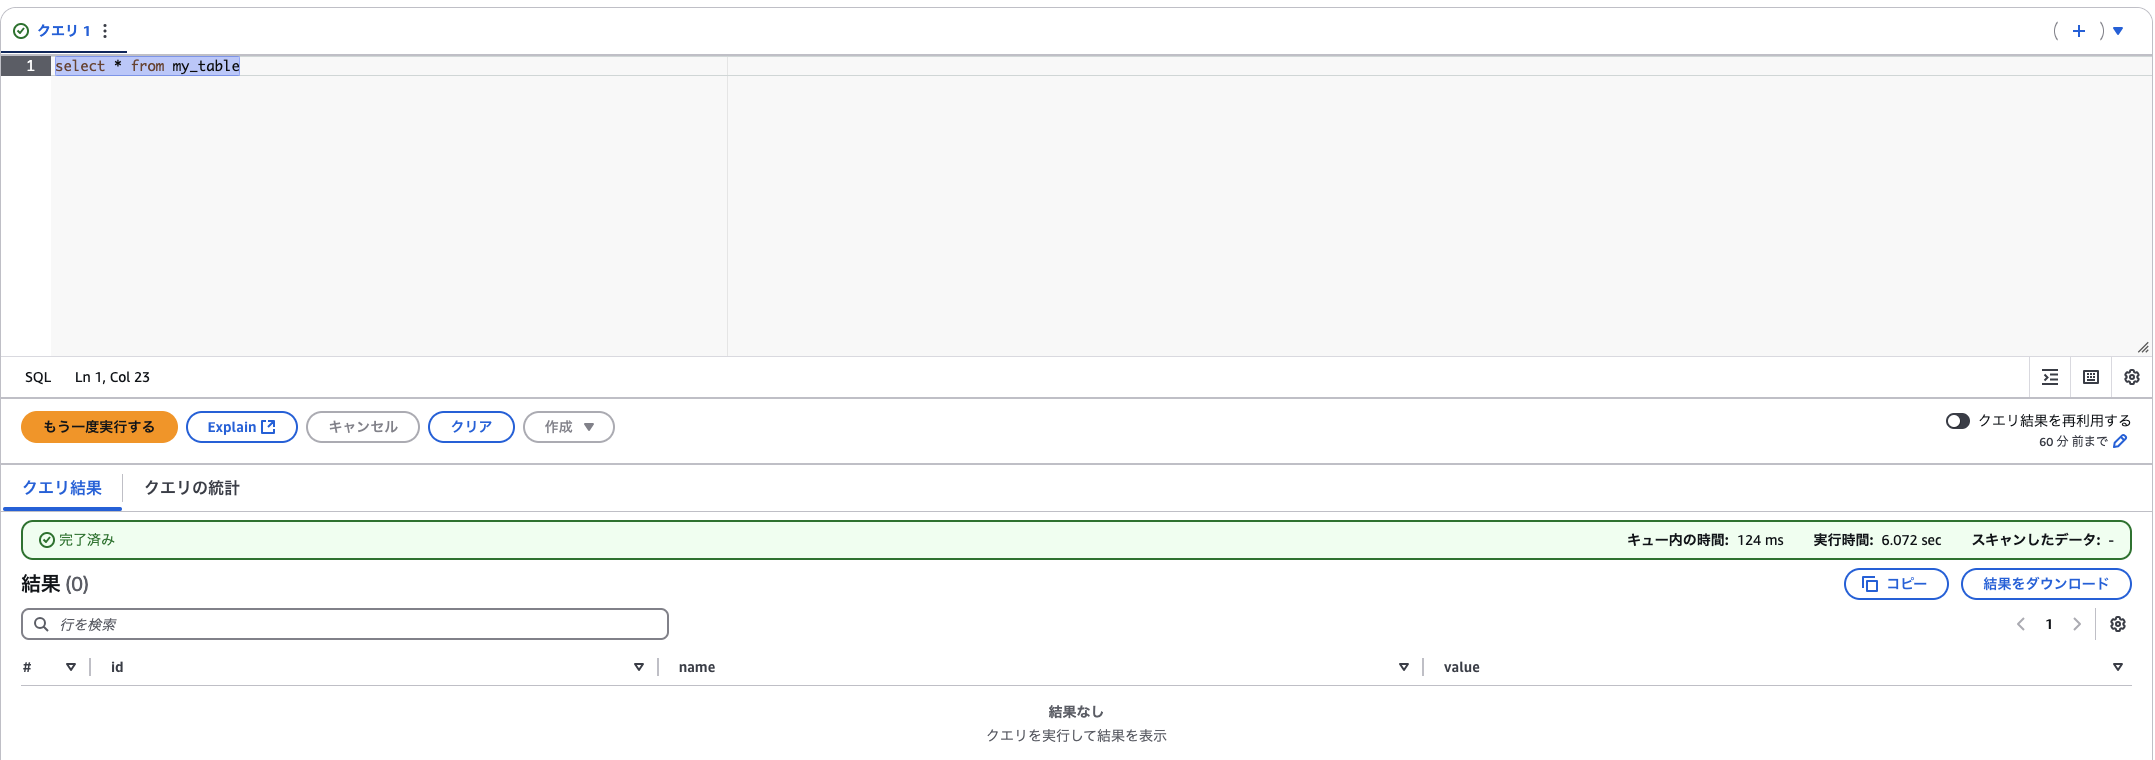
-
下記のクエリを実行し、データを登録します
INSERT INTO my_namespace.my_table
VALUES
    (111, 'ABC', 100),
    (222, 'XYZ', 200);
-
下記のクエリを実行し、あらためて確認します
select * from my_table
考察
今回、S3 Tablesのチュートリアルを試してみました。
次回以降は、S3 metadataをあわせて利用してみたいと思います。
参考