Cairoの同次変換機能
Cairoには描画対象を平行移動・回転・拡大/縮小・鏡像反転・剪断変形する機能があります。これは行列によって座標を同次変換する機能、と言い換えても良いのですが、そのような表現に慣れない向きもあると思うので、前者の理解で問題ありません。
剪断変形はやや難しいので別記事に回すとして、ここでは平行移動・回転・拡大/縮小のみを説明します。
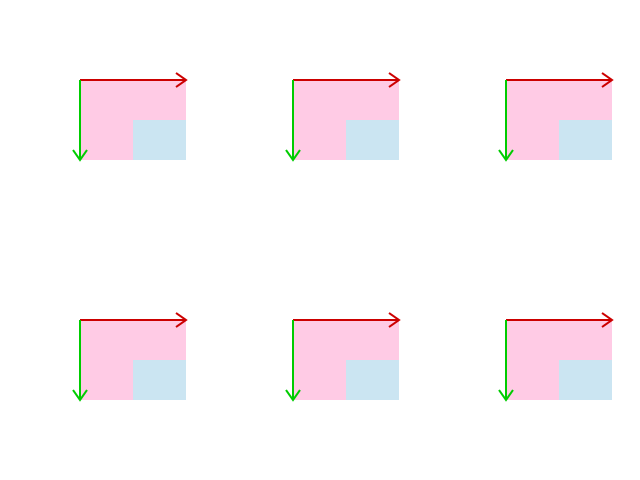
これらの機能を理解するには次のコードで十分かと思います。
void draw_shape(cairo_t *c, int width, int height)
{
  /* pink rectangle */
  cairo_set_source_rgba( c, 1, 0.6, 0.8, 0.5 );
  cairo_rectangle( c, 0, 0, width/6, height/6 );
  cairo_fill( c );
  /* cyan rectangle */
  cairo_set_source_rgba( c, 0.6, 1, 1, 0.5 );
  cairo_rectangle( c, width/12, height/12, width/12, height/12 );
  cairo_fill( c );
  /* x-axis */
  cairo_set_source_rgb( c, 0.8, 0, 0 );
  cairo_move_to( c, 0, 0 );
  cairo_rel_line_to( c, width/6, 0 );
  cairo_rel_move_to( c,-width/64, height/64 );
  cairo_rel_line_to( c, width/64,-height/64 );
  cairo_rel_line_to( c,-width/64,-height/64 );
  cairo_stroke( c );
  /* y-axis */
  cairo_set_source_rgb( c, 0, 0.8, 0 );
  cairo_move_to( c, 0, 0 );
  cairo_rel_line_to( c, 0, height/6 );
  cairo_rel_move_to( c,-height/64,-width/64 );
  cairo_rel_line_to( c, height/64, width/64 );
  cairo_rel_line_to( c, height/64,-width/64 );
  cairo_stroke( c );
}

void draw(cairo_t *c, int width, int height)
{
  /* background */
  cairo_set_source_rgb( c, 1, 1, 1 );
  cairo_rectangle( c, 0, 0, width, height );
  cairo_fill( c );
  /* transform test */
  cairo_translate( c, 0, height/4 ); draw_shape( c, width, height );
  cairo_translate( c, width/3, 0 );  draw_shape( c, width, height );
  cairo_rotate( c, M_PI/6 );         draw_shape( c, width, height );
  cairo_translate( c, width/3, 0 );  draw_shape( c, width, height );
  cairo_rotate( c, M_PI/3 );         draw_shape( c, width, height );
  cairo_scale( c, 2, 3 );            draw_shape( c, width, height );
}
M_PIを使っているのでmath.hをインクルードするのを忘れないで下さい。draw_shape()の中身に深い意味は無いのですが、変換の様子が分かりやすいものにしてあります。出力は次のようになります。

- cairo_translate( c, x, y )が平行移動です。「現在の座標系」からx,y移動します。
- cairo_rotate( c, a )が回転で、「現在の座標系」を時計回りにa回転します。aの単位はラジアンです。
- cairo_scale( c, sx, sy )は、「現在の座標系」に描かれる図形をx方向にsx倍、y方向にsy倍します。sx, syが1より大きければ拡大、1より小さければ縮小です。
「現在の座標系」というのが、同次変換に慣れない人には分かりづらいかも知れません。上の図中にある赤の矢印が「現在の座標系」のx軸、同じく緑の矢印がy軸を表しています。いずれも、「既に描かれた図形を変換する」のではなく「これから描かれる図形に変換を施す」作用を持ちます。ここを理解できれば変換は難しくありません。
上の例で説明しましょう。
- 「現在の座標系」は、最初は描画座標系に一致してます。つまり左上隅が(0,0)で、右にx軸、下にy軸が伸びています。
- 最初に下にheight/4、次に右にwidth/3座標系が平行移動します。
- そして時計回りにπ/6=30度回転しますので、この時点でx軸は右下30度の方向を向きます。
- その次に施されている平行移動は、この右下を向いたx軸に沿ってwidth/3動く、ことになります。
- さらに時計回りにπ/3=60度回転したら、x軸は真下を向きます。
- 最後にx方向に2倍、y方向に3倍の拡大を施します。
どの変換がどの図形に対応するかを、順を追って確認してみて下さい。
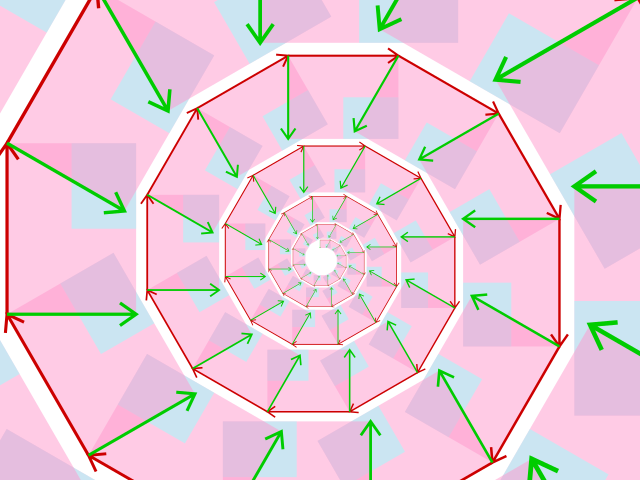
ちょっとお遊びですが、draw()関数を次のように変えてみましょう。
void draw(cairo_t *c, int width, int height)
{
  int i;

  /* background */
  cairo_set_source_rgb( c, 1, 1, 1 );
  cairo_rectangle( c, 0, 0, width, height );
  cairo_fill( c );
  /* spiral */
  cairo_translate( c, width/2, height/2 );
  cairo_scale( c, 0.1, 0.1 );
  draw_shape( c, width, height );
  for( i=0; i<=70; i++ ){
    cairo_translate( c, width/6, 0 );
    cairo_rotate( c, M_PI/6 );
    cairo_scale( c, 1.05, 1.05 );
    draw_shape( c, width, height );
  }
}
出力は次のようになります。
楕円を描く
拡大縮小機能を使うことで、楕円が描けます。次のdraw()関数を試してみて下さい。
void draw(cairo_t *c, int width, int height)
{
  /* background */
  cairo_set_source_rgb( c, 1, 1, 1 );
  cairo_rectangle( c, 0, 0, width, height );
  cairo_fill( c );
  /* ellipsoid */
  cairo_translate( c, width/2, height/2 );
  cairo_scale( c, 3, 2 );
  cairo_arc( c, 0, 0, height/6, 0, 2*M_PI );
  cairo_set_source_rgb( c, 0, 0, 1 );
  cairo_fill( c );
}
次のように、青い楕円が出力されます。

長方形に合わせたグラデーション
(その6)透過とグラデーションで、次のような絵を描きました。

同記事で説明した通り、線形グラデーションは指定した線分に沿ってかかり、直線に垂直な方向には色が変化しません。上の例では長方形の左上隅と右下隅を結ぶ線分を指定していました。したがって、左下隅はちょっと白寄りの、右上隅はちょっとピンク寄りの青でそれぞれ着色されています。
これを、長方形に合わせて左下隅と右上隅がちょうど真ん中の青になるようにしてみましょう。これにはdraw()関数を次のように変えると良いです。
void draw(cairo_t *c, int width, int height)
{
  cairo_pattern_t *p;

  /* background */
  cairo_set_source_rgb( c, 1, 1, 1 );
  cairo_rectangle( c, 0, 0, width, height );
  cairo_fill( c );
  /* red rectangle */
  cairo_translate( c, width/4, height/4 );
  cairo_scale( c, (double)width/height, 1 );
  cairo_rectangle( c, 0, 0, height/2, height/2 );
  p = cairo_pattern_create_linear( 0, 0, height/2, height/2 );
  cairo_pattern_add_color_stop_rgb( p, 0, 1, 1, 1 );
  cairo_pattern_add_color_stop_rgb( p, 0.5, 0.6, 0.8, 1 );
  cairo_pattern_add_color_stop_rgb( p, 1, 1, 0.6, 0.8 );
  cairo_set_source( c, p );
  cairo_pattern_destroy( p );
  cairo_fill_preserve( c );
  cairo_set_source_rgb( c, 1, 0, 0 );
  cairo_set_line_width( c, 10 );
  cairo_stroke( c );
}
最初に座標系を長方形を描き始める(width/4,height/4)まで平行移動、次に幅がwidth/height倍されるように拡大を施しています。widthもheightもint型なので、doubleにキャストしています。その上で、現在の座標系原点(0,0)を左上隅として正方形を描けば、出力される図形は長方形になるということです。
ポイントはその次のcairo_pattern_create_linear()で、正方形の左上隅と右上隅を結ぶ線分を指定しています。正方形ですので、ちょうど真ん中を通る垂線は正方形の左下隅と右上隅を通ります。つまり左下隅と右上隅は同じ色になるわけです。出力は次のようになります。

問題は、長方形の枠線も同様に横方向に拡大されてしまっている(縦方向の枠線の方が横方向の枠線よりも太い)ことですが、これは次のようにすれば解消されます。
void draw(cairo_t *c, int width, int height)
{
  cairo_pattern_t *p;

  /* background */
  cairo_set_source_rgb( c, 1, 1, 1 );
  cairo_rectangle( c, 0, 0, width, height );
  cairo_fill( c );
  /* red rectangle */
  cairo_translate( c, width/4, height/4 );
  cairo_scale( c, (double)width/height, 1 );
  cairo_rectangle( c, 0, 0, height/2, height/2 );
  p = cairo_pattern_create_linear( 0, 0, height/2, height/2 );
  cairo_pattern_add_color_stop_rgb( p, 0, 1, 1, 1 );
  cairo_pattern_add_color_stop_rgb( p, 0.5, 0.6, 0.8, 1 );
  cairo_pattern_add_color_stop_rgb( p, 1, 1, 0.6, 0.8 );
  cairo_set_source( c, p );
  cairo_pattern_destroy( p );
  cairo_fill( c );
  cairo_scale( c, (double)height/width, 1 );
  cairo_rectangle( c, 0, 0, width/2, height/2 );
  cairo_set_source_rgb( c, 1, 0, 0 );
  cairo_set_line_width( c, 10 );
  cairo_stroke( c );
}
cairo_fill()した後に、拡大を元に戻した上で改めて枠の長方形を描いています。出力は

と、今度は期待通りの結果になりました。
変換のリセット
先ほどのdraw_shape()関数を使い、draw()関数を次のようにします。
void draw(cairo_t *c, int width, int height)
{
  /* background */
  cairo_set_source_rgb( c, 1, 1, 1 );
  cairo_rectangle( c, 0, 0, width, height );
  cairo_fill( c );
  /* first row */
  cairo_translate( c, width/8, height/6 );
  draw_shape( c, width, height );
  cairo_translate( c, width/3, 0 );
  draw_shape( c, width, height );
  cairo_translate( c, width/3, 0 );
  draw_shape( c, width, height );
}
これ自体は何ということもなく、次のような絵が出力されます。

これと同じ図を下に続けて描きたいと思った時、次のようにすることは可能です。
void draw(cairo_t *c, int width, int height)
{
  /* background */
  cairo_set_source_rgb( c, 1, 1, 1 );
  cairo_rectangle( c, 0, 0, width, height );
  cairo_fill( c );
  /* first row */
  cairo_translate( c, width/8, height/6 );
  draw_shape( c, width, height );
  cairo_translate( c, width/3, 0 );
  draw_shape( c, width, height );
  cairo_translate( c, width/3, 0 );
  draw_shape( c, width, height );
  /* second row */
  cairo_translate( c,-2*width/3, height/2 );
  draw_shape( c, width, height );
  cairo_translate( c, width/3, 0 );
  draw_shape( c, width, height );
  cairo_translate( c, width/3, 0 );
  draw_shape( c, width, height );
}
途中のcairo_translate( c,-2*width/3, height/2 )で、次に描き出す位置を動かしています。結果はもちろん期待通りになります。しかし、繰り返したいパターンの中にもっと煩雑な変換が含まれていた場合、次の描き出し位置を正しく指定するための変換をいちいち自分で考えるのは大変です。
そこで、ある時点以降の変換を「無かったこと」にします。これは次のようにcairo_save()とcairo_restore()を使えば可能です。
void draw(cairo_t *c, int width, int height)
{
  /* background */
  cairo_set_source_rgb( c, 1, 1, 1 );
  cairo_rectangle( c, 0, 0, width, height );
  cairo_fill( c );
  /* first row */
  cairo_translate( c, width/8, height/6 );
  draw_shape( c, width, height );
  cairo_save( c );
   cairo_translate( c, width/3, 0 );
   draw_shape( c, width, height );
   cairo_translate( c, width/3, 0 );
   draw_shape( c, width, height );
  cairo_restore( c );
  /* second row */
  cairo_translate( c, 0, height/2 );
  draw_shape( c, width, height );
  cairo_translate( c, width/3, 0 );
  draw_shape( c, width, height );
  cairo_translate( c, width/3, 0 );
  draw_shape( c, width, height );
}
出力は次の通りです。
cairo_save()を呼んだ時点で、それまでになされたcairo_translate( c, width/8, height/6 )による座標変換が保存されます。その後も2回cairo_translate()を行っていますが、cairo_restore()を呼べばこれらがリセットされ、保存した座標変換まで戻ります。
座標変換の保存とリセットは段階的に行うことができます。次の例を試してみましょう。
void draw(cairo_t *c, int width, int height)
{
  /* background */
  cairo_set_source_rgb( c, 1, 1, 1 );
  cairo_rectangle( c, 0, 0, width, height );
  cairo_fill( c );
  /* first row */
  cairo_translate( c, width/8, height/6 );
  draw_shape( c, width, height );
  cairo_save( c );
   cairo_translate( c, width/3, 0 );
   draw_shape( c, width, height );
   cairo_save( c );
    cairo_translate( c, width/3, 0 );
    draw_shape( c, width, height );
   cairo_restore( c );
   /* second row */
   cairo_translate( c, 0, height/4 );
   draw_shape( c, width, height );
   cairo_translate( c, width/3, 0 );
   draw_shape( c, width, height );
  cairo_restore( c );
  /* third row */
  cairo_translate( c, 0, height/2 );
  draw_shape( c, width, height );
  cairo_translate( c, width/3, 0 );
  draw_shape( c, width, height );
}
出力は次のようになります。

- 最初にcairo_save()を呼んだ時点で、描画開始位置を(width/8,height/6)まで移動する変換が保存されます。
- そこから右にwidth/3移動した時点でもう一度cairo_save()を呼び保存します。
- もう一度右にwidth/3移動して図形を描いた後でcairo_restore()を呼び、最後に保存された変換、つまり2番目の図形を描いたときの変換までリセットします。
- 下にheight/4移動して描画するということなので、2番目の図形の下に次の図形が現れることになります。
- さらに右にもう一つ図形を描いてからcairo_restore()を呼んでいますので、最初に保存された(1番目の図形を描いた時の)変換までリセットします。
- その後に下にheight/4移動して描画しているので、描き出し位置は1番目の図形の下になっています。
これも、順を追って変換と図形との対応を確認してみて下さい。