FeliCaの仕事はずいぶんやってないので備忘メモ。
本当はKotlinで書きたいけど、過去のソースとか参考にしたいので一旦Javaで書きます。
やりたいこと
- IDmを取得したい
- とりあえずJavaを利用(後でKotlinで書き直す)
- 開発環境はAndroid Studio(3.4をMacで利用)
仕様
ネットに多存在するサンプルの多くはNfcAdapter.enableForegroundDispatch()を利用してアプリがフォアグラウンドにある間ずっと読みっぱなしで、認識したらIntentde処理するものが多いようですが、この仕様だと読むタイミングや機能のOn/OffのコントロールしにくいのでNfcAdapter.enableReaderMode()を利用してみます。
完全にイベントドリブンで読取りってできないのかな?要はonClickで読取りみたいなことしたいのですが、スマートなやり方がわかりません。誰か教えて。
仕様の概要
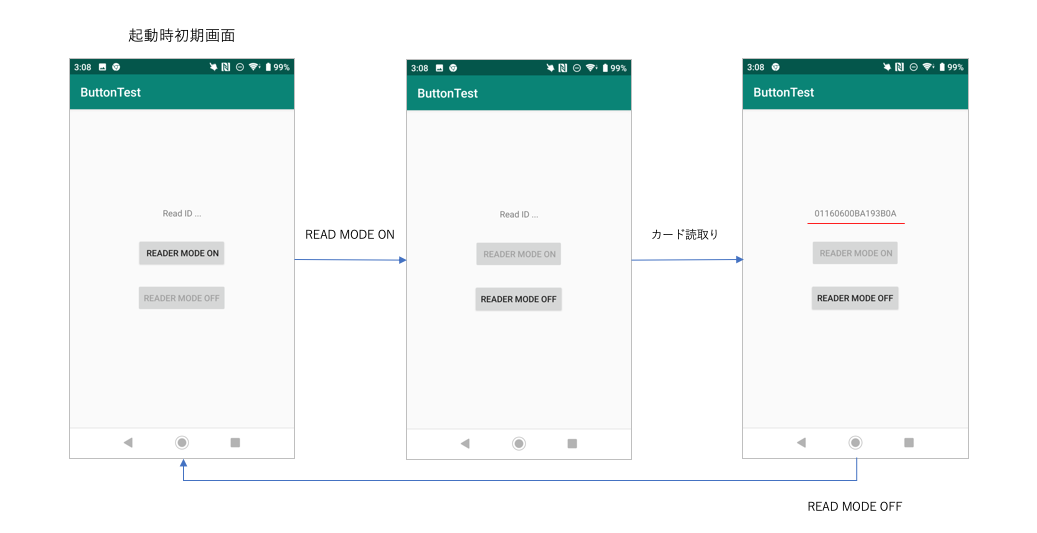
アプリの動きは下記のような感じ
- READER MODE ONボタン(btn01)で読取りスタート
- 読み取ったらTextView(txt01)に表示
- READER MODE OFFボタン(btn02)で読取り中止
下記のような動き
注意事項
Reader/Write機能をOnに
Reader/Writer機能を利用するアプリを開発する場合は、Android(9.0の場合)の設定で[設定]->[接続機器]->[接続の設定]->NFC[NFC/おサイフケータイ設定]->[Reader/Write,P2P]機能をOnにしておく必要があります。
既存アプリをアンインストール(可能なら)
他のNFC機能を利用するアプリ、特にバックグラウンドで待ってIntentを発生させるようなアプリ(例えば、おサイフケータイアプリ)は開発に影響があるので不要なら削除しておいたほうがいいでしょう。
一方、一般向けアプリの場合は利用者が他のNFCアプリをインストールしていることを前提に仕様を考えておく必要があるでしょう。
実装
無駄が多いですが、各種主要コード全体を貼り付けておきます。
AndroidManifest.xml
NFC利用のパーミッションを追加。
<?xml version="1.0" encoding="utf-8"?>
<manifest xmlns:android="http://schemas.android.com/apk/res/android"
    package="jp.bluecode.buttontest">

    <application
        android:allowBackup="true"
        android:icon="@mipmap/ic_launcher"
        android:label="@string/app_name"
        android:roundIcon="@mipmap/ic_launcher_round"
        android:supportsRtl="true"
        android:theme="@style/AppTheme">
        <activity android:name=".MainActivity">
            <intent-filter>
                <action android:name="android.intent.action.MAIN" />

                <category android:name="android.intent.category.LAUNCHER" />
            </intent-filter>
        </activity>
    </application>

+   <uses-permission android:name="android.permission.NFC" />

</manifest>
activity_main.xml
あまり参考になりませんが、とりあえず。
画面は自分で適当にレイアウトした方が早いかも。
<?xml version="1.0" encoding="utf-8"?>
<android.support.constraint.ConstraintLayout xmlns:android="http://schemas.android.com/apk/res/android"
    xmlns:app="http://schemas.android.com/apk/res-auto"
    xmlns:tools="http://schemas.android.com/tools"
    android:layout_width="match_parent"
    android:layout_height="match_parent"
    tools:context=".MainActivity">

    <TextView
        android:id="@+id/txt01"
        android:layout_width="wrap_content"
        android:layout_height="wrap_content"
        android:layout_marginTop="8dp"
        android:text="Read ID ..."
        app:layout_constraintBottom_toBottomOf="parent"
        app:layout_constraintLeft_toLeftOf="parent"
        app:layout_constraintRight_toRightOf="parent"
        app:layout_constraintTop_toTopOf="parent"
        app:layout_constraintVertical_bias="0.308" />

    <Button
        android:id="@+id/btn01"
        android:layout_width="wrap_content"
        android:layout_height="wrap_content"
        android:text=" Reader Mode On"
        app:layout_constraintBottom_toBottomOf="parent"
        app:layout_constraintEnd_toEndOf="parent"
        app:layout_constraintHorizontal_bias="0.498"
        app:layout_constraintStart_toStartOf="parent"
        app:layout_constraintTop_toBottomOf="@+id/txt01"
        app:layout_constraintVertical_bias="0.107" />

    <Button
        android:id="@+id/btn02"
        android:layout_width="wrap_content"
        android:layout_height="wrap_content"
        android:text="Reader Mode Off"
        app:layout_constraintBottom_toBottomOf="parent"
        app:layout_constraintEnd_toEndOf="parent"
        app:layout_constraintHorizontal_bias="0.498"
        app:layout_constraintStart_toStartOf="parent"
        app:layout_constraintTop_toBottomOf="@+id/btn01"
        app:layout_constraintVertical_bias="0.116" />

</android.support.constraint.ConstraintLayout>
MainActivity
できるだけ要点だけ短く書くために端折ってます。
IDm取得するところまでなら、NfcAdapter作って、Tagを取得すれば、Tag.getId()という感じでIDmを取得できる。
Javaには標準でbyte列をStringにする関数が無いのでカスタム関数で用意してますが、そっちのほうが長いくらい。
package jp.bluecode.buttontest;

import android.nfc.NfcAdapter;
import android.nfc.Tag;
import android.os.Handler;
import android.os.Looper;
import android.support.v7.app.AppCompatActivity;
import android.os.Bundle;
import android.util.Log;
import android.view.View;
import android.widget.Button;
import android.widget.TextView;

import java.util.Formatter;
import java.util.Locale;

public class MainActivity extends AppCompatActivity {

    //Viewで使う変数を初期化(別にここじゃなくてもいいけど)
    TextView txt01;
    Button btn01;
    Button btn02;

    //NfcAdapterを初期化
    NfcAdapter nfcAdapter;

    @Override
    protected void onCreate(Bundle savedInstanceState) {
        super.onCreate(savedInstanceState);
        setContentView(R.layout.activity_main);

        //UIのマーツをマッピング
        txt01 = findViewById(R.id.txt01);
        btn01 = findViewById(R.id.btn01);
        btn02 = findViewById(R.id.btn02);

        //nfcAdapter初期化
        nfcAdapter = NfcAdapter.getDefaultAdapter(this);

        //Reader Mode Offボタンのenabledをfalseに(トグルにするため)
        btn02.setEnabled(false);

        btn01.setOnClickListener(new View.OnClickListener() {
            @Override
            public void onClick(View v) {
                //トグル機能
                btn01.setEnabled(false);
                btn02.setEnabled(true);

                //Redermode On
                nfcAdapter.enableReaderMode(MainActivity.this,new MyReaderCallback(),NfcAdapter.FLAG_READER_NFC_F,null);
            }
        });

        btn02.setOnClickListener(new View.OnClickListener(){
            @Override
            public void onClick(View v) {
                //トグル機能
                btn01.setEnabled(true);
                btn02.setEnabled(false);

                //Readermode Off
                nfcAdapter.disableReaderMode(MainActivity.this);

                //表示初期化
                txt01.setText("Read ID ...");
            }
        });
    }

    //Callback Class
    private class MyReaderCallback implements NfcAdapter.ReaderCallback{
        @Override
        public void onTagDiscovered(Tag tag){

            Log.d("Hoge","Tag discoverd.");

            //get idm
            byte[] idm = tag.getId();
            final String idmString = bytesToHexString(idm);

            //idm取るだけじゃなくてread,writeしたい場合はtag利用してごにょごにょする

            //親スレッドのUIを更新するためごにょごにょ
            final Handler mainHandler = new Handler(Looper.getMainLooper());
            mainHandler.post(new Runnable() {
                @Override
                public void run() {
                    txt01.setText(idmString);
                }
            });

        }
    }

    //bytes列を16進数文字列に変換(めんどい)
    public static String bytesToHexString(byte[] bytes) {
        StringBuilder sb = new StringBuilder();

        Formatter formatter = new Formatter(sb);
        for (byte b : bytes) {
            formatter.format("%02x", b);
        }

        return sb.toString().toUpperCase(Locale.getDefault());
    }
}
簡単ですが以上です。
