AngularでFormの取り扱い?にはReactive FormとTemplate Driven Formの2種類があります。
その2つで実装方法が異なるのでその2つの実装について簡単に調べてみます。
本記事はReactive Form編とします。Template Drive Fromについてはこちらをご覧ください。
準備
angular cliはインストールされていることを前提とします。
まず、プロジェクトを作成します。
ng new reactiveform
cd reactiveform
作成の際、strictはNのまま。routingはyでいいでしょう(Nでもいいです)。
基礎
あまりよくないのでしょうけど、めんどくさいのでapp.component.*に直接実装していきたいと思います。
app.component.html
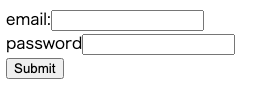
まずはapp.component.htmlに下記を実装して動作を確認します。この時点でangularに依存した記述は一切ありません。
<form>
  email:<input type="email"><br>
  password<input type="text"><br>
  <button type="submit">Submit</button>
</form>
実装が終わったら一旦動作を確認しておきます。
ng serve --open
見た目は悪いですが、なるべく余計な記述をしないためです。ご了承ください。
app.module.ts
Formの利用に際して、app.module.tsのimportsに利用モジュールを追加しておきます。
import { BrowserModule } from '@angular/platform-browser';
import { NgModule } from '@angular/core';

import { AppRoutingModule } from './app-routing.module';
import { AppComponent } from './app.component';

import { ReactiveFormsModule } from '@angular/forms';

@NgModule({
  declarations: [
    AppComponent
  ],
  imports: [
    BrowserModule,
    AppRoutingModule,
+   ReactiveFormsModule //Add
  ],
  providers: [],
  bootstrap: [AppComponent]
})
export class AppModule { }
app.component.ts
app.component.htmlに対応するapp.component.tsに必要な実装を行います。
import { Component } from '@angular/core';
import { FormGroup, FormControl, Validators } from '@angular/forms';

@Component({
  selector: 'app-root',
  templateUrl: './app.component.html',
  styleUrls: ['./app.component.css']
})

export class AppComponent {
  title = 'reactiveform';

 //ここが重要
  loginForm = new FormGroup({
    email: new FormControl('', []),
    password: new FormControl('', []),
  });

 //ひとまず入力値を表示
  onSubmit() {
    alert(JSON.stringify(this.loginForm.value));
  }

}
実装したら、連携して動作するようhtmlを編集します。ts側の記述との対応をよく注意して記述してください。
<form [formGroup]="loginForm" (ngSubmit)="onSubmit()">
  email:<input type="email" formControlName="email"><br>
  password<input type="text" formControlName="password"><br>
  <button type="submit">Submit</button>
</form>
記述が終わったら動作を確認してみます。
やっていることは、
- fromにformGroupとngSubmit時の紐付け
- emailにformControlNameで紐付け
- passwordにformControlNameで紐付け
という感じです。
Submitボタンを押すと入力値が取得できています。あとは、API連携などを実装すれば意味のあるSPAが開発できそうです。
応用
Formはアプリ開発時の主コンポーネントであるため、もう少し細かく見てみます。
値やプロパティーの取得
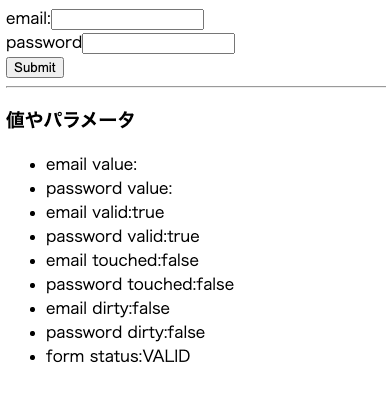
htmlに下記記述を追加し、実装に必要な値やプロパティがどのように取得できるか確認してください。
<form [formGroup]="loginForm" (ngSubmit)="onSubmit()">
  email:<input type="email" formControlName="email"><br>
  password<input type="text" formControlName="password"><br>
  <button type="submit">Submit</button>
</form>
<hr>
<h3>値やパラメータ</h3>
<ul>
  <li>email value:{{loginForm.get("email").value}}</li>
  <li>password value:{{loginForm.get("password").value}}</li>
  <li>email valid:{{loginForm.get("email").valid}}</li>
  <li>password valid:{{loginForm.get("password").valid}}</li>
  <li>email touched:{{loginForm.get("email").touched}}</li>
  <li>password touched:{{loginForm.get("password").touched}}</li>
  <li>email dirty:{{loginForm.get("email").dirty}}</li>
  <li>password dirty:{{loginForm.get("password").dirty}}</li>
  <li>form status:{{loginForm.status}}</li>
</ul>
各値の取得はloginForm.controls.email?.invalidという書き方もできる(template driven formとの互換性重視ならこっちのほうがよい)。
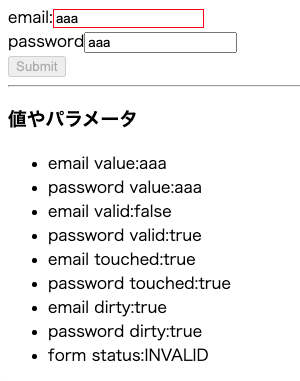
初期状態で下記のように表示されています。
値を入力したり、inputを移動したりするとどのように値が変化するか確認してください。
ここでは代表的なものを表示してみましたが、他にどのような値やプロパティがあるか調査してみてください。
基本的なバリデーション(パラメータやクラスの変化を見る)
ここのまでの知識を応用して簡単なバリデーションを実装してみたいのですが、まずはバリデーションの実装に必要な値の取得方法について見てみます。
バリデーションを追加(有効化)
import { Component } from '@angular/core';
import { FormGroup, FormControl, Validators } from '@angular/forms';

@Component({
  selector: 'app-root',
  templateUrl: './app.component.html',
  styleUrls: ['./app.component.css']
})

export class AppComponent {
  title = 'reactiveform';

	//バリデーションを追加
    loginForm = new FormGroup({
    email: new FormControl('', [Validators.required, Validators.email]),
    password: new FormControl('', [Validators.required]),
  });

  onSubmit() {
    alert(JSON.stringify(this.loginForm.value));
  }

}
各種値の変化を確認
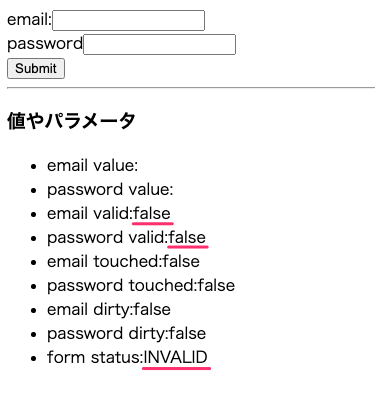
バリデーションを有効にすることで、条件を満たしていない項目の値が変化しています。
HTMLレベルで出力されるclass名も変化しています。
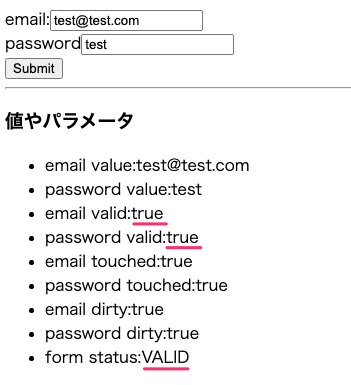
条件を満たした場合の変化もみてみます。
HTMLレベでももちろん変化しています。
基本的なバリデーション(実装)
では、ここまでの知識を応用して簡単なバリデーションを実装してみます。
classの変化を応用
出力されるclassを利用して下記記述をCSSに追加してみます。
input.ng-invalid{
    border: 1px solid red;
}
また、全てのバリデーションが通るまでSubmitボタンそdisabledにしてみたいと思います。
<form [formGroup]="loginForm" (ngSubmit)="onSubmit()">
  email:<input type="email" formControlName="email"><br>
  password<input type="text" formControlName="password"><br>
+  <button type="submit" [disabled]="loginForm.status == 'INVALID'">Submit</button>
</form>
<hr>
<h3>値やパラメータ</h3>
<ul>
  <li>email value:{{loginForm.get("email").value}}</li>
  <li>password value:{{loginForm.get("password").value}}</li>
  <li>email valid:{{loginForm.get("email").valid}}</li>
  <li>password valid:{{loginForm.get("password").valid}}</li>
  <li>email touched:{{loginForm.get("email").touched}}</li>
  <li>password touched:{{loginForm.get("password").touched}}</li>
  <li>email dirty:{{loginForm.get("email").dirty}}</li>
  <li>password dirty:{{loginForm.get("password").dirty}}</li>
  <li>form status:{{loginForm.status}}</li>
</ul>
動作を確認してみます。
ものすごく簡単ですが、バリデーションが実装できました。
あとはご利用のCSSフレームワーク等の記述と連携させれば高度なバリデーションが実装可能かと思います。
その他
知っておくと実装がスムーズな知識についても紹介しておきます。
値のセット(個別と全て)
プログラム中で値を変化させることが多いかと思いますが、単体と全体で記述が違います。
単体ではpatchValue()を全体ではsetValue()を利用します。
import { Component } from '@angular/core';
import { FormGroup, FormControl, Validators } from '@angular/forms';

@Component({
  selector: 'app-root',
  templateUrl: './app.component.html',
  styleUrls: ['./app.component.css']
})

export class AppComponent {
  title = 'reactiveform';

  loginForm = new FormGroup({
    email: new FormControl('', [Validators.required, Validators.email]),
    password: new FormControl('', [Validators.required]),
  });

  onSubmit() {
    alert(JSON.stringify(this.loginForm.value));
  }

  //個別
  singleValueChange() {
    this.loginForm.patchValue({
      email: "hoge",
    });
  }

  //全て
  allValuesChange() {
    this.loginForm.setValue({
      email: "foo@test.com",
      password: "bar",
    });
  }

}
<h3>値の操作</h3>
<p><button (click)="singleValueChange()">emailの変更</button></p>
<p><button (click)="allValuesChange()">email,passwordの変更</button></p>
値の簡素化
あと、html側から値や関数の呼び出しを簡素化するために(それ以外でも)、get(){}を利用するパターンがあり、知っておくと簡素化はもちろん他人のコードを読むときにも便利です。
import { Component } from '@angular/core';
import { FormGroup, FormControl, Validators } from '@angular/forms';

@Component({
  selector: 'app-root',
  templateUrl: './app.component.html',
  styleUrls: ['./app.component.css']
})

export class AppComponent {
  title = 'reactiveform';

  loginForm = new FormGroup({
    email: new FormControl('', [Validators.required, Validators.email]),
    password: new FormControl('', [Validators.required]),
  });

  onSubmit() {
    alert(JSON.stringify(this.loginForm.value));
  }

  //個別
  singleValueChange() {
    this.loginForm.patchValue({
      email: "hoge",
    });
  }

  //全て
  allValuesChange() {
    this.loginForm.setValue({
      email: "foo@test.com",
      password: "bar",
    });
  }

  //取得の簡素化
+  get emil(){return this.loginForm.get("email")}
+  get password(){return this.loginForm.get("password")}

}
上記の記述を行うことで、emailやpasswordの値へのアクセスが簡素化されます。
<h3>値やパラメータ</h3>
<ul>
  <li>email value:{{email.value}}</li>
  <li>password value:{{password.value}}</li>
  <li>email valid:{{email.valid}}</li>
  <li>password valid:{{password.valid}}</li>
  <li>email touched:{{email.touched}}</li>
  <li>password touched:{{password.touched}}</li>
  <li>email dirty:{{email.dirty}}</li>
  <li>password dirty:{{password.dirty}}</li>
  <li>form status:{{loginForm.status}}</li>
</ul>
もっと現実的なバリデーション
上記の例では、初期状態からバリデーションが効いた状態になってしまいます。
多くの場合、touchedやdirtyと併用することになります。その場合の例。
<p>reactive works!</p>
<form [formGroup]="loginForm" (ngSubmit)="onSubmit()">
    email:<input type="email" formControlName="email"/>
    <ng-container *ngIf="email.invalid && (email.touched||email.dirty)">
        <p *ngIf="email.hasError('required')">必須です。</p>
    </ng-container>
    <br/>
    password<input type="password" formControlName="password"/>
    <button type="submit" [disabled]="loginForm.status == 'INVALID'">Click</button>
</form>
上記はts側に下記の(簡素化)記述があることが前提です。
  get email(){return this.loginForm.get("email")};
  get passowrd(){return this.loginForm.get("password")}
カスタムバリデーション
最もシンプルな実装パターン。
nullが帰ってくればvalid、それ以外はinvalidというちょっと変わった仕様。
import { Component, OnInit } from '@angular/core';

import { FormBuilder, FormGroup, FormControl, Validators, AbstractControl } from '@angular/forms';

@Component({
  selector: 'app-reactive',
  templateUrl: './reactive.component.html',
  styleUrls: ['./reactive.component.css']
})
export class ReactiveComponent implements OnInit {

  constructor(private builder: FormBuilder) { }


  loginForm = new FormGroup({
    email: new FormControl('', [Validators.required]),
+   password: new FormControl('', [customValidator])
  });

  onSubmit() {
    alert(JSON.stringify(this.loginForm.value))
  }


  ngOnInit(): void {
  }

  get email() { return this.loginForm.get("email") };
  get passowrd() { return this.loginForm.get("password") }

}

//nullが返ればvalid。それ以外はinvalid
+function customValidator(formControl: AbstractControl) {
+  const val = formControl.value;
+  const reg = /a/;
+  return reg.test(val) ? null : { value: val };
+}
