AngularでFormの取り扱い?にはReactive FormとTemplate Driven Formの2種類があります。
その2つで実装方法が異なるのでその2つの実装について簡単に調べてみます。
本記事はTemplate Driven Form編とします。Reactive Fromについてはこちらをご覧ください。
準備
angular cliはインストールされていることを前提とします。
まず、プロジェクトを作成します。
ng new templateDrivenForm
cd templateDrivenForm
作成の際、strictはNのまま。routingはyでいいでしょう(Nでもいいです)。
基礎
関連の記述は、あまりよくないのでしょうけど、めんどくさいのでapp.component.*に直接実装していきたいと思います。
app.component.html
まずはapp.component.htmlに下記を実装して動作を確認します。この時点でangularに依存した記述は一切ありません。
<form>
  email:<input type="email"><br>
  password<input type="text"><br>
  <button type="submit">Submit</button>
</form>
もしくは下記のように書いてもいいかもしれません(内容はまったく同じです)。というのはtemplate driven formではinput等にたくさんの属性を記述することになるため可読性向上に繋がります。
<form>
  email:
  <input
    type="email"
  ><br/>
  password:
  <input
    type="password"
  ><br/>
  <button type="submit">Submit</button>
</form>
実装が終わったら一旦動作を確認しておきます。
ng serve --open
モデルの作成
Template Driven Formの特徴の1つはモデルを利用することです。なので、まずモデルを作ります。
appフォルダ直下にuser.tsとして下記を作成しておきます。
export class User {
    email: string;
    password: string;
}
忘れがちなapp.module.tsに必要なモジュールを追加しておきましょう。
FormsModuleを利用します。
app.module.ts
import { BrowserModule } from '@angular/platform-browser';
import { NgModule } from '@angular/core';

import { AppRoutingModule } from './app-routing.module';
import { AppComponent } from './app.component';

+ import { FormsModule } from '@angular/forms';

@NgModule({
  declarations: [
    AppComponent
  ],
  imports: [
    BrowserModule,
    AppRoutingModule,
+   FormsModule, //add for template driven form
  ],
  providers: [],
  bootstrap: [AppComponent]
})
export class AppModule { }
componentのロジックを書きます。
そんなに多くの記述はしません。
app.component.ts
import { Component } from '@angular/core';
import { NgForm } from '@angular/forms';
import { User } from './user';

@Component({
  selector: 'app-root',
  templateUrl: './app.component.html',
  styleUrls: ['./app.component.css']
})

export class AppComponent {

  title = 'templateDrivenForm';

  //modelの初期化
  user: User = { email: '', password: '' };
  //NgFormの作成
  form: NgForm;

  onSubmit(form): void {
    alert(JSON.stringify(form.value));
  }

}
app.componet.html
ロジックを書いたらHTMLと関連付けます。
<form #form=ngForm (ngSubmit)="onSubmit(form)">
  email:
  <input
    type="email"
    name="email"
    [ngModel]="user.email"
  ><br/>
  password:
  <input
    type="password"
    name="password"
    [ngModel]="user.password"
  ><br/>
  <button type="submit">Submit</button>
</form>
ここまでの記述でinputとモデルのバインド等も完成し、最低限のFormの機能は実装できました。
応用
基本的な流れをみたところで、Form機能をより洗練させるために利用できる周辺機能を見てみます。
値やプロパティーの取得
まずは、値や各種プロパティーの取得方法を見てみます。
<form #form=ngForm (ngSubmit)="onSubmit(form)">
  email:
  <input
    type="email"
    name="email"
    [ngModel]="user.email"
  ><br/>
  password:
  <input
    type="password"
    name="password"
    [ngModel]="user.password"
  ><br/>
  <button type="submit">Submit</button>
</form>
<hr>
<ul>
  <li>email value:{{form.value.email}}</li>
  <li>password value:{{form.value.password}}</li>
  <li>email valid:{{form.controls.email?.valid}}</li>
  <li>password valid:{{form.controls.password?.valid}}</li>
  <li>email touched:{{form.controls.email?.touched}}</li>
  <li>password touched:{{form.controls.password?.touched}}</li>
  <li>email dirty:{{form.controls.email?.dirty}}</li>
  <li>password dirty:{{form.controls.password?.dirty}}</li>
  <li>{{form.status}}</li>
</ul>
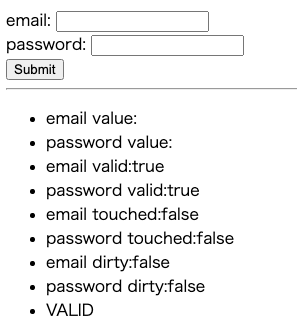
Reactive Formで利用してたform.get("email").といった記述は使えないのかな?。あと?をつけるのがミソ。
こんか感じで出ます。
このときHTMLとして出力されている内容(class名等)も変化しているので確認する。
基本的なバリデーション(パラメータやクラスの変化を見る)
では、バリデーションを実装するための記述と利用できそうなパラメータについて見てみます。
下記のようにバリデーションのための記述を追加します。requiredやemailなどの記述をつけるだけのようです。
<form #form=ngForm (ngSubmit)="onSubmit(form)">
  email:
  <input
    type="email"
    name="email"
    [ngModel]="user.email"
    required
    email
  ><br/>
  password:
  <input
    type="password"
    name="password"
    [ngModel]="user.password"
    required
  ><br/>
  <button type="submit">Submit</button>
</form>
バリデーションを追加するとデフォルトのパラメータ値が変化します。valid系がかわるようです。
HTML中のclassなども変わります。
バリデーション条件を満たした場合の値もみてみてください。
classの変化も見てください。invalidがvalid的なものになります。
基本的なバリデーション(実装)
ここまでの知識を利用して(ものすごく)簡単なバリデーションを実装してみます。
CSSを変更
ng-invalidが出力されてるとき、枠を赤くしてみます。
input.ng-invalid{
    border: 1px solid red;
}
条件を満たさない間はSubmitボタンを押せないようにしてみましょう。
<form #form=ngForm (ngSubmit)="onSubmit(form)">
  email:
  <input
    type="email"
    name="email"
    [ngModel]="user.email"
    required
    email
  ><br/>
  password:
  <input
    type="password"
    name="password"
    [ngModel]="user.password"
    required
  ><br/>
+ <button type="submit" [disabled]="form.status == 'INVALID'">Submit</button>
</form>
実行してみます。
実運用には随分機能が足らない感じはしますが、基礎知識としてはこんなもんかなと。
その他
値の変更
Reactive Formでは値の変更はpatchValue()とsetValue()を使い分ける必要がありましたが、Template Driven Formではモデルの値を更新するだけです。
import { Component } from '@angular/core';
import { NgForm } from '@angular/forms';
import { User } from './user';

@Component({
  selector: 'app-root',
  templateUrl: './app.component.html',
  styleUrls: ['./app.component.css']
})

export class AppComponent {

  title = 'templateDrivenForm';

  //modelの初期化
  user: User = { email: '', password: '' };
  //NgFormの作成
  form: NgForm;

  onSubmit(form): void {
    alert(JSON.stringify(form.value));
  }

  //個別
  singleValueChange(){
    this.user.email = "hoge@hoge.com";
  }

  //全部
  allValuesChange(){
    this.user.email = "hoge@hoge.com";
    this.user.password = "abcd"
  }

}
<form #form=ngForm (ngSubmit)="onSubmit(form)">
  email:
  <input type="email" name="email" [ngModel]="user.email" required email><br />
  password:
  <input type="password" name="password" [ngModel]="user.password" required><br />
  <button type="submit" [disabled]="form.status == 'INVALID'">Submit</button>
</form>
<hr>
<!-- 追加 -->
<p><button (click)="singleValueChange()">set email</button></p>
<p><button (click)="allValuesChange()">set email&password</button></p>
変数名の簡素化等
Template Driven Formでは余り使わず。


