はじめに
例に漏れず今年の師走もバタバタとしていますが、新しいことを学ぶのはいつでも楽しいものです。
時間をわすれてやってしまうのでより忙しさに拍車をかけていますが、それもまたよし。
というわけで、最近ようやく Three.js を触り始めました。
いままで触っていなかったので、WebGL 自体の知識を中心とした新しい概念が盛り沢山なのですが、
Three.js を学んでいく上で「これめちゃくちゃ便利な機能だなー」となったものをいくつかご紹介させていただきます。
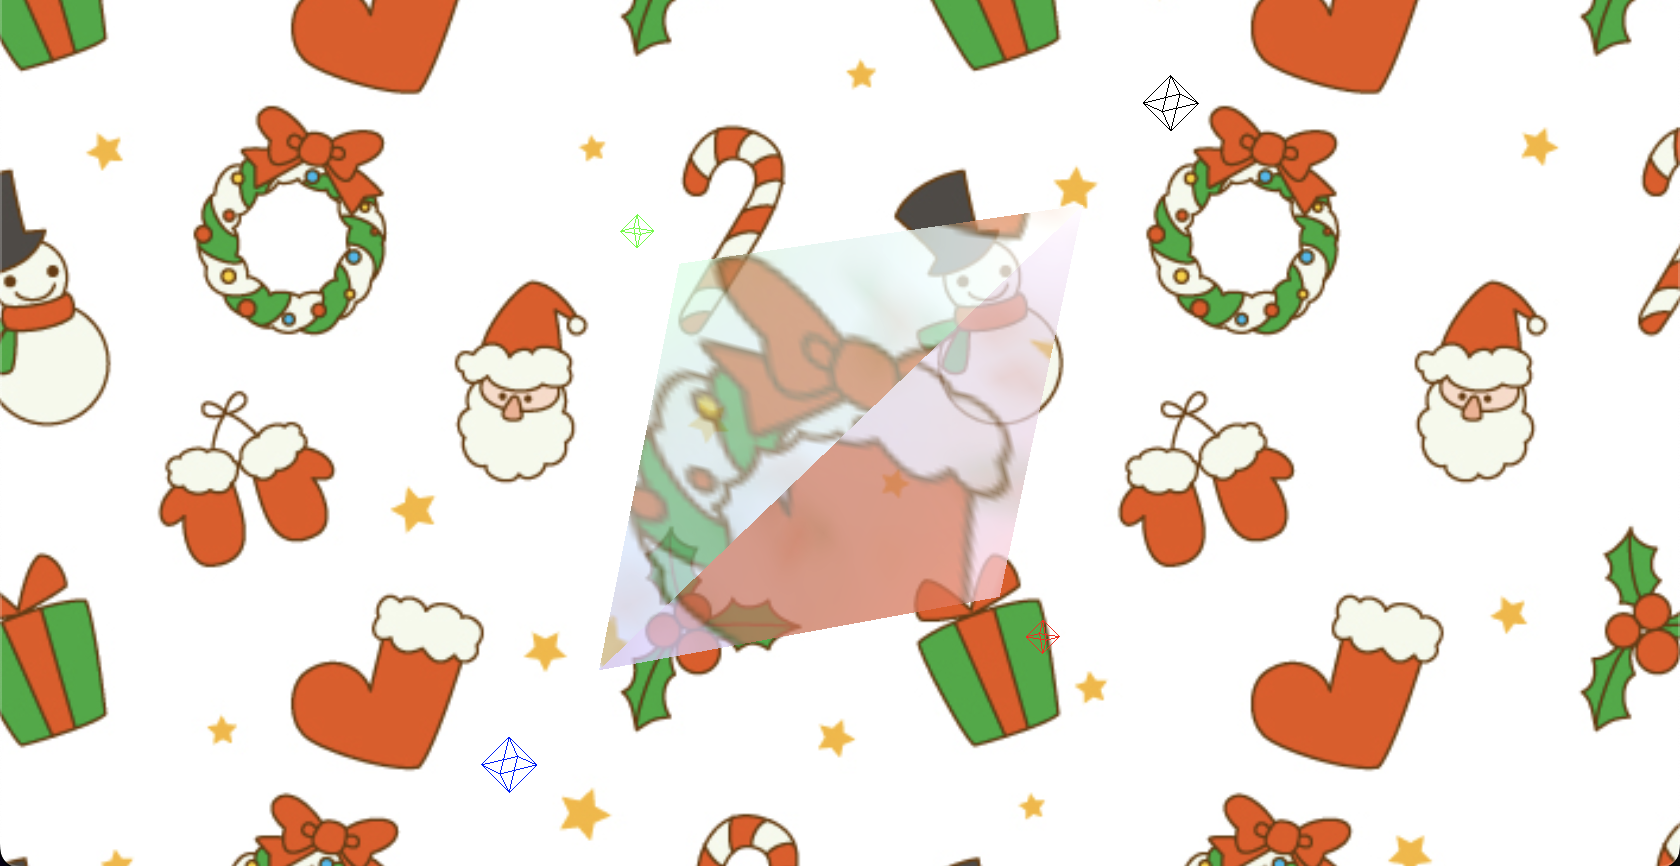
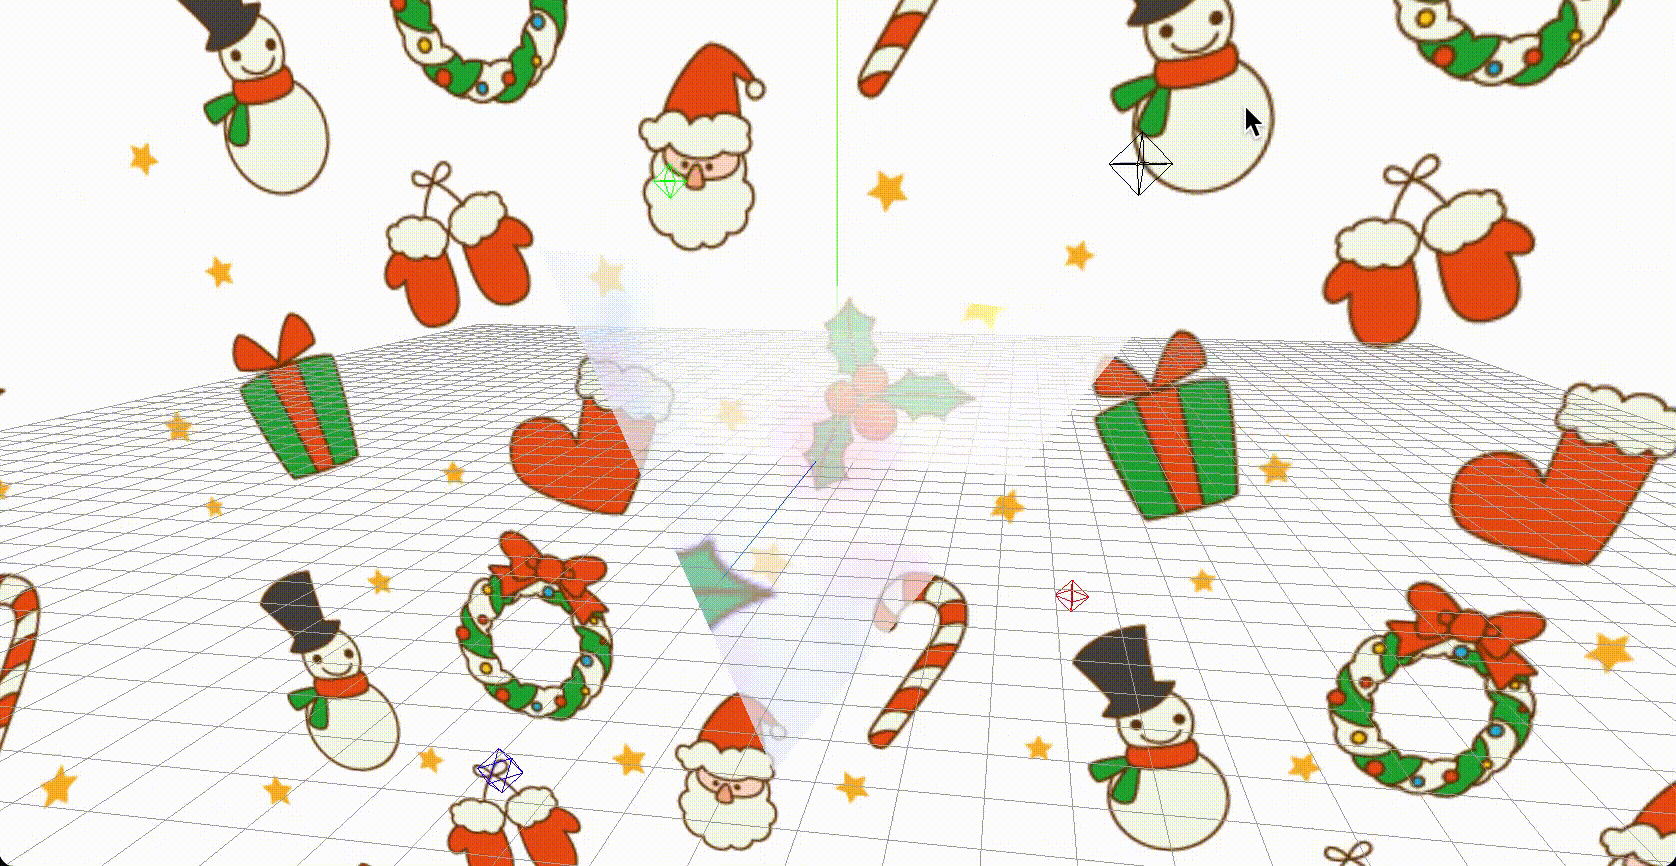
今回は例として、Three.js の例としてよく挙げられる「何らかのオブジェクトを回すやつ」をベースに、三角錐でのプリズムを考えます。プリズムを「反射・屈折が起こる、半透明のマテリアル」として捉え、反射するマテリアルと屈折するマテリアルを同じ速度で回転させています。
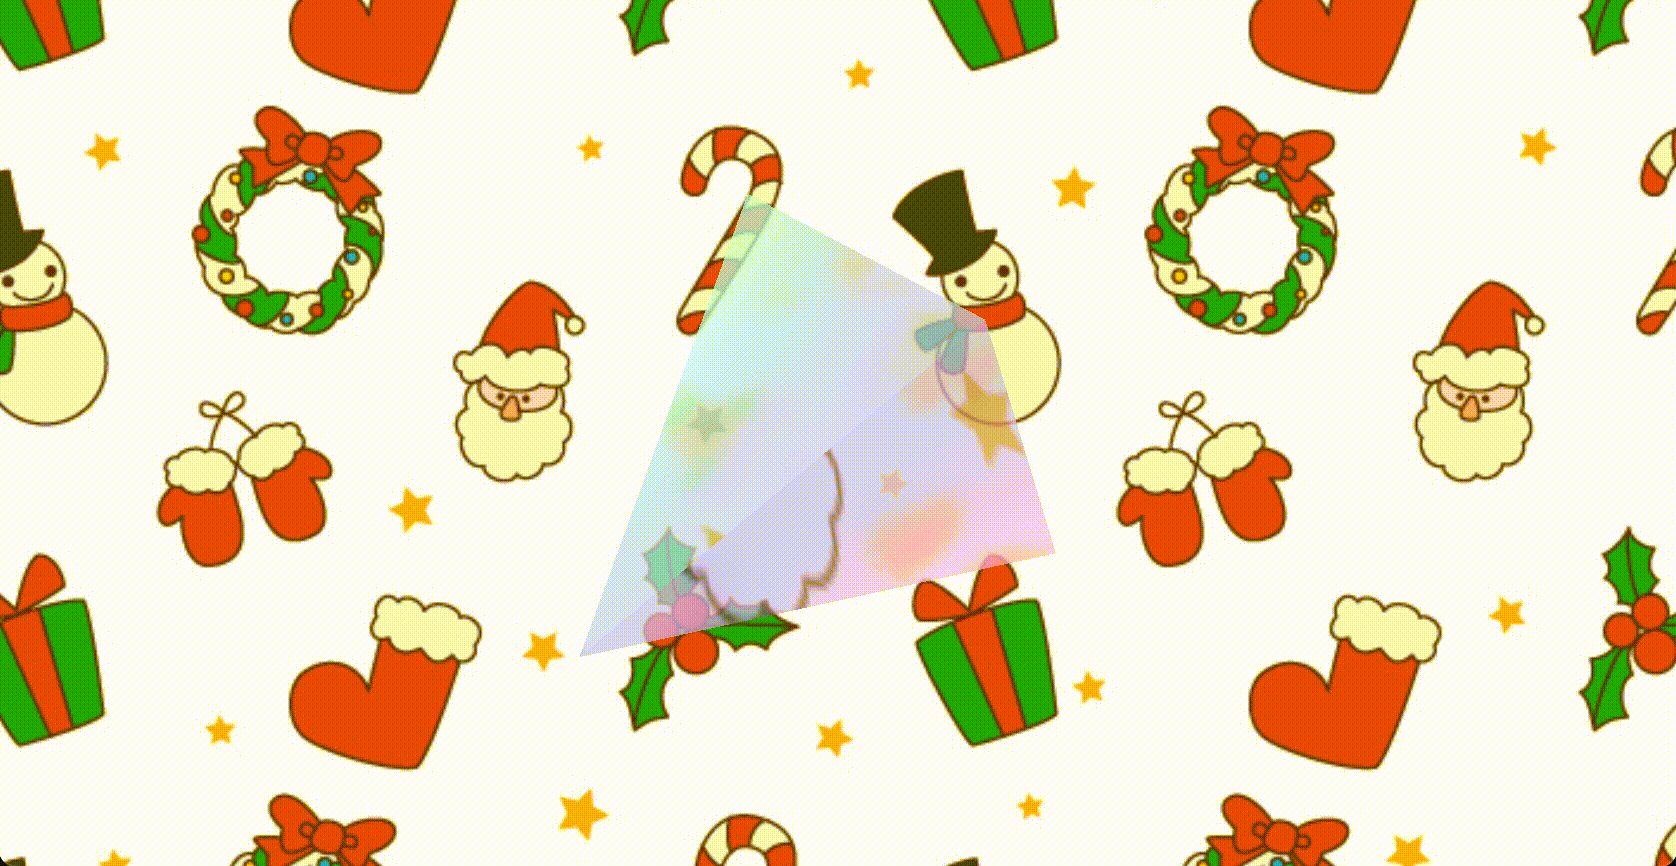
おやおや、いかにもクリスマスという感じでかわいいですね。
最終的に大体こんな感じのコードになりました。
- main.ts
- _stage.ts
- _cube.ts
- _mesh.ts
import { Stage } from "./_stage";
import { Cube } from "./_cube";
import { Mesh } from "./_mesh";

(() => {
  const url = [
    "paper.jpg",
    "paper.jpg",
    "paper.jpg",
    "paper.jpg",
    "paper.jpg",
    "paper.jpg",
  ];

  const stage = new Stage();
  const cube = new Cube(stage, url);
  const mesh = new Mesh(stage, cube);

  stage.init();
  cube.init();
  mesh.init();

  const _raf = () => {
    window.requestAnimationFrame(() => {
      stage.onRaf();
      cube.onRaf();
      mesh.onRaf();

      _raf();
    });
  };

  _raf();

  window.addEventListener("resize", () => {
    stage.onResize();
  });
})();
import * as THREE from "three";
import { OrbitControls } from "three/examples/jsm/controls/OrbitControls";
import Stats from "three/examples/jsm/libs/stats.module";

export class Stage {
  canvas = document.getElementById("canvas") as HTMLCanvasElement;
  devicePixelRatio = window.devicePixelRatio;
  windowWidth = window.innerWidth;
  windowHeight = window.innerHeight;

  scene = new THREE.Scene();
  camera = new THREE.PerspectiveCamera(
    45,
    this.windowWidth / this.windowHeight,
    1,
    100
  );

  controls = new OrbitControls(this.camera, this.canvas);
  stats = Stats();
  renderer = new THREE.WebGLRenderer({
    canvas: this.canvas,
  });

  constructor() {
    this.onResize();
  }

  public init() {
    this._setCamera();
    this._setControls();
    this._setStats();
    this._setRenderer();
  }

  public onRaf() {
    this.controls.update();
    this.stats.update();
    this.renderer.render(this.scene, this.camera);
  }

  public onResize() {
    // NOTE: Resize
    // https://ics.media/tutorial-three/renderer_resize/

    const width = window.innerWidth;
    const height = window.innerHeight;

    this.renderer.setSize(width, height);
    this.renderer.setPixelRatio(window.devicePixelRatio);

    this.camera.aspect = width / height;
    this.camera.updateProjectionMatrix();
  }

  private _setCamera() {
    this.camera.position.set(0, 0, 50);
    this.scene.add(this.camera);
  }

  private _setRenderer() {
    this.renderer.setSize(this.windowWidth, this.windowHeight);
    this.renderer.setPixelRatio(this.devicePixelRatio);
    this.renderer.render(this.scene, this.camera);
  }

  private _setControls() {
    this.controls.enableDamping = true;
    this.controls.enableZoom = false;
    this.controls.enablePan = false;
  }

  private _setStats() {
    document.body.appendChild(this.stats.dom);
  }
}
import * as THREE from "three";
import { Stage } from "./_stage";

export class Cube {
  stage: Stage;
  url: string[];

  cubeRenderTarget = new THREE.WebGLCubeRenderTarget(64);
  cubeCamera = new THREE.CubeCamera(1, 100, this.cubeRenderTarget);
  loader = new THREE.CubeTextureLoader();
  textureCube: THREE.CubeTexture;

  constructor(stage: Stage, url: string[]) {
    this.stage = stage;
    this.url = url;

    this.textureCube = this.loader.load(this.url);
  }

  public init() {
    this._setCubeCamera();
    this._setImage();
  }

  public onRaf() {
    this.cubeCamera.update(this.stage.renderer, this.stage.scene);
  }

  private _setCubeCamera() {
    this.stage.scene.add(this.cubeCamera);
  }

  private _setImage() {
    this.stage.scene.background = this.textureCube;
    this.textureCube.mapping = THREE.CubeRefractionMapping;
  }
}
import * as THREE from "three";
import { Cube } from "./_cube";
import { Stage } from "./_stage";
import { GUI } from "lil-gui";

export class Mesh {
  stage: Stage;
  cube: Cube;

  geometry = new THREE.TetrahedronGeometry(16, 0);

  // NOTE: 反射マテリアル
  reflectMaterial = new THREE.MeshLambertMaterial({
    color: 0xf7fafa,
    reflectivity: 0.5, // 反射率
    opacity: 0.5,
    transparent: true,
  });

  // NOTE: 屈折マテリアル
  refractionMaterial = new THREE.MeshLambertMaterial({
    color: 0xf7fafa,
    refractionRatio: 0.5, // 屈折率
    opacity: 0.5,
    transparent: true,
  });

  reflectTetrahedron = new THREE.Mesh(this.geometry, this.reflectMaterial);
  refractionTetrahedron = new THREE.Mesh(
    this.geometry,
    this.refractionMaterial
  );

  ambientLight = new THREE.AmbientLight(0xffffff, 0.8);

  pointLight1 = new THREE.PointLight(0xff0000, 1);
  pointLight2 = new THREE.PointLight(0x00ff00, 1);
  pointLight3 = new THREE.PointLight(0x0000ff, 1);
  pointLight4 = new THREE.PointLight(0xffffff, 1);

  constructor(stage: Stage, cube: Cube) {
    this.stage = stage;
    this.cube = cube;
  }

  public init() {
    this._setMaterial();
    this._setLights();
    this._setHelper();
    this._setControl();

    this.stage.scene.add(this.reflectTetrahedron);
    this.stage.scene.add(this.refractionTetrahedron);
  }

  public onRaf() {
    this._render();
  }

  private _setMaterial() {
    this.reflectMaterial.envMap = this.cube.cubeRenderTarget.texture;
    this.refractionMaterial.envMap = this.cube.textureCube;
  }

  private _setControl() {
    const gui = new GUI();

    const reflectFolder = gui.addFolder("反射マテリアル");
    reflectFolder.add(this.reflectMaterial, "reflectivity", 0, 1, 0.1);
    reflectFolder.add(this.reflectMaterial, "opacity", 0, 1, 0.1);
    reflectFolder.open();

    const refractionFolder = gui.addFolder("屈折マテリアル");
    refractionFolder.add(this.refractionMaterial, "refractionRatio", 0, 1, 0.1);
    refractionFolder.add(this.refractionMaterial, "opacity", 0, 1, 0.1);
    refractionFolder.open();

    const ambientLightFolder = gui.addFolder("環境光源");
    ambientLightFolder.addColor(this.ambientLight, "color");
    ambientLightFolder.add(this.ambientLight, "intensity", 0, 1, 0.1);
    ambientLightFolder.open();

    const palette = {
      color1: this.pointLight1.color,
      color2: this.pointLight2.color,
      color3: this.pointLight3.color,
      color4: this.pointLight4.color,
    };

    const lightFolder = gui.addFolder("点光源");
    lightFolder.addColor(palette, "color1").onChange(() => {
      this.pointLight1.color.set(palette.color1);
    });
    lightFolder.addColor(palette, "color2").onChange(() => {
      this.pointLight2.color.set(palette.color2);
    });
    lightFolder.addColor(palette, "color3").onChange(() => {
      this.pointLight3.color.set(palette.color3);
    });
    lightFolder.addColor(palette, "color4").onChange(() => {
      this.pointLight4.color.set(palette.color4);
    });
    lightFolder.open();

    gui.close();
  }

  private _setHelper() {
    const helpers = {
      axesHelper: new THREE.AxesHelper(20),
      gridHelper: new THREE.GridHelper(80, 50, 0xaaaaaa, 0xaaaaaa),
      lightHelper1: new THREE.PointLightHelper(
        this.pointLight1,
        1,
        this.pointLight1.color
      ),
      lightHelper2: new THREE.PointLightHelper(
        this.pointLight2,
        1,
        this.pointLight2.color
      ),
      lightHelper3: new THREE.PointLightHelper(
        this.pointLight3,
        1,
        this.pointLight3.color
      ),
      lightHelper4: new THREE.PointLightHelper(this.pointLight4, 1, 0x000000),
    };

    Object.values(helpers).forEach((helper) => {
      this.stage.scene.add(helper);
    });
  }

  private _render() {
    this.reflectTetrahedron.rotation.x += 0.002;
    this.reflectTetrahedron.rotation.y += 0.002;
    this.refractionTetrahedron.rotation.x += 0.002;
    this.refractionTetrahedron.rotation.y += 0.002;
  }

  private _setLights() {
    this.stage.scene.add(this.ambientLight);

    this.pointLight1.position.set(12, -12, -12);
    this.stage.scene.add(this.pointLight1);

    this.pointLight2.position.set(-12, 12, -12);
    this.stage.scene.add(this.pointLight2);

    this.pointLight3.position.set(-12, -12, 12);
    this.stage.scene.add(this.pointLight3);

    this.pointLight4.position.set(12, 12, 12);
    this.stage.scene.add(this.pointLight4);
  }
}
※ 本記事では WebGL, Three.js 自体の基礎知識的な部分にはほぼ触れません。
世の中には素晴らしい記事がたくさん書かれているので、ぜひそちらをご参照ください!
なにはともあれ Helper
配置するジオメトリの大きさやライトの位置など、オブジェクトを描画するにあたって設定項目が色々あります。
が、何がどういった位置関係で配置されているのかわからないと、どのように設定値を変更すればよいのかいまいち考えづらいです。
Three.js にはデバッグで使える便利なヘルパーが用意されていますので、こちらを使っていくのがよさそうです。
https://threejs.org/ で検索かけてみましたが、結構ありますね。
- ArrowHelper
- AxesHelper
- BoxHelper
- Box3Helper
- CameraHelper
- DirectionalLightHelper
- GridHelper
- PolarGridHelper
- HemisphereLightHelper
- PlaneHelper
- PointLightHelper
- SkeltonHelper
- SpotLightHelper
- LightProbeHelper
- PositionalaudioHelper
- RectAreaLightHelper
- VertexNormalshelper
- VertexTangentsHelper
- MMDAnimationHelper
順にどういったものか確認していこうかと思いましたが、すでに記事にしてくれている方がいらっしゃいました。
three.jsのヘルパー一覧【GIFアニメ付き】
自分の場合は AxesHelper, GridHelper, LightHelper の設定でかなり考えやすくなりましたので、こちら三つの紹介に留めます。
それぞれ基本的な使い方としては「引数を設定してインスタンス生成 → シーンへの追加」という流れになります。
サンプルでは helpers オブジェクトにインスタンスを格納し、Object.values でそれぞれのヘルパーをシーンへ追加しました。
  private _setHelper() {
    const helpers = {
      axesHelper: new THREE.AxesHelper(20),
      gridHelper: new THREE.GridHelper(80, 50, 0xaaaaaa, 0xaaaaaa),
      lightHelper1: new THREE.PointLightHelper( this.pointLight1, 1, this.pointLight1.color),
      lightHelper2: new THREE.PointLightHelper( this.pointLight2, 1, this.pointLight2.color),
      lightHelper3: new THREE.PointLightHelper( this.pointLight3, 1, this.pointLight3.color),
       // NOTE: this.pointLight4.color は白色ライトなので他と同様の色設定だと見えなくなってしまう。
      lightHelper4: new THREE.PointLightHelper( this.pointLight4, 1, 0x000000),
    };

    Object.values(helpers).forEach((helper) => {
      this.stage.scene.add(helper);
    });
  }
AxesHelper
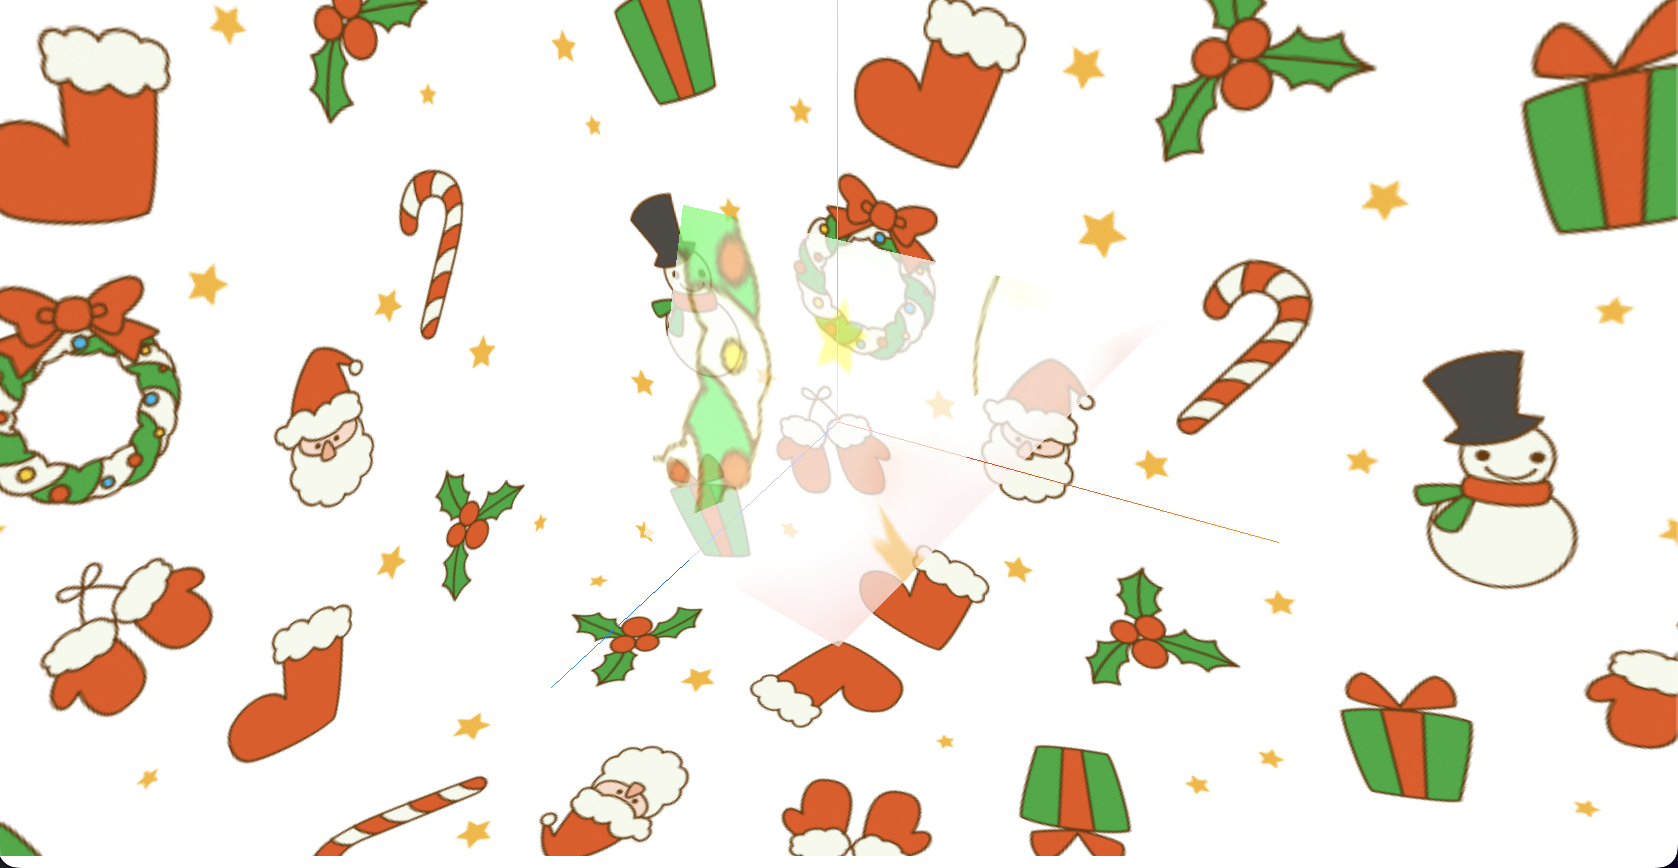
AxesHelper を設定することで、画面上に x, y, z 軸が描画されます。
感覚的には Z が縦軸になっていそうですが、Three.js では Y 軸が縦となっているので注意が必要です。
The X axis is red. The Y axis is green. The Z axis is blue.
GridHelper
- 画面上にグリッドを引いてくれます。
引数としてグリッドの大きさ、マス目の個数(グリッドを何等分するか)、中心軸の色、グリッド全体の色が設定できるようです。
横からだと分かりにくいですが
斜め上から見下ろすとこんな感じ
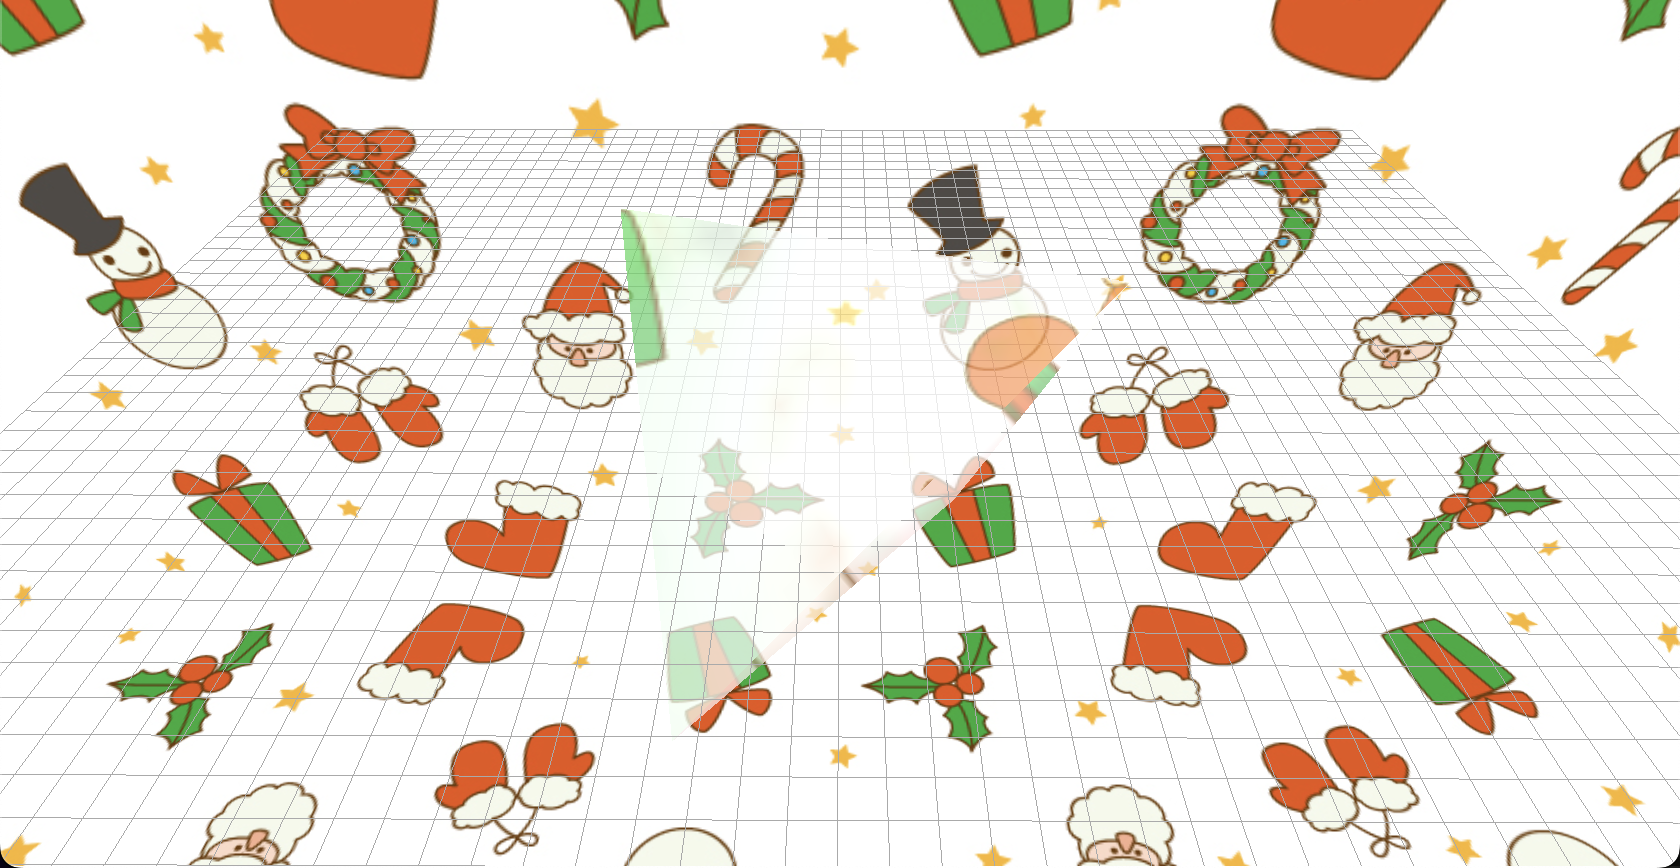
PointLightHelper
- 光源を表示してくれます。ライト自体数種類あるので、対応するヘルパーを選択して使う必要がありそうですが、これがあるだけで一気に分かりやすくなりますね。
キャプチャでは pointLightHelper を使いました。
対象とするライト、ヘルパーの大きさ、ヘルパーの色を指定することができます。
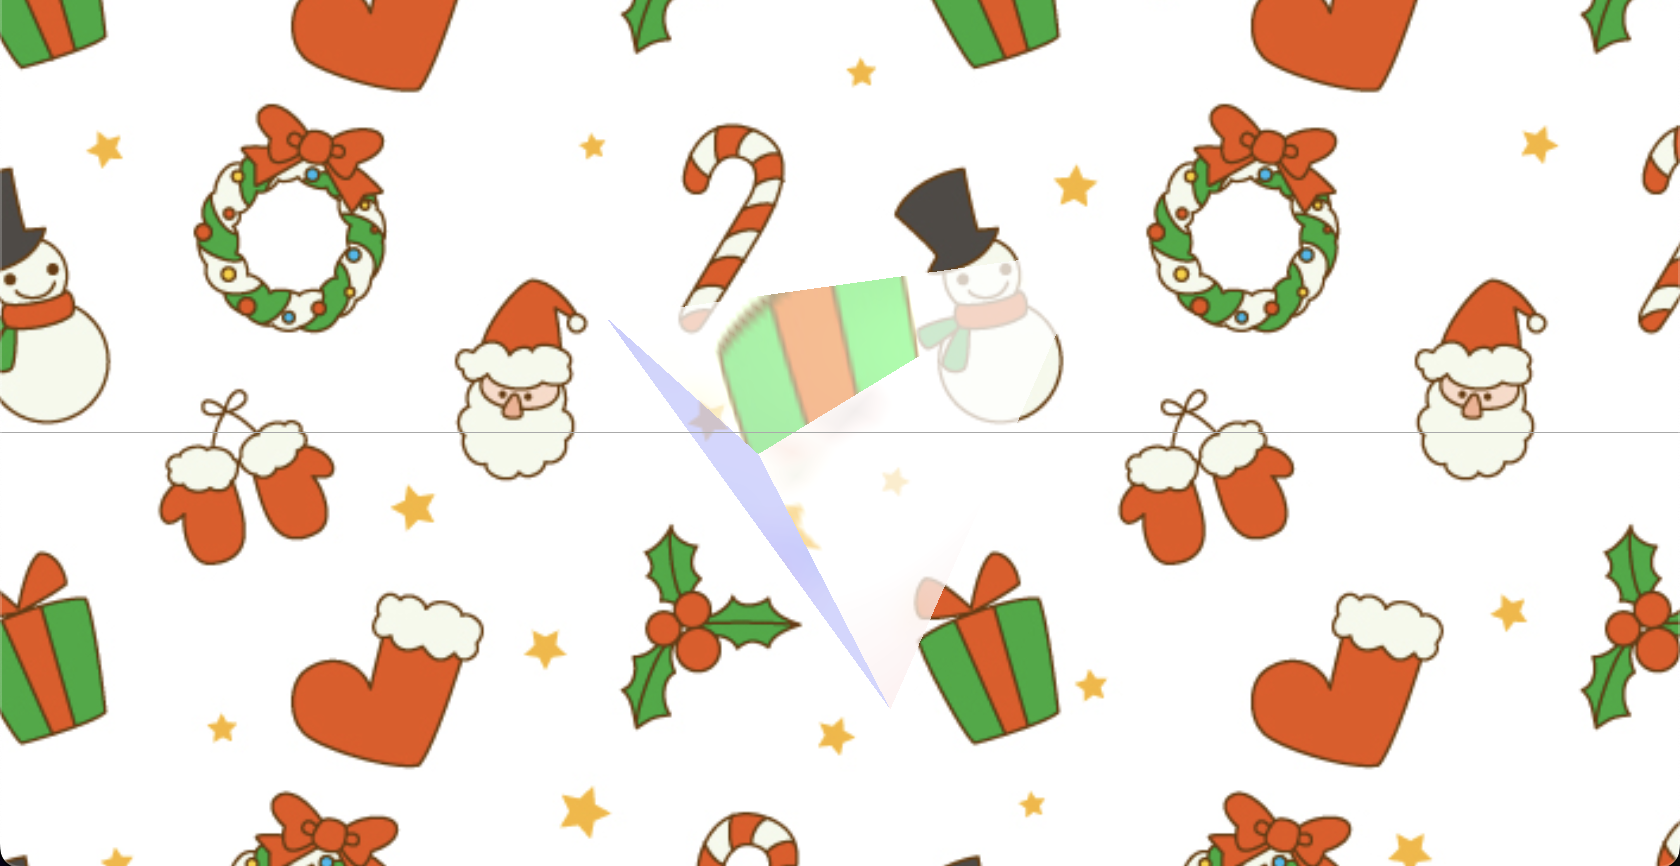
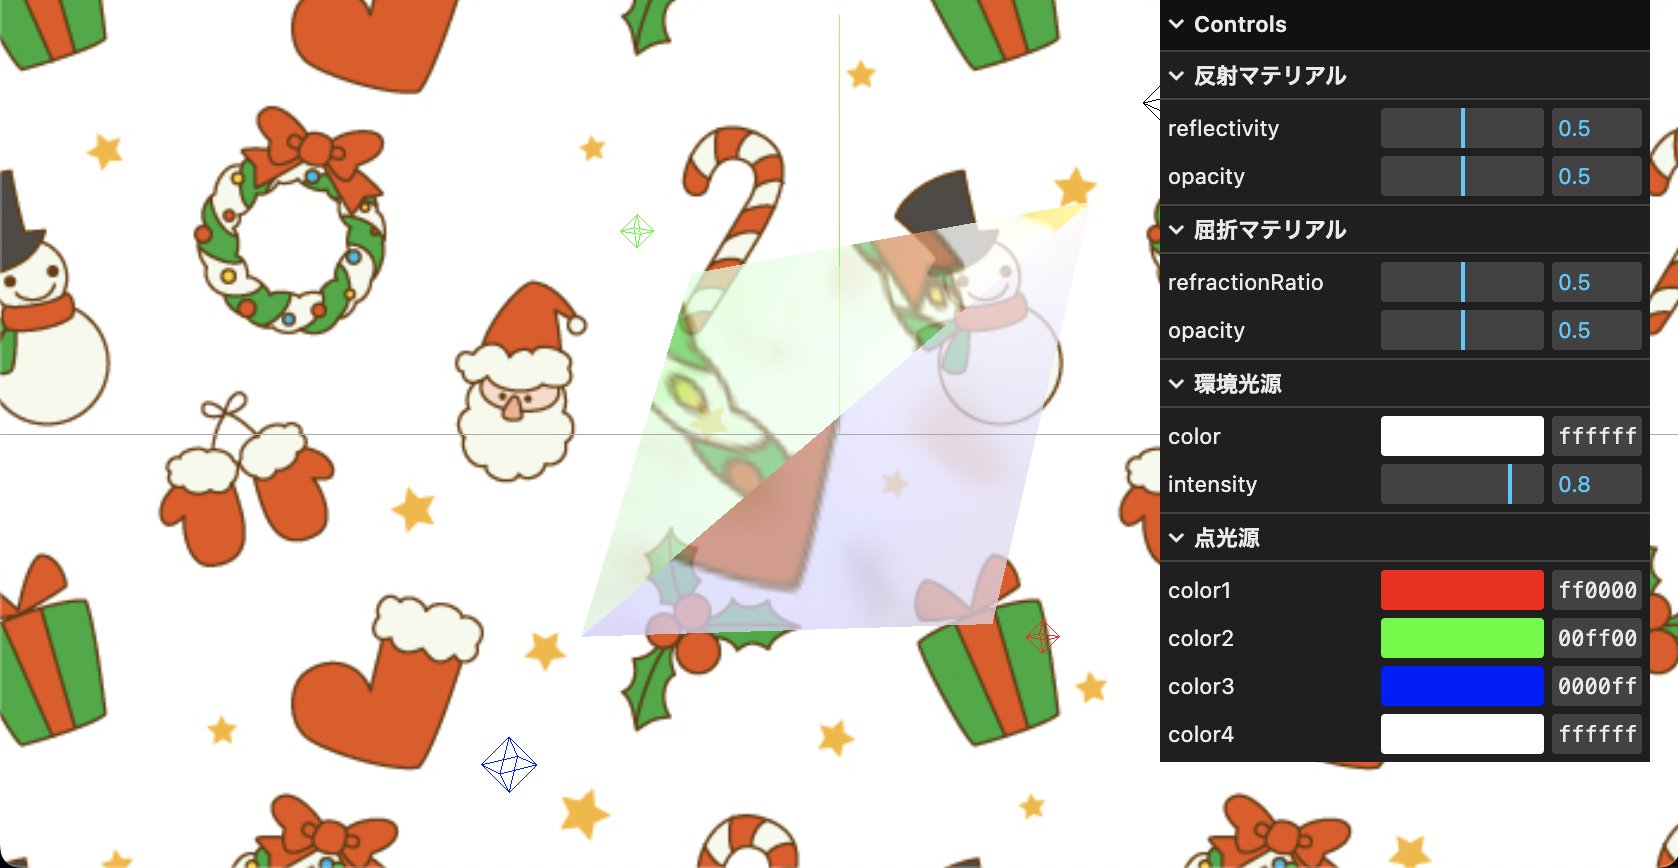
lil-gui でもっと効率よく
さて、プリズム表現を詰めていく上で透過度や反射量など、各値を調整する必要があります。
コード上の数値を変更していくのもよいですが、都度変更の保存・画面リロードを繰り返すのはなかなか骨折れる作業ですので、lil-gui の出番です。
https://lil-gui.georgealways.com/
Three.js のサンプルにもちょくちょくありますが、実際に GUI の数値を変更してどういう見た目になるか調整できるやつ、ありますよね。あれです。
dat.gui が使われている記事をよく見かけるのですが、最近はあまりメンテナンスがされておらず、Three.js のサンプルも lil-gui が使われるようになっているようです。
three.js r135のexamplesにて、dat.guiがlil-guiへ移行しました。
波はありますが、dat.gui と比較してみても 2022/7 ごろから lil-gui の採用が増えているようです。(2022/11 に一度落ちているのはなんなんだろう。。)
https://npmtrends.com/dat.gui-vs-lil-gui
反射・屈折の値、ライティングの色を調整できるようにしておきます。
  private _setControl() {
    const gui = new GUI();

    const reflectFolder = gui.addFolder("反射マテリアル");
    reflectFolder.add(this.reflectMaterial, "reflectivity", 0, 1, 0.1);
    reflectFolder.add(this.reflectMaterial, "opacity", 0, 1, 0.1);
    reflectFolder.open();

    const refractionFolder = gui.addFolder("屈折マテリアル");
    refractionFolder.add(this.refractionMaterial, "refractionRatio", 0, 1, 0.1);
    refractionFolder.add(this.refractionMaterial, "opacity", 0, 1, 0.1);
    refractionFolder.open();

    const ambientLightFolder = gui.addFolder("環境光源");
    ambientLightFolder.addColor(this.ambientLight, "color");
    ambientLightFolder.add(this.ambientLight, "intensity", 0, 1, 0.1);
    ambientLightFolder.open();

    const palette = {
      color1: this.pointLight1.color,
      color2: this.pointLight2.color,
      color3: this.pointLight3.color,
      color4: this.pointLight4.color,
    };

    const lightFolder = gui.addFolder("点光源");
    lightFolder.addColor(palette, "color1").onChange(() => {
      this.pointLight1.color.set(palette.color1);
    });
    lightFolder.addColor(palette, "color2").onChange(() => {
      this.pointLight2.color.set(palette.color2);
    });
    lightFolder.addColor(palette, "color3").onChange(() => {
      this.pointLight3.color.set(palette.color3);
    });
    lightFolder.addColor(palette, "color4").onChange(() => {
      this.pointLight4.color.set(palette.color4);
    });
    lightFolder.open();

    gui.close();
  }
ファイル分けをやっておくと一見して分かりやすいので良いですね。
(キャプチャでは Controls が開いていますが、コード上では gui.close(); で Controls を閉じた状態を初期表示にしています。)
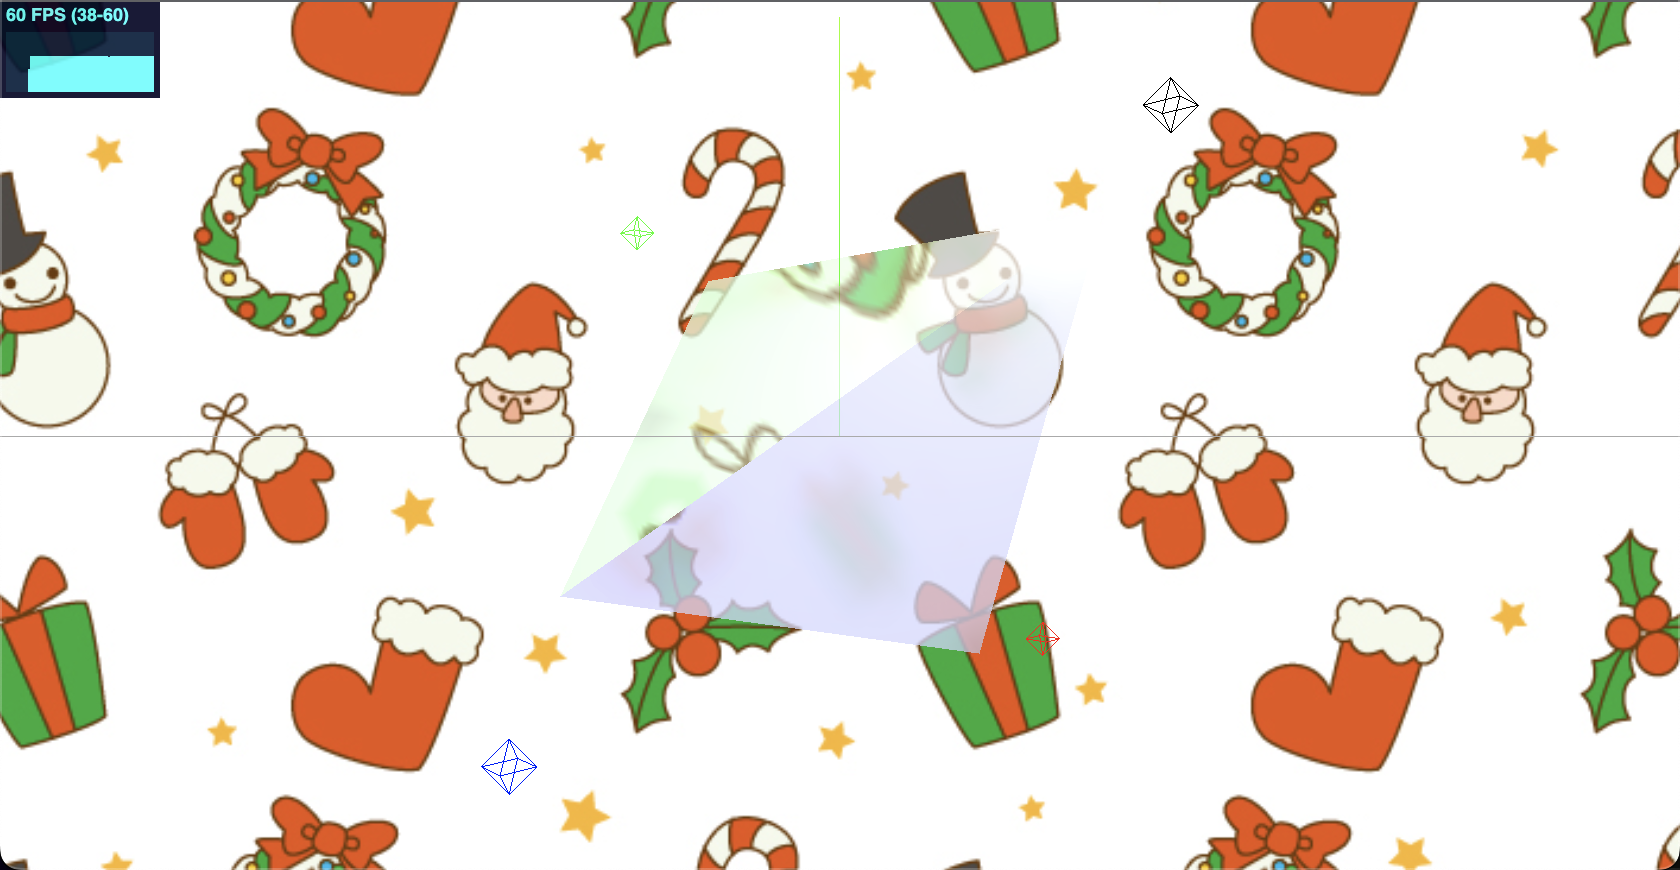
FPS は stats で確認
Three.js を使用するとアニメーション面での描画パフォーマンスも気になります。
都度検証ツールからパフォーマンスを確認するのはなかなか手間になってしまいますので、画面に FPS 値が常に表示されてくれるように stats.js を使用していきます。
左上に出現するメーターで FPS の値を確認することができます。
冒頭のサンプルコードから stats 関連のコードを抽出するとこんな感じですね。
import Stats from "three/examples/jsm/libs/stats.module";

export class Stage {
  stats = Stats();

  public init() {
    this._setStats();
  }

  public onRaf() {
    this.stats.update();
  }

  private _setStats() {
    document.body.appendChild(Stats().dom);
  }
}
import と dom への追加、描画時の更新程度で簡単に追加することができます。
OrbitControls で簡単カメラ操作
マウス操作でカメラを動かしてみるのも非常に楽しいものです。
画面を自由に回してみることで、知らないうちにぶっ飛んでいってしまったライトやマテリアルなどを発見することができました。
(本来デバッグ用のものではなさそうですが。。)
zoom や位置のスライドなども行うことができるので、大まかな調整や見え感を変更するのにも良さそうです。
最終的に全て同じ画像を設定していますが、反射素材を設定する際にどの面に何が設定されているかな?と確認するために使用しました。
感想
実際に業務でやってみていたのは、プロトタイプを手元で作っておいて、細かい値をビジュアル面の調整が上手なデザイナーさんたちに確認してもらい、フィードバックとして設定値をいただくという形でした。
アプリケーションのロジックを考えるのも好きですが、数値やロジックがビジュアル表現となって現れるところにもやはり面白さがあります。やはり新しいことを学ぶのは楽しいですね。
まだ浅い知識の域を出ないので、来年も引き続き WebGL 周りも勉強を進めていこうと思います。