この記事はGopher道場アドベントカレンダーの20日目の記事です。
はじめに
Gopher道場1期生の@yuuyamadです。今回gRPCについて調べた内容を書いてみました。
gRPCについてはすでに様々なサービスで利用されていると思いますし、gRPCについて調べたという記事も他にいくつもあるのですが、もしよろしければお付き合いください。
gRPCとは?
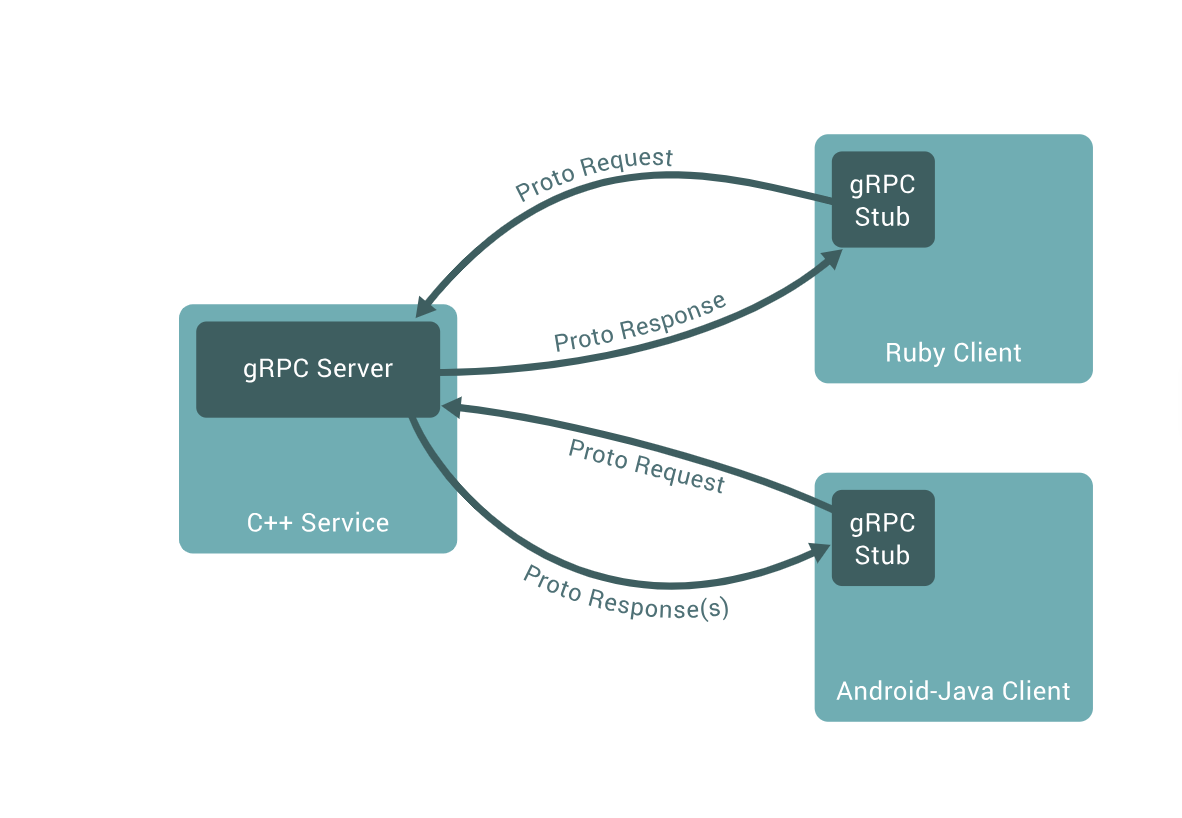
Googleが公開したRPCのフレームワークで以下のような特徴があります。
- Protocol Buffersというシリアライズのフォーマットによってデータのフォーマットを定義します
- protoファイルという定義ファイルに記述することで、サーバ実装・クライアント実装が自動生成されます
- 通信プロトコルにHTTP/2を使うことで高速化、双方向通信、streaming等を実現することができます
上記のような特徴とgRPCのクライアントとサーバで複数の言語をサポートしていることなどから、マイクロサービス間の接続やデータ転送について効率良く行うことができます。

参考:https://grpc.io/
実装方法
Protocol Buffersによってデータのフォーマットを定義
まず最初にProtocol Buffersでサービス間でやりとりするデータのフォーマットを定義します。
message Person {
  string name = 1;
  int32 id = 2;  // Unique ID number for this person.
  string email = 3;

  enum PhoneType {
    MOBILE = 0;
    HOME = 1;
    WORK = 2;
  }

  message PhoneNumber {
    string number = 1;
    PhoneType type = 2;
  }

  repeated PhoneNumber phones = 4;

  google.protobuf.Timestamp last_updated = 5;
}
参考:https://developers.google.com/protocol-buffers/docs/gotutorial
Protocol Buffersで下記のように定義したデータは、
//Protocol Buffers
message Test1 {
  optional int32 a = 1;
}
実際には下記のようにバイナリに変換されてやりとりがされます。
08 96 01
参考:https://developers.google.com/protocol-buffers/docs/encoding
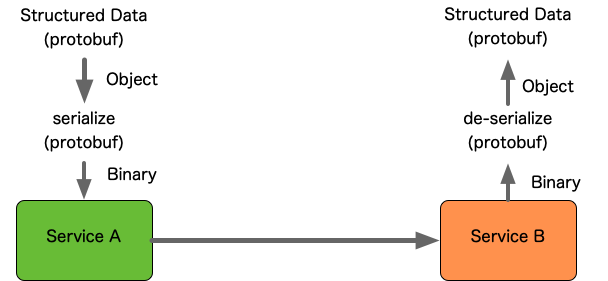
Protocol Buffersでのデータのやりとりのイメージは下記のようになります。
Protocol Buffersを使うことで次のようなメリットとデメリットがあります。
Protocol Buffersを使うメリット 
- read/writeの処理を自分で書かなくて良い
- 読み書きの処理速度が早い
- データ量が減るため通信が高速
Protocol Buffersを使うデメリット 
- Protocol Buffersのインストールが必要
- ブラウザを通した外部からの利用に向いてない
- データ量が小さい場合は処理速度に差が出ない(デメリットではないですが。。)
protoファイルに定義を書いて、サーバ実装・クライアント実装を自動生成
Protocol Buffersで書いたデータフォーマットの他に外部呼び出しするメソッドについてもServiceとしてprotoファイルという定義ファイルに記載します。
// The greeting service definition.
service Greeter {
  // Sends a greeting
  rpc SayHello (HelloRequest) returns (HelloReply) {}
  // Sends another greeting
  rpc SayHelloAgain (HelloRequest) returns (HelloReply) {}
}
// The request message containing the user's name.
message HelloRequest {
  string name = 1;
}

// The response message containing the greetings
message HelloReply {
  string message = 1;
}
参考:https://grpc.io/docs/quickstart/go.html
上記のprotoファイルからサーバとクライアントの実装を自動生成します。詳しい手順については下記のドキュメントを見てください。
参考:https://grpc.io/docs/quickstart/go.html
コードを生成すると下記のようにサーバ側のinterfaceとクライアント側のinterfaceとメソッドが生成されます。
// GreeterServer is the server API for Greeter service.
type GreeterServer interface {
	// Sends a greeting
	SayHello(context.Context, *HelloRequest) (*HelloReply, error)
	// Sends another greeting
	SayHelloAgain(context.Context, *HelloRequest) (*HelloReply, error)
}
type GreeterClient interface {
	// Sends a greeting
	SayHello(ctx context.Context, in *HelloRequest, opts ...grpc.CallOption) (*HelloReply, error)
	// Sends another greeting
	SayHelloAgain(ctx context.Context, in *HelloRequest, opts ...grpc.CallOption) (*HelloReply, error)
}
func (c *greeterClient) SayHello(ctx context.Context, in *HelloRequest, opts ...grpc.CallOption) (*HelloReply, error) {
	out := new(HelloReply)
	err := c.cc.Invoke(ctx, "/helloworld.Greeter/SayHello", in, out, opts...)
	if err != nil {
		return nil, err
	}
	return out, nil
}
参考:https://grpc.io/docs/reference/go/generated-code.html
コードを生成したらデータを取得する部分とデータを返す部分を書いていきます。
サーバ側は構造体を定義して生成されたinterfaceを満たすようにメソッドを書きます。
type server struct{}

// SayHello implements helloworld.GreeterServer
func (s *server) SayHello(ctx context.Context, in *pb.HelloRequest) (*pb.HelloReply, error) {
	return &pb.HelloReply{Message: "Hello " + in.Name}, nil
}

func (s *server) SayHelloAgain(ctx context.Context, in *pb.HelloRequest) (*pb.HelloReply, error) {
	return &pb.HelloReply{Message: "Hello again " + in.Name}, nil
}
gRPCサーバーのインスタンスを作成して自分で定義したserver構造体を登録します。
func main() {
	lis, err := net.Listen("tcp", port)
	if err != nil {
		log.Fatalf("failed to listen: %v", err)
	}
	s := grpc.NewServer()
	pb.RegisterGreeterServer(s, &server{})
	// Register reflection service on gRPC server.
	reflection.Register(s)
	if err := s.Serve(lis); err != nil {
		log.Fatalf("failed to serve: %v", err)
	}
}
クライアント側は自動生成されたメソッドを呼んでデータを取得します。
r, err := c.SayHello(ctx, &pb.HelloRequest{Name: name})
if err != nil {
	log.Fatalf("could not greet: %v", err)
}
log.Printf("Greeting: %s", r.Message)

r, err = c.SayHelloAgain(context.Background(), &pb.HelloRequest{Name: name})
if err != nil {
	log.Fatalf("could not greet: %v", err)
}
log.Printf("Greeting: %s", r.Message)
双方向通信、streamingの実現
gRPCにはRPCの方式が下記のように4つ存在します。
- Simple-RPC
- ServerSideStreaming-RPC
- ClientSideStreaming-RPC
- BidirectionalStreaming-RPC
ここまで説明してきたのはSimple-RPCでの方式で、双方向通信やstreamingを実現するには他のRPC方式を使う必要があります。
Simple-RPC以外の方式を使うにはprotoファイルでの定義方法や実装方法が異なるので、詳しくは参考資料を見てみてください。
参考:RPCにおけるRPC方式の整理
参考:https://grpc.io/docs/tutorials/basic/go.html
まとめ
gRPCの基礎について調べてみました。
protoファイルからクライアントとサーバのコードを複数の言語で自動生成できるので、サービス間の連携についてgRPCを使うことで効率的にできるようになるのではないかなと感じました。
今回はSimple-RPC以外のRPC方式について詳しく見れなかったので、今後もう少し深掘りしていきたいと思います。
