目的
pythonを用いてGUIを操作し、画像変換器を作成します。
実行環境
Python version: 3.9.13
OS: Windows 10
イメージ
完成したGUIをキャプチャしてます。画像を選択します。左には、加工前の画像(Base)と右には加工後の画像を(Effect)を表示するようにしています。タブを選択すると、設定してあるいくつかの加工ができるようにしています。

ライブラリ
GUI表示、画像処理ライブラリを選んだ背景です。また、モジュールを3つに分けてプログラムを作成しており、その背景について簡単に説明します。
GUI
以前の記事では、PySimpleGUIを使用していたのですが、違うGUIを使用してみたかったので、今回は、tkinterを使用することにしました。
GUIは、tkinterを使用してます。
画像処理
画像処理は、Pillow, NumPy, OpenCVなどいくつかありますが、今回は、画像処理を中心に行いたかったため、こちらの記事を参考にPillow(PIL)を使用するとにしました。
MVCモデル
今回、こちらの記事からMVC(Model View Controller)モデルを知りました。classやdefの使い方を知りたかったので、MVCモデルで作成することにしました。
プログラム
この記事を書いたときのプログラムは、githubのv0.1にあります。プログラムは、Model(GUI_model.py) View(run_gui.py) Controller(GUI_control.py)としています。run_gui.pyでは、GUIの外観のボタン、画像の配置をしています。GUI_control.pyでは、Comboboxで選択された加工をするための操作を分けています。GUI_model.pyでは、実際に画像を加工するためのプログラムを実行してます。
プログラム内のclass名と役割は下記のようにしています。
| Class名 | 役割 |
|---|---|
| Set_gui | GUIの外観(表示、イベント登録) |
| GUI_control | GUIの操作 |
| GUI_model | 画像処理 |
走行方法
プログラムは、githubに置いています。3つのファイル(GUI_model.py,run_gui.py,GUI_control.py)を同じディレクトリに置き、下記コマンドを実行すると、走行します。
$ python run_gui.py
run_gui.py
GUIの外観ボタンは、下記のように関数を設定しました。
| def | 概要 |
|---|---|
| init | Tkinterの部品生成 |
| on_click_close | main windowのclose |
| draw_default_image | entryに画像のpath表示、呼び出した画像をcanvasに表示する |
| effect_event | 画像の加工処理 |
| replace_effect_image | 加工処理をした画像をcanvas部分に反映する |
プログラムは、下記のようにしています。
import tkinter as tk
from tkinter import ttk

from PIL import Image, ImageOps, ImageTk

from GUI_control import GUI_control


class Set_gui:
    def __init__(self, main_window):

        # controller Class生成
        self.control = GUI_control()

        # Variable setting
        self.function_btn = [
            "Gray_scale",
            "Binarization",
            "Sepia",
            "Jagged_mosaic",
            "Soft_mosaic",
            "Quantize",
            "Invert",
            "Mirror",
            "Flip",
            "Posterize",
            "Solarize",
            "Equalize",
            "Counter",
            "Emboss",
            "Find_emboss",
        ]
        self.canvas_title = ["Base", "Effect"]

        # Main window
        self.main_window = main_window
        self.main_window.geometry("1400x800")
        self.main_window.title("Image Editor v0.10")

        # Sub window
        self.filepath_frame = tk.Frame(self.main_window, height=100, width=400)
        self.func_frame = tk.Frame(self.main_window, height=450, width=400)
        self.exit_frame = tk.Frame(self.main_window, height=100, width=400)
        self.canvas_frame = tk.Frame(self.main_window, height=450, width=400)

        # Widgetsmith
        self.filepath_frame.place(relx=0.05, rely=0.8)
        self.func_frame.place(relx=0.85, rely=0.15)
        self.exit_frame.place(relx=0.85, rely=0.8)
        self.canvas_frame.place(relx=0.05, rely=0.05)

        # 1. Set file path
        self.imp_path_btn = tk.Button(
            self.filepath_frame,
            text="Select_image_file",
            command=self.draw_default_image,
        )
        self.imp_path_btn.grid(row=0, column=0, sticky=tk.W, padx=10, pady=5)

        self.img_path_stvar = tk.StringVar()
        self.imp_path_entry = tk.Entry(
            self.filepath_frame, textvariable=self.img_path_stvar, width=70
        )
        self.imp_path_entry.grid(row=1, column=0, sticky=tk.EW, padx=10)

        # 2. Set Function botton
        self.func_combobox = ttk.Combobox(
            self.func_frame,
            text="combo_file",
            state="readonly",
            value=self.function_btn,
            width=30,
        )
        self.func_combobox.set(self.function_btn[0])
        self.func_combobox.bind("<<ComboboxSelected>>", self.effect_event)
        self.func_combobox.pack()

        # 3.1 canvas_frame title
        for i in range(2):
            label = tk.Label(
                self.canvas_frame,
                text=self.canvas_title[i],
                bg="white",
                relief=tk.RIDGE,
            )
            label.grid(row=0, column=i, sticky=tk.W + tk.E)

        # 3.2 canvas_frame title
        self.base_canvas = tk.Canvas(
            self.canvas_frame, width=500, height=500, bg="#A9A9A9"
        )
        self.base_canvas.grid(row=1, column=0)

        self.effect_canvas = tk.Canvas(
            self.canvas_frame, width=500, height=500, bg="#A9A9A9"
        )
        self.effect_canvas.grid(row=1, column=1)

        # 4 set to close the window
        self.button = tk.Button(
            self.exit_frame, text="Exit", width=10, command=self.on_click_close
        )
        self.button.grid(row=0, column=0, sticky=tk.SE, padx=10, pady=10)

    # Function for closing window
    def on_click_close(self):
        self.main_window.destroy()

    def draw_default_image(self):
        self.img_path = self.control.get_image_path()
        self.img_path_stvar.set(self.img_path)

        (
            self.effect_img,
            self.base_canvas,
            self.effect_canvas_create,
        ) = self.control.draw_image(self.img_path, self.base_canvas, self.effect_canvas)

    def effect_event(self, arg):
        self.converted_img = self.control.effect_image(
            self.effect_img, self.func_combobox
        )
        self.replace_effect_image(self.converted_img)

    def replace_effect_image(self, pic_img):
        self.effect_canvas.photo = ImageTk.PhotoImage(pic_img)
        self.effect_canvas.itemconfig(
            self.effect_canvas_create, image=self.effect_canvas.photo
        )

def main():

    #  Tk MainWindow
    main_window = tk.Tk()

    # Viewクラス生成
    Set_gui(main_window)

    #  フレームループ処理
    main_window.mainloop()

if __name__ == "__main__":
    main()
tkinterについて
run_gui.pyで使われているtkinterのイメージを説明します。
1.main windowの作成
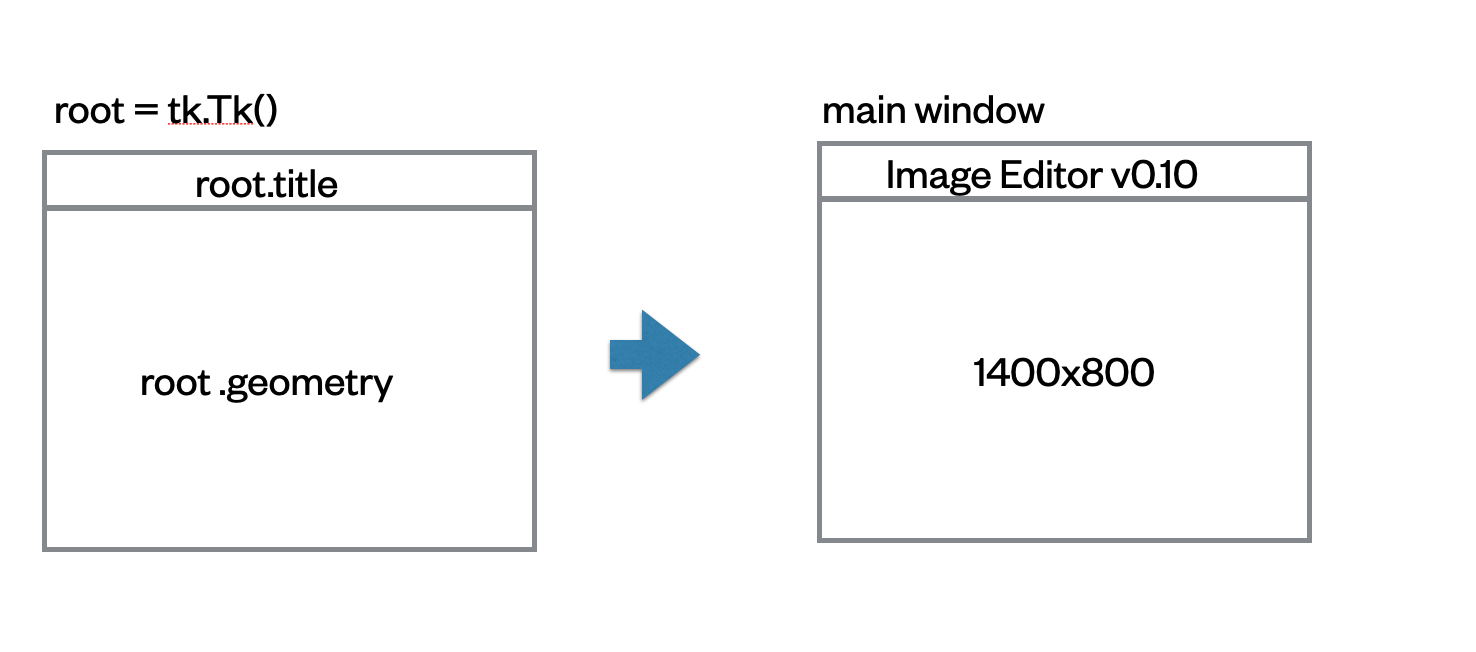
main windowの部分は、外観を作っています。タイトルは、上部の部分に出力されます。geometryは、main windowを開いた時の大きさを決めています。
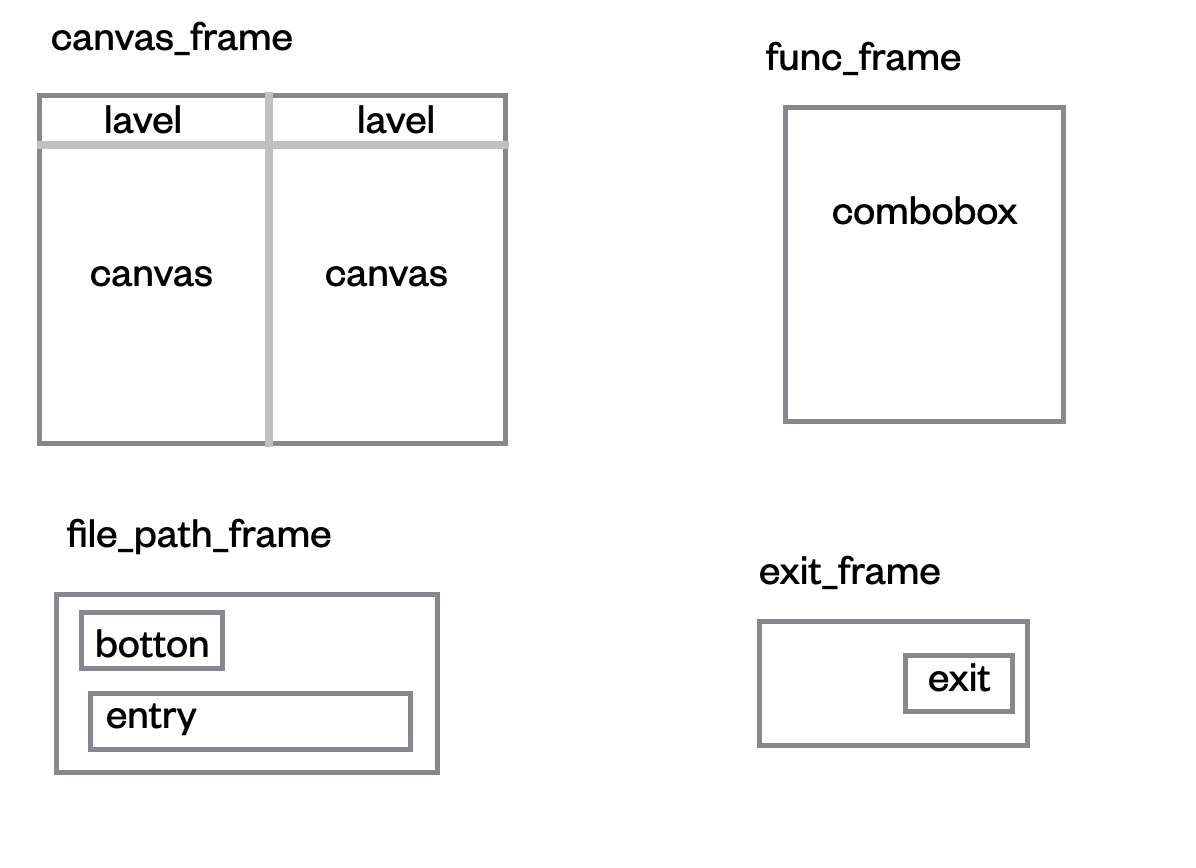
2.frame(sub window)の作成

大枠の部分をいくつかの領域に分けるためframeを使っています。私は、canvas、func、file_path,quitと4つの領域に分けて作成しました。relx,relyは、フレームの幅を1として相対的な位置を示しています。
3.botton,entry,imageの作成
2.で各フレームごとに分けたので、どんなbotton、box、canvas を各フレームごとに決めていきます。
4.図形の変更

最後に描写した画像を変更する場合、.itemconfigを使用することで変更することができます。
GUI_control.py
GUIの操作は、下記のように関数を設定しました。
| def | 概要 |
|---|---|
| init | 初期化 |
| get_image_path | 画像ファイルのpath取得 |
| draw_image | 画像ファイルをcanvasのサイズに合わせて調整する。エフェクト加工前のファイルをcanvasに表示する。 |
| effect_image | comboxで選択した加工処理をmodelへ渡す。 |
プログラムは、下記のようにしています。
from GUI_model import GUI_model


class GUI_control:
    def __init__(self):
        self.model = GUI_model()

    # Function for closing window

    def get_image_path(self):
        img_file_path = self.model.get_path()
        return img_file_path

    def draw_image(self, im_path, base_canvas, effect_canvas):
        resize_img, base_img_canvas, effect_canvas_create = self.model.resize_image(
            im_path, base_canvas, effect_canvas
        )
        return resize_img, base_img_canvas, effect_canvas_create

    def effect_image(self, effect_img, func_combobox):

        func_no = func_combobox.current()
        func_name = func_combobox.get()

        if func_no <= 2:
            convert_img = self.model.retouch_gray_scale(effect_img)

            if func_name == "Gray_scale":
                converted_img = convert_img

            elif func_name == "Binarization":
                converted_img = self.model.retouch_binarization(convert_img)

            elif func_name == "Sepia":
                converted_img = self.model.retouch_sepia(convert_img)

        elif func_name == "Jagged_mosaic":
            converted_img = self.model.retouch_jagged_mosaic(effect_img)

        elif func_name == "Soft_mosaic":
            converted_img = self.model.retouch_soft_mosaic(effect_img)

        elif func_name == "Quantize":
            converted_img = self.model.retouch_alpha_blend(effect_img)

        elif func_name == "Invert":
            converted_img = self.model.retouch_invert(effect_img)

        elif func_name == "Mirror":
            converted_img = self.model.retouch_mirror(effect_img)

        elif func_name == "Flip":
            converted_img = self.model.retouch_flip(effect_img)

        elif func_name == "Posterize":
            converted_img = self.model.retouch_posterize(effect_img)

        elif func_name == "Solarize":
            converted_img = self.model.retouch_solarize(effect_img)

        elif func_name == "Equalize":
            converted_img = self.model.retouch_equalize(effect_img)

        elif func_name == "Counter":
            converted_img = self.model.retouch_counter(effect_img)

        elif func_name == "Emboss":
            converted_img = self.model.retouch_emboss(effect_img)

        elif func_name == "Find_emboss":
            converted_img = self.model.retouch_findemboss(effect_img)

        return converted_img
GUI_model.py
画像処理は、下記のように関数を設定しました。実行処理については、PIL/Pillow チートシートを参考にしてます。
| def | 概要 |
|---|---|
| get_path | 画像ファイルのpath取得 |
| resize_image | 画像ファイルの大きさを調べて、キャンバスのサイズに合わせて調整する。 |
| retouch_gray_scale | グレイスケールに変換する(Imageモジュール) |
| retouch_binarization | 2値化(Imageモジュール) |
| retouch_sepia | セピアに変換する(Imageモジュール) |
| retouch_jagged_mosaic | ギザギザモザイク(Imageモジュール) |
| retouch_soft_mosaic | やわらかいモザイク(Imageモジュール) |
| retouch_alpha_blend | アルファブレンド(Imageモジュール) |
| retouch_invert | ネガポジ反転(ImageOpsモジュール) |
| retouch_mirror | 左右反転(ImageOpsモジュール) |
| retouch_flip | 上下反転(ImageOpsモジュール) |
| retouch_posterize | ポスタライズ(ImageOpsモジュール) |
| retouch_solarize | ソーラライズ(ImageOpsモジュール) |
| retouch_equalize | イコライズ(ImageOpsモジュール) |
| retouch_counter | counter表示(ImageFilterモジュール) |
| retouch_emboss | emboss表示(ImageFilterモジュール) |
| retouch_findemboss | findemboss表示(ImageFilterモジュール) |
プログラムは、下記のようにしています。
from tkinter import filedialog
from tkinter.filedialog import askopenfile

from PIL import Image, ImageFilter, ImageOps, ImageTk


class GUI_model:
    def __init__(self):
        self.file_filter = [("Image file", ".bmp .png .jpg .tif")]

    def get_path(self):
        return filedialog.askopenfilename(
            title="Please select image file,", filetypes=self.file_filter
        )

    def resize_image(self, path, base_canvas, effect_canvas):

        resize_img = Image.open(path)

        w = resize_img.width
        h = resize_img.height
        w_offset = 250 - (w * (500 / h) / 2)
        h_offset = 250 - (h * (500 / w) / 2)

        if w > h:
            resize_img = resize_img.resize((int(w * (500 / w)), int(h * (500 / w))))
        else:
            resize_img = resize_img.resize((int(w * (500 / h)), int(h * (500 / h))))

        self.pil_base_img = ImageTk.PhotoImage(resize_img)
        self.pil_effect_img = self.pil_base_img

        if w > h:
            base_img_canvas = base_canvas.create_image(
                0, h_offset, anchor="nw", image=self.pil_base_img
            )
            effect_canvas_create = effect_canvas.create_image(
                0, h_offset, anchor="nw", image=self.pil_effect_img
            )
        else:
            base_img_canvas = base_canvas.create_image(
                w_offset, 0, anchor="nw", image=self.pil_base_img
            )
            effect_canvas_create = effect_canvas.create_image(
                w_offset, 0, anchor="nw", image=self.pil_effect_img
            )

        return resize_img, base_img_canvas, effect_canvas_create

    # effect image model
    def retouch_gray_scale(self, ef_img):
        convert_img = ef_img.convert("L")
        return convert_img

    def retouch_binarization(self, ef_img):
        converted_img = ef_img.point(lambda x: 0 if x < 230 else x)
        return converted_img

    def retouch_sepia(self, ef_img):
        converted_img = Image.merge(
            "RGB",
            (
                ef_img.point(lambda x: x * 240 / 255),
                ef_img.point(lambda x: x * 200 / 255),
                ef_img.point(lambda x: x * 145 / 255),
            ),
        )
        return converted_img

    def retouch_jagged_mosaic(self, ef_img):
        converted_img = ef_img.resize([x // 8 for x in ef_img.size]).resize(ef_img.size)
        return converted_img

    def retouch_soft_mosaic(self, ef_img):
        gimg = ef_img.filter(ImageFilter.GaussianBlur(4))
        converted_img = gimg.resize([x // 8 for x in ef_img.size]).resize(ef_img.size)
        return converted_img

    def retouch_alpha_blend(self, ef_img):
        converted_img = ef_img.quantize(4)
        return converted_img

    def retouch_invert(self, ef_img):
        converted_img = ImageOps.invert(ef_img.convert("RGB"))
        return converted_img

    def retouch_mirror(self, ef_img):
        converted_img = ImageOps.mirror(ef_img.convert("RGB"))
        return converted_img

    def retouch_flip(self, ef_img):
        converted_img = ImageOps.flip(ef_img.convert("RGB"))
        return converted_img

    def retouch_posterize(self, ef_img):
        converted_img = ImageOps.posterize(ef_img.convert("RGB"), 2)
        return converted_img

    def retouch_solarize(self, ef_img):
        converted_img = ImageOps.solarize(ef_img.convert("RGB"), 128)
        return converted_img

    def retouch_equalize(self, ef_img):
        converted_img = ImageOps.equalize(ef_img.convert("RGB"))
        return converted_img

    def retouch_counter(self, ef_img):
        converted_img = ef_img.filter(ImageFilter.CONTOUR)
        return converted_img

    def retouch_emboss(self, ef_img):
        converted_img = ef_img.filter(ImageFilter.EMBOSS)
        return converted_img

    def retouch_findemboss(self, ef_img):
        converted_img = ef_img.filter(ImageFilter.FIND_EDGES)
        return converted_img
その他
作成時に参考にしたサイトをまとめておきます。
| 項目 | サイト名 |
|---|---|
| color codeの調査 | Modern browsers support 140 named colors |
| 変数について | グローバル変数とか |
| デバック | pythonで、ログ表示やデバック時に使う、行番号、関数名、ファイル名を表示 |
| 関数名を考える | Naming -名前付け- |
| 自動整形 | [Python]blackとisortで自動フォーマット |
補足
一人で適当にコードを書いたので、blackとisortで自動整形しました。実行コマンドは、下記です。
# black
black ファイル名

# isort
isort ファイル名