Introduction
Amazon EKS Auto Mode is an innovative feature that significantly automates Kubernetes cluster operations, but in actual projects, customization is often necessary to meet various requirements.
This article introduces a real-world case of using EKS Auto Mode while responding to complex requirements. It explains in detail how we customized the configuration to address challenges that cannot be handled with standard Auto Mode setup alone.
What is EKS Auto Mode?
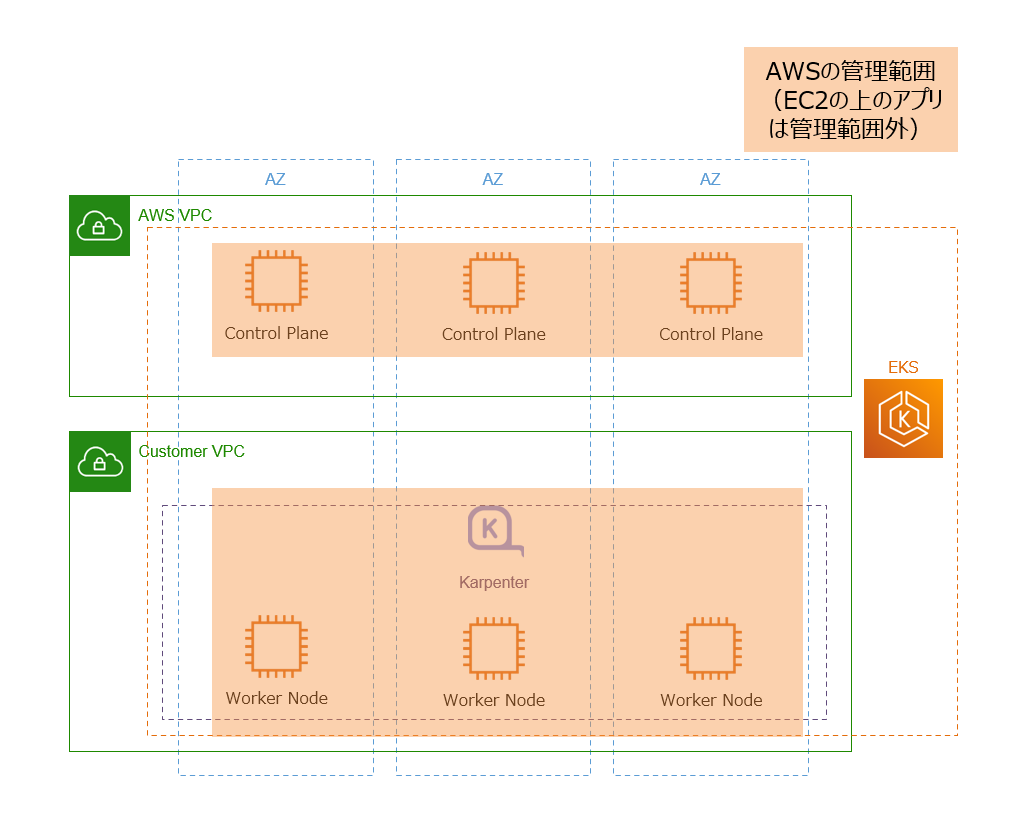
EKS Auto Mode is a new feature that significantly automates Kubernetes cluster operations. Compared to traditional EKS, the following operational tasks are automated. Simply put, as shown in the diagram below, AWS now manages not only the control plane but also worker nodes.
Traditional EKS Management Scope:

EKS Auto Mode Management Scope:
Key Benefits of EKS Auto Mode
EKS Auto Mode automates operational tasks such as those listed below. This significantly reduces the burden of infrastructure management, allowing developers to focus more on application development.
Examples of Automated Features:
- Automatic Compute Management: Automatic selection of optimal instances based on workload
- Auto Scaling: Automatic management of Karpenter, automatic scale up/down based on resource usage
- Automatic Upgrades: Automatic node updates
- Built-in Add-ons: Automatic updates for EBS CSI Driver, VPC CNI, CoreDNS, etc.
- Built-in AWS Load Balancer Controller: AWS Load Balancer Controller (ALBC) required for ALB and NLB integration is provided as standard, eliminating the need for manual installation and management
This significantly reduces operational burden, allowing even greater focus on application development.
Complex Project Requirements
This project had the following complex requirements that could not be addressed simply by enabling EKS Auto Mode.
Requirement 1: Operation Automation
-
Maximize operation automation
- Maximize Auto Mode benefits and minimize manual operations
- Automate node lifecycle management and scaling management
Requirement 2: Cost Optimization
-
Need to reduce costs
- Reduce unnecessary resources and optimize costs
- Operate with minimum necessary instances
Requirement 3: Use of Stable Instance Types
-
Need to use only specific instance types as nodes
- Fixed to specific instance types instead of Auto Mode's automatic selection
Requirement 4: Connection to ALB in Different Account VPC
-
Connection between ALB in the same account VPC as EKS and Pods
- Connection with standard configuration
-
In addition, connection between ALB in different account VPC from EKS and Pods
- Cross-account network connection
System Architecture
To meet the above requirements, we adopted the following architecture.
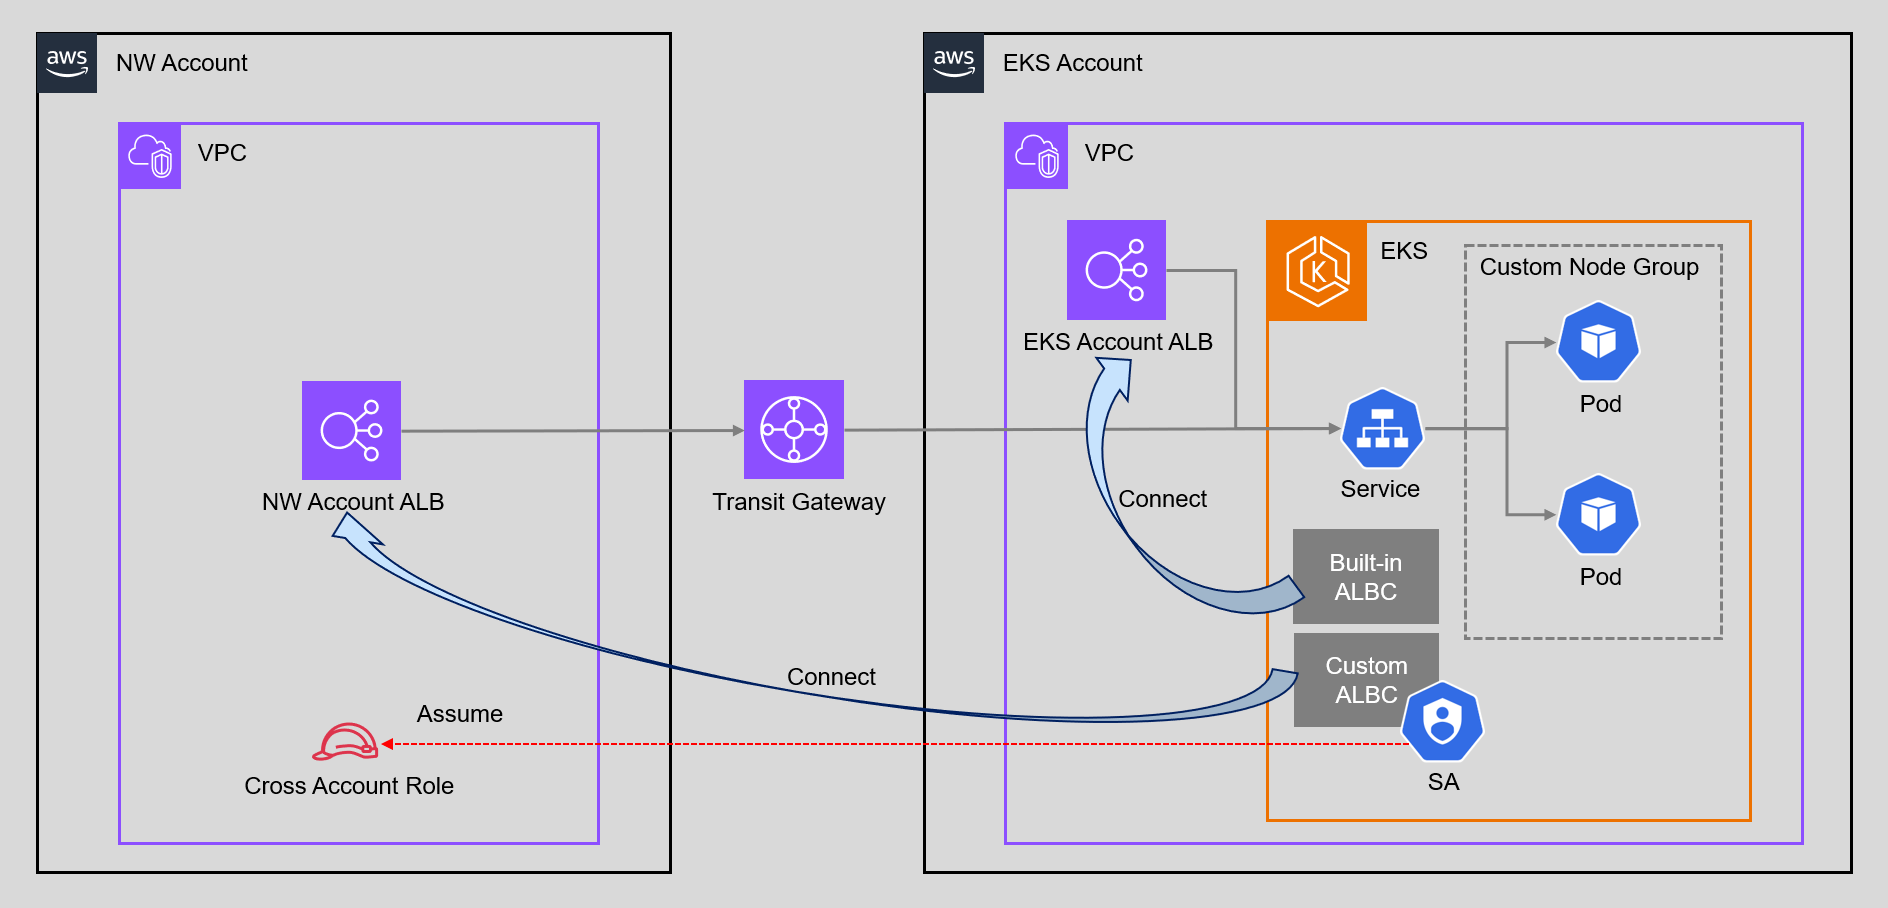
Main System Components:
- EKS Auto Mode: Optimized configuration using custom NodeClass/NodePool
- Auto Mode-managed ALB Controller: For ALB connection within the same account
- Custom ALB Controller: For cross-account ALB connection
- Transit Gateway: Connects VPCs between eks-account and nw-account to enable cross-account communication
- IAM Role (nw-account): Cross-account connection IAM role (can be assumed by eks-account ServiceAccount via OIDC Provider)
In this configuration, we use AWS Transit Gateway (TGW) to connect VPCs between eks-account and nw-account. In reality, there are multiple other accounts and VPCs, so we adopted TGW which can connect in a hub-and-spoke model. Other connection methods such as VPC Peering are also available, but this article does not cover network connection details.
Addressing Requirements
First, here's how we solved the four requirements.
Addressing Requirement 1: Operation Automation
- Utilizing EKS Auto Mode and Custom NodePool: Automated node management and Karpenter management, reducing operational team burden by approximately 70%
Addressing Requirement 2: Cost Optimization
- Disabling Built-in NodePools (General Purpose/System): Reduced costs by stopping unnecessary NodePools, achieving approximately 30% monthly cost reduction
- Operating with Custom NodePool Only: Limited to minimum necessary instance types, and fixing instance types improved cost predictability
Simply adding a custom NodePool would result in multiple NodePools existing alongside the built-in General Purpose and System NodePools, with EC2 instances launched from each NodePool, presenting cost challenges.
We also considered leaving only the System node pool, but judged it inefficient to maintain the System node pool just for add-on management, so we disabled all built-in NodePools and operated with custom NodePool only. (Keeping only General Purpose was also deemed impossible due to Requirement 3.)
Addressing Requirement 3: Use of Stable Instance Types
-
Creating Custom NodeClass/NodePool: Limited to using only specific instance types (m5a.large, m5a.xlarge) via NodePool
requirements, achieving stable operation of AMD architecture-dependent applications. Also improved performance predictability
Since the application to be deployed had specifications that only work on AMD architecture, we needed to stabilize instance types. Since Auto Mode's default behavior could select various instance types, we explicitly control this with custom NodePool.
Addressing Requirement 4: Connection to ALB in Different Account VPC
- Auto Mode-managed Load Balancer Controller: Used for ALB connection within the same account (eks-account), easily connected with Auto Mode standard features
- Self-managed Load Balancer Controller: Additionally installed for ALB connection to different account (nw-account), connected with self-managed controller
- Cross-account Authentication Using OIDC Provider: Created OIDC Provider in nw-account and authenticated securely based on ServiceAccount, enabling both to coexist and achieving flexible ALB connection in multi-account environment
This configuration deviates from Auto Mode's official recommendations. Normally, it is recommended to use a method without Auto Mode or to separate clusters, but for this project, we adopted this configuration after thorough validation to meet special requirements.
Build Process
Below, we explain the specific build procedures to realize the above requirement responses.
Unless otherwise specified for build methods, CloudFormation is used. Also, deployment, pod, and service-related builds are omitted.
Build Procedures in eks-account
1. Creating EKS Auto Mode Cluster
Disabling Built-in NodePools
Standard Auto Mode automatically creates General Purpose and System NodePools, but this time we disabled them for cost optimization and instance type fixation.
EKS Auto Mode Configuration (Excerpt)
apiVersion: eksctl.io/v1alpha5
kind: ClusterConfig

metadata:
  name: <cluster-name>
  region: ap-northeast-1
  version: "1.33"

iam:
  withOIDC: true

autoModeConfig:
  enabled: true
  nodePools: []  # Disable built-in NodePools
Creating EKS Cluster:
# Create EKS Auto Mode cluster
eksctl create cluster -f eks-account/eks-cluster-auto-mode.yaml
IAM Role Configuration
For Auto Mode node role, we follow the official guidelines.
Auto Mode IAM Role Configuration
AWSTemplateFormatVersion: '2010-09-09'

Resources:
  EksAutoModeNodeRole:
    Type: AWS::IAM::Role
    Properties:
      RoleName: test-eks-node-role
      AssumeRolePolicyDocument:
        Version: '2012-10-17'
        Statement:
          - Effect: Allow
            Principal:
              Service: ec2.amazonaws.com
            Action: sts:AssumeRole
      ManagedPolicyArns:
        - arn:aws:iam::aws:policy/AmazonEC2ContainerRegistryPullOnly
        - arn:aws:iam::aws:policy/AmazonEKSWorkerNodeMinimalPolicy
Access Entry Configuration
Access Entry needs to be configured so that nodes created in Auto Mode can access the cluster.
Access Entry Configuration
AWSTemplateFormatVersion: '2010-09-09'

Resources:
  EKSAutoNodeRoleAccessEntry:
    Type: AWS::EKS::AccessEntry
    Properties:
      ClusterName: test-eks-cluster
      PrincipalArn: arn:aws:iam::<account-id>:role/test-eks-node-role
      Type: "EC2"
      AccessPolicies:
        - AccessScope:
            Type: cluster
          PolicyArn: arn:aws:eks::aws:cluster-access-policy/AmazonEKSAutoNodePolicy
2. Creating Custom NodeClass/NodePool
This time, we created custom NodeClass and custom NodePool to use only specific instance types (m5a.large, m5a.xlarge).
In a configuration with built-in NodePools disabled, the flow is to first define NodeClass, then create NodePool that references that NodeClass.
Custom NodeClass Configuration (Excerpt)
apiVersion: eks.amazonaws.com/v1
kind: NodeClass
metadata:
  name: custom-nodeclass
spec:
  role: arn:aws:iam::<account-id>:role/<node-role-name>

  subnetSelectorTerms:
    - id: subnet-xxxxxxxxxxxxxxxxx
    - id: subnet-xxxxxxxxxxxxxxxxx

  securityGroupSelectorTerms:
    - id: sg-xxxxxxxxxxxxxxxxx
Custom NodePool Configuration (Excerpt)
apiVersion: karpenter.sh/v1beta1
kind: NodePool
metadata:
  name: custom-nodepool
spec:
  nodeClassRef:
    group: eks.amazonaws.com
    kind: NodeClass
    name: custom-nodeclass
  template:
    spec:
      requirements:
        - key: node.kubernetes.io/instance-type
          operator: In
          values:
            - m5a.large
            - m5a.xlarge
Applying Custom NodeClass/NodePool:
# Apply custom NodeClass
kubectl apply -f eks-account/custom-nodeclass.yaml

# Apply custom NodePool
kubectl apply -f eks-account/custom-nodepool.yaml

# Verify NodePool
kubectl get nodepool
NAME              NODECLASS          NODES   READY   AGE
custom-nodepool   custom-nodeclass   0       True    10s
3. Installing Self-managed Load Balancer Controller
Install self-managed Load Balancer Controller for ALB connection to different account.
The following commands are executed in eks-account. The order is reversed, but specify to use the cross-account role created in nw-account.
# Create IAM ServiceAccount (using cross-account role)
eksctl create iamserviceaccount \
  --cluster <eks-cluster-name> \
  --namespace kube-system \
  --name aws-load-balancer-controller \
  --attach-role-arn arn:aws:iam::<nw-account-id>:role/<cross-account-role-name> \
  --approve \
  --region ap-northeast-1 \
  --override-existing-serviceaccounts

# Install Load Balancer Controller
helm repo add eks https://aws.github.io/eks-charts
helm repo update

helm install aws-load-balancer-controller eks/aws-load-balancer-controller \
  -n kube-system \
  --set clusterName=<eks-cluster-name> \
  --set serviceAccount.create=false \
  --set serviceAccount.name=aws-load-balancer-controller \
  --set region=ap-northeast-1 \
  --set vpcId=<nw-account-vpc-id>
Important Points:
-
--attach-role-arn: Specify the ARN of the cross-account role created in nw-account -
--set vpcId: Specify nw-account VPC ID (to connect with ALB in different account)
4. Creating Target Group Binding
For Same Account ALB Connection (Auto Mode-managed)
Use the built-in Load Balancer Controller managed by Auto Mode to connect with ALB within the same account.
By enabling Auto Mode, AWS Load Balancer Controller is automatically installed and managed, eliminating the need for manual Helm installation or ServiceAccount creation. This allows immediate use of Ingress and Target Group Binding.
Creating Target Group Binding for Same Account:
# Create Target Group Binding for same account
kubectl apply -f tgb-for-eks-account-alb.yaml
Target Group Binding for Same Account
apiVersion: eks.amazonaws.com/v1
kind: TargetGroupBinding
metadata:
  name: test-tgb
  namespace: test-ns
spec:
  serviceRef:
    name: test-service
    port: 443
  targetGroupARN: arn:aws:elasticloadbalancing:ap-northeast-1:<account-id>:targetgroup/<target-group-name>/<target-group-id>
  targetType: ip
For Different Account ALB Connection (Custom)
The Auto Mode-managed Load Balancer Controller does not support connection to ALBs in different VPCs/accounts via Target Group Binding. Therefore, it is necessary to install a self-managed Load Balancer Controller separately.
Use the self-managed Load Balancer Controller to connect with ALB in different account.
When connecting to ALB in different VPC/account, you need to specify the nw-account VPC ID in the Target Group Binding spec.
Creating Target Group Binding for Different Account:
# Create Target Group Binding for different account
kubectl apply -f tgb-for-nw-account-alb.yaml
Target Group Binding for Different Account
apiVersion: elbv2.k8s.aws/v1beta1
kind: TargetGroupBinding
metadata:
  name: test-cross-account-tgb
  namespace: test-ns
spec:
  serviceRef:
    name: test-service
    port: 443
  targetGroupARN: arn:aws:elasticloadbalancing:ap-northeast-1:<nw-account-id>:targetgroup/<target-group-name>/<target-group-id>
  vpcID: vpc-xxxxxxxxxxxxxxxxx
Important Points:
The default ALBC and custom ALBC have different API versions.
- Auto Mode-managed Target Group Binding:
apiVersion: eks.amazonaws.com/v1 - Self-managed Target Group Binding:
apiVersion: elbv2.k8s.aws/v1beta1
5. Verifying Target Group Binding
When multiple API versions exist, kubectl get targetgroupbinding by default only displays the higher priority version (v1 > v1beta1).
In this project, the following two API versions coexist:
-
eks.amazonaws.com/v1(Auto Mode, GA version) -
elbv2.k8s.aws/v1beta1(Self-managed, Beta version)
How to Verify Self-managed Version:
# Verify self-managed version (explicitly specify API version)
kubectl get targetgroupbinding.elbv2.k8s.aws -A

# Verify Auto Mode version
kubectl get targetgroupbinding -A
Build Procedures in nw-account
Creating Cross-account Role and OIDC Provider
In the different account (nw-account), create an IAM role and OIDC Provider accessible from eks-account.
Procedure Overview:
- Obtain OIDC Provider information from eks-account
- Create OIDC Provider and IAM role in nw-account
Step 1: Obtaining OIDC Provider Information
First, obtain the OIDC Provider information for the EKS cluster (execute in eks-account):
# Obtain OIDC Provider URL (execute in eks-account)
aws eks describe-cluster \
  --name <eks-cluster-name> \
  --query "cluster.identity.oidc.issuer" \
  --output text
# Output example: https://oidc.eks.ap-northeast-1.amazonaws.com/id/XXXXXXXXXXXXXXXXXXXXXXXXXXXXX
Step 2: Applying CloudFormation Template
Create OIDC Provider and IAM role in nw-account.
In advance, download the IAM policy for Load Balancer Controller and create it as a managed policy:
curl -o iam_policy.json https://raw.githubusercontent.com/kubernetes-sigs/aws-load-balancer-controller/v2.7.0/docs/install/iam_policy.json
Using the downloaded policy, create it separately as a managed policy and add it to the ManagedPolicyArns of the following CloudFormation template.
Cross-account Role and OIDC Provider Configuration
AWSTemplateFormatVersion: '2010-09-09'

Resources:
  # OIDC Provider
  OIDCProvider:
    Type: AWS::IAM::OIDCProvider
    Properties:
      Url: https://oidc.eks.ap-northeast-1.amazonaws.com/id/<oidc-provider-id>
      ClientIdList:
        - sts.amazonaws.com
      ThumbprintList:
        - <oidc-thumbprint>

  # Cross-account ALBC IAM Role
  ALBControllerRole:
    Type: AWS::IAM::Role
    DependsOn: OIDCProvider
    Properties:
      RoleName: test-cross-account-alb-controller-role
      AssumeRolePolicyDocument:
        Version: "2012-10-17"
        Statement:
          - Effect: Allow
            Principal:
              Federated: !Ref OIDCProvider
            Action: sts:AssumeRoleWithWebIdentity
            Condition:
              StringEquals:
                oidc.eks.ap-northeast-1.amazonaws.com/id/<oidc-provider-id>:aud: "sts.amazonaws.com"
                oidc.eks.ap-northeast-1.amazonaws.com/id/<oidc-provider-id>:sub: "system:serviceaccount:kube-system:aws-load-balancer-controller"
      ManagedPolicyArns:
        - <ALBControllerPolicy ARN>
Cross-account Connection Mechanism:
Cross-account connection utilizes trust relationships between OIDC Provider and IAM roles.
For detailed implementation methods of cross-account connection, refer to the following AWS official blog:
Expose Amazon EKS pods through cross-account load balancer
1. Creating OIDC Provider in nw-account
The EKS cluster in eks-account is automatically issued an OIDC Provider URL when the cluster is created (e.g., https://oidc.eks.ap-northeast-1.amazonaws.com/id/XXXXX). This OIDC Provider has the role of issuing JWT (JSON Web Token) to Kubernetes ServiceAccount.
In nw-account, create an IAM OIDC Provider using this eks-account OIDC Provider URL. This allows nw-account IAM to trust tokens issued by the eks-account Kubernetes cluster.
2. IAM Role Trust Relationship Configuration
For the IAM role created in nw-account, configure a trust policy that allows AssumeRoleWithWebIdentity action with OIDC Provider as principal, restricting that only specific ServiceAccounts in eks-account can assume the role.
{
  "Version": "2012-10-17",
  "Statement": [{
    "Effect": "Allow",
    "Principal": {
      "Federated": "arn:aws:iam::<nw-account-id>:oidc-provider/oidc.eks.ap-northeast-1.amazonaws.com/id/XXXXX"
    },
    "Action": "sts:AssumeRoleWithWebIdentity",
    "Condition": {
      "StringEquals": {
        "oidc.eks.ap-northeast-1.amazonaws.com/id/XXXXX:aud": "sts.amazonaws.com",
        "oidc.eks.ap-northeast-1.amazonaws.com/id/XXXXX:sub": "system:serviceaccount:kube-system:aws-load-balancer-controller"
      }
    }
  }]
}
- Principal.Federated: Specify ARN of OIDC Provider created in nw-account
-
Action: Allow
sts:AssumeRoleWithWebIdentity(allow role assumption via OIDC) - Condition.StringEquals: Restrict role assumption by validating JWT token claims
3. Associating ServiceAccount with IAM Role
In eks-account, use the eksctl create iamserviceaccount command to add the nw-account IAM role ARN as an annotation to the Kubernetes ServiceAccount.
apiVersion: v1
kind: ServiceAccount
metadata:
  name: aws-load-balancer-controller
  namespace: kube-system
  annotations:
    eks.amazonaws.com/role-arn: arn:aws:iam::<nw-account-id>:role/test-cross-account-alb-controller-role
This annotation allows Pods using the ServiceAccount to assume the specified IAM role.
Troubleshooting
From here, we introduce problems that occurred during actual construction and their solutions.
NodePool Not Created
Symptom:
NodePool is not displayed when executing kubectl get nodepool, or NodeClass Ready status is False.
kubectl get nodepool
# No resources found

# or
kubectl get nodeclass
NAME                  ROLE                                                          READY   AGE
custom-nodeclass      arn:aws:iam::<account-id>:role/test-eks-node-role            False   2m
Cause and Solution:
The main causes of this problem include NodeClass configuration errors, insufficient IAM role permissions, or network configuration errors.
First, check the NodeClass status in detail:
kubectl describe nodeclass <nodeclass-name>
In the NodeClass Status.Conditions section, errors like the following will be displayed:
1. SecurityGroupsNotFound Error
Status:
  Conditions:
    Type:    SecurityGroupsReady
    Status:  False
    Reason:  SecurityGroupsNotFound
    Message: SecurityGroupSelector did not match any SecurityGroups
This error occurs when the security group ID specified in NodeClass securityGroupSelectorTerms does not exist or is incorrect.
2. UnauthorizedNodeRole Error
Status:
  Conditions:
    Type:    InstanceProfileReady
    Status:  False
    Reason:  UnauthorizedNodeRole
    Message: Role arn:aws:iam::<account-id>:role/<node-role-name> is unauthorized to join nodes to the cluster
Cause and Solution:
This error occurs when the specified IAM role does not have permission to join nodes to the EKS cluster.
Check the following:
- Verify that Access Entry is correctly created
- Verify that Access Entry type is
EC2 - Verify that Access Entry has
AmazonEKSAutoNodePolicyattached - Verify that IAM role has required policies (
AmazonEC2ContainerRegistryPullOnly,AmazonEKSWorkerNodeMinimalPolicy) attached
# Verify Access Entry
aws eks list-access-entries --cluster-name <cluster-name>
aws eks describe-access-entry --cluster-name <cluster-name> --principal-arn <node-role-arn>
Once NodeClass becomes Ready: True, NodePool will also be created normally.
Same Account Target Group Binding Not Working
Symptom:
Despite creating Target Group Binding, targets are not registered in the Target Group.
Cause and Solution:
One cause is incorrect apiVersion setting in Target Group Binding. When using Auto Mode-managed Load Balancer Controller, specify eks.amazonaws.com/v1, and when using self-managed, specify elbv2.k8s.aws/v1beta1. The API version was recently changed.
Also, when using Auto Mode-managed Load Balancer Controller, verify that the Target Group has the eks:eks-cluster-name tag set. Without this tag, the controller cannot recognize the Target Group.
If the problem is not resolved with the above verification, you can check detailed error information by verifying the Load Balancer Controller logs with the following command.
kubectl logs -n kube-system deployment/aws-load-balancer-controller
Internal Error When Creating TargetGroupBinding or Service (Webhook Communication Error)
Symptom:
When trying to create Target Group Binding, the following internal error occurs and resources cannot be created.
Error from server (InternalError): error when creating "target-group-binding.yaml": Internal error occurred: failed calling webhook "mtargetgroupbinding.elbv2.k8s.aws"
Also, after installing AWS Load Balancer Controller (custom), when trying to create a Service resource, Webhook validation may timeout and block.
Error: INSTALLATION FAILED: 1 error occurred:
* Internal error occurred: failed calling webhook "mservice.elbv2.k8s.aws": failed to call webhook: Post "https://aws-load-balancer-webhook-service.kube-system.svc:443/mutate-v1-service?timeout=10s": context deadline exceeded
Pods and PodDisruptionBudget (PDB) are created without problems, but only Service was not created. Also, after uninstalling the custom Load Balancer Controller, Service could be created normally.
Cause and Solution:
At first glance, it seemed to be because we installed the custom AWS Load Balancer Controller, but the AWS Load Balancer Controller operates as a Mutating Webhook when creating TargetGroupBinding or Service, listening for Webhook requests on TCP port 9443.
During resource creation, first the EKS control plane API server receives the resource creation request, then the API server sends a validation request to the AWS Load Balancer Controller Pod (Webhook) on TCP port 9443. When the Webhook returns a response, resource creation is completed.
At this time, if the EKS cluster security group outbound rules do not allow connections to TCP port 9443 to itself (same security group), Webhook communication fails and internal error or timeout error occurs.
Therefore, add an outbound rule allowing TCP 9443 communication to the security group used for communication between the EKS cluster control plane and worker nodes.
Reference Information:
- aws-load-balancer-controller - Webhook Configuration
- Patterns for TargetGroupBinding with AWS Load Balancer Controller
Cross-account Connection Failure
Symptom:
Attempted to connect to ALB in different account using self-managed Load Balancer Controller, but connection fails.
Cause and Solution:
Causes of cross-account connection failure include OIDC Provider configuration errors, IAM role trust relationship issues, or insufficient permissions. Follow the steps below to verify that ServiceAccount settings, OIDC settings, and work in each account are performed correctly.
1. Verifying ServiceAccount Configuration in eks-account
First, verify that the Load Balancer Controller ServiceAccount in eks-account is correctly configured.
# Verify ServiceAccount existence and annotations (execute in eks-account)
kubectl get serviceaccount aws-load-balancer-controller -n kube-system -o yaml

# Verify the following annotation is set
# eks.amazonaws.com/role-arn: arn:aws:iam::<nw-account-id>:role/<cross-account-role-name>
2. Verifying OIDC Provider in nw-account
Verify that OIDC Provider is correctly created in nw-account. It is especially important to verify that the Thumbprint has the correct value.
# Verify OIDC Provider existence (execute in nw-account)
aws iam list-open-id-connect-providers

# Verify that OIDC Provider URL matches eks-account EKS cluster OIDC Provider URL
# Example: arn:aws:iam::<nw-account-id>:oidc-provider/oidc.eks.ap-northeast-1.amazonaws.com/id/XXXXX
For how to obtain the Thumbprint, refer to AWS official documentation.
3. Verifying IAM Role Configuration in nw-account
Verify the IAM role trust relationship. In the Condition block, verify that the OIDC Provider ID is correctly set, and that the ServiceAccount namespace (kube-system) and service account name (aws-load-balancer-controller), and OIDC Provider information are correctly specified.
3. Verifying Network Connection
Verify that network connection between eks-account and nw-account (Transit Gateway or VPC Peering, etc.) is correctly configured.
Summary
In this project, we achieved both significant operational burden reduction and cost optimization by implementing customizations such as utilizing custom NodePools, realizing cross-account connection, and fixing instance types for complex requirements that could not be addressed with EKS Auto Mode's standard features.
1. Balancing Cost Optimization and Operation Automation
- Disabled built-in NodePools (General Purpose/System) and operated with custom NodePool only, achieving approximately 30% monthly cost reduction
- Achieved approximately 70% operational team burden reduction by utilizing Auto Mode
2. Addressing Architecture Requirements
- Fixed to specific instance types (m5a.large/xlarge) to achieve stable operation of AMD architecture-dependent applications
- Fixing instance types improved performance predictability
3. Cross-account Network Connection
- Enabled both Auto Mode-managed and self-managed AWS Load Balancer Controllers to coexist, achieving flexible ALB connection in multi-account environment