記事一覧
Swift MkMapViewで地図アプリ作成してみた(記事一覧)
ブラウザを表示する
WKWebViewで簡単にブラウザを表示する
ブラウザの表示領域の設定と、ブラウザの状態取得、操作を有効にする。
ブラウザを定義する
import WebKit

class PointPopupViewController: UIViewController,WKNavigationDelegate, WKUIDelegate {

    var webView: WKWebView!

    override func viewDidLoad() {
        super.viewDidLoad()

        // ブラウザの表示領域を設定
        let rect = CGRect(x:0, y:230, width:width, height:height-230)
        let webConfiguration = WKWebViewConfiguration()
        webView = WKWebView(frame: rect, configuration: webConfiguration)

        // 読み込み開始、完了などの状態を取得できる様にする
        webView.navigationDelegate = self

        // back, forwardなどの操作メソッドを使用できる様にする
        webView.uiDelegate = self
- WKNavigationDelegate(webView.navigationDelegate = self)で、読み込み開始、完了などの状態を取得できる様にする
- WKUIDelegate(webView.uiDelegate = self)で、back, forwardなどの操作メソッドを使用できる様にする
Googleを表示してみる
ブラウザにURLを指定して表示する。
ブラウザでGoogleを表示する
        var url: String = "https://www.google.co.jp"

        // 日本語を含んだ文字列をURLやNSURLにするとnilになる対策
        let encodeUrl: String = url.addingPercentEncoding(withAllowedCharacters: .urlQueryAllowed)!
        let webUrl = URL(string: encodeUrl)
        let myRequest = URLRequest(url: webUrl!)
        webView.load(myRequest)

        // インスタンスをビューに追加する
        self.view.addSubview(webView)
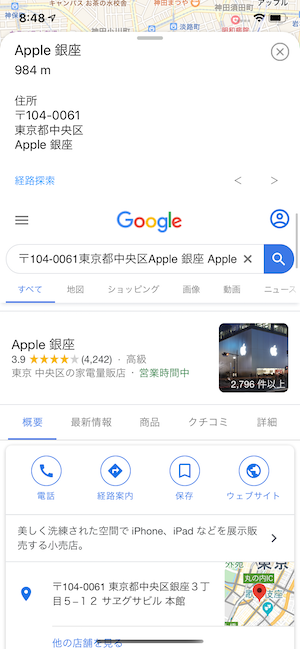
セミモーダルビューにブラウザを表示する
(21)- 周辺検索した地点をセミモーダルビューに表示するでセミモーダルに表示した地点をGoogle検索するためのクエリを追加する。
Googleの検索条件を指定してブラウザ表示する
        var url: String = "https://www.google.co.jp"
        url += "/search?q="
        url += appDelegate.walkViewController.getTapStreetAddr()
        url += "+"
        url += appDelegate.walkViewController.getTapPointTitle()
読み込み開始、完了の状態を取得する
読み込み開始、完了などの状態を取得して、
back(<), forward(>)のボタンの状態を更新する。
読み込み開始、完了の状態を取得
    // 読み込み開始
    func webView(_ webView: WKWebView, didCommit navigation: WKNavigation!) {
        setEnableWebButton()
    }

    // Web読み込み完了
    func webView(_ webView: WKWebView, didFinish navigation: WKNavigation!) {
        setEnableWebButton()
    }

    // Web back/forwardボタンのisEnableを更新する
    func setEnableWebButton() {
        // カスタムの文字色で初期化
        let g = CGFloat(0x94) / 255
        let b = CGFloat(0xFE) / 255
        let strColor: UIColor = UIColor(red: 0, green: g, blue: b, alpha: 1.0)

        if webView.canGoBack {
            backBtn.isEnabled = true
            backBtn.setTitleColor(strColor, for: .normal)
        }
        else {
            backBtn.isEnabled = false
            backBtn.setTitleColor(UIColor.gray, for: .normal)
        }

        if webView.canGoForward {
            forwardBtn.isEnabled = true
            forwardBtn.setTitleColor(strColor, for: .normal)
        }
        else {
            forwardBtn.isEnabled = false
            forwardBtn.setTitleColor(UIColor.gray, for: .normal)
        }
    }
- webView.canGoBackで戻ることが可能かを取得
- webView.canGoForward進むことが可能かを取得
back(<), forward(>)ボタンを実装する
back forward ボタンを実装する
    // < ボタンを押下した時の処理
    @IBAction func btnBack(_ sender: Any)
    {
        if webView.canGoBack {
            webView.goBack()
        }
    }

    // > ボタンを押下した時の処理
    @IBAction func btnForward(_ sender: Any)
    {
        if webView.canGoForward {
            webView.goForward()
        }
    }
