はじめに
普段から多くのOSSライブラリたちを利用させてもらっているが、そういったライブラリを自分でも作ってみたくなった。今回はあまり複雑ではないかなりシンプルなライブラリをTypeScriptで開発し、それを公開し利用するまでをやってみたいと思う。
開発するライブラリの機能としては、Expressのmiddlewareになる。
ライブラリを実装する
Expressのmiddlewareとして利用できるライブラリで、機能としてはAuthorizationヘッダーのBearerトークンをreq.tokenから利用できるようにするもの。cookie-parserやbody-parserのように、req.○○○のプロパティアクセスができるようにするもの。
今回はかなり単純に以下のような実装にした。
import { Request, Response, NextFunction } from 'express';
import HttpError from './lib/http-error.js';

declare module 'express-serve-static-core' {
	interface Request {
		token: string | undefined;
	}
}

export interface BearerParserOptions {
	/**
	 * @default false
	 * @description If true, throw error when bearer token is invalid.
	 */
	isThrowError?: boolean;
}

const authBearerParser =
	(option?: BearerParserOptions) =>
	(req: Request, res: Response, next: NextFunction): void => {
		const { authorization } = req.headers;
		if (!authorization) {
			if (option?.isThrowError) throw new HttpError(401, `authorization header missing`);
			return next();
		}

		const [type, token] = authorization.split(/\s/, 2);
		if (type !== 'Bearer') {
			if (option?.isThrowError) throw new HttpError(400, `invalid token type: ${type}`);
			return next();
		}

		if (!token) {
			if (option?.isThrowError) throw new HttpError(401, `token missing`);
			return next();
		}

		req.token = token;
		return next();
	};

export default authBearerParser;
import { BaseError } from 'make-error';

export default class HttpError extends BaseError {
	status: number;

	constructor(status: number, msg: string) {
		super(msg);
		this.status = status;
	}
}
上記の実装で補足をする。
実装の補足
declare module 'express-serve-static-core' {...}
これは、node_modules/@types/express-serve-static-core/index.d.tsにある、以下のinterface Request {}を拡張するための宣言。
declare global {
    namespace Express {
        // These open interfaces may be extended in an application-specific manner via declaration merging.
        // See for example method-override.d.ts (https://github.com/DefinitelyTyped/DefinitelyTyped/blob/master/types/method-override/index.d.ts)
        interface Request {}
        interface Response {}
        interface Locals {}
        interface Application {}
    }
}
まず前提として、Expressでは独自にreq・resを拡張することができる(Expressのerror handlingを理解し、middlewareで実装してみたやWriting middleware for use in Express appsを参照)。JavaScriptであればどんなに独自拡張をしてもなにも困ることはないが、TypeScriptの場合、型で縛られるのでreq.tokenのようにもともと存在しないプロパティを設定する場合は、Expressの型を拡張する必要がある。
その型の拡張を行うために用意されているモジュールが@types/express-serve-static-core/index.d.tsであり、Module Augmentationという方法でモジュールのinterfaceを拡張している(namespace Expressに属するinterface RequestでもModule Augmentationができている認識だが、認識に誤りがあればご指摘ください)。
実際、コードのほうにも以下のように記載がされている通り、拡張するためにここに宣言されている事が分かる。
These open interfaces may be extended in an application-specific manner via declaration merging.
(これらのオープン・インターフェイスは、宣言のマージによってアプリケーション固有の方法で拡張することができる。)
この拡張により、TypeScriptのほうでinterface Requestにはtokenというプロパティがあることが認識でき、エラーにならなくなる。この設定がない場合、以下のようなエラーになる。
$ npx tsc
src/index.ts:47:7 - error TS2339: Property 'token' does not exist on type 'Request<ParamsDictionary, any, any, ParsedQs, Record<string, any>>'.

47   req.token = token;
         ~~~~~


Found 1 error in src/index.ts:47
※ちなみに、今回はESLintでエラーになるのであえて以下のような実装はしなかったが、gobalで宣言されているnamespace Expressを拡張する方法でも同じ(Global augmentationを参照)。
...
declare global {
	// eslint-disable-next-line @typescript-eslint/no-namespace
	namespace Express {
		interface Request {
			token: string | undefined;
		}
	}
}
...
export default authBearerParser;
今回、default exportを使って実装したが、なぜ default export を使うべきではないのか?に書かれているように、named exportを利用する事で得られるメリットもある。その場合は、以下のような実装になるだろう。
import { Request, Response, NextFunction } from 'express';
import HttpError from './lib/http-error.js';

...

export interface BearerParserOptions {
	...
}

const authBearerParser =
	(option?: BearerParserOptions) =>
	(req: Request, res: Response, next: NextFunction): void => {
		...
	};

export { authBearerParser, BearerParserOptions };
ローカル環境でパッケージを作成し、利用してテストする
上記まででいったんライブラリの実装は完了したので、npmにパッケージを公開する前に、実際に意図通りに利用できるか?の確認を行う。
以下のようにyarn packコマンドでローカル上でnpmパッケージを作成する事ができる。

上記を利用する他のプロジェクトを作成し、以下のようにpackage.jsonに依存を追加する。
	"dependencies": {
		"express": "^4.18.2",
		"auth-bearer-parser": "file:/home/study/workspace/authorization-bearer-parser/auth-bearer-parser-v1.0.0.tgz"
	},
	"devDependencies": {
		...
		"@types/express": "^4.17.17",
        ...
	},
あとは作成したパッケージを利用するコードを実際に実装して、利用できるか?を確認するだけ。今回は以下のような実装を行い、実際にcurlでリクエストを送ってreq.tokenに値が入るか?を確認してみた。
import express, { Request, Response } from 'express';
import authBearerParser from 'auth-bearer-parser';

const app = express();
app.use(express.json());
app.use(authBearerParser());

app.get('/', (req: Request, res: Response) => {
	console.log(req.token);
	res.send('Hello World!');
});

app.listen(3000, () => {
	console.log('Listening on port 3000!');
});
npmの場合
上記ではyarnでpackを行ったが、npmの場合は以下のようになる。

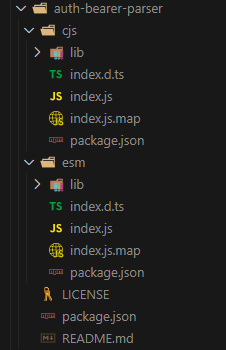
※上記はpackage.jsonの設定のfilesが以下のような状態でのnpm packだったので、esmディレクトリのみがパッケージに含まれている。
{
	"type": "module",
	"types": "./esm/index.d.ts",
	"main": "./cjs/index.js",
	"module": "./esm/index.js",
	"exports": {
		".": {
			"import": {
				"types": "./esm/index.d.ts",
				"default": "./esm/index.js"
			},
			"require": {
				"types": "./cjs/index.d.ts",
				"default": "./cjs/index.js"
			},
			"default": "./cjs/index.js"
		}
	},
    ...
	"files": [
		"esm"
	],
}
npmパッケージを公開するにあたっての準備をする
npmパッケージとして公開する前にpackage.jsonやREADMEなどに必要なことを記載する。このあたりはすでに公開されているライブラリ(パッケージ)の設定やREADMEを参考にして書く。
npmパッケージを公開する
ここまでできたら、実際にnpmパッケージとして公開する。アカウントの取得から順番にやっていく。
npmのアカウントを取得する
npm adduserコマンドでできる。コマンドを実行すると、URLが発行されるのでブラウザ上で新規にアカウントを作成すればいい。

ログインしているか?の確認はnpm whoamiで確認できる。

npmパッケージとして公開する
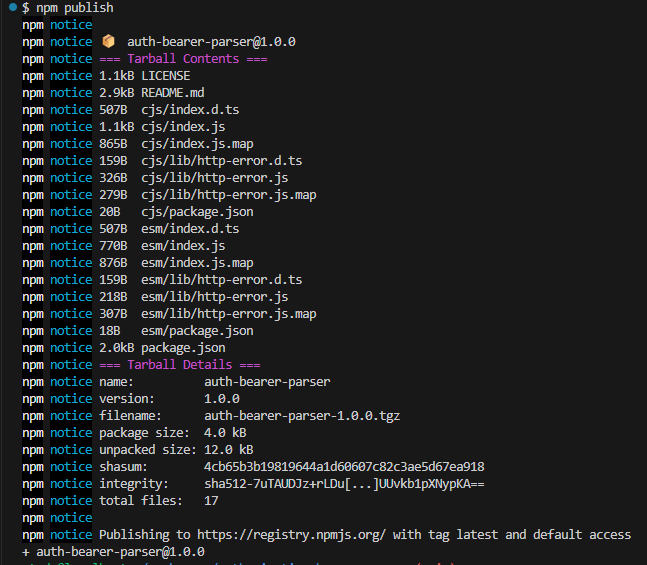
これは難しいことはなく、TypeScriptをコンパイルしてパッケージとして公開するファイルを生成してから、npm publishコマンドを実行するだけ。

公開したパッケージを利用してみる
$ yarn add auth-bearer-parser
依存に追加してみて、ローカルでパッケージを作成した時と同じように検証をすると利用できることが確認できた。また、node_modules以下にちゃんと公開したパッケージのコードがあることを確認することもできた。

まとめとして
今回はTypeScriptでライブラリを実装して、それをnpmに公開するまでをやってみた。pure ESMで公開することも考えたが、TypeScriptにおいてCommonJSとES Moduleの両方に対応するパッケージを作るで取り上げたようなデュアルパッケージ(CommonJSとES Moduleの両方で利用できる)として公開することにした。
以下、実際に公開したパッケージ。
GitHubは以下。
おまけ
GitHubのページでプロっぽさを出す
以下のように、Releasesがあるとなんかそれらしい感じになるので、これをやってみる。

やり方は簡単でgit tagでタグを作成して、GitHub上でReleaseを作成するだけ。
$ git tag -a v1.0.1 -m "version 1.0.1"

$ git push origin v1.0.1
Enumerating objects: 1, done.
Counting objects: 100% (1/1), done.
Writing objects: 100% (1/1), 161 bytes | 161.00 KiB/s, done.
Total 1 (delta 0), reused 0 (delta 0), pack-reused 0
To github.com:yutak23/auth-bearer-parser.git
 * [new tag]         v1.0.1 -> v1.0.1
READMEにバッヂを表示する
これは

のようにすれば表示できる。


