はじめに
よくあるCookieによるセッション管理を行っているWebアプリケーションを、SPA(Vue3)とExpress(REST API)の技術スタックでサクッとPoCとして作り、サーバーレスアプリケーションとしてDeployしそれを限られた人にのみ公開する、という事をやってみる。
システムの構成としては以下。

以下の手順でアプリケーションを実装してDeployしていく。
- サーバーレスのExpressで静的ファイル(VueのSPA)を配信する
- API GatewayのリソースポリシーでIP制限する
- Expressにexpress-sessionを導入し、ログインセッションを管理できるようにする
- (セッションがあれば)REST APIを呼び出せるようにする
※REST APIの実装については、後編の記事にて取り上げる。
※今回、PoCという事でアクセスの数はたかが知れているのとアクセス数が制御可能だったため、RDS Proxyを間に挟むなど本運用時には必要になるであろうアーキテクチャに敢えてしていない。また、REST APIであればAPI Gatewayでスキーマチェックをする事もできるが、後々コンテナでサーバーを立てるなどの際に移植が面倒なので、これも敢えてExpressのmiddlewareでOpenAPIのバリデーションを行う構成にしている。
※前編部分のソースコード全体は以下。
サーバーレスのExpressをDeployする(前編)
1. サーバーレスのExpressで静的ファイルを配信する
まず、第1段階としてサーバーレスのExpressで静的ファイルを配信できるようにしてみる。実装としては通常のExpressの実装と何ら変わらず、以下のようになる。
import serverlessExpress from '@vendia/serverless-express';

import app from './app.js';

// eslint-disable-next-line import/prefer-default-export
export const handler = serverlessExpress({ app });
import express from 'express';
import appRoot from 'app-root-path';

const app = express();
app.use(express.static('dist'));

app.get('*', (req, res) => {
	res.sendFile(appRoot.resolve('dist/index.html'));
});

export default app;
後は、以下のようにserverless.yamlを定義してDeployすれば、API Gatewayのエンドポイントに対しGETでindex.htmlが返ってくるようになり、SPAであれば他のJavascriptなどのアセットがロードされる。
provider:
  ...
  apiGateway:
    binaryMediaTypes:
      - '*/*'

functions:
  sls-express:
    name: sls-express-lambda-${sls:stage}
    handler: ./srv/lambda.handler
    timeout: 5
    environment:
      ENV: ${file(./env/${self:provider.stage}.json):ENV}
    events:
      # HTTP API endpoint (API Gateway v1) <- リソースポリシーでIP制限するため
      - http:
          method: get
          path: /{proxy+}
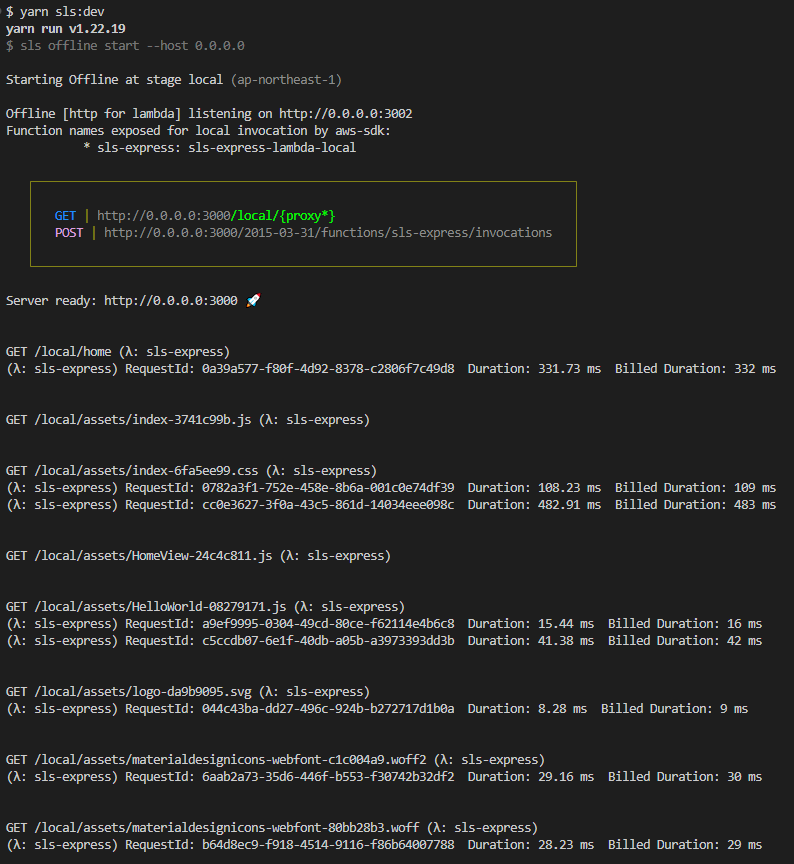
実際にserverless offlineを利用してローカル環境で確認してみると、以下のように静的コンテンツをLambdaのサーバーレスExpressから配信出来ている事が確認できる(serverless-offlineを利用した開発については過去の記事も参照下さい)。

注意点
-
API Gatewayで画像やファイルなどのバイナリメディアを返す場合、
binaryMediaTypesの設定が必要になる。サーバーレスWFではBinary Media Typesに書かれている通り、provider.apiGateway.binaryMediaTypesで設定できる(今回は全てのバイナリを返せるようにしている)。 -
API Gatewayのパスは、
path: /{proxy+}のようにしておかないと、アセットをロードするGETリクエストが404になってしまうので、全てのパスに対するGETが動くように設定する必要がある(アセットをロードするGETリクエストとは<script type="module" crossorigin src="/local/assets/index-6ef1a4b4.js"></script>のようなリクエストの事)。 -
Vueのrouterの設定でTopページを
/にしている場合、API Gatewayとの関係上404エラーになってしまうので、トップページを/homeなどにする必要があるだろう。

import { createRouter, createWebHistory } from 'vue-router';
import GlobalView from '@/views/GlobalView.vue';

const router = createRouter({
	history: createWebHistory(import.meta.env.BASE_URL),
	routes: [
		{
			path: '/',
			name: 'global',
			component: GlobalView,
			meta: { requiresAuth: true },
			children: [
				{ path: '/', redirect: { name: 'home', params: {} } },
				{
					path: '/home',
					name: 'home',
					component: () => import('@/views/HomeView.vue')
				}
			]
		},
		{
			path: '/welcome',
			name: 'welcome',
			component: () => import('@/views/WelcomeView.vue')
		},
		{ path: '/:pathMatch(.*)*', redirect: { name: 'home', params: {} } }
	]
});
...
- Vueのビルド後のアセットへのパスを、API Gatewayのstageを考慮したパスにする必要がある。具体的には、ViteでVueをビルドしている場合、デフォルトのアセットURLは
src="/assets/index-6ef1a4b4.js"
のようになり、HTTPのリクエストとしては
http://192.168.56.2:3000/assets/index-6ef1a4b4.js
になる。ただ、API Gatewayのパスは
http://192.168.56.2:3000/local/{any+}
なので
http://192.168.56.2:3000/assets/index-6ef1a4b4.js
は404エラーになる。

そのため、アセットのパスをAPI Gatewayのパスを考慮したものに変更する必要がある。Viteであれば以下のようにbaseオプションを設定する事で、アセットのパスを
src="/local/assets/index-6ef1a4b4.js"
にできるのでその設定を行う必要がある(通常のローカル環境での開発と、サーバーレスをエミュレーションして開発する時の両方に対応するなら以下のような分岐を入れる必要があるだろう)。
const options = {
	...
}
if (process.env.NODE_ENV !== 'development')
	options.base = process.env.NODE_ENV === 'local' ? '/local' : '/production';
export default defineConfig(options);
	"scripts": {
		"dev": "vite",
		"build:local": "NODE_ENV=local vite build",
		"build": "vite build",
        ...
	}
2. API GatewayのリソースポリシーでIP制限する
API GatewayのREST API(v1)では、API Gateway リソースポリシーを使用して API へのアクセスを制御するに書かれている通り、リソースポリシーによるアクセス制御ができる。そして、そのポリシーにはIPアドレスによるルールも設定できるので、今回はリソースポリシーでのIP制限を設定してみる。
サーバーレスFWでのリソースポリシーの設定方法は公式のResource Policyに書かれている通りで、以下のように設定すればいい。
provider:
  ...
  apiGateway:
    binaryMediaTypes:
      - '*/*'
    resourcePolicy:
      - Effect: Allow
        Principal: '*'
        Action: execute-api:Invoke
        Resource:
          - execute-api:/*
        Condition:
          IpAddress:
            aws:SourceIp:
              - '123.123.123.123' # <- ここにIPアドレスを設定
設定後許可していないIPアドレスからAPI GatewayのURLにアクセスしても、以下のように403エラーになる事が確認できる。

※serverless.yamlにIPアドレスをべた書きするのが憚られる場合、CLIのオプションで渡す(sls deploy --stage production --param=ipaddress1=123.123.123.123)か環境変数で設定などができるのでそれを利用すればいいだろう。
3. Expressにexpress-sessionを導入し、ログインセッションを管理できるようにする
前提として今回は認証の部分はOpenID ConnectのIDプロバイダー(Google)を利用する事にする。まずはそのための事前準備として、以下の事を行う(詳細は過去記事①や過去記事②を参照。OAuth2.0のセットアップと全く同じになる)。
- Google Cloudで
OAuth 同意画面を設定する - Google Cloudで
認証情報(OAuth 2.0 クライアント ID)を作成する
※今回はAuthorization Code Grantでscopeにopenid email profileを設定する事で認証を行う(Implicit Grantは利用しない)。
続いて、GoogleのOAuth 2.0クライアントのドメインはHTTPSで接続する必要があるので、NginxでブラウザからのリクエストをHTTPSで受け取れるようにする(詳細についてはdocker-composeでNginx(リバースプロキシ)を立てて、ローカルでHTTPS通信をやってみたなどを参照)。やる事は以下。
- オレオレ証明書を作成する
- Nginxの設定をする
- Windowsのhostsファイル(なんちゃってDNS)でドメイン解決の設定をする
認可フロー(Authorization Code Flow)を回すにあたってのstateやcodeVerifierを保存するため、かつ、認証後のセッション保持のためにexpress-sessionを導入する。今回、AWS Lambdaでのサーバレスアプリケーションという事で、相性の良さそうなDynamoDBをセッション用のstoreとして利用してみる。
利用するライブラリはconnect-dynamodb。利用方法などはREADMEに書かれている通りで、以下のように実装するだけでいい。
import expressSession from 'express-session';
import connectDynamodb from 'connect-dynamodb';
import { DynamoDBClient } from '@aws-sdk/client-dynamodb';
import config from 'config';
...
const DynamoDBStore = connectDynamodb(expressSession);
const clientOptions = {};
if (process.env.NODE_ENV === 'development')
	clientOptions.endpoint = 'http://localhost:4566';
app.use(
	expressSession({
		...config.get('dynamodb.session'),
		secret: process.env.COOKIE_SECRET,
		store: new DynamoDBStore({
			client: new DynamoDBClient(clientOptions)
		})
	})
);
あとは認可フロー(Authorization Code Flow)を回すための実装を追加するだけ。
import CustomHttpError from './lib/custom-http-error.js';
import CustomOpenidClient from './lib/custom-openid-client.js';
...
const { locals } = app;
locals.errors = { HttpError: CustomHttpError };
locals.authClient = await CustomOpenidClient.init({
	...config.get('auth'),
	client_id: process.env.CLIENT_ID,
	client_secret: process.env.CLIENT_SECRET,
	redirect_uri: process.env.REDIRECT_URI
});
import { strict as assert } from 'assert';
import camelcaseKeys from 'camelcase-keys';
import { Issuer, generators } from 'openid-client';

export default class CustomOpenidClient {
	constructor(options = {}) {
		this.issure = options.issure;
		this.client = options.client;
		this.scopes = options.scopes;
	}

	static async init(options = {}) {
		const camelcasedOptions = camelcaseKeys(options, { deep: true });
		const issure = await Issuer.discover(camelcasedOptions.issure);
		const client = new issure.Client({
			client_id: camelcasedOptions.clientId,
			client_secret: camelcasedOptions.clientSecret,
			redirect_uris: [camelcasedOptions.redirectUri],
			response_types: ['code']
		});
		return new CustomOpenidClient({
			issure,
			client,
			scopes: camelcasedOptions.scopes.join(' ')
		});
	}

	start() {
		const state = generators.state();
		const codeVerifier = generators.codeVerifier();
		const codeChallenge = generators.codeChallenge(codeVerifier);

		const authUrl = this.client.authorizationUrl({
			scope: this.scopes,
			state,
			code_challenge: codeChallenge,
			code_challenge_method: 'S256',
			prompt: 'select_account'
		});
		return { authUrl, state, codeVerifier };
	}

	async callback(options = {}) {
		const { req, state, codeVerifier } = options;

		const params = this.client.callbackParams(req);
		const tokenSet = await this.client.callback(
			this.client.redirect_uris[0],
			params,
			{ response_type: 'code', state, code_verifier: codeVerifier }
		);
		return camelcaseKeys(tokenSet.claims());
	}
}
import express from 'express';

const router = express.Router();

router.get('/token', async (req, res) => {
	const { session } = req;
	const {
		errors: { HttpError }
	} = req.app.locals;

	try {
		if (!session || !session.email)
			throw new HttpError(404, 'Session does not exists.');
		return res.status(200).json({ token: session.id });
	} catch (e) {
		return res.status(500).error(e);
	}
});

router.get('/login', async (req, res) => {
	const {
		session,
		app: {
			locals: { authClient, nodeEnv }
		},
		query: { url }
	} = req;

	if (session.userId)
		res.redirect(nodeEnv !== 'development' ? `/${nodeEnv}/home` : '/home');

	const { authUrl, state, codeVerifier } = authClient.start();
	if (url && url.startsWith('/') && !url.startsWith('/auth/login'))
		session.redirectUrl = url;
	session.state = state;
	session.codeVerifier = codeVerifier;
	await new Promise((resolve, reject) => {
		session.save((err) => {
			if (err) reject(err);
			resolve('');
		});
	});

	return res.redirect(authUrl);
});

router.get('/callback', async (req, res) => {
	const { session } = req;
	const {
		errors: { HttpError },
		authClient
	} = req.app.locals;

	try {
		if (session.state !== req.query.state)
			throw new HttpError(400, 'Invalid state.');

		const { email, name } = await authClient.callback({
			req,
			state: session.state,
			codeVerifier: session.codeVerifier
		});

		const regenerate = (oldSession) => {
			return new Promise((resolve, reject) => {
				oldSession.regenerate((err) => {
					if (err) throw reject(err);
					const { session: newSession } = req;
					newSession.email = email;
					newSession.name = name;
					resolve(newSession);
				});
			});
		};
		await regenerate(session);

		return res.redirect(`${session.redirectUrl || '/home'}`);
	} catch (e) {
		return res.status(500).error(e);
	}
});

export default router;
(Expressのルーターの実装を少し端折っているが)これで以下のようにログインセッション(今回はセッションにemailがあるか?でログイン済みかを判定する事にしている)の有無で認証を行うか?をチェックし、未認証であれば認可フローで認証を行うという事ができる。
| 1 | 2 |
|---|---|
| 未ログインの場合の認可リクエスト | 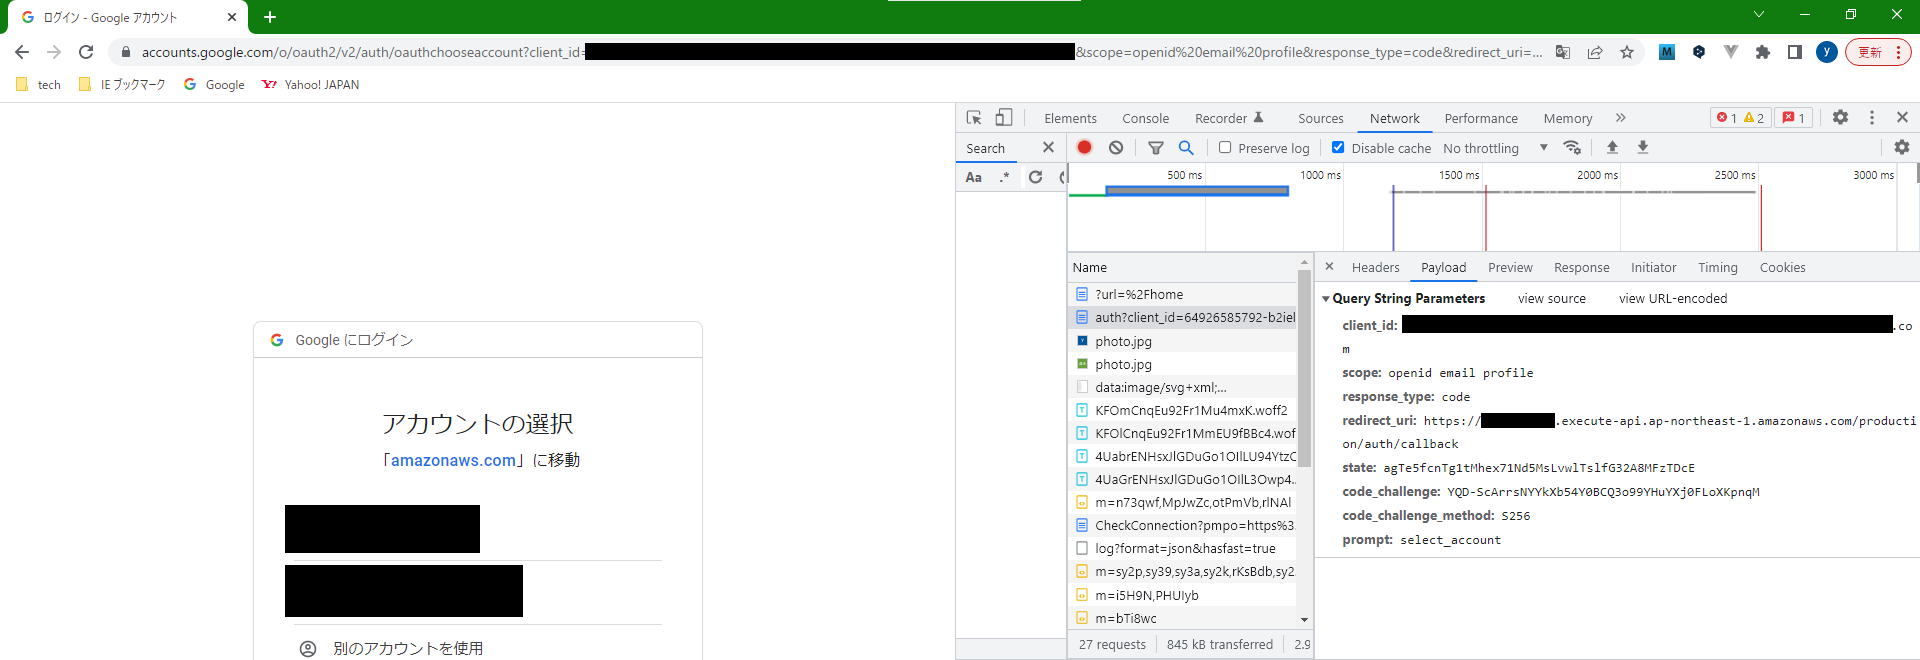 |
| ログイン済みの場合 | 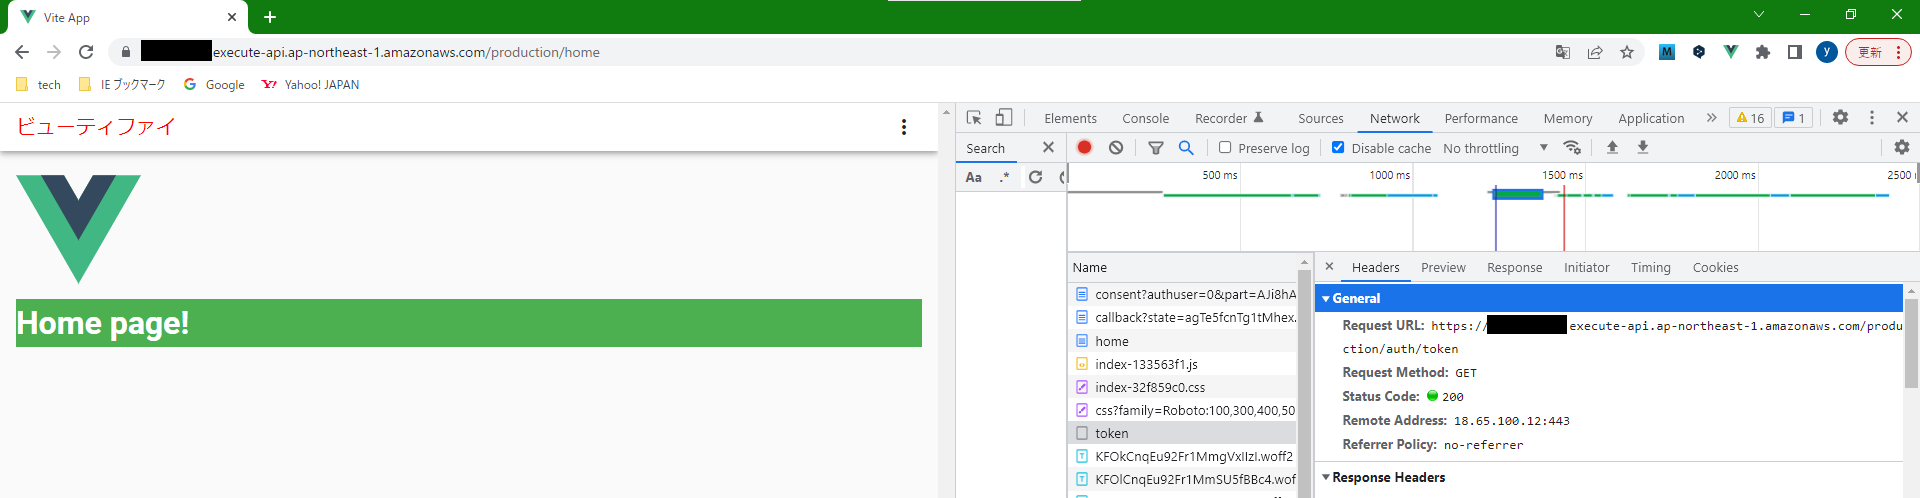 |
	try {
		if (!session || !session.email)
			throw new HttpError(404, 'Session does not exists.');
		return res.status(200).json({ token: session.id }); // 後編で詳細は触れるが、CookieがあればブラウザからGETリクエストを叩けるのはよろしくないので、セッションIDをAuthorizationヘッダーのBearerに渡す、という実装ができるようにするために返している
	} catch (e) {
		return res.status(500).error(e);
	}
AWSにDeployする際には、以下のようにLambdaに対してDynamoDBへのアクセスを許可するIAMロールの設定が必要になる(今回テーブルはサーバーレスの中で作成するので、以下の権限にCreateTableを含めていない)。
provider:
  ...
  iam:
    role:
      statements:
        - Effect: Allow
          Action:
            - dynamodb:DescribeTable
            - dynamodb:PutItem
            - dynamodb:DeleteItem
            - dynamodb:GetItem
            - dynamodb:Scan
            - dynamodb:UpdateItem
          Resource:
            - !GetAtt dynamodbSessionTable.Arn
※connect-dynamodbではライブラリの中で自前でTTL管理を行う実装があるが、DynamoDBに標準で備わっている機能を利用すべきだろう。そのため、テーブルの作成はserverless.yamlのresources.Resourcesで行うようにした。
※サーバーレスをローカルでエミュレーションして開発する場合には、API Gatewayのstageを考慮して各パスを設定する必要がある。今回は以下のようにして、サーバーレスでエミュレーションしてLambdaで起動する場合と、単にExpressのapp.listen()で起動する場合とで共存して開発できるようにした(以下のコードはフロントエンドのVue routerのコード)。vite build --mode localdevの場合やvite build時のみimport.meta.env.MODE !=== 'development'になるので、vite時にはパスにmodeが含まれないで起動できる(modeをAPI Gatewayのstageに対応させるイメージ)。
...
const mode = import.meta.env.MODE;
const tokenEndpoint =
	mode && mode !== 'development' ? `/${mode}/auth/token` : '/auth/token';
const loginEndpoint =
	mode && mode !== 'development' ? `/${mode}/auth/login` : '/auth/login';

const router = createRouter({
	history: createWebHistory(import.meta.env.BASE_URL),
	routes: [
		{
			path: loginEndpoint,
			redirect: (to) => {
				const { url } = to.query;
				window.location.href = url
					? `${loginEndpoint}/?${qs.stringify({ url })}`
					: `${loginEndpoint}/`;
			}
		},
		...
	]
});

// eslint-disable-next-line no-unused-vars
router.beforeEach(async (to, from) => {
	const commonStore = useCommonStore();
	const { initCustomAxios } = commonStore;

	if (to.meta.requiresAuth) {
		try {
			const {
				data: { token: accountToken }
			} = await axios.get(tokenEndpoint);
			initCustomAxios(accountToken);
		} catch (e) {
			return {
				path: loginEndpoint,
				query: { url: to.path }
			};
		}
	}

	return true;
});

export default router;
※認可フローのscopeにopenid email profileを設定してIDトークンを取得して認証に利用しているのは、Implicit Flowではresponse_mode=form_postを指定してリダイレクトURLに対してHTMLのformのPOSTリクエストを送信するようにできるが、CookieのSameSiteとの相性が悪いため。具体的には、ChromeではデフォルトでSameSiteがLaxになるので、クロスドメインでのPOST時にCookieがセットされない。そのためOAuth0 : Browser cookie changesにあるようにSameSiteをnoneにしてsecureをtrueにするなどで回避する必要が出てくる。その辺りが面倒だったり、他のサービスでも認証に認可フローでscopeにopenidやemailを設定してIDトークンを取得しているものが多くみられるのでImplicit Flowにしていない(今回はローカル環境でもNginxを間に入れてHTTPSにしているので面倒ではないのだが)。
まとめ
今回はServerless ExpressでVue3+ExpressのWebアプリケーションをさくっとDeployして触れるようにする(PoC開発をする)の前編として、セッション管理の仕組みを導入する部分までをやってみた。カスタムドメインを設定するまでをやればAPI GatewayのURLを直に叩く必要がなくなるが、PoCレベルであればAPI GatewayのURLにアクセスでもまあ許容されるだろう。
次回、ログインセッションを持った状態でREST APIを呼び出せるようにする実装を、今回の記事の後編としてやってみる。
おまけ
Lambda Authorizerについて
API Gatewayのリソースポリシーではなく、Lambda Authorizerでアクセス制御をできないか?を検討していたが、うまくいかなかった。その時の備忘録を残しておく。
まず基本的にAuthorizerなので、Request Headerの何らからの項目が"identitySource"に設定されている必要がある(identitySourceを省略した場合のデフォルトのidentitySourceはAuthorizationヘッダー)。そのため、API Gateway v1でもv2でもidentitySourceを省略する事はできない。
serverless offlineでエミュレーションする場合でもそれば同じで、identitySourceを未設定でリクエストを送ると、API GatewayはリクエストヘッダーにAuthorizationがあり空でない事を保証するので、それがない場合には以下のようなエラーになる(Lambda Authorizerが起動する前にエラーになる)。

つまり、ブラウザからのリクエストに対してのアクセス制御にLambda Authorizerを利用するのは現実的ではないだろう(ブラウザからのリクエスト時にAuthorizationヘッダーを追加するのは不可能)。一応、identitySourceを"Hostヘッダー"にするなどブラウザからのリクエストに必ず含まれているリクエストヘッダーを指定する事はできるので、Lambda Authorizerの起動前にエラーにならないようにはできる。つまり、Lambda内でカスタムの認証ロジックを実装する事はできなくはないが、そこまでするのであればWAFとかを素直に入れるべきという話になるだろう。
provider:
  ...
  httpApi:
    authorizers:
      customAuthorizer:
        type: request
        functionName: customAuthorizer
        identitySource:
          - $request.header.Host

functions:
  sls-express:
    name: sls-express-lambda-${sls:stage}
    handler: ./srv/lambda.handler
    timeout: 5
    environment:
      ENV: ${file(./env/${self:provider.stage}.json):ENV}
    events:
      # HTTP API endpoint (API Gateway v2)
      - httpApi:
          method: GET
          path: /{any+}
          authorizer:
            name: customAuthorizer
  customAuthorizer:
    handler: ./srv/authorizer.handler