前回までは、ブログ記事投稿フォームなどの管理画面側を実装してきました。今回からは、主に投稿したブログ記事を表示する、フロント側の処理を実装していきます。まずは、ブログトップページの表示を実装します。
ルーティングの追加
ブログを表示するURL(ルーティング)を追加します。routes/web.php を開いて下記一行を追加します。
Route::get('/', 'FrontBlogController@index')->name('front_index');
ブログトップページ、すなわち http://{ホスト名}/ と入力すれば、FrontBlogController の index メソッドを実行する、という設定にします。
コントローラーの作成
フロント側の処理を書いていくので、FrontBlogController という名前のコントローラークラスを作成します。Laravel ホームディレクトリに移動して、下記 artisan コマンドを打って、コントローラーを作成します。
php artisan make:controller FrontBlogController
そうすると、app/Http/Controllers/FrontBlogController.php ができるので、それを開いて下記のように編集します。
<?php

namespace App\Http\Controllers;

use App\Models\Article;

class FrontBlogController extends Controller
{
    /** @var Article */
    protected $article;

    // 1ページ当たりの表示件数
    const NUM_PER_PAGE = 10;

    function __construct(Article $article)
    {
        $this->article = $article;
    }

    /**
     * ブログトップページ
     *
     * @return \Illuminate\Contracts\View\Factory|\Illuminate\View\View
     */
    function index()
    {
        // ブログ記事一覧を取得
        $list = $this->article->getArticleList(self::NUM_PER_PAGE);
        return view('front_blog.index', compact('list'));
    }
}
前回実装した、管理画面側の記事一覧ページを表示する処理とほぼ同じですね。
View テンプレートの作成
続いてブログトップページの View テンプレートを、継承を使って作成していきます。
まずは「親」テンプレートを作成します。resources/views/front_blog/app.blade.php ファイルを(front_blogディレクトリも含めて)作成して、下記のように編集します。
<!DOCTYPE html>
<html lang="ja">
<head>
    <meta charset="UTF-8">
    <title>@yield('title')</title>
    <link rel="stylesheet" href="{{ asset('/css/bootstrap.min.css') }}">
    <link rel="stylesheet" href="{{ asset('/css/blog.css') }}">
</head>

<body>
@yield('body')
</body>
</html>
resources/views/admin_blog/app.blade.php と同じですね。
では、続いて「子」テンプレートを作成します。resources/views/front_blog/index.blade.php ファイルを作成して、下記のように編集します。
@extends('front_blog.app')
@section('title', '私のブログ')

@section('body')
    <div class="container">
        <div class="row">
            <div class="col-md-10 col-md-offset-1">
                <h2><a href="{{ route('front_index') }}">私のブログ</a></h2>
            </div>

            <div class="col-md-8 col-md-offset-1">
                {{--forelse ディレクティブを使うと、データがあるときはループし、無いときは @empty 以下を実行する--}}
                @forelse($list as $article)
                <div class="panel panel-default">
                    <div class="panel-heading">
                        {{--post_date は日付ミューテタに設定してあるので、自動的に Carbon インスタンスにキャストされる--}}
                        <h3 class="panel-title">{{ $article->post_date->format('Y/m/d(D)') }} {{ $article->title }}</h3>
                    </div>
                    <div class="panel-body">
                        {{--nl2br 関数で改行文字を <br> に変換する。これをエスケープせずに表示させるため {!! !!} で囲む--}}
                        {{--ただし、このまま出力するととても危険なので e 関数で htmlspecialchars 関数を通しておく--}}
                        {!! nl2br(e($article->body)) !!}
                    </div>
                    <div class="panel-footer text-right">
                        {{--updated_at も日付ミューテタに設定してあるので Carbon インスタンスにキャストされる--}}
                        {{ $article->updated_at->format('Y/m/d H:i:s') }}
                    </div>
                </div>
                @empty
                    <p>記事がありません</p>
                @endforelse

                {{ $list->links() }}
            </div>
        </div>
    </div>
@endsection
ここまでできたら、http://{ホスト名}/ を開いてみて、ブログ記事が表示されるかどうか、試してみてください。
続いて、ブログの機能としてよく見られる、とある月に書かれたブログ記事をまとめて表示する、月別の表示(月別アーカイブ)を実装します。
月別アーカイブ用パラメータ
ルーティングはそのままで、下記のようにパラメータを付けることで、月別表示に対応します。
| パラメータ名 | 意味 | 備考 |
|---|---|---|
| year | 対象年 | 対象年月を指定するときは必須 |
| month | 対象月 | 任意のパラメータとする |
例えば、
http://{ホスト名}/?year=2018&month=7 なら2018年7月の記事を
http://{ホスト名}/?year=2017なら2017年の記事を表示するという意味です。
http://{ホスト名}/?month=7という month のみ指定するのはNGにしておきます。
リクエストクラスの作成
パラメータを扱うので、リクエストクラスを作成して、バリデーションの設定をします。Laravel ホームディレクトリで、下記 artisan コマンドを実行して、フロント用のリクエストクラス app/Http/Requests/FrontBlogRequest.php を作成します。
php artisan make:request FrontBlogRequest
作成されたファイルを開いて、下記のように編集します。
<?php

namespace App\Http\Requests;

use Illuminate\Foundation\Http\FormRequest;

class FrontBlogRequest extends FormRequest
{
    /**
     * Determine if the user is authorized to make this request.
     *
     * @return bool
     */
    public function authorize()
    {
        return true;
    }

    /**
     * Get the validation rules that apply to the request.
     *
     * @return array
     */
    public function rules()
    {
        return [
            'year'  => 'integer',
            'month' => 'integer',
        ];
    }

    public function messages()
    {
        return [
            'year.integer'  => '年は整数にしてください',
            'month.integer' => '月は整数にしてください',
        ];
    }
}
対象年月パラメータが整数かどうかをチェックするだけの、シンプルなコードですね。
モデルの編集
続いて app/Models/Article.php を開いて getArticleList メソッドを下記のように編集し、getMonthList メソッドを追加します。
    /**
     * 記事リストを取得する
     *
     * @param  int   $num_per_page 1ページ当たりの表示件数
     * @param  array $condition    検索条件
     * @return Illuminate\Pagination\LengthAwarePaginator
     */
    public function getArticleList(int $num_per_page = 10, array $condition = [])
    {
    	// パラメータの取得
        $year  = array_get($condition, 'year');
        $month = array_get($condition, 'month');

        $query = $this->orderBy('article_id', 'desc');

        // 期間の指定
        if ($year) {
            if ($month) {
                // 月の指定がある場合はその月の1日を設定し、Carbonインスタンスを生成
                $start_date = Carbon::createFromDate($year, $month, 1);
                $end_date   = Carbon::createFromDate($year, $month, 1)->addMonth();     // 1ヶ月後
            } else {
                // 月の指定が無い場合は1月1日に設定し、Carbonインスタンスを生成
                $start_date = Carbon::createFromDate($year, 1, 1);
                $end_date   = Carbon::createFromDate($year, 1, 1)->addYear();           // 1年後
            }
            // Where句を追加
            $query->where('post_date', '>=', $start_date->format('Y-m-d'))
                  ->where('post_date', '<',  $end_date->format('Y-m-d'));
        }

        // paginate メソッドを使うと、ページネーションに必要な全件数やオフセットの指定などは全部やってくれる
        return $query->paginate($num_per_page);
    }

    /**
     * 月別アーカイブの対象月のリストを取得
     *
     * @return Illuminate\Database\Eloquent\Collection Object
     */
    public function getMonthList()
    {
        // selectRaw メソッドを使うと、引数にSELECT文の中身を書いてそのまま実行できる
        // 返り値はコレクション(Illuminate\Database\Eloquent\Collection Object)
        // コレクションとは配列データを操作するための便利なラッパーで、多種多様なメソッドが用意されている
        $month_list = $this->selectRaw('substring(post_date, 1, 7) AS year_and_month')
            ->groupBy('year_and_month')
            ->orderBy('year_and_month', 'desc')
            ->get();

        foreach ($month_list as $value) {
            // YYYY-MM をハイフンで分解して、YYYY年MM月という表記を作る
            list($year, $month) = explode('-', $value->year_and_month);
            $value->year  = $year;
            $value->month = (int)$month;
            $value->year_month = sprintf("%04d年%02d月", $year, $month);
        }
        return $month_list;
    }
getArticleList メソッドの引数に、検索条件を格納した配列を追加して、その中にパラメータ year month が存在すれば、クエリビルダの where メソッドで検索条件を追加していきます。
getMonthList メソッドは、既存記事の post_date から、何年の何月に記事の投稿があるか、そのリストを取得するメソッドです、下記のSQLを実行することで、ブログ記事を post_date の年月でまとめています。
SELECT
    substring(post_date, 1, 7) AS year_and_month -- substring で YYYY-MM の部分だけ切り出し
FROM
    articles
WHERE
    deleted_at is NULL
GROUP BY
    year_and_month
ORDER BY
    year_and_month desc
それから、getMonthList メソッドに出てくる「コレクション」ですが、「コレクション」とは、配列データを操作するための多くの便利なメソッドが定義されているラッパークラスです。
Eloquent で取得したレコードが複数ある場合は、このコレクションインスタンスに、その結果(レコード)が詰められた状態で返ってきます。詳細は日本語ドキュメントを参照してください。
コントローラーの編集
それでは、パラメータに対応した記事を取得して View テンプレートに渡す処理を実装していきます。app/Http/Controllers/FrontBlogController.php を開いて index メソッドを下記のように編集します。
use App\Http\Requests\FrontBlogRequest;

...(中略)...

    /**
     * ブログトップページ
     *
     * @param FrontBlogRequest $request
     * @return \Illuminate\Contracts\View\Factory|\Illuminate\View\View
     */
    function index(FrontBlogRequest $request)
    {
        // パラメータを取得
        $input = $request->input();

        // ブログ記事一覧を取得
        $list = $this->article->getArticleList(self::NUM_PER_PAGE, $input);
        // ページネーションリンクにクエリストリングを付け加える
        $list->appends($input);
        // 月別アーカイブの対象月リストを取得
        $month_list = $this->article->getMonthList();
        return view('front_blog.index', compact('list', 'month_list'));
    }
変更点は、作成した FrontBlogRequest クラスを、メソッドの引数に指定して、フォームリクエストバリデーションを設定していることと、パラメータを取得して、getArticleList メソッドに渡していること、ページネーションリンクにクエリストリングを付け加える処理、月別アーカイブの対象月リストを取得して、テンプレートに渡しているところですね。
ページネーションリンクについてですが、year=2018 というクエリストリングを追加する場合は、下記のように設定します。
$list->appends(['year' => 2018]);
$input にはパラメータが連想配列で入っていて、これがそのままクエリストリングになればよいので、そのまま引数として渡しています($input にpageパラメータが含まれていても、うまく調整してくれるようです)。※2018/07/28追記
View テンプレートの編集
さて、View テンプレートですが、レイアウトを2カラムにしたいと思います。左カラムはメインカラムとして、各ページのコンテンツを表示し、右カラムはどのページでも表示するサブカラムとして、月別アーカイブのリンクなどの情報を表示したいと思います。
まずは、親テンプレートから編集していきます。resources/views/front_blog/app.blade.php を開いて、下記のように編集します。
<!DOCTYPE html>
<html lang="ja">
<head>
    <meta charset="UTF-8">
    <title>@yield('title')</title>
    <link rel="stylesheet" href="{{ asset('/css/bootstrap.min.css') }}">
    <link rel="stylesheet" href="{{ asset('/css/blog.css') }}">
</head>

<body>
<div class="container">
    <div class="row">
        <div class="col-md-10 col-md-offset-1">
            <h2><a href="{{ route('front_index') }}">私のブログ</a></h2>

            {{--何らかのエラー表示用--}}
            @if ($errors->any())
                <div class="alert alert-danger">
                    <ul>
                        @foreach ($errors->all() as $error)
                            <li>{{ $error }}</li>
                        @endforeach
                    </ul>
                </div>
            @endif
        </div>

        {{--メインカラム--}}
        @yield('main')
        {{--右サブカラム--}}
        {{--@include ディレクティブで他のテンプレートを読み込むこともできる--}}
        @include('front_blog.right_column')
    </div>
</div>
</body>
</html>
<body> タグ内のメインカラム部分だけを、子テンプレートの main セクションに記述するような形にしています。右サブカラムの HTML を、親テンプレートに書くと、なんとなく気持ちが悪いので、別テンプレートに記述して、それを @include ディレクティブで読み込む形にします。
では、resources/views/front_blog/right_column.blade.php を新規に作成して、右サブカラムのHTMLを書いていきます。
{{--右カラム--}}
<div class="col-md-2">
    <div class="panel panel-default">
        <div class="panel-heading">
            <h3 class="panel-title">月別アーカイブ</h3>
        </div>
        <div class="panel-body">
            <ul class="monthly_archive">
                @forelse($month_list as $value)
                    <li>
                        <a href="{{ route('front_index', ['year' => $value->year, 'month' => $value->month]) }}">
                            {{ $value->year_month }}
                        </a>
                    </li>
                @empty
                    <p>記事がありません</p>
                @endforelse
            </ul>
        </div>
    </div>
</div>
ここでは、月別アーカイブを表示するHTMLを記述しました。
最後に resources/views/front_blog/index.blade.php を開いて、下記のように編集します。
@extends('front_blog.app')
@section('title', '私のブログ')

@section('main')
    <div class="col-md-8 col-md-offset-1">
        {{--forelse ディレクティブを使うと、データがあるときはループし、無いときは @empty 以下を実行する--}}
        @forelse($list as $article)
            <div class="panel panel-default">
                <div class="panel-heading">
                    {{--post_date はモデルクラスで $dates プロパティに指定してあるので、自動的に Carbon インスタンスにキャストされる--}}
                    <h3 class="panel-title">{{ $article->post_date->format('Y/m/d(D)') }} {{ $article->title }}</h3>
                </div>
                <div class="panel-body">
                    {{--nl2br 関数で改行文字を <br> に変換する。これをエスケープせずに表示させるため {!! !!} で囲む--}}
                    {{--ただし、このまま出力するととても危険なので e メソッドで htmlspecialchars 関数を通しておく--}}
                    {!! nl2br(e($article->body)) !!}
                </div>
                <div class="panel-footer text-right">
                    {{--updated_at も同様に自動的に Carbon インスタンスにキャストされる--}}
                    {{ $article->updated_at->format('Y/m/d H:i:s') }}
                </div>
            </div>
        @empty
            <p>記事がありません</p>
        @endforelse

        {{ $list->links() }}
    </div>
@endsection
元々、<body> タグの中身が全て書いてあったので、それをメインカラムの部分だけに削減した形ですね。
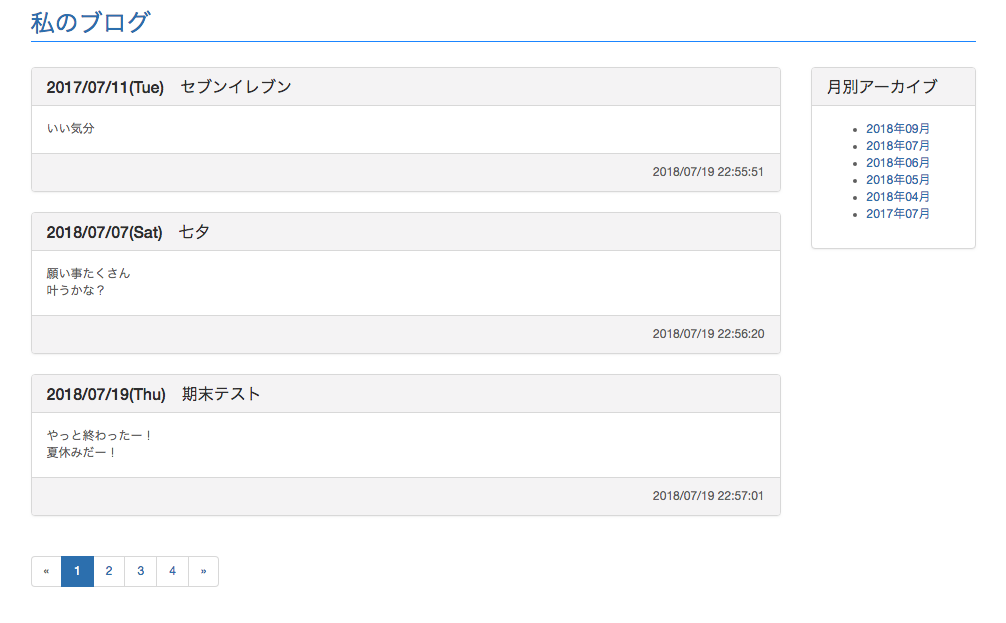
ここまでできたら、実際に画面を表示して、ブログが表示されること、月別表示がちゃんと機能することを確認してください。うまくいけば、下記のような画面になります。(1ページあたりの表示件数を3件にしたときの表示です)