Blender Advent Calendar 2020の空き空欄を埋めるため
以前に公開したスクリプトの2.8対応版を記事にしてみます
選択したオブジェクトを前後左右からレンダリングして、
1枚の画像に合成するスクリプトです、
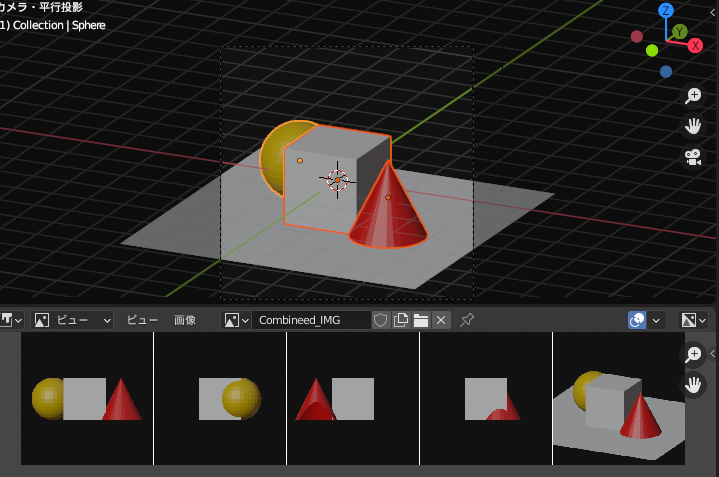
3Dビューで選択している形状が収まるようにカメラの設定を調整して
前後左右平行投影でのレンダリングと 現在のカメラ設定でレンダリングした画像を作成し [Combineed_IMG]という名前で横に並べた画像を作成します
メッシュオブジェクトを選択していないとエラーになるので注意してください
render_around.py
import bpy
import math
import os
import numpy as np
import mathutils
# レンダリングの幅を固定
render_width = 300


# レンダリング画像の保存パス
render_path = bpy.context.scene.render.filepath

def render_func(context):
    #シーンで使用しているカメラ
    camera = context.scene.camera
    if len(context.selected_objects) == 0: return
    ###############################
    ###########設定の退避###########
    ##レンダリングサイズ
    render = context.scene.render
    ref_render_x = render.resolution_x
    ref_render_y = render.resolution_y
    ref_render_percentage =render.resolution_percentage
    ##カメラタイプ(透視投影,平行投影など)
    ref_camera_type = camera.data.type
    ##位置
    ref_location = camera.location.copy()
    ref_rotate = camera.rotation_euler.copy()
    ##################################

    ##オブジェクトモードに
    bpy.ops.object.mode_set(mode = 'OBJECT')
    #bpy.ops.object.select_all(action="DESELECT")
    ##################################
    ##カメラ設定
    ###レンダリングサイズ
    (bbox_width, center_pos) = get_bound_data(context)
    set_render_size(context, bbox_width)
    #初期状態でレンダリング
    bpy.ops.render.render()
    #保存
    f_name = "view4.png"
    seve_render(f_name)
    ###平行投影
    camera.data.type = 'ORTHO'
    #平行投影のスケールを設定(幅がBU基準)
    camera.data.ortho_scale = max(bbox_width)*1.2
    #カメラ位置を(0, -10, 0.3) 回転を(90°, 0, 0)に
    camera_pos =get_camera_pos_top(bbox_width, center_pos)
    camera.location = camera_pos
    camera.rotation_euler = (math.radians(90.0), 0, 0)
    #########################################
    pos = mathutils.Vector((camera_pos))
    mat_rot1 = mathutils.Matrix.Rotation(math.radians(90.0), 4, 'Z')
    mat_trs = mathutils.Matrix.Translation(mathutils.Vector(center_pos))
    mat_rot = mat_trs *mat_rot1 *mat_trs.inverted()
    for i in range(4):
        #レンダリング
        bpy.ops.render.render()
        #保存
        f_name = "view%s.png" % i
        seve_render(f_name)
        #90度回転
        pos = mat_rot @ pos
        camera.location = pos
        cam_rot = (math.radians(90.0), 0, math.radians(90.0)*(i+1))
        camera.rotation_euler = cam_rot
    ##################################
    ###########設定の書き戻し###########
    ###レンダリングサイズ
    render.resolution_x = ref_render_x
    render.resolution_y = ref_render_y
    render.resolution_percentage = ref_render_percentage
    ##カメラタイプ
    camera.data.type = ref_camera_type
    ##位置
    camera.location = ref_location
    camera.rotation_euler = ref_rotate
    #########################################
    combine_image(render_path)

# 選択形状から描画範囲のデータを取得(中心点, 幅)
def get_bound_data(context):
    objects = context.selected_objects
    bb_point_list = []
    #選択形状のbbox値をグローバル座標で取得
    for obj in objects:
        if obj.type != 'MESH':continue
        bbox_list = [mathutils.Vector(v[:]) for v in obj.bound_box]
        mat = obj.matrix_world
        bb_point_list += [mat@v for v in bbox_list]
    #範囲を取得
    bbox_width = []
    center_pos = []
    for i in range(3):
        min_i = min(bb_point_list, key = (lambda x: x[i]))[i]
        max_i = max(bb_point_list, key = (lambda x: x[i]))[i]
        bbox_width.append( max_i - min_i )
        center_pos.append( (max_i + min_i)/2 )
    return(bbox_width, center_pos)
# レンダリングサイズの設定(幅を固定)
def set_render_size(context, bbox_width):
    render = context.scene.render
    #print(bbox_width)
    #縦の長さを取得
    render_height = int(render_width*(bbox_width[2]/max(bbox_width[:2])))
    if render_height < render_width:  render_height = render_width
    render.resolution_x = render_width
    render.resolution_y = render_height
    render.resolution_percentage = 100
# 正面画像レンダリング用のカメラ位置を設定
def get_camera_pos_top(bbox_width, center_pos):
    distance = max(bbox_width)
    return(center_pos[0], center_pos[1]-distance,center_pos[2])
# 画像の保存
def seve_render(f_name):
    img_path = os.path.join(render_path,f_name)
    bpy.data.images['Render Result'].save_render(filepath=img_path)

# 画像の読み込み
def load_tex(f_path):
    img = bpy.data.images.load(f_path)
    return(img)

# rgbaの画像をnparrayに変換
def img_to_nparray(img):
    bit_len = len(img.pixels)
    (width,height) = img.size
    channels = img.channels #色数
    #numpy arrayを作成
    pixlist = np.array(img.pixels)
    pixlist = pixlist.reshape( height, width, 4)
    return( pixlist )

# 結合処理
def combine_image(render_path):
    width = 0
    height = 0
    image_list = []
    for i in range(5):
        f_name = "view%s.png" % i
        img_path = os.path.join(render_path,f_name)
        img = load_tex(img_path)
        image_list.append(img)
        width += img.size[0]
        height = max(height, img.size[1])
    combine_img_np = np.zeros((height, width, 4))
    offset = 0
    for img in image_list:
        #読み込んだ画像をnumpy配列に
        np_array = img_to_nparray(img)
        (height, width, deps) = np_array.shape
        #結合処理
        combine_img_np[0:height, offset:offset + width] = np_array
        combine_img_np[:,offset] = np.ones(4)
        offset += width
    #numpy配列からBlender画像データオブジェクトを作成
    img_name = 'Combineed_IMG'
    (height, width, deps) = combine_img_np.shape
    image_object = bpy.data.images.new(name=img_name, width=width, height=height)
    image_object.pixels = list(combine_img_np.flatten())
    for img in image_list:
        bpy.data.images.remove(img)

render_func(bpy.context)
以前のバージョンのものを 2.8以降の対応と多少のバグフィックスをしてあります。