はじめに
本記事は、「Ruby on Rails6.0」の環境構築から新規プロジェクト作成までの手順を自分用にまとめたものです。
また、前回の投稿記事「クラウド開発環境構築(メモ)」で作成した環境を前提に作成しています。
前提条件
- クライアントはWindows環境
- 開発環境はCloud9
- Linuxコマンドの使い方がわかる
- Rubyの基本ぐらいはわかる
参考記事
RVMとは?(RVMを利用したRubyのインストール)
シェルを再起動させる簡単な方法
Ruby Version Manager (RVM)【外部サイト】
rvmコマンドを使用した際に受けたWarning! PATH is not properly set up, ... is not at first placeという警告
RailsGirls_day.2-2_reretry【外部サイト】
【備忘録】Ruby on Railsでのエラーメッセージ【外部サイト】
CentOS環境でRails6.0をSQLite3 (>=3.8)で動かす
The dependency tzinfo-data〜【外部サイト】
Rails6サーバー起動時webpackerエラー(Node.jsアップデート, yarnインストール)
Ruby関連のインストールとアップデート
まずはgemのアップデートを実施します。
$ gem update --system

Updating rubygems-update
Fetching: rubygems-update-3.0.6.gem (100%)
ERROR:  Error installing rubygems-update:
        rubygems-update requires Ruby version >= 2.3.0.
ERROR:  While executing gem ... (NoMethodError)
    undefined method `version' for nil:NilClass
Ruby本体のバージョンが古いと叱られたのでRubyのアップデート作業を開始します。
他のサイトを軽く見てみるとcloud9は「RVM」でバージョンを上げる記事が多いので「RVM」で作業を開始します。
- 【RVM】
- RVMは複数のRuby実行環境を管理するためのツールで「Ruby Version Manager」とも言います。
RVMを使用する事で、インストール・管理・操作等が簡単に行えるようになります。
詳しい情報などはサイトで確認してください。
| 現行 | 予定 |
|---|---|
| 2.0.0 | 2.3.0以上へ |
とりあえずどのバージョンまでアップデートできるのか確認してみます。
$ rvm list known

-bash: rvm: command not found
まあ当然といえば当然ですが「RVM」もインストールされていないようなので「RVM」をインストールを作業開始します。
# gpg2 --recv-keys 409B6B1796C275462A1703113804BB82D39DC0E3 7D2BAF1CF37B13E2069D6956105BD0E739499BDB

gpg: requesting key D39DC0E3 from hkp server keys.gnupg.net
gpg: requesting key 39499BDB from hkp server keys.gnupg.net
gpg: /root/.gnupg/trustdb.gpg: trustdb created
gpg: key D39DC0E3: public key "Michal Papis (RVM signing) <mpapis@gmail.com>" imported
gpg: key 39499BDB: public key "Piotr Kuczynski <piotr.kuczynski@gmail.com>" imported
gpg: no ultimately trusted keys found
gpg: Total number processed: 2
gpg:               imported: 2  (RSA: 2)

# \curl -sSL https://get.rvm.io | bash -s stable

Downloading https://github.com/rvm/rvm/archive/1.29.9.tar.gz
Downloading https://github.com/rvm/rvm/releases/download/1.29.9/1.29.9.tar.gz.asc
gpg: Signature made Wed 10 Jul 2019 05:31:02 PM JST using RSA key ID 39499BDB
gpg: Good signature from "Piotr Kuczynski <piotr.kuczynski@gmail.com>" [unknown]

【以下省略】

  Donate: https://opencollective.com/rvm/donate

# \curl -sSL https://get.rvm.io | bash -s stable --rails

Downloading https://github.com/rvm/rvm/archive/1.29.9.tar.gz
Downloading https://github.com/rvm/rvm/releases/download/1.29.9/1.29.9.tar.gz.asc
gpg: Signature made Wed 10 Jul 2019 05:31:02 PM JST using RSA key ID 39499BDB

【以下省略】
  * To start using RVM you need to run `source /usr/local/rvm/scripts/rvm`
    in all your open shell windows, in rare cases you need to reopen all shell windows.

  * To start using rails you need to run `rails new <project_dir>`.
最後の説明にRVMを使用するために記載されているコマンドを実行するよう指示がありましたので実行します。
# source /usr/local/rvm/scripts/rvm
インストールが完了したようなので再度バージョン確認を実行します。
# rvm list known

[ruby-]1.8.6[-p420]
[ruby-]1.8.7[-head] # security released on head
[ruby-]1.9.1[-p431]
[ruby-]1.9.2[-p330]
【以下省略】
問題なく動くことを確認できましたので、とりあえずruby本体を最新へアップデートします。
# rvm install ruby-head

Checking requirements for amazon.
Requirements installation successful.
Installing Ruby from source to: /usr/local/rvm/rubies/ruby-head,

【以下省略】

Install of ruby-head - #complete
Ruby was built without documentation, to build it run: rvm docs generate-ri
rubyのバージョンを確認します。
# ruby -v

ruby 2.7.0dev (2019-11-14T18:56:58Z trunk 018be445e9) [x86_64-linux]
無事最新のrubyがインストールできたようですので次に再度gemのアップデートを実施します。
# gem update --system

Latest version already installed. Done.
よく見るとruby本体インストール時のコンソールに「Installed rubygems 3.1.0.pre3 is newer」とありました。
そのためgemのアップデート作業は実は不要だったようです。
続いてBundlerのインストールを実施します。
# gem install bundler

Fetching bundler-2.0.2.gem
Successfully installed bundler-2.0.2
Parsing documentation for bundler-2.0.2
Installing ri documentation for bundler-2.0.2
Done installing documentation for bundler after 2 seconds
1 gem installed
Bundlerのバージョンを確認します。
# bundle -v

Bundler version 2.1.0.pre.3
作業用ユーザー環境の不備修正(?)
ここでプロジェクトを作成するために一旦作業用ユーザーに戻ってみるとrubyのバージョンがアップデート前に戻っている事に気づきました。
rootユーザーで作業していたからパス等が古い方を見ているのかな?と考え一度再起動を実施します。
$ sudo shutdown -r now
再起動後、各種バージョンを再確認します。
$ ruby -v

ruby 2.6.3p62 (2019-04-16 revision 67580) [x86_64-linux]

$ gem -v
3.0.6

$ bundle -v

Bundler version 1.17.3

$ rvm -v

Warning! PATH is not properly set up, /usr/local/rvm/gems/ruby-2.6.3/bin is not at first place.
         Usually this is caused by shell initialization files. Search for PATH=... entries.
         You can also re-add RVM to your profile by running: rvm get stable --auto-dotfiles
         To fix it temporarily in this shell session run: rvm use ruby-2.6.3
         To ignore this error add rvm_silence_path_mismatch_check_flag=1 to your ~/.rvmrc file.
(???)以前よりはバージョンはアップしていましたが基本全部バージョンが下がっています。
rubyの2.7.0はプレビュー版ですので無理に上げる必要はないとしてもRVMは警告が出ています。
まずはRVMの設定見直しを実施します。
警告メッセージのPATHについてはこの段階ではよくわからなかったので、警告に出ているコマンドを順次試していきます。
$ rvm get stable --auto-dotfiles

Warning! PATH is not properly set up, /usr/local/rvm/gems/ruby-2.6.3/bin is not at first place.
【以下省略】
Archives path '/usr/local/rvm/archives' not writable, aborting.
少しメッセージが変わりました。
今度は書込み権限がないらしいのでsudoで再実行します。
$ sudo rvm get stable --auto-dotfiles
sudo: rvm: command not found
(!?)RVMをsudoで実行することができませんでした。
少し調べてみるとrvmコマンドはrvmsudoコマンドで実行するのが正しいらしいです。
という事で、rvmsudoで再実行します。
$  rvmsudo rvm get stable --auto-dotfiles
Warning! PATH is not properly set up, /usr/local/rvm/gems/ruby-2.6.3/bin is not at first place.
【以下省略】
  * Please do NOT forget to add your users to the rvm group.
     The installer no longer auto-adds root or users to the rvm group. Admins must do this.
     Also, please note that group memberships are ONLY evaluated at login time.
     This means that users must log out then back in before group membership takes effect!

Thanks for installing RVM
Please consider donating to our open collective to help us maintain RVM.

  Donate: https://opencollective.com/rvm/donate


RVM reloaded!
今度はrvmグループを追加してくださいと言われましたのでグループ設定を見直します。
よく考えるとプロジェクト作成時のグループもrvmの方が良さそうですので「wheel」「rvm」のメイン・サブを入れ替える事にします。
$ sudo usermod -aG wheel -g rvm ユーザ名

$ sudo chown -R ユーザー名:rvm /home/ユーザー名
再度バージョン確認を実施します。
$ rvm -v

Warning! PATH is not properly set up, /usr/local/rvm/gems/ruby-2.6.3/bin is not at first place.
【以下省略】
         To fix it temporarily in this shell session run: rvm use ruby-2.6.3
         To ignore this error add rvm_silence_path_mismatch_check_flag=1 to your ~/.rvmrc file.
rvm 1.29.9 (latest) by Michal Papis, Piotr Kuczynski, Wayne E. Seguin [https://rvm.io]
むうっ、バージョンは表示されるようになりましたが警告が気になります。
先程スルーしてましたが調べてみるとrubyをPATH設定の一番初めにする事で解消されるらしいとありました。
という事でPATH設定の読込順番を修正します。
$ vim ~/.bash_profile

【修正前】
PATH=$PATH:$HOME/.local/bin:$HOME/bin

【修正後】
# PATH=$PATH:$HOME/.local/bin:$HOME/bin
PATH=$GEM_HOME/bin:$PATH:$HOME/.local/bin:$HOME/bin
ここでPATHの再読み込みのために一旦ターミナルを落として再ログインとなります。
しかし、今後も同様の作業があるととても面倒・・・いえ大変なので何かいい方法がないか調査します。
そうすると、シェルの再読み込みする手段がありましたので実行します。
$ exec $SHELL -l
これでPATHも再読み込みされたと思いますので警告が出ないか確認します。
$ rvm -v
rvm 1.29.9 (latest) by Michal Papis, Piotr Kuczynski, Wayne E. Seguin [https://rvm.io]
ようやく警告が消えましたので、本格的に各種バージョンアップ再実行します。
$ gem update --system

Latest version already installed. Done.

$gem update bundler

Updating installed gems
Nothing to update
これで作業用ユーザーの環境は全て最新化できましたのでプロジェクト作成を開始します。
プロジェクト新規作成
まずは、Bundlerで管理できるようにするためにプロジェクトの空ディレクトリとgemの格納先を作成します。
$ cd ~/cloud9/

$ mkdir -p プロジェクト名/vendor/bundle/

$ tree
.
└── プロジェクト名
    └── vendor
        └── bundle
今回は結果を表示するためにtreeコマンドを使用しました。
しかし、ec2初期環境にはtreeコマンドは無いようなのでインストールしています。
もし同様の手順で確認されたい方は下記コマンドでインストールしてみてください。
$ sudo yum -y install tree

Loaded plugins: priorities, update-motd, upgrade-helper
【以下省略】
Installed:
  tree.x86_64 0:1.6.0-5.8.amzn1

Complete!
次にgemインストール用のファイル作成と修正を実施します。
$ cd プロジェクト名

$ bundle init

Writing new Gemfile to /home/ユーザー名/cloud9/プロジェクト名/Gemfile

$ vim Genfile

【追記】
gem 'rails', '6.0.1'
準備ができましたらgemのインストールを実行します。
$ bundle install --path vendor/bundle

Fetching gem metadata from https://rubygems.org/.............
Fetching gem metadata from https://rubygems.org/.
Resolving dependencies...
【以下省略】
For more info see:
https://github.com/svenfuchs/i18n/releases/tag/v1.1.0
これで下準備が整いましたのでプロジェクトの新規作成を実施します。
コマンドはプロジェクト内で実行して、bundleは作成済みのためオプションでスキップします。
$ bundle exec rails new . --skip-bundle

       exist
      create  README.md
      create  Rakefile
   identical  .ruby-version
      create  config.ru
    conflict  .gitignore
Overwrite /home/ユーザー名/cloud9/ChatTest/.gitignore? (enter "h" for help) [Ynaqdhm] y
       force  .gitignore
    conflict  Gemfile
Overwrite /home/ユーザー名/cloud9/ChatTest/Gemfile? (enter "h" for help) [Ynaqdhm] y
【以下省略】
Could not find gem 'sqlite3 (~> 1.4)' in any of the gem sources listed in your Gemfile.
Run `bundle install` to install missing gems.
作成するとsqlite3のバージョンが1.4以上ではないと叱られました。
仕方なくバージョンを上げるためにsqlite3の最新バージョンをダウンロードしてパスを通すことにします。
まずは最新バージョンのsqlite3を取得(ダウンロード先のURL確認)。
$ sudo wget https://www.sqlite.org/2019/sqlite-autoconf-3300100.tar.gz
--2019-11-16 22:13:56--  https://www.sqlite.org/2019/sqlite-autoconf-3300100.tar.gz
【以下省略】
2019-11-16 22:13:58 (2.67 MB/s) - ‘sqlite-autoconf-3300100.tar.gz’ saved [2848951/2848951]
次にダウンロードしたファイルを解凍してインストールまで実施します。
$ tar xzvf sqlite-autoconf-3300100.tar.gz

sqlite-autoconf-3300100/
sqlite-autoconf-3300100/sqlite3.rc
【以下省略】
sqlite-autoconf-3300100/INSTALL
sqlite-autoconf-3300100/compile

$ cd sqlite-autoconf-3300100

$ ./configure --prefix=/opt/sqlite/sqlite3

checking for a BSD-compatible install... /usr/bin/install -c
checking whether build environment is sane... yes
【以下省略】
config.status: executing libtool commands

$ make

/bin/sh ./libtool  --tag=CC   --mode=compile gcc -DPACKAGE_NAME=\"sqlite\"
【以下省略】

$ sudo make install

make[1]: Entering directory `/home/ユーザー名/cloud9/sqlite-autoconf-3300100'
【以下省略】
 /usr/bin/install -c -m 644 sqlite3.pc '/opt/sqlite/sqlite3/lib/pkgconfig'
make[1]: Leaving directory `/home/ユーザー名/cloud9/sqlite-autoconf-3300100'

$ /opt/sqlite/sqlite3/bin/sqlite3 --version

3.30.1 2019-10-10 20:19:45 18db032d058f1436ce3dea84081f4ee5a0f2259ad97301d43c426bc7f3df1b0b
次にインストールされたsqlite3へのパスを通して、シェル再読み込みを実行します。
$ vim ~/.bash_profile

【修正前】
PATH=$GEM_HOME/bin:$PATH:$HOME/.local/bin:$HOME/bin

【修正後】
# PATH=$GEM_HOME/bin:$PATH:$HOME/.local/bin:$HOME/bin
PATH=$GEM_HOME/bin:/opt/sqlite/sqlite3/bin:$PATH:$HOME/.local/bin:$HOME/bin

$ exec $SHELL -l
次はgem(sqlite3)の再インストールを実施します。
$ gem uninstall sqlite3

Gem 'sqlite3' is not installed

$ gem install sqlite3 -- --with-sqlite3-lib=/opt/sqlite/sqlite3/lib

Fetching sqlite3-1.4.1.gem
【以下省略】
1 gem installed
最後にbundleのアップデートを実施します。
$ cd ~/cloud9/プロジェクト名

$ bundle update
The dependency tzinfo-data (>= 0) will be unused by any of the platforms Bundler is installing for. Bundler is installing for ruby but the dependency is only for x86-mingw32, x86-mswin32, x64-mingw32, java. To add those platforms to the bundle, run `bundle lock --add-platform x86-mingw32 x86-mswin32 x64-mingw32 java`.
【以下省略】
sing webpacker 4.2.0
Bundle updated!
これでアップデートは完了しましたが、tzinfo-dataに関して警告のようなものが出ています。
調べてみるとオプションの削除とlockファイルの削除した後にアップデートで解決するらしいので実行します。
$ vim Gemfile

【修正前】
gem 'tzinfo-data', platforms: [:mingw, :mswin, :x64_mingw, :jruby]

【修正後】
# gem 'tzinfo-data', platforms: [:mingw, :mswin, :x64_mingw, :jruby]
gem 'tzinfo-data'

$ rm -f Gemfile.lock

$ bundle update

Fetching gem metadata from https://rubygems.org/............
Fetching gem metadata from https://rubygems.org/.
【以下省略】
Bundle updated!
これでエラー関連は潰したはずなので最後にDBファイルを作成してみます。
$ bundle exec rails db:create
Created database 'db/development.sqlite3'
Created database 'db/test.sqlite3'
これでようやく準備が整ったので一度起動してみます。
$ bundle exec rails s

=> Booting Puma
=> Rails 6.0.1 application starting in development
【以下省略】
/home/ユーザー名/cloud9/プロジェクト名/vendor/bundle/ruby/2.6.0/gems/webpacker-4.2.0/lib/webpacker/configuration.rb:95:in `rescue in load': Webpacker configuration file not found /home/ユーザー名/cloud9/プロジェクト名/config/webpacker.yml. Please run rails webpacker:install Error: No such file or directory @ rb_sysopen - /home/ユーザー名/cloud9/プロジェクト名/config/webpacker.yml (RuntimeError)
(!?)・・・起動できない。
いろいろ調べるとnode.js、yarn、webpackerをインストールすれば解決するらしい。
素直に順番にインストール実施。
$ curl --silent --location https://rpm.nodesource.com/setup_10.x | sudo bash -

+ rpm -q --whatprovides redhat-release || rpm -q --whatprovides centos-release || rpm -q --whatprovides cloudlinux-release || rpm -q --whatprovides sl-release


$ sudo yum -y install nodejs

Loaded plugins: priorities, update-motd, upgrade-helper
【以下省略】
Complete!

$ sudo curl --silent --location https://dl.yarnpkg.com/rpm/yarn.repo | sudo tee /etc/yum.repos.d/yarn.repo

[yarn]
name=Yarn Repository
【以下省略】
gpgkey=https://dl.yarnpkg.com/rpm/pubkey.gpg

$ sudo rpm --import https://dl.yarnpkg.com/rpm/pubkey.gpg

$ sudo yum -y install yarn
Loaded plugins: priorities, update-motd, upgrade-helper
【以下省略】
Complete!

$ bundle exec rails webpacker:install
【以下省略】
Webpacker successfully installed
さあ、これで必要なパッケージはインストールされましたので再度実行します。
$ bundle exec rails s

=> Booting Puma
=> Rails 6.0.1 application starting in development
=> Run `rails server --help` for more startup options
Puma starting in single mode...
* Version 4.3.0 (ruby 2.6.3-p62), codename: Mysterious Traveller
* Min threads: 5, max threads: 5
* Environment: development
* Listening on tcp://127.0.0.1:8080
* Listening on tcp://[::1]:8080
Use Ctrl-C to stop
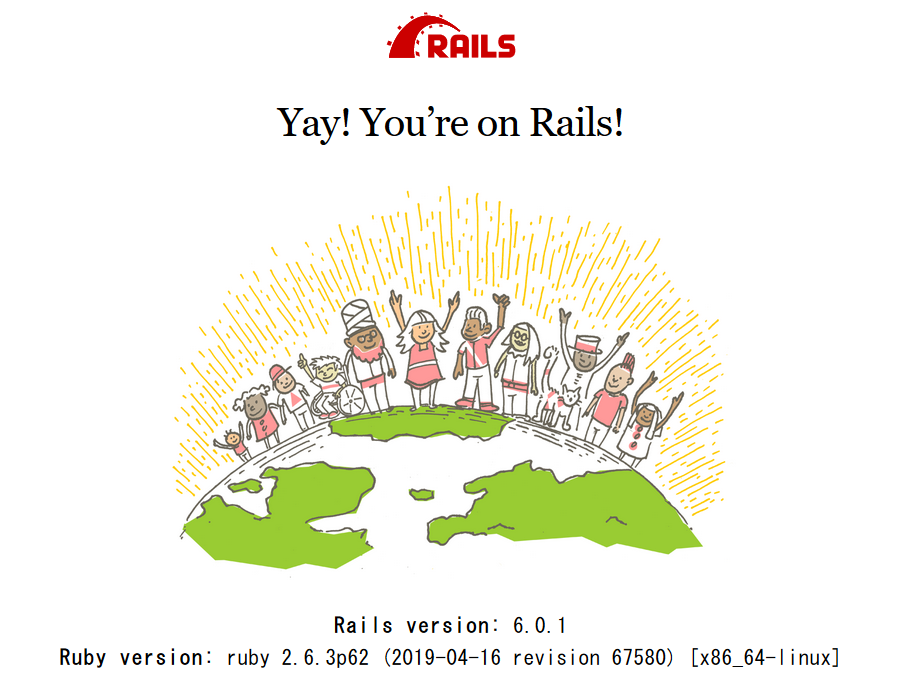
ようやく起動する事ができたのでRailsの「Yay! You’re on Rails!」を表示してみようと思います。
「Preview」>「Preview Running Application」を実行します。

すると・・・。
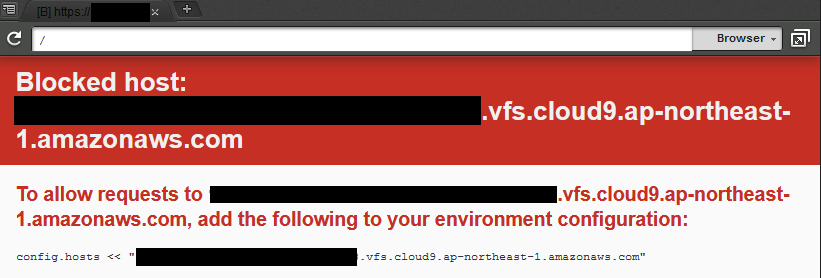
(!?)・・・調べてみますと一番下に記載されている「config.hosts << "【以下省略】"」を「config/application.rb」に追記する必要があるそうなので追記します。
$ vi config/application.rb

【修正前】
    config.load_defaults 6.0

【修正後】
    config.load_defaults 6.0
    config.hosts << "【自身の環境参照】.vfs.cloud9.ap-northeast-1.amazonaws.com"
あらためてrailsの起動とプレビューを実行してみます。
$ bundle exec rails s

=> Booting Puma
=> Rails 6.0.1 application starting in development
=> Run `rails server --help` for more startup options
Puma starting in single mode...
* Version 4.3.0 (ruby 2.6.3-p62), codename: Mysterious Traveller
* Min threads: 5, max threads: 5
* Environment: development
* Listening on tcp://127.0.0.1:8080
* Listening on tcp://[::1]:8080
Use Ctrl-C to stop
そうすると下記のような真っ白(?)な画面が表示されます。
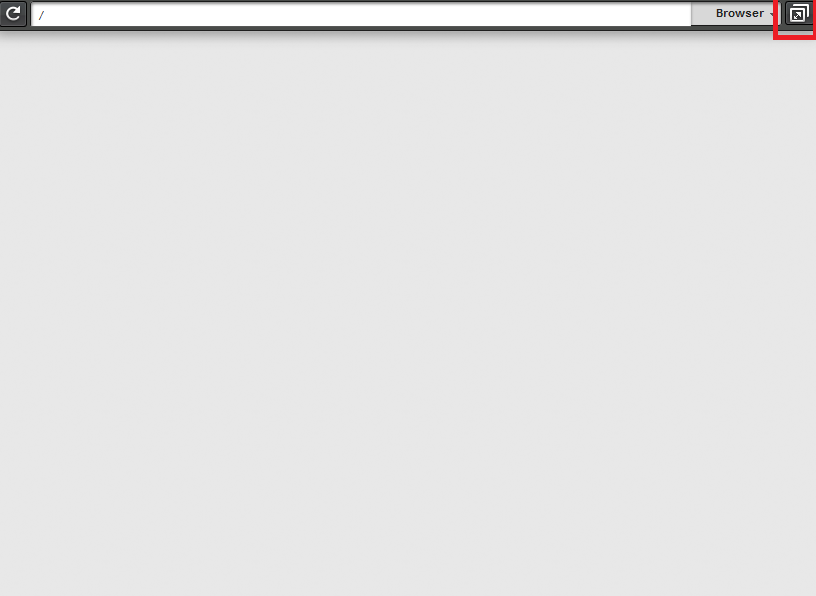
「Browser」の右横にある赤枠で囲んである部分をクリックすると下記画面が表示されると思います。
これで今回の作業は完了です。
余談(sqliteのバージョン問題がクリアできない場合)
さて、上記までで作業は完了ですが、途中四苦八苦して修正してしまったせいかsqlite3関連のトラブルが再現ができませんでした。
そのため、sqlite3関連のトラブルを余談として追記しています。
トラブルの内容としては起動後に下記エラー画面が表示されて「Yay! You’re on Rails!」が表示されないというものでした。
「Your version of SQLite (3.7.17) is too old. Active Record supports SQLite >= 3.8.」
調べると同様の事例が多数見つかると思います。
正直、最新版を導入しても何故か解決できなかったのでMysqlに一回逃げました。
もし、同様に解消できなかった人のために、Mysqlへ切り替える手順も載せておきます。
Sqlite3からMysqlへの切替
まずは、Mysqlのインストール可能バージョンを確認します。
$ sudo yum list | grep mysql
apr-util-mysql.x86_64                1.5.4-6.18.amzn1              amzn-main
collectd-mysql.x86_64                5.8.0-2.19.amzn1              amzn-main
【以下省略】
rsyslog-mysql.x86_64                 5.8.10-9.26.amzn1             amzn-main
ruby-mysql.x86_64                    2.8.2-1.11.amzn1              amzn-main
Mysqlの「server」「devel」パッケージをインストールします。
$ sudo yum -y install mysql57-server.x86_64 mysql57-devel.x86_64

Loaded plugins: priorities, update-motd, upgrade-helper
Resolving Dependencies
--> Running transaction check
【以下省略】
Complete!
次にmysqlの自動起動設定とサービス起動を設定します。
$ sudo chkconfig mysqld on

$ sudo service mysqld start

Starting mysqld:                                           [  OK  ]
mysqlのバージョンを確認します。
$ sudo mysql -V

mysql  Ver 14.14 Distrib 5.7.27, for Linux (x86_64) using  EditLine wrapper
mysqlのパスワード等のセキュリティ設定を実施します。
$ mysql_secure_installation

Securing the MySQL server deployment.

Enter password for user root: 【初期設定は空】

The 'validate_password' plugin is installed on the server.
The subsequent steps will run with the existing configuration
of the plugin.
Using existing password for root.

Estimated strength of the password: 50
Change the password for root ? ((Press y|Y for Yes, any other key for No) : 【yを選択】

New password: 【新しいmysql用のrootパスワード】

Re-enter new password: 【再入力】

Estimated strength of the password: 100
Do you wish to continue with the password provided?(Press y|Y for Yes, any other key for No) : 【yを選択】
By default, a MySQL installation has an anonymous user,
allowing anyone to log into MySQL without having to have
a user account created for them. This is intended only for
testing, and to make the installation go a bit smoother.
You should remove them before moving into a production
environment.

Remove anonymous users? (Press y|Y for Yes, any other key for No) : 【yを選択】
Success.


Normally, root should only be allowed to connect from
'localhost'. This ensures that someone cannot guess at
the root password from the network.

Disallow root login remotely? (Press y|Y for Yes, any other key for No) : 【yを選択】
Success.

By default, MySQL comes with a database named 'test' that
anyone can access. This is also intended only for testing,
and should be removed before moving into a production
environment.


Remove test database and access to it? (Press y|Y for Yes, any other key for No) : 【yを選択】
 - Dropping test database...
Success.

 - Removing privileges on test database...
Success.

Reloading the privilege tables will ensure that all changes
made so far will take effect immediately.

Reload privilege tables now? (Press y|Y for Yes, any other key for No) : 【yを選択】
Success.

All done!
mysql設定変更のためにmysqlへ接続します。
$ mysql -u root -p
Enter password: 【先程入力したパスワード】

Welcome to the MySQL monitor.  Commands end with ; or \g.
Your MySQL connection id is 7
Server version: 5.7.27 MySQL Community Server (GPL)

Copyright (c) 2000, 2019, Oracle and/or its affiliates. All rights reserved.

Oracle is a registered trademark of Oracle Corporation and/or its
affiliates. Other names may be trademarks of their respective
owners.

Type 'help;' or '\h' for help. Type '\c' to clear the current input statement.

mysql>
mysqlデータベース関連の各種設定を実施します。
mysql> create user "【接続用ユーザー名】"@"localhost" identified by "【接続用パスワード】";

Query OK, 0 rows affected (0.00 sec)
```

作成したユーザーの情報を確認します。

```shell-session:mysqlユーザーの情報確認
mysql> select User,Host from mysql.user;

+---------------+-----------+
| User          | Host      |
+---------------+-----------+
| 【XX】       | localhost |
| mysql.session | localhost |
| mysql.sys     | localhost |
| root          | localhost |
+---------------+-----------+
4 rows in set (0.00 sec)
```

次に作成したユーザーに権限を設定します。
尚、今回はあくまでテスト用の設定のため緩めの権限を振っています。
正式リリースを考慮する場合は見直しを実施してください。

```shell-session:mysqlユーザーの権限変更
mysql> grant all on *.* to '【接続用ユーザー名】'@'localhost';

Query OK, 0 rows affected (0.00 sec)
```

ここまで準備できましたらrailsのデータベース設定ファイルを修正します。

```shell-session:railsデータベース設定ファイル修正
$ vim config/database.yml

【修正前】
default: &default
  adapter: sqlite3
  pool: <%= ENV.fetch("RAILS_MAX_THREADS") { 5 } %>
  timeout: 5000

development:
  <<: *default
  database: db/development.sqlite3

# Warning: The database defined as "test" will be erased and
# re-generated from your development database when you run "rake".
# Do not set this db to the same as development or production.
test:
  <<: *default
  database: db/test.sqlite3

production:
  <<: *default
  database: db/production.sqlite3

【修正後】
default: &default
  #adapter: sqlite3
  adapter: mysql2
  pool: <%= ENV.fetch("RAILS_MAX_THREADS") { 5 } %>
  timeout: 5000

development:
  <<: *default
  #database: db/development.sqlite3
  adapter: mysql2
  encoding: utf8
  reconnect: false
  database: 【アプリケーション名】_development
  username: 【接続用ユーザー名】
  password: 【接続用パスワード】
  host: localhost

# Warning: The database defined as "test" will be erased and
# re-generated from your development database when you run "rake".
# Do not set this db to the same as development or production.
test:
  <<: *default
  #database: db/test.sqlite3
  adapter: mysql2
  encoding: utf8
  reconnect: false
  database: 【アプリケーション名】_test
  username: 【接続用ユーザー名】
  password: 【接続用パスワード】
  host: localhost


production:
  <<: *default
  #database: db/production.sqlite3
  adapter: mysql2
  encoding: utf8
  reconnect: false
  database: 【アプリケーション名】_production
  username: 【接続用ユーザー名】
  password: 【接続用パスワード】
  host: localhost
```

gemファイルの修正とbundleインストールを実施します。

```shell-session:gemファイルの修正とbundleインストール
$ vim Gemfile

【修正前】
gem 'sqlite3', '~> 1.4'

【修正前】
# gem 'sqlite3', '~> 1.4'
gem 'mysql2'

$ bundle install --clean
```

最後にデータベースを作成して終了です。

```shell-session:データベース作成
$ bundle exec rails db:create
```