ローディング中の表示にこんなのを用意したくなりました。
ちょっと悩んだので、誰かの参考になればと。
コード
解説は下記に。
class LoadingLabel: UILabel {

    let strokeRate: CGFloat = 0.9
    let lineWidth: CGFloat = 1
    let cornerRadius: CGFloat = 4

    let borderLayer = CAShapeLayer()

    override init(frame: CGRect) {
        super.init(frame: frame)
        initialize()
    }

    required init?(coder aDecoder: NSCoder) {
        super.init(coder: aDecoder)
        initialize()
    }

    func initialize() {
        borderLayer.fillColor = nil
        borderLayer.lineWidth = lineWidth
        borderLayer.strokeColor = UIColor.blue.cgColor
        borderLayer.strokeStart = 0
        borderLayer.strokeEnd = 0.5
        borderLayer.zPosition = 1 // 解説.3
        self.layer.addSublayer(borderLayer)

        let animationStrokeStart = CABasicAnimation(keyPath: "strokeStart")
        animationStrokeStart.fromValue = 0
        animationStrokeStart.toValue = 0.5
        animationStrokeStart.duration = 2
        animationStrokeStart.repeatDuration = .infinity
        borderLayer.add(animationStrokeStart, forKey: nil)

        let animationStrokeEnd = CABasicAnimation(keyPath: "strokeEnd")
        animationStrokeEnd.fromValue = 0.5 * strokeRate
        animationStrokeEnd.toValue = 0.5 * strokeRate + 0.5
        animationStrokeEnd.duration = 2
        animationStrokeEnd.repeatDuration = .infinity
        borderLayer.add(animationStrokeEnd, forKey: nil)
    }

    override func layoutSubviews() {
        super.layoutSubviews()

        borderLayer.frame = bounds

        // 解説.1 解説.2
        let rect = CGRect(x: lineWidth/2, y: lineWidth/2, width: bounds.width - lineWidth, height: bounds.height - lineWidth)
        let path = UIBezierPath(roundedRect: rect, cornerRadius: cornerRadius)
        path.append(UIBezierPath(roundedRect: rect, cornerRadius: cornerRadius))
        borderLayer.path = path.cgPath
    }

    // 解説.4
    override var intrinsicContentSize: CGSize {
        var size = super.intrinsicContentSize
        size.width += 20
        size.height += 6
        return size
    }
}
解説
1. 二重のパス
この中で何が工夫されてるかというと、 UIBezierPath で同じパスを二重に書いてるところです。
問題点
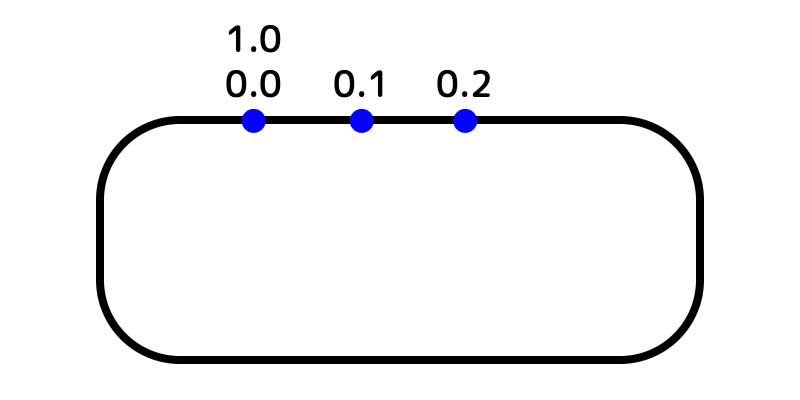
strokeStart と strokeEnd で線の開始位置を終了位置を指定できます。
この値を変化させることでアニメーションをしようとしています。
順当に書くと、とあるところを起点に、時計回りに 0.0 ~ 1.0 になります。
strokeStart < strokeEnd となるように 0.0 ~ 1.0 の範囲で指定することを考えると、起点 0 をまたぐ線は引くことができません。
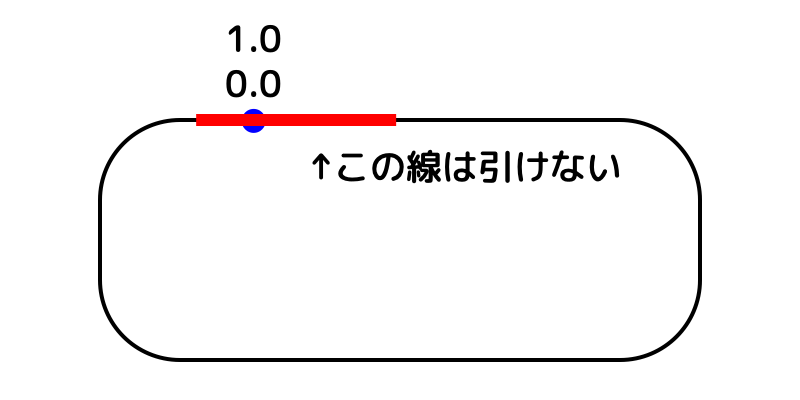
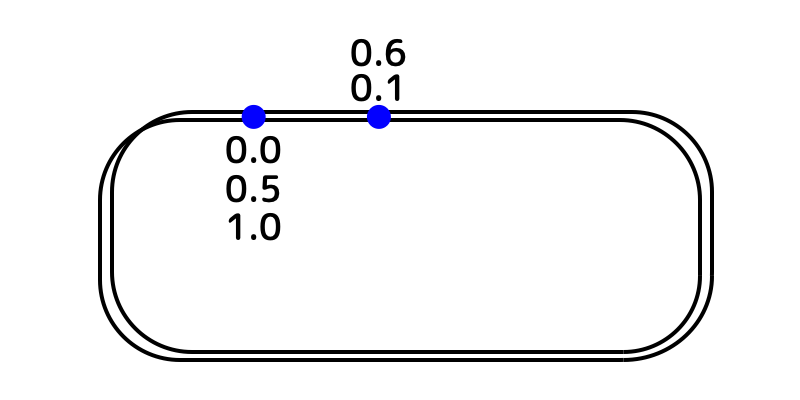
解決策
二重にパスを引くことで、一周を 0.0 ~ 0.5 とします。そうすることで、0.4 ~ 0.7 といったような、起点 0 をまたぐ線を描けます。

2. パスを少し内側に
パスを中心に線は引かれるので、
UIBezierPath(roundedRect: self.bounds, cornerRadius: cornerRadius)
のパスに線を描くと、 lineWidth の半分はビューをはみ出ることになります。
なので lineWidth / 2 の分だけ内側にパスを描きます。
3. zPosition
値が大きいほど手前に表示されます。
基本的に全てのレイヤーの zPosition はデフォルト 0 となっています。
Viewのサイズが変更されると borderLayer が埋もれてしまうようなので、1 を指定しておきます。
4. UILabel の padding
この記事で伝えたいことから少しずれてしまうので、下記の記事をご参照にどうぞ。
https://qiita.com/ryokosuge/items/eb64ed8e6d718378f770
その他
CAShapeLayer , CABasicAnimation , UIBezierPath 等の知識を前提に書いています。
コードからでも Interface Builder 上からでも問題なく使用でき、
テキスト変更などによるサイズ変更にも追従できるよう設計しています。
細かなカスタマイズ性の拡充など、ご自由にどうぞ!
環境
- Swift 4.2