はじめに
今年の2025年3月に SORACOM Downlink API の Remote Command サービスが開始しました。
以前から SORACOM Napter で SSH接続して、エッジ(サーバ)側の操作を行ってきましたが、1回接続しただけでも月額固定費用が発生し、更にコマンドオペレーションの自動化は別途実装する必要がありました。
ですがこの Downlink API の Remote Command を利用すると、エッジ(サーバ)のログを収集・保管するような作業の自動化が簡単にできそうです。
そこで、この Downlink API を活用し、kintone の JavaScript カスタマイズしたアプリからエッジ(サーバ)側のコマンド実行とその結果を記録を試してみました。
こちらは SORACOM Advent Calendar 2025 19日目の記事です。
Downlink APIサービスとは
Downlink API については、以下 SORACOM のサービス更新情報 Downlink API に詳細が記載されています。

以下、引用。
SORACOM からコマンドやリクエストを送信して、実行結果やレスポンスを受け取るための Downlink API (Sim:sendDownlinkSsh API および Sim:sendDownlinkHttp API) をリリースしました。Downlink API は、SSH、HTTP、HTTPS をサポートします。
(中略)
たとえばデバイスに SSH で接続してコマンドを実行するケースでは、新しい Downlink API を利用すると、SIM ID を指定して 1 回 API を呼び出すだけで、デバイスに SSH で接続してログイン (認証) したうえで、コマンドを実行し、その結果を API のレスポンスとして受け取れます。
1回の API コールで SSH接続とコマンドを実行、その結果を得られるのは実装が楽になります。当初は SSH、HTTP、HTTPS のみのサポートでしたが、現在は TCP、UDP、RTSP にも対応しているようです。
更に詳しい情報は以下に掲載されています。
事前準備
SORACOM SIM で通信する Raspberry Pi
今回は 4GPI に SORACOM の SIM を載せて長期運用試験中の Raspberry Pi 4B を試験用に利用しました。OS は Raspbian で 4GPI を販売するメカトラックスさんが提供したイメージをそのまま使っています。
SORACOM Arc で VPN 接続する Amazon EC2 インスタンス
こちらで説明すると長くなりますので、詳細は以下の別記事に記載しました。OS は Amazon Linux 2023 で WireGuard を利用しています。
コマンドを実行する kintone アプリの用意
コマンドを実行し、結果を記録する「リモートコマンド」アプリを kintone で作成しました。用意したアプリの項目は以下です。
| フィールド名 | フィールドタイプ | 解説 |
|---|---|---|
| 実行日時 | 日時 | コマンド実行日時 |
| IMSI | ルックアップ | SIMマスタを参照 |
| 名称 | 文字列(1行) | SIMマスタより |
| 実行コマンド | 文字列(1行) | 実行コマンドの入力 |
| 実行結果 | 文字列(複数行) | コマンド実行結果等 |
| 認証方法【非表示】 | ラジオボタン | SIMマスタより |
| ポート【非表示】 | 数値 | SIMマスタより |
| ユーザID【非表示】 | 文字列(1行) | SIMマスタより |
| パスワード【非表示】 | 文字列(1行) | SIMマスタより |
| 公開鍵【非表示】 | 文字列(1行) | SIMマスタより |
kintone アプリの画面は以下です。
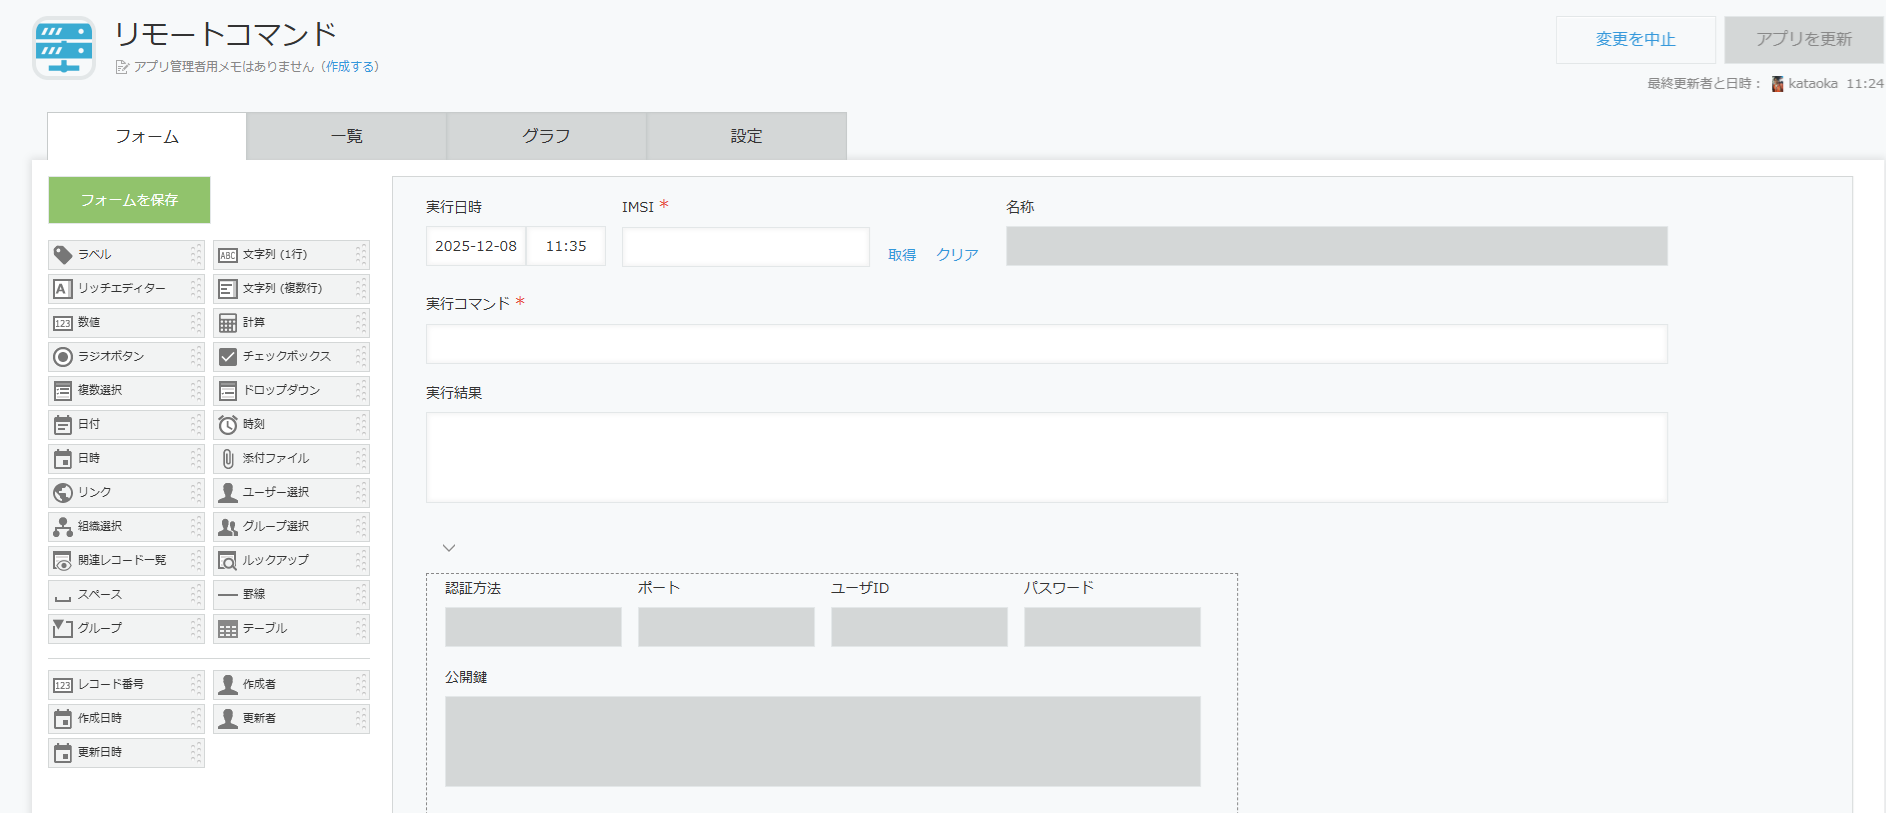
SORACOM API を実行するための認証情報は自作の「プライベート鍵秘匿プラグイン」を利用して、ブラウザデバッグ時にも参照できないように秘匿しています。


別途 SIM の接続先のサーバの SSH設定等を管理する「SIMマスタ」アプリを用意しました。
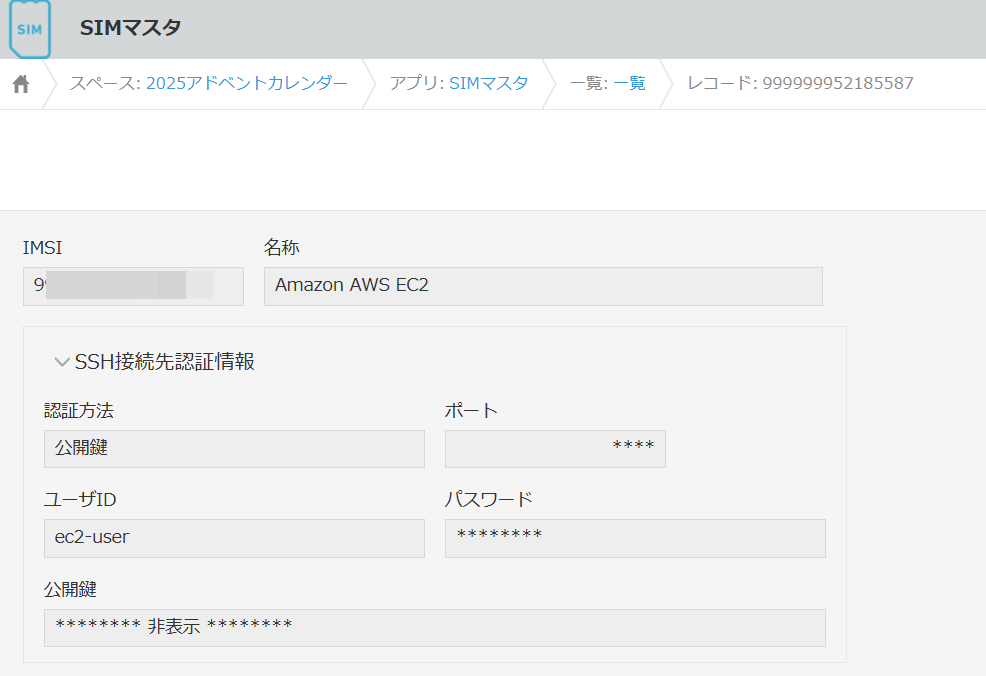
こちらも認証に関する情報は閲覧できないように、JavaScript カスタマイズで秘匿しています。
「SIMマスタ」アプリは「リモートコマンド」アプリから Lookup で参照します。
SORACOM Downlink API の Remote Command 処理
Remote Command 処理の SORACOM API 実行手順は以下です。
1.認証
2.Downlink API で SSHコマンドを実行、結果を取得
3.認証のログアウト
認証と認証のログアウトについては、以下の過去記事を参考ください。
https://qiita.com/yukataoka/items/675660968c3aa2306a6d
Downlink API で SSH接続は以下の API を実行します。
POST /v1/sims//downlink/ssh
実行するコマンドは API の Body から以下の json データで引渡しします。
パスワード認証の設定例
{
  "authentication": {
    "password": "パスワード",
    "type": "password"
  },
  "command": "ls -al",
  "port": 22,
  "username": "ユーザID"
}
正常にコマンド実行できた時は、200番の応答と以下のレスポンスが返ってきます。
{
  "exitcode": 0,
  "stdout": "total 28\ndrwxr-xr-x 3 pi 121 4096 Feb  2  2024 .\ndrwxr-xr-x 4 pi 121 4096 Jun  4  2024 ..\n-rw------- 1 pi pi   200 Nov 29 12:25 .bash_history\n-rw-r--r-- 1 pi pi   220 Jan 28  2024 .bash_logout\n-rw-r--r-- 1 pi pi  3523 Jan 28  2024 .bashrc\ndrwx------ 3 pi pi  4096 Feb  2  2024 .gnupg\n-rw-r--r-- 1 pi pi   807 Jan 28  2024 .profile\n",
  "stderr": "",
  "isStdoutBase64Encoded": false,
  "isStderrBase64Encoded": false
}
コマンドでエラーが発生した時は、200番の応答と以下のレスポンスが返ってきます。
{
  "exitcode": 127,
  "stdout": "",
  "stderr": "bash: err_command: command not found\n",
  "isStdoutBase64Encoded": false,
  "isStderrBase64Encoded": false
}
SSHに接続できなかった時は、422番の応答と以下のレスポンスが返ってきます。
{
  "code": "DDL1005",
  "message": "Failed to establish SSH connection"
}
SORACOM Napter を利用する場合は、ポートマッピングを手動で行うためインターネットGW のグローバルIPアドレスを取得する必要があり、更にポートマッピング後 SSH接続してコマンド実行までの手順を全てプログラム実装する必要があり、大変面倒でした。
Downlink API で Remote Command を利用すると、API を1回実行するだけの処理で、簡単にプログラム実装できます。
詳細は、以下の API リファレンスを参照ください。
https://users.soracom.io/ja-jp/tools/api/reference/#/Sim/sendDownlinkSsh
kintone アプリの JavaScript カスタマイズと実装結果
kintone アプリの JavaScript カスタマイズ
kintone アプリの JavaScript カスタマイズでは、kintone がレコードを追加又は更新する前にDownlink API で SSHコマンドを実行、結果を取得して反映する処理を実装しています。
create.submit 時と edit.submit 時に、以下の手順を実施します。
1. 認証
2.1. SIM ID の取得 ( Downlink API で必要なため)
2.2. Downlink API で SSH コマンドを実行、結果を取得
3. 認証のログアウト
今回の kintone アプリには IMSI のデータしかないため、2.1. の手順で subscribers 情報から SIM ID を取得します。
Remote Command の実行は、SSH接続後の認証方法により POST で受け渡すデータが少し違うのみで、SSH接続の基本情報を渡して API 実行するだけでコマンドのレスポンスを得ることができます。
    // ------------------------------
    // コマンドの実行
    // ------------------------------
    async function DoCommand(auth, event, simId) {
        const url = GetApiUrl(event.record['IMSI'].value) + SoracomSsh.replace('<SIMID>', simId);
        const headers = {
            'accept': 'application/json',
            'X-Soracom-API-Key': auth.apiKey,
            'X-Soracom-Token': auth.token,
            'Content-Type': 'application/json'
        };

        let data = {}
        if (event.record['認証方法'].value === '公開鍵') {
            // 公開鍵認証の設定
            data = {
                "authentication": {
                    "key": event.record['公開鍵'].value,
                    "type": "publickey"
                },
                "command": event.record['実行コマンド'].value,
                "port": parseInt(event.record['ポート'].value, 10),
                "username": event.record['ユーザID'].value
            };
        } else {
            // パスワード認証の設定
            data = {
                "authentication": {
                    "password": event.record['パスワード'].value,
                    "type": "password"
                },
                "command": event.record['実行コマンド'].value,
                "port": parseInt(event.record['ポート'].value, 10),
                "username": event.record['ユーザID'].value
            };
        }

        try {
            // コマンドの実行
            const respons = await kintone.proxy(url, 'POST', headers, data);
            const apiRespons = await JSON.parse(respons[0]);
            let status;
            let result;
            if (apiRespons.code === undefined) {
                if (apiRespons.exitcode !== 0) {
                    status = "エラー";
                    result = apiRespons.stderr;
                } else {
                    status = "成功";
                    result = apiRespons.stdout;
                }
            } else {
                status = "SSH通信エラー";
                result = "code: "+apiRespons.code + "\nmessage: " + apiRespons.message;
            }

            return {
                status: status,
                result: result
            };
        } catch (error) {
            console.log(error);
            return false;
        }
    }
エラー処理等を除けば、body に簡単な Json 引数を設定し、POST するだけで SSH接続とコマンドの実行とレスポンスの受信が行えます。Napter に比べて実装は相当楽になります。
認証とログアウト、SIM ID の取得については、以下に JavaScript カスタマイズ全コードを公開しています。ご参照ください。
JavaScriptカスタマイズ全コード
(function () {
    "use strict";

    // SORACOM API
    const SoracomApiUrl = "https://api.soracom.io/v1/";
    const SoracomGApiUrl = "https://g.api.soracom.io/v1/";
    const SoracomAuth = "auth";
    const SoracomLogout = "auth/logout";
    const SoracomSubsc = "subscribers/<IMSI>";
    const SoracomSsh = "sims/<SIMID>/downlink/ssh";

    // ------------------------------
    // 追加・変更・詳細画面の表示処理
    // ------------------------------
    const EVENT_SHOW = ['app.record.create.show', 'app.record.edit.show', 'app.record.detail.show'];
    kintone.events.on(EVENT_SHOW, function (event) {

        // ローディング表示初期設定
        InitLoading();

        // 実行結果は入力不可に
        event.record['実行結果'].disabled = true;

        // SSH接続情報は非表示に
        kintone.app.record.setFieldShown('システム情報', false);

        return event;
    });

    // ------------------------------
    // 追加・変更画面のSubmit処理
    // ------------------------------
    const EVENT_SUBMIT = ['app.record.create.submit', 'app.record.edit.submit'];
    kintone.events.on(EVENT_SUBMIT, async function (event) {

        // SORACOM認証鍵(自作プラグインから設定を取得)
        const SoracomAuthKey = kintonePlugin.getPluginPrivateSetting('SORACOM_AUTH');
        if (SoracomAuthKey.key === '' || SoracomAuthKey.value === '') {
            event.error = 'SORACOM API 鍵の設定が見つかりません!\nプライベート鍵秘匿プラグインの設定をご確認ください!';
            return event;
        }

        // ローディング表示開始
        ShowLoading();

        // コマンド実行処理
        await CommandExecutionProcess(event, SoracomAuthKey);

        // ローディング表示終了
        HideLoading();

        return event;
    });

    // ------------------------------
    // コマンド実行処理
    // ------------------------------
    async function CommandExecutionProcess(event, SoracomAuthKey) {

        const imsi = event.record['IMSI'].value;

        // APIキーの取得
        const auth = await AuthSoracomApi(GetApiUrl(imsi), SoracomAuthKey);
        if (!auth) {
            event.error = 'SORACOM API の認証に失敗しました!\nプライベート鍵秘匿プラグインの設定をご確認ください!';
            return;
        }

        // SIM IDの取得
        const simId = await GetSimId(auth, imsi);
        if (!simId) {
            event.error = 'SORACOM API で SIM ID の取得に失敗しました!';
            await LogoutSoracomApi(GetApiUrl(imsi), auth);
            return;
        }

        // コマンドの実行
        const command = await DoCommand(auth, event, simId);

        // 実行結果を反映
        await SetRecord(event, command);

        // APIログアウト
        await LogoutSoracomApi(GetApiUrl(imsi), auth);
    }

    // ------------------------------
    // SORACOM API鍵の取得
    // ------------------------------
    async function AuthSoracomApi(apiUrl, SoracomAuthKey) {
        const url = apiUrl + SoracomAuth;
        const headers = {
            "Content-type": "application/json"
        };
        const data = {
            "authKeyId": SoracomAuthKey.key,
            "authKey": SoracomAuthKey.value
        };
        try {
            const respons = await kintone.proxy(url, 'POST', headers, data);
            return JSON.parse(respons[0]);
        } catch (error) {
            console.log(error);
            return false;
        }
    }

    // ------------------------------
    // SORACOM API鍵の無効化
    // ------------------------------
    async function LogoutSoracomApi(apiUrl, auth) {
        const url = apiUrl + SoracomLogout;
        const headers = {
            'X-Soracom-API-Key': auth.apiKey,
            'X-Soracom-Token': auth.token
        };
        const data = {};
        try {
            await kintone.proxy(url, 'POST', headers, data);
        } catch (error) {
            console.log(error);
        }
    }

    // ------------------------------
    // IMSIで国内かグルーバルかを判断しAPIのURLを返す
    // ------------------------------
    function GetApiUrl(imsi) {
        if (imsi.toString().substring(0, 1) == "2") {
            return SoracomGApiUrl;
        } else {
            return SoracomApiUrl;
        }
    }

    // ------------------------------
    // SIM IDの取得
    // ------------------------------
    async function GetSimId(auth, imsi) {
        const url = GetApiUrl(imsi) + SoracomSubsc.replace('<IMSI>', imsi);
        const headers = {
            'accept': 'application/json',
            'X-Soracom-API-Key': auth.apiKey,
            'X-Soracom-Token': auth.token
        };
        const data = {};
        try {
            const respons = await kintone.proxy(url, 'GET', headers, data);
            return await JSON.parse(respons[0]).simId;
        } catch (error) {
            console.log(error);
            return false;
        }
    }

    // ------------------------------
    // コマンドの実行
    // ------------------------------
    async function DoCommand(auth, event, simId) {
        const url = GetApiUrl(event.record['IMSI'].value) + SoracomSsh.replace('<SIMID>', simId);
        const headers = {
            'accept': 'application/json',
            'X-Soracom-API-Key': auth.apiKey,
            'X-Soracom-Token': auth.token,
            'Content-Type': 'application/json'
        };

        let data = {}
        if (event.record['認証方法'].value === '公開鍵') {
            // 公開鍵認証の設定
            data = {
                "authentication": {
                    "key": event.record['公開鍵'].value,
                    "type": "publickey"
                },
                "command": event.record['実行コマンド'].value,
                "port": parseInt(event.record['ポート'].value, 10),
                "username": event.record['ユーザID'].value
            };
        } else {
            // パスワード認証の設定
            data = {
                "authentication": {
                    "password": event.record['パスワード'].value,
                    "type": "password"
                },
                "command": event.record['実行コマンド'].value,
                "port": parseInt(event.record['ポート'].value, 10),
                "username": event.record['ユーザID'].value
            };
        }

        try {
            // コマンドの実行
            const respons = await kintone.proxy(url, 'POST', headers, data);
            const apiRespons = await JSON.parse(respons[0]);
            let status;
            let result;
            if (apiRespons.code === undefined) {
                if (apiRespons.exitcode !== 0) {
                    status = "エラー";
                    result = apiRespons.stderr;
                } else {
                    status = "成功";
                    result = apiRespons.stdout;
                }
            } else {
                status = "SSH通信エラー";
                result = "code: "+apiRespons.code + "\nmessage: " + apiRespons.message;
            }

            return {
                status: status,
                result: result
            };
        } catch (error) {
            console.log(error);
            return false;
        }
    }

    // ------------------------------
    // 実行結果を反映
    // ------------------------------
    async function SetRecord(event, command) {
        event.record['実行日時'].value = GetCurrentUTCDateTime();
         let result;
        if (!command) {
            result = "コマンド実行結果:SSH接続処理エラー\n";
        } else {
            result = "コマンド実行結果:" + command.status + "\n\n" + command.result;
        }
        event.record['実行結果'].value = result;
    }

    // ------------------------------
    // 世界標準時形式で現在日時を取得
    // ------------------------------
    function GetCurrentUTCDateTime() {
        const now = new Date();
        const year = now.getUTCFullYear();
        const month = (now.getUTCMonth() + 1).toString().padStart(2, '0');
        const day = now.getUTCDate().toString().padStart(2, '0');
        const hours = now.getUTCHours().toString().padStart(2, '0');
        const minutes = now.getUTCMinutes().toString().padStart(2, '0');
        const seconds = now.getUTCSeconds().toString().padStart(2, '0');
        return `${year}-${month}-${day}T${hours}:${minutes}:${seconds}Z`;
    }

    // ------------------------------
    // ローディング表示の開始
    // ------------------------------
    function InitLoading() {
        let divAction = document.createElement('div');
        divAction.id = "customLoading";
        let pAction = document.createElement('p');
        pAction.innerText = '処理中...';
        divAction.appendChild(pAction);
        kintone.app.record.getHeaderMenuSpaceElement().appendChild(divAction);
        document.getElementById('customLoading').style.display = 'none';
    }

    // ------------------------------
    // ローディング表示の開始
    // ------------------------------
    function ShowLoading() {
        document.getElementById('customLoading').style.display = 'flex';
    }

    // ------------------------------
    // ローディング表示の終了
    // ------------------------------
    function HideLoading() {
        document.getElementById('customLoading').style.display = 'none';
    }
})();
kintone アプリの JavaScript カスタマイズと Remote Command 実行結果
実際に kintone のアプリで実行した結果は以下です。
SORACOM Air で繋がる Raspberry Pi のコマンド実行例
SORACOM Air で繋がる Raspberry Pi に向けて、Remote Command で ifconfig コマンドを実行した例です。

実行結果から、有線LAN のインタフェース eth0 と SORACOM SIM の接続 wwan0 が確認できました。
SORACOM Arc で繋がる Raspberry Pi のコマンド実行例
有線LAN を経由して SORACOM Arc で繋がる Raspberry Pi に向けて、Remote Command で ifconfig コマンドを実行した例です。

実行結果から、soratun0 というインタフェースが見えています。これは SORACOM Arc 用のクライアントエージェント soratun で、SORACOM Arc 接続しているのが確認できました。
SORACOM Arc で繋がる Amazon Linux 2023 のコマンド実行例
SORACOM Arc で繋がる AWS のインバウンド接続を全て閉じたEC2(Amazon Linux 2023)に向けて、Remote Command で ifconfig コマンドを実行した例です。

実行結果から、wg0 というインタフェースが見えています。WireGuard 経由で SORACOM Arc 接続しているのが確認できました。
SSH通信エラーの例
SSL通信でエラーを起こした例です。
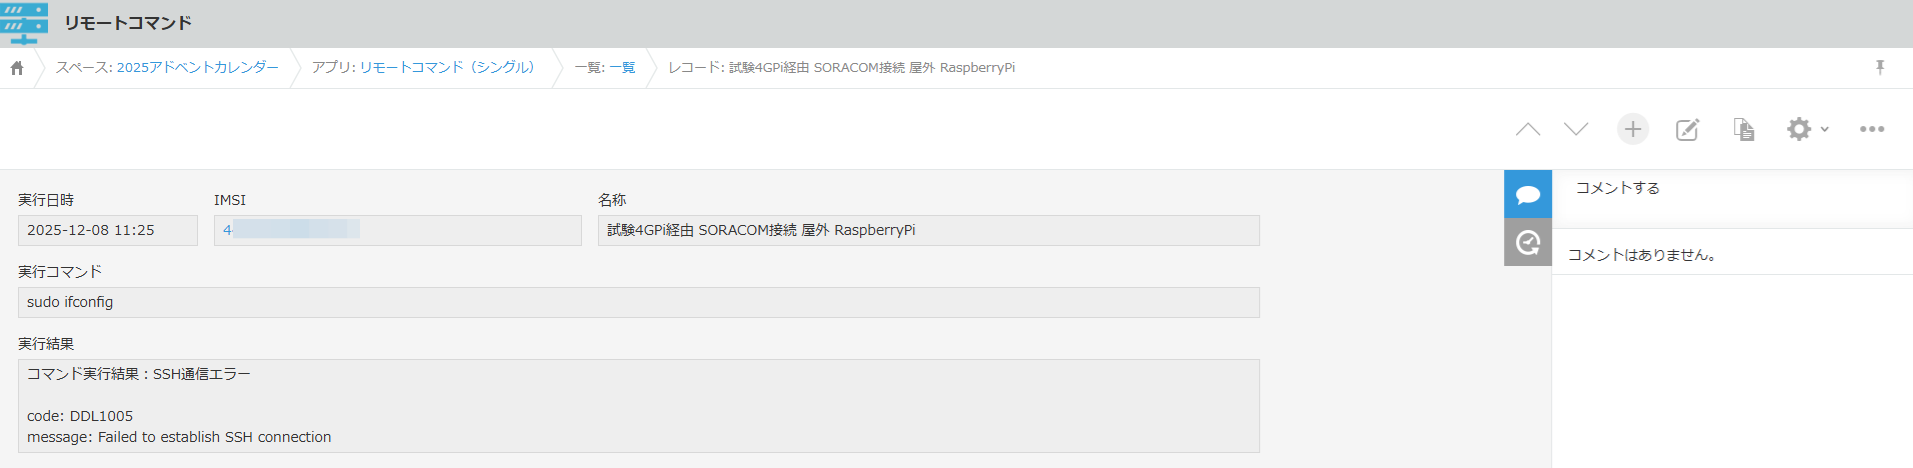
上記は SSH のパスワードが違う場合です。
コマンド実行エラーの例
存在しないコマンドを実行させた例です。

bash からのエラーメッセージを受信できました。
実装結果
SORACOM Downlink API の Remote Command は kintone からも簡単に活用でき、レスポンス速度もそこそこ早く感じました。kintone アプリから IoT なエッジ側の管理や、AWS のサーバ管理など、仕事での活用に問題はなさそうです。
まとめ
SORACOM Downlink API の Remote Command を試して、以下を確認しました。
・SORACOM Downlink API Remote Command で kintone からコマンドを実行できる
・Downlink API Remote Command は Napter より簡単にプログラム実装できる
・SORACOM SIM と SORACOM Arc 接続、いずれも問題なくコマンドを実行できる
・Amazon Linux 2023 でインカムポートを開けることなくコマンドを実行できる
今回の検証で SORACOM Downlink API の Remote Command が簡単に活用できました。
今後は仕事でも活用してゆく予定です!
追伸
今回は Amazon Linux 2023 に SORACOM Arc で Remote Command を試しましたが、本来は AWS SystemsManager の RunCommand を利用するようです。ドキュメントを参照しただけなんですが、実装は今回よりちょっと面倒な感じです。
・AWS: SystemsManagerのRunCommandでEC2インスタンスのコマンドを実行する
https://qiita.com/haraitai00/items/1ff4da073dfdde214f0b
・AWS LambdaでSSM RunCommandを実行する(AWS SDK for JavaScript v3)
https://qiita.com/urushibata/items/5915f8dc72b082a45595
・SDK for JavaScript (v3) を使用した Systems Manager の例
https://docs.aws.amazon.com/ja_jp/sdk-for-javascript/v3/developer-guide/javascript_ssm_code_examples.html#basics