概要
Raspberry Piのセンサ値のデータ保管、可視化、分析は、クラウドのkintoneを活用することで簡単に行えます。
このkintoneへのデータアップロードはこれまで自作ライブラリィで処理を実装してきましたが、公式サイトで紹介されているkintone API SDK for Pythonで処理を実装してみました。(以下Rasberry Piよりアップしたデータ)

結果、不具合もなく短いコードで処理を簡単に実装できましたので、これからは自作ライブラリィのメンテを止めて、kintone API SDK for Pythonを利用することにしました。
Python用 kintone API SDK
https://developer.cybozu.io/hc/ja/articles/205382194-kintone-API-SDK-for-Python
GitHub icoxfog417/pykintone
https://github.com/icoxfog417/pykintone
Raspberry Piの設定
Raspberry Pi 本体は3B、OSは現時点で最新の以下を利用しました。
Raspbian Buster with desktop
・Version: September 2019
・Release date: 2019-09-26
・Kernel version: 4.19
セットアップする方法などは省略します。
詳しく知りたい方は以下を参照ください。
Raspberry Pi 初期設定 Windows( @sigma7641 さん)
https://qiita.com/sigma7641/items/995c7bb07eab408b9d0e
Raspberry Pi 初期設定 Mac( @skkojiko さん)
https://qiita.com/skkojiko/items/a7e342a8ab53b409fe6a
kintone API SDK for Pythonの設定
今回利用したOSイメージ Raspbian Buster with desktop 2019-09-26 は最初からPython2、Python3、pip、pip3とも利用できるようになっていますので、これらの設定は不要です。以下のpipでkintone API SDK for Pythonは簡単にインストールできます。
$ pip install pykintone
$ pip3 install pykintone
kintone アプリの追加
kintoneのアプリをはじめから作成し、フォームを作成
フィールドは以下のように設定します。
| フィールド名 | タイプ | フィードコート・要素ID |
|---|---|---|
| 日時 | 日時 | datetime |
| タイトル | 文字列(1行) | title |
| 添付ファイル | 添付ファイル | file |
| 作成日時 | 日時(システム) | 作成日時 |
 |
アプリの設定画面でAPIトークンを設定
アプリの設定画面から、設定 -> カスタマイズ/サービス連携 APIトークン の順でAPIトークンの設定画面が開きます。
「生成する」ボタンを押すとAPIトークンが追加されるので、アクセス権をアプリ管理以外全てをチェックして「保存」します。
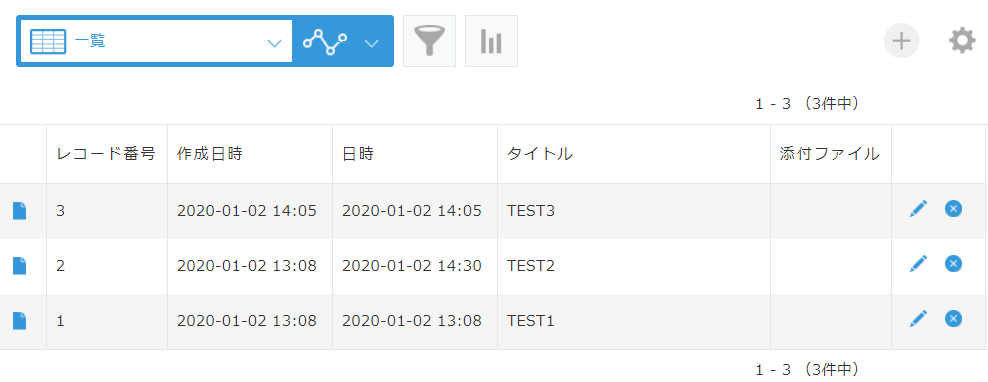
kintone の初期データ
以下の初期データを準備しておきます。
pythonプログラム開発
kintone API SDK for Pythonを利用して、データの取得、追加、更新、ファイルアップロードを含む追加、削除を実装してみます。
kintone APIの設定(全処理共通)
# !/usr/bin/python
# -*- coding: utf-8 -*-

import codecs
import sys
import time

import pykintone
from pykintone import model
import pykintone.structure_field as sf

# kintone APIの設定(全処理共通)
subdomein = "kintoneのサブドメイン"
appId     = "kintoneのアプリケーションID"
token     = "kintoneのAPIトークン"
app       = pykintone.app(subdomein, appId, token)
kintoneのサブドメイン、アプリID、APIトークンを指定して pykintone.app() のインスタンス app を作成します。
このインスタンスは全ての処理で利用します。
kintoneのデータ取得
(kintone APIの設定までの記述を省略)

# データの取得
select = "作成日時 < NOW() order by dateTime asc"
res = app.select(select)
if res.ok:
    records = res.records
    if len(records) < 1 :
        print("レコード0件")
    for record in records:
        print(record[u"作成日時"]["value"] + ", " + record["dateTime"]["value"] + ", " + record["title"]["value"])
else:
    print(res.error.id.encode('utf-8'))
    print(res.error.message.encode('utf-8'))
    print(res.error.code)
「kintone APIの設定」で作成したインスタンスappで指定された条件のレコード取得処理を実行します。
レコード取得の条件は app.select() の引数として渡し、処理結果を受け取ります。
処理結果として渡される引数は以下です。
| 引数 | 内容 |
|---|---|
| .ok | true : 処理正常完了、false : 処理エラー |
| .records | 取得したレコード情報(配列) |
| .error.id | エラーID |
| .error.message | エラーメッセージ |
| .error.code | エラーコード |
処理が正常に完了すると .records(配列)にデータが格納されています。
kintoneのデータ追加
(kintone APIの設定までの記述を省略)

# データの追加
class recordLayout(model.kintoneModel):
    def __init__(self):
        super(recordLayout, self).__init__()
        self.datetime = ""  # kintoneの「日時」のフィールドコード
        self.title    = ""  # kintoneの「タイトル」のフィールドコード

record = recordLayout()
record.datetime = time.strftime('%Y-%m-%dT%H:%M:%S+09:00')
record.title    = u"テストデータをRaspiから追加"
res = app.create(record)
if res.ok:
    print("レコード追加 id=" + str(res.record_id) + " revision=" + str(res.revision))
else:
    print(res.error.id.encode('utf-8'))
    print(res.error.message.encode('utf-8'))
    print(res.error.code)
「kintone APIの設定」で作成したインスタンスappで1レコード追加処理を実行します。
追加するレコードを格納するのは、SDKのkintoneModelを継承したclassのモデルを作成します。
モデル内の変数名にはkintoneフォームのフィールドコードを設定し、それぞれのデータをセットします。
app.create() の引数としてこのモデルをセットして、処理結果を受け取ります。
処理結果として渡される引数は以下です。
| 引数 | 内容 |
|---|---|
| .ok | true : 処理正常完了、false : 処理エラー |
| .record_id | 追加したレコードのID |
| .revision | 追加したレコードのリビジョン番号 |
| .error.id | エラーID |
| .error.message | エラーメッセージ |
| .error.code | エラーコード |
処理が正常に完了すると、追加したレコードのレコードのID、リビジョン番号を受け取ります。
複数レコードを追加する場合は、app.batch_create() にモデル配列を引数として渡します。
kintoneのデータ更新
(kintone APIの設定までの記述を省略)

# データの更新
select    = "作成日時 < NOW() order by dateTime asc"
records = app.select(select).models(recordLayout)
record = records[0]
record.title    = u"テストデータをRaspiから更新"
res = app.update(record)
if res.ok:
    print("レコード更新 revision=" + str(res.revision))
else:
    print(res.error.id.encode('utf-8'))
    print(res.error.message.encode('utf-8'))
    print(res.error.code)
「kintone APIの設定」で作成したインスタンスappで1レコード更新処理を実行します。
先ず最初に該当するレコードをkintoneより取得します。
取得した1レコードの該当するフィールドコードに更新値を反映します。
app.update() の引数としてこのレコードをセットして、処理結果を受け取ります。
処理結果として渡される引数は、データ追加処理と同じです。
複数レコードを更新する場合は、app.batch_update() にレコード配列を引数として渡します。
kintoneのデータ追加(ファイルアップロード)
(kintone APIの設定までの記述を省略)

# データの追加
class recordLayout2(model.kintoneModel):
    def __init__(self):
        super(recordLayout2, self).__init__()
        self.datetime = ""
        self.title    = ""
        self.file     = [sf.File()]

file = ["test.jpg"]  # 配列にkintoneに保管するファイルのパスを設定
record = recordLayout2()
record.datetime = time.strftime('%Y-%m-%dT%H:%M:%S+09:00')
record.title    = u"テストデータをRaspiからファイルと一緒に追加"
record.file     = [sf.File.upload(f, app) for f in file]
res = app.create(record)
if res.ok:
    print("レコード追加(ファイルUP) id=" + str(res.record_id) + " revision=" + str(res.revision))
else:
    print(res.error.id.encode('utf-8'))
    print(res.error.message.encode('utf-8'))
    print(res.error.code)
kintone API SDK for Python では、ファイルのアップロードを伴うデータの追加が簡単に実装できます。
モデル内に添付ファイルのフィールドコード名の変数を追加します。
追加変数にファイルアップロードの構成情報を保管できるように sf.File() で初期化します。
sf.File.upload() で事前にkintoneにファイルをアップロード、結果のファイルキー配列をモデルの変数にセットします。
その他はデータ追加処理と同じです。
kintoneのデータ削除
(kintone APIの設定までの記述を省略)

select    = "レコード番号 > \"3\""
records = app.select(select).models(recordLayout)
for record in records:
    res = app.delete(record.record_id)
    if res.ok:
        print("レコード削除 id=" + str(record.record_id))
    else:
        print(res.error.id.encode('utf-8'))
        print(res.error.message.encode('utf-8'))
        print(res.error.code)
「kintone APIの設定」で作成したインスタンスappで1レコード削除処理を実行します。
先ず最初に該当するレコードをkintoneより取得します。
app.delete() の引数としてこのレコードの record_id をセットして、処理結果を受け取ります。
処理結果として渡される引数は、データ追加処理のリビジョン番号を除いた内容と同じです。
複数レコードを削除する場合は、app.batch_delete() にレコード配列を引数として渡します。
結果
最後の「参考」に全コードを記載した pykintoneTest.py を実行した結果が以下です。
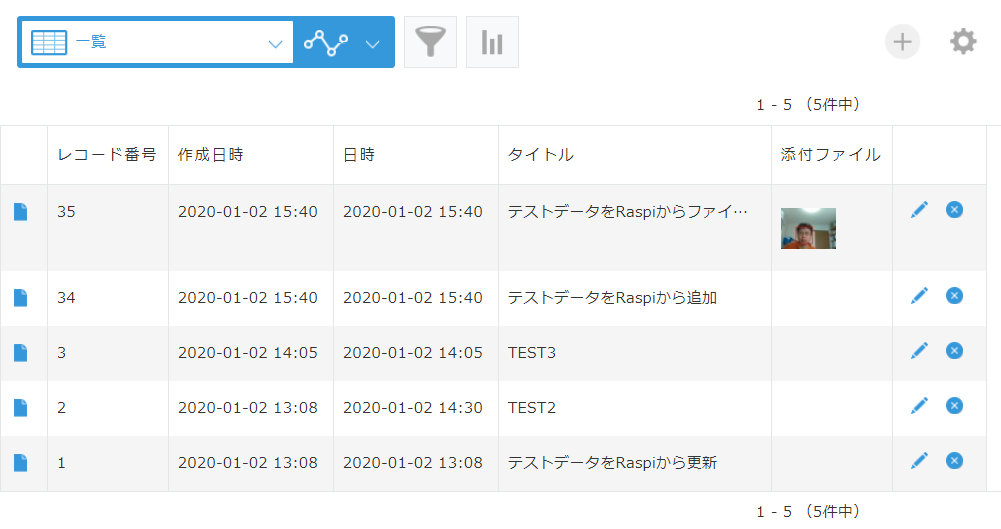
・レコード番号34が追加されています。
・レコード番号1ではタイトルが更新されています。
・レコード番号35が追加され、添付ファイルが保管されています。
kintone API SDK for Python のソースコードも確認しましたが、使い勝手が良さそうです。
ドキュメントが少ないのが残念で、今後は複数レコードの追加、更新、削除などの利用例もまとめてみます。
参考
kintone API SDK for Python
https://developer.cybozu.io/hc/ja/articles/205382194-kintone-API-SDK-for-Python
icoxfog417/pykintone
https://github.com/icoxfog417/pykintone
【pykintone】Pythonからkintoneに対してレコード操作する方法まとめ
https://trialanderror.jp/python-kintone-records/
今回作成した__pykintoneTest.py 全コード__
# !/usr/bin/python
# -*- coding: utf-8 -*-

import codecs
import sys
import time

import pykintone
from pykintone import model
import pykintone.structure_field as sf

# -------------------------------------------------
# kintone APIの設定(全処理共通)
# -------------------------------------------------
subdomein = "kintoneのサブドメイン"
appId     = "kintoneのアプリケーションID"
token     = "kintoneのAPIトークン"
app       = pykintone.app(subdomein, appId, token)

# -------------------------------------------------
# データの取得
# -------------------------------------------------
select = "作成日時 < NOW() order by dateTime asc"
res = app.select(select)
if res.ok:
    records = res.records
    if len(records) < 1 :
        print("レコード0件")
    for record in records:
        print(record[u"作成日時"]["value"] + ", " + record["dateTime"]["value"] + ", " + record["title"]["value"])
else:
    print(res.error.id.encode('utf-8'))
    print(res.error.message.encode('utf-8'))
    print(res.error.code)

# -------------------------------------------------
# データの追加・更新
# -------------------------------------------------
# データの追加
class recordLayout(model.kintoneModel):
    def __init__(self):
        super(recordLayout, self).__init__()
        self.datetime = ""
        self.title    = ""

record = recordLayout()
record.datetime = time.strftime('%Y-%m-%dT%H:%M:%S+09:00')
record.title    = u"テストデータをRaspiから追加"
res = app.create(record)
if res.ok:
    print("レコード追加 id=" + str(res.record_id) + " revision=" + str(res.revision))
else:
    print(res.error.id.encode('utf-8'))
    print(res.error.message.encode('utf-8'))
    print(res.error.code)


# データの更新
select    = "作成日時 < NOW() order by dateTime asc"
records = app.select(select).models(recordLayout)
record = records[0]
record.title    = u"テストデータをRaspiから更新"
res = app.update(record)
if res.ok:
    print("レコード更新 revision=" + str(res.revision))
else:
    print(res.error.id.encode('utf-8'))
    print(res.error.message.encode('utf-8'))
    print(res.error.code)

# -------------------------------------------------
# データの追加(ファイルアップロード)
# -------------------------------------------------
class recordLayout2(model.kintoneModel):
    def __init__(self):
        super(recordLayout2, self).__init__()
        self.datetime = ""
        self.title    = ""
        self.file     = [sf.File()]

file = ["test.jpg"]
record = recordLayout2()
record.datetime = time.strftime('%Y-%m-%dT%H:%M:%S+09:00')
record.title    = u"テストデータをRaspiからファイルと一緒に追加"
record.file     = [sf.File.upload(f, app) for f in file]
res = app.create(record)
if res.ok:
    print("レコード追加(ファイルUP) id=" + str(res.record_id) + " revision=" + str(res.revision))
else:
    print(res.error.id.encode('utf-8'))
    print(res.error.message.encode('utf-8'))
    print(res.error.code)

# -------------------------------------------------
# データの削除
# -------------------------------------------------
# select    = "レコード番号 > \"3\""
# records = app.select(select).models(recordLayout)
# for record in records:
#    res = app.delete(record.record_id)
#    if res.ok:
#        print("レコード削除 id=" + str(record.record_id))
#    else:
#        print(res.error.id.encode('utf-8'))
#        print(res.error.message.encode('utf-8'))
#        print(res.error.code)