皆さんこんにちは!スーパーマーケットの従業員によるゼロからのプロトタイピングチャレンジ第三弾です~
今回は・・・
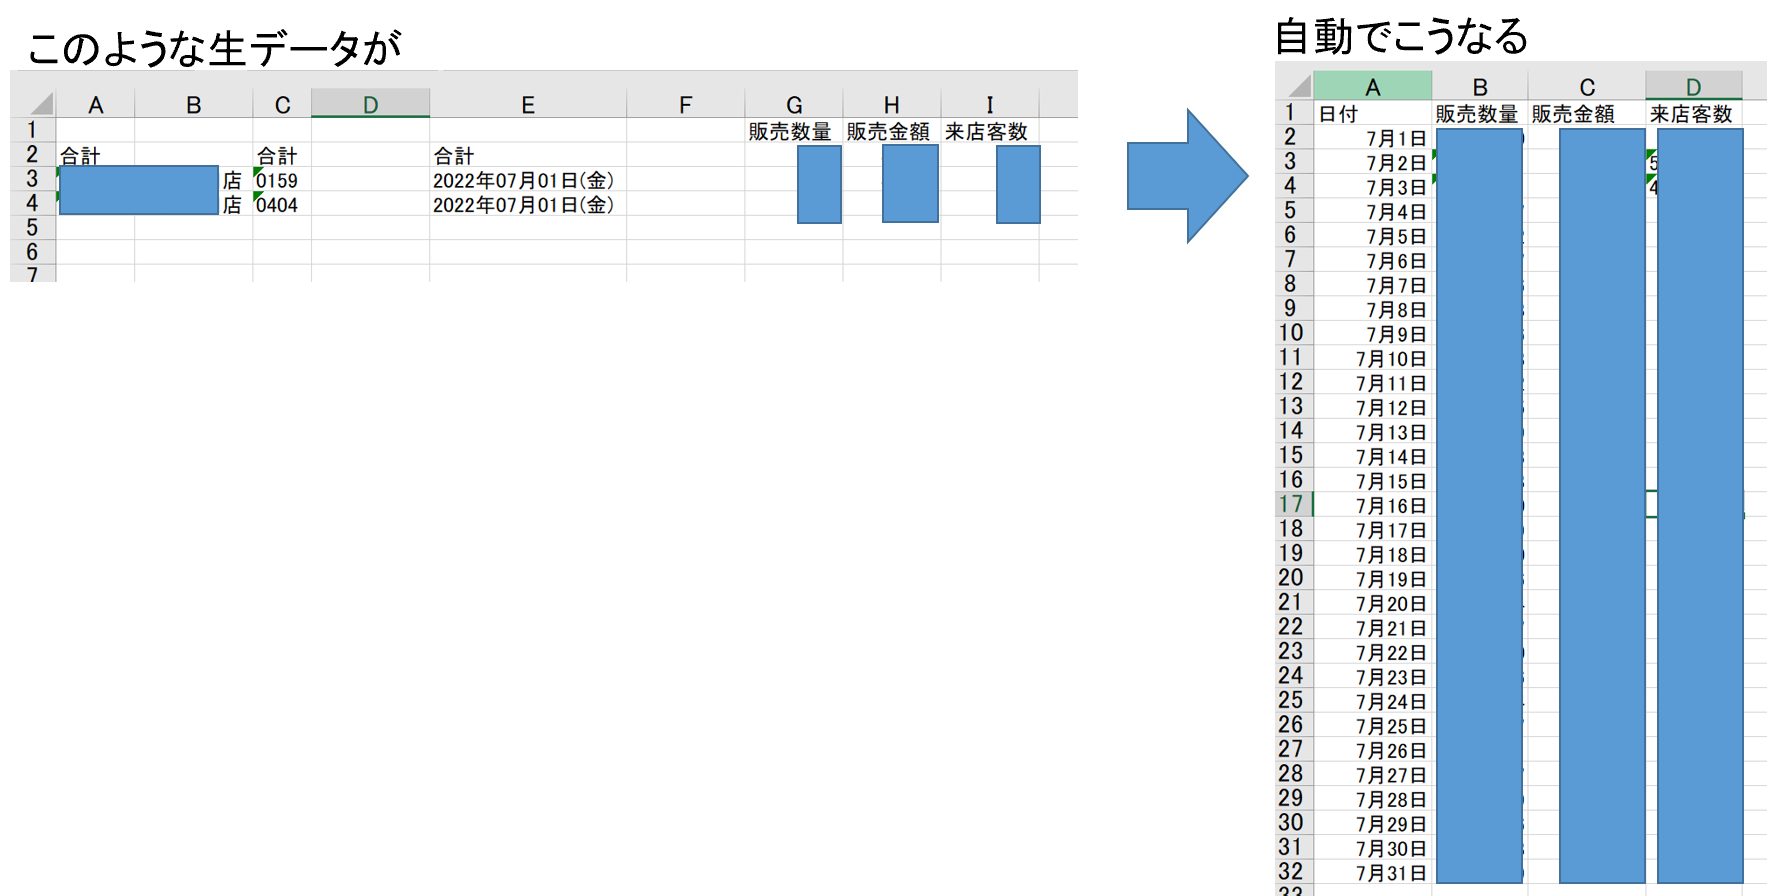
売上管理表を自動で収集し手軽に確認できる!
の前段部分を作成しました。
経緯
私の管理する無人店舗や移動販売の売上確認は、既存のお店とは違いボタン一つで売上を収集できません。私含め担当者や部長が日々一つ一つ開いて確認している為、自動で収集されているものを各々が簡単に確認できるようなものを作りたくて、その前段なるものをPowerAutomateDesktopを使用して作成してみました。
PowerAutomateDesktop
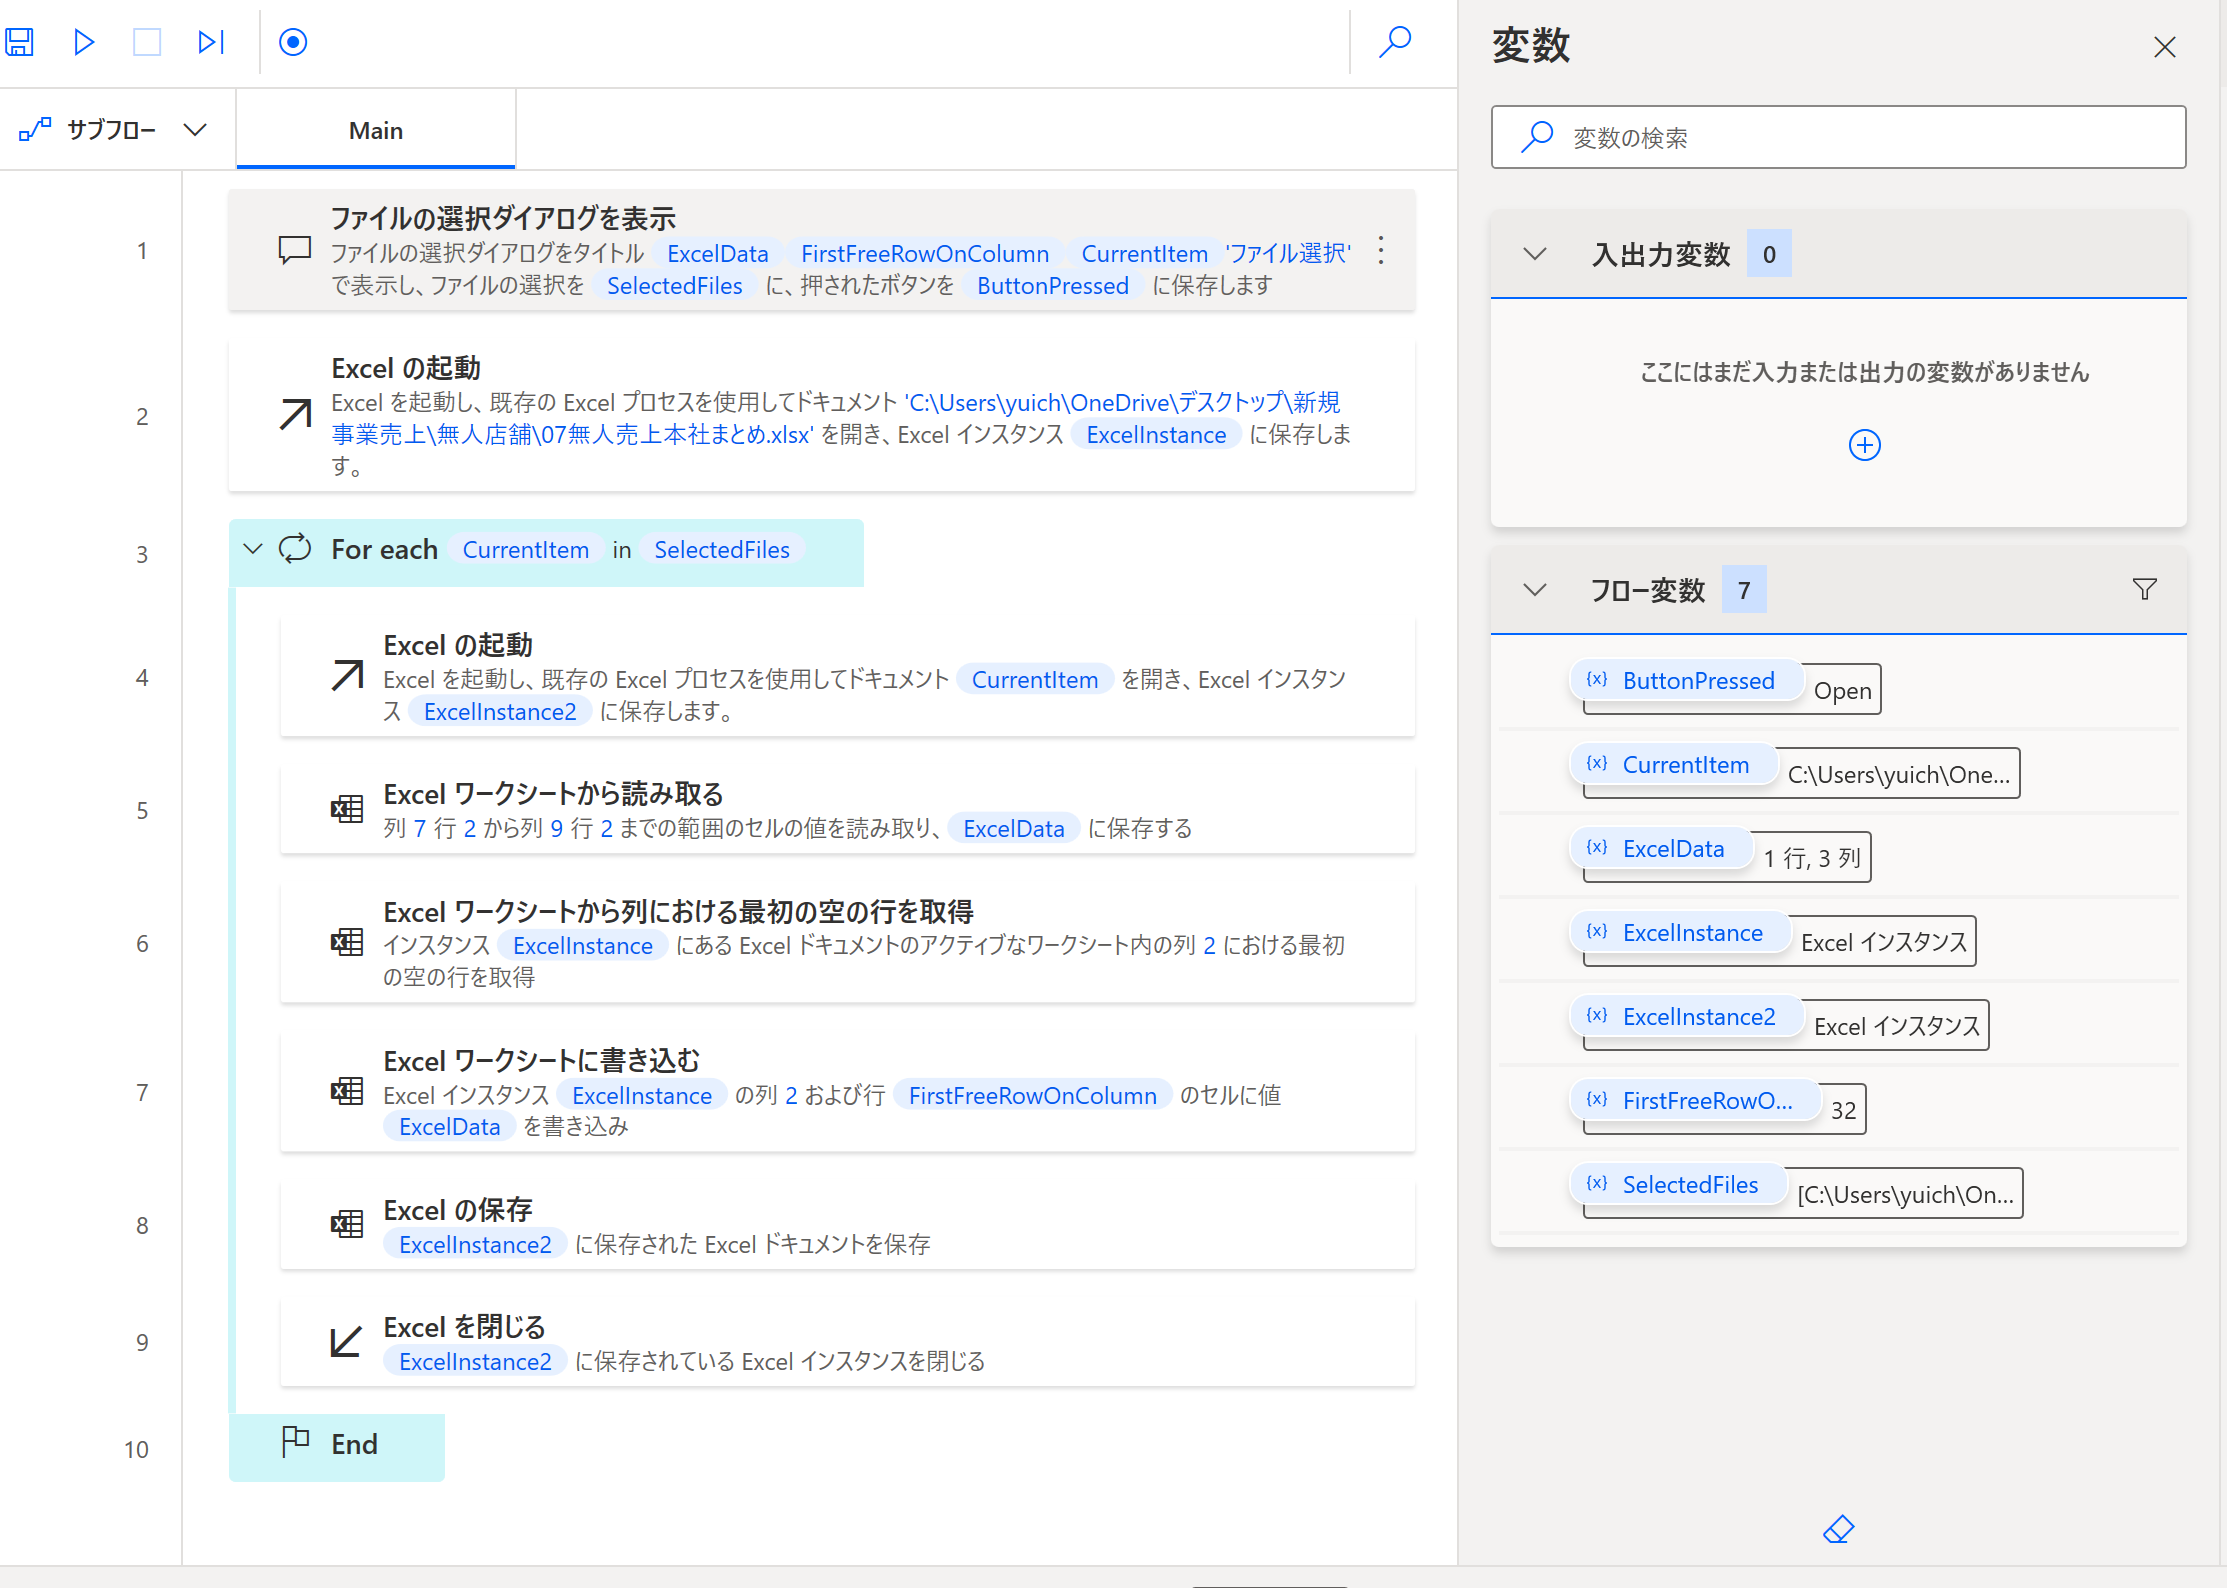
PowerAutomateDesktopの中身フロー
フローコードは
    Display.SelectFileDialog.SelectFiles Title: $'''%ExcelData%%FirstFreeRowOnColumn%%CurrentItem%ファイル選択''' InitialDirectory: $'''C:\\Users\\yuich\\OneDrive\\デスクトップ\\新規事業売上\\無人店舗''' FileFilter: $'''*.xlsx''' IsTopMost: False CheckIfFileExists: False SelectedFiles=> SelectedFiles ButtonPressed=> ButtonPressed
    Excel.LaunchExcel.LaunchAndOpenUnderExistingProcess Path: $'''C:\\Users\\yuich\\OneDrive\\デスクトップ\\新規事業売上\\無人店舗\\07無人売上本社まとめ.xlsx''' Visible: True ReadOnly: False Instance=> ExcelInstance
    LOOP FOREACH CurrentItem IN SelectedFiles
        Excel.LaunchExcel.LaunchAndOpenUnderExistingProcess Path: CurrentItem Visible: True ReadOnly: False Instance=> ExcelInstance2
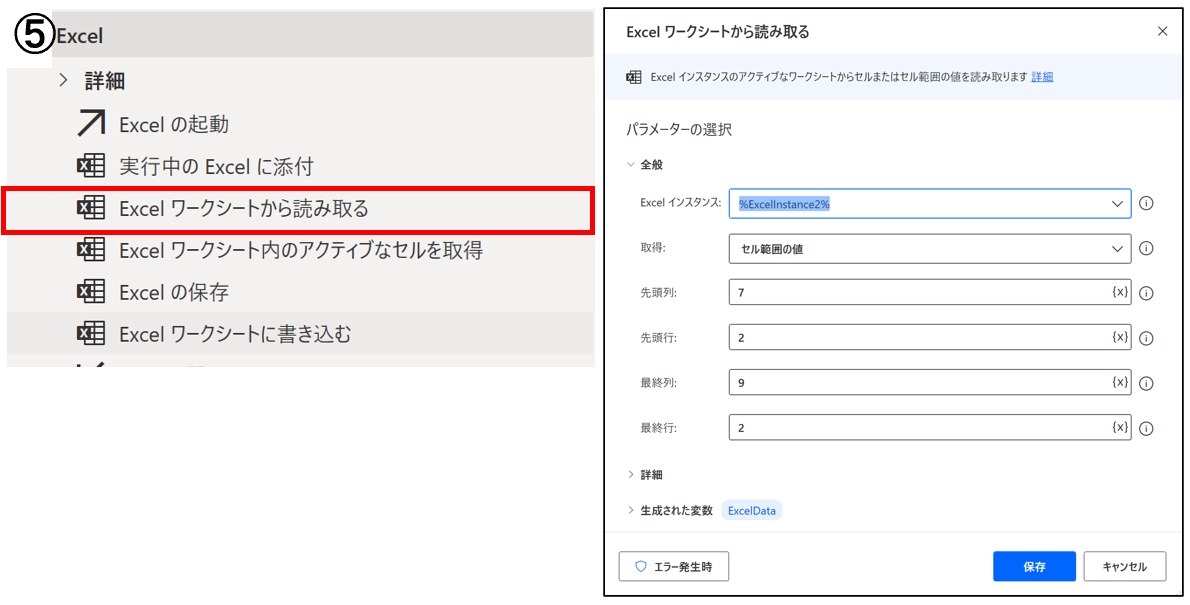
        Excel.ReadFromExcel.ReadCells Instance: ExcelInstance2 StartColumn: 7 StartRow: 2 EndColumn: 9 EndRow: 2 ReadAsText: True FirstLineIsHeader: False RangeValue=> ExcelData
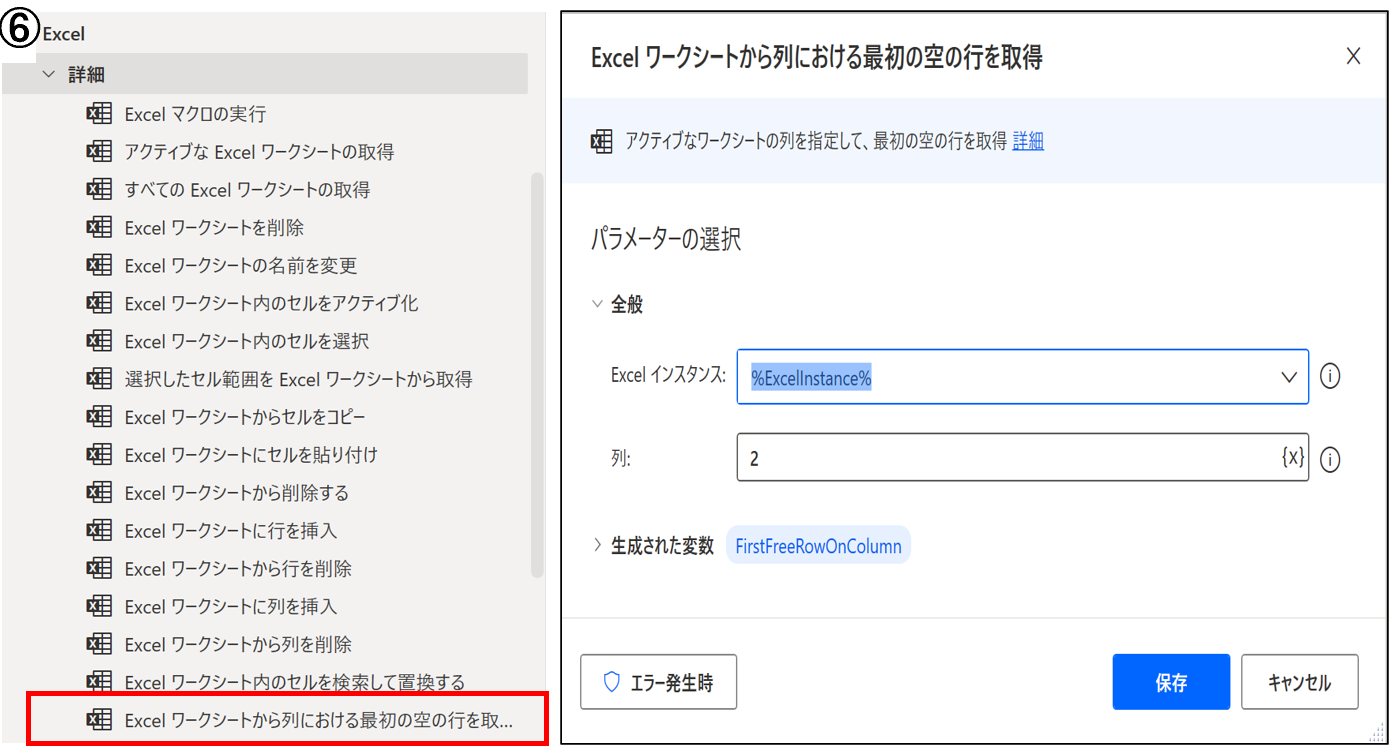
        Excel.GetFirstFreeRowOnColumn Instance: ExcelInstance Column: 2 FirstFreeRowOnColumn=> FirstFreeRowOnColumn
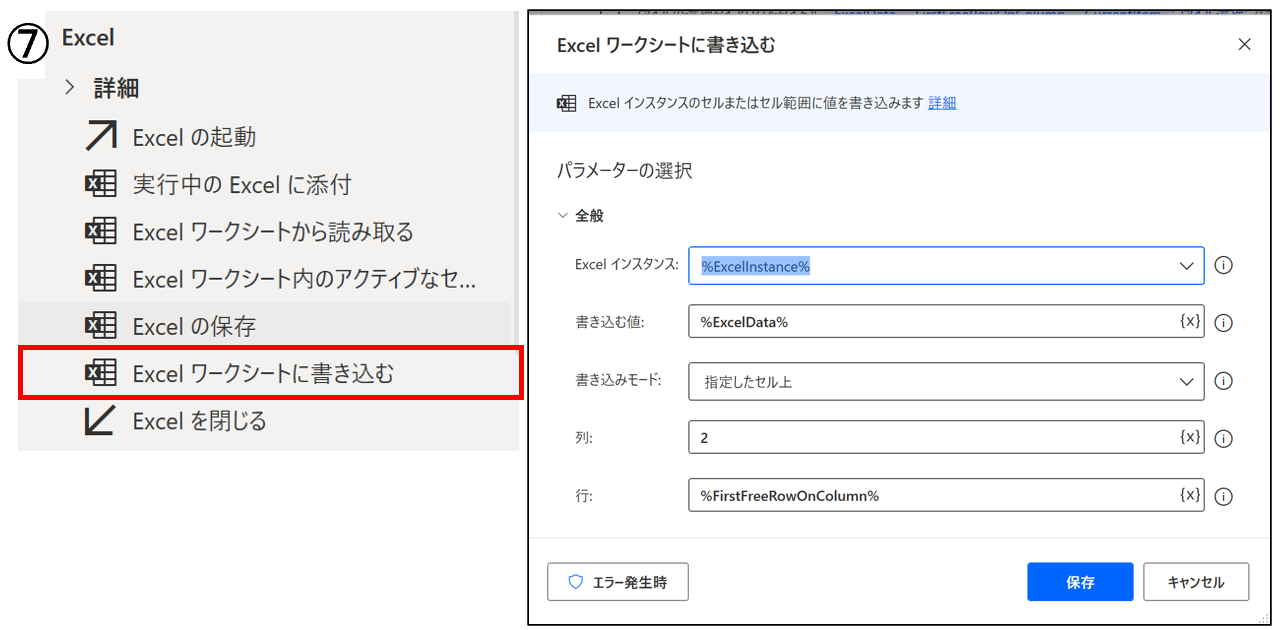
        Excel.WriteToExcel.WriteCell Instance: ExcelInstance Value: ExcelData Column: 2 Row: FirstFreeRowOnColumn
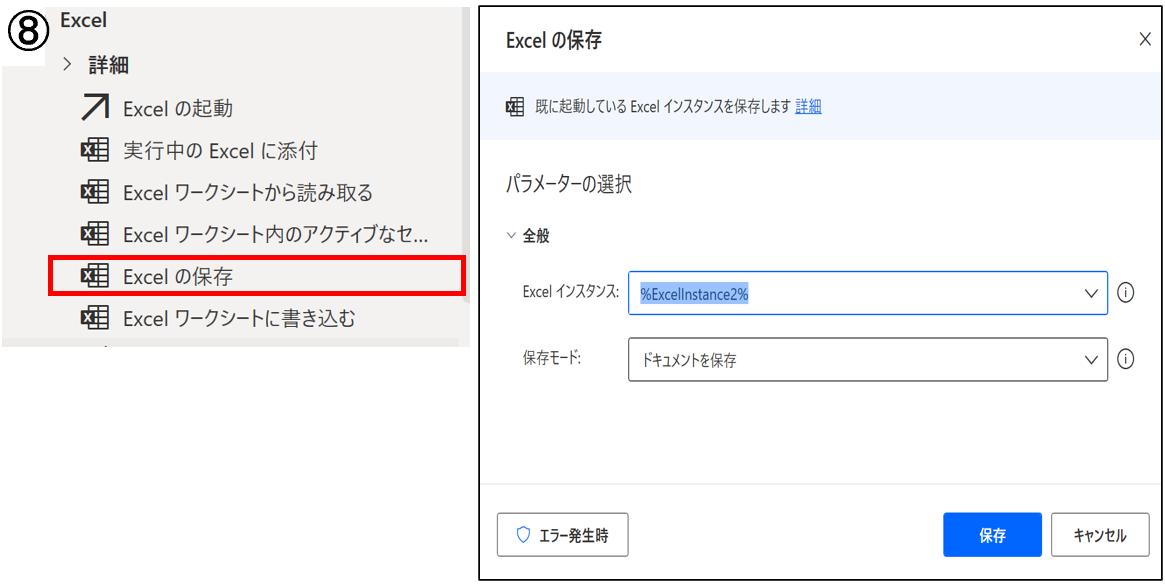
        Excel.SaveExcel.Save Instance: ExcelInstance2
        Excel.CloseExcel.Close Instance: ExcelInstance2
    END
END FUNCTION
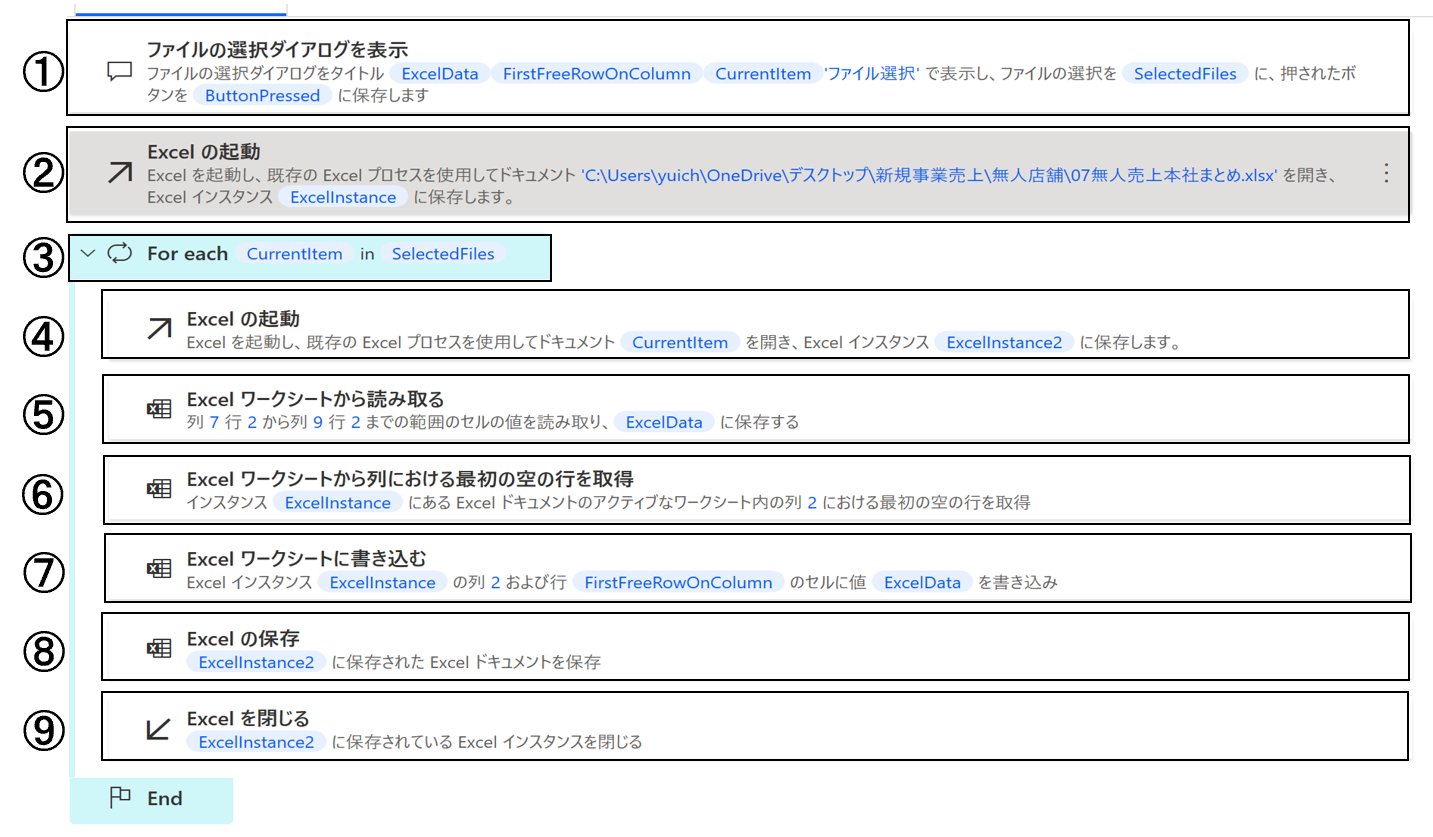
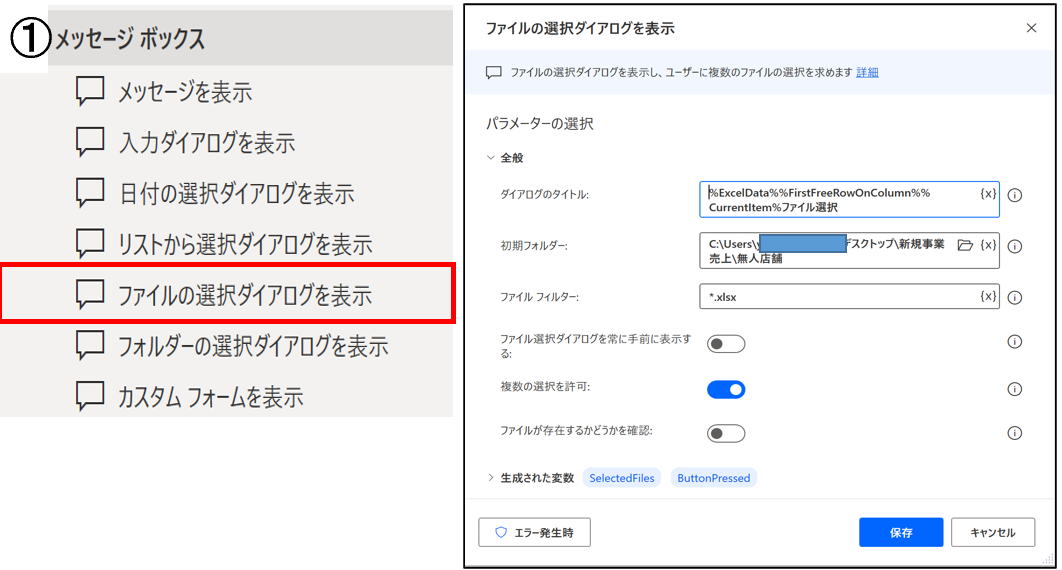
①メッセージボックス → 「ファイルの選択ダイアログを表示」
まとめるファイルの選択を行うためのフローです。選択させないで強制なら別フロー使用。
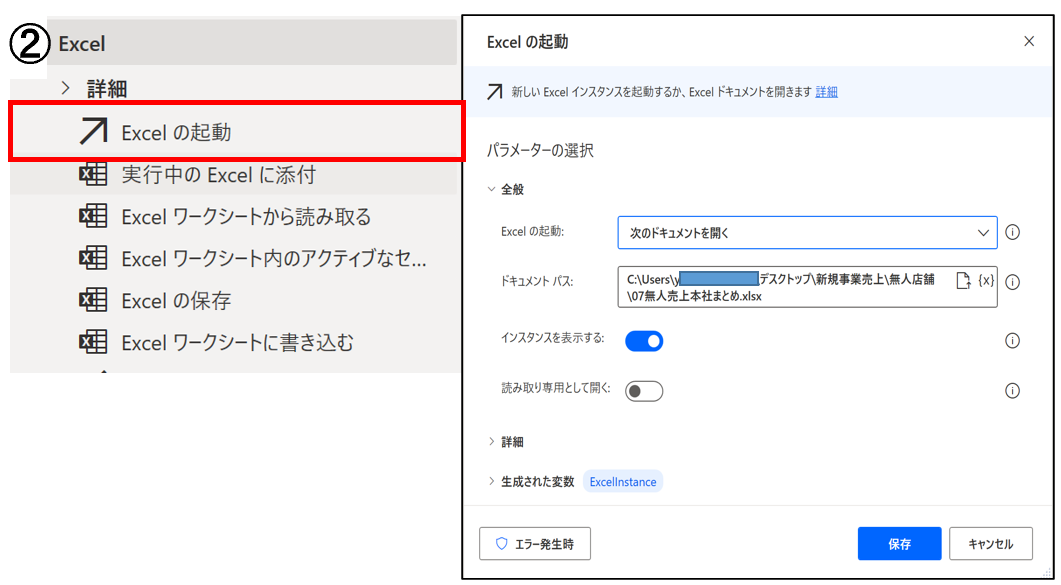
②Excel → 「Excelの起動」
新規ファイルに作成するのか、既存ファイルに抜き出すのかによって中身が変わります。
今回はベースに張り付けていくフローにしました。
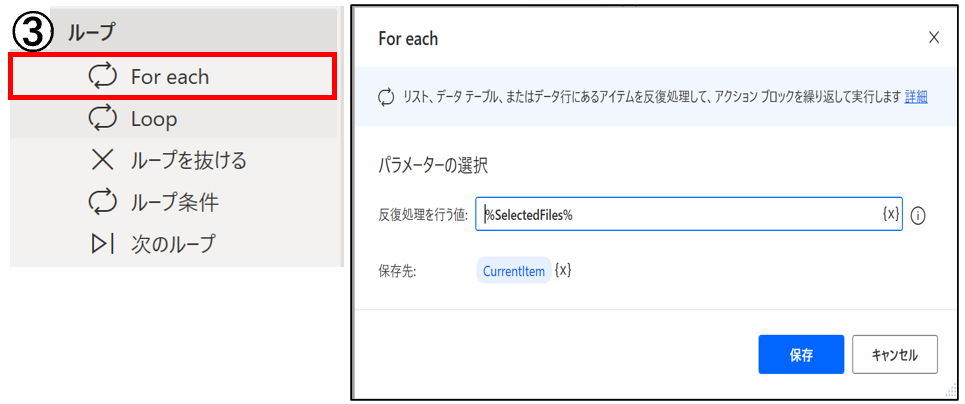
③ループ → 「For each」
繰り返しの作業はループを使用して繰り返し指示を行う。
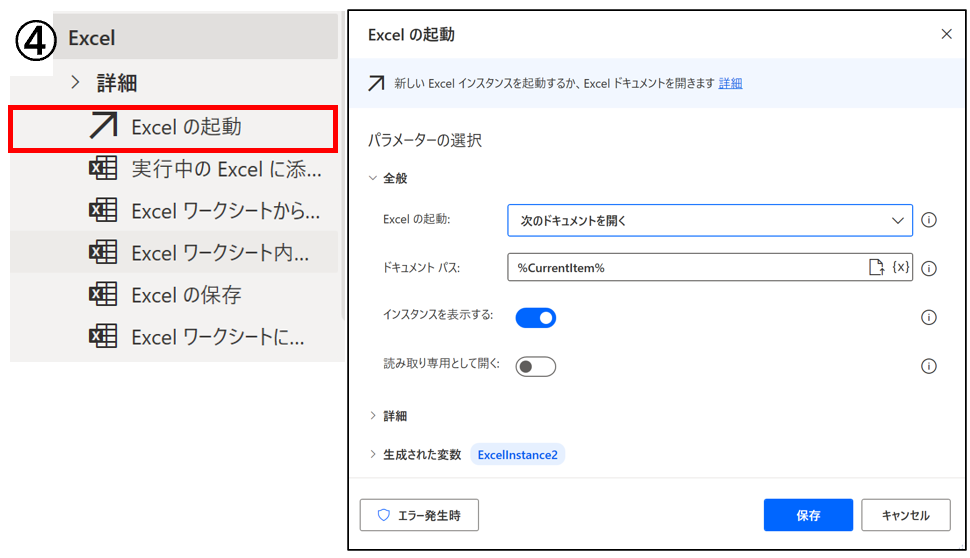
④Excel → 「Excelの起動」
日別ファイルを開く指示
⑤Excel → 「Excelワークシートから読み取る」
開いたExcelから、セル値をすべて読み取ります。
⑥Excel → 詳細 → 「Excelワークシートから列における最初の空の行を取得」
A列の最終行を取得します。
⑦Excel → 「Excelワークシートに書き込む」
取得したセル値を書き込みます。
⑧Excel → 「Excelの保存」
開いたExcelを保存します。
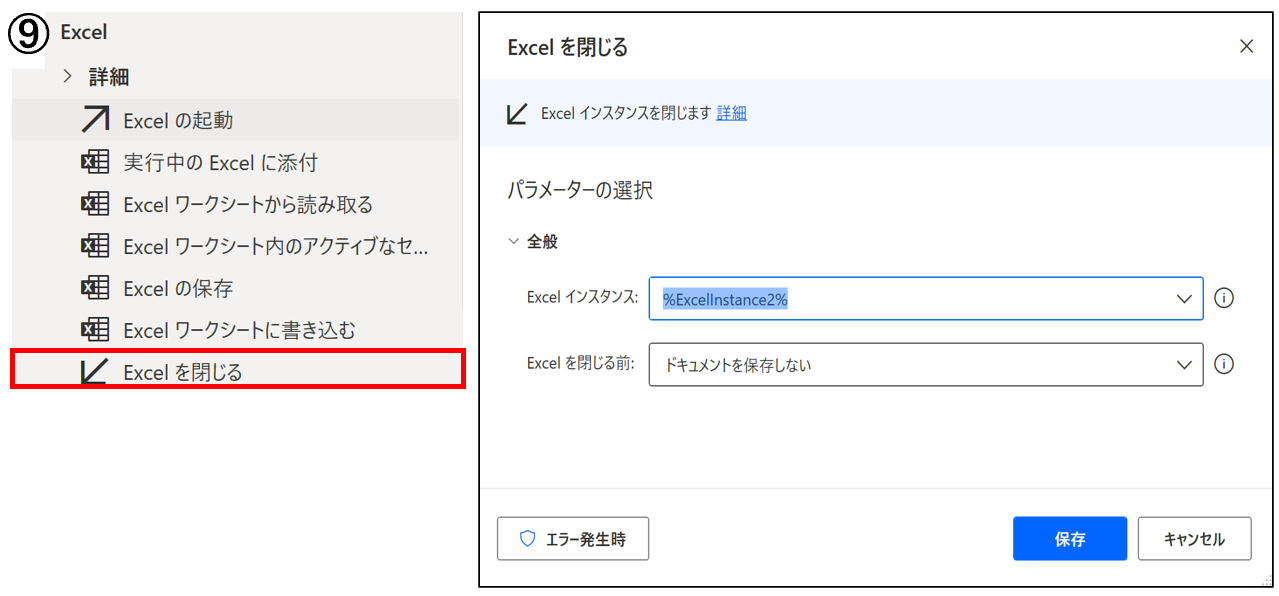
⑨Excel → 「Excelを閉じる」
開いたファイルを閉じます。
下記参考をにして作成しました。
参考資料
周りの評価
上司:現状のままだと社内PCでできないし、全く使えない。そもそも、システムに売上を簡単に抜けるようにしてもらうことも考えたほうがいい。と辛口コメントをいただきました・・・
担当者:最後の展開までたどり着けば端末で簡単に確認できるのでよさそうだが・・・逆に手間がかかる気がする。とこちらも辛口コメント・・・
今後の展開
本来であれば会社PCを使用し売上データ抽出から自動化したいところだが、規制がかかっているため抜き出したデータからの自動化にとどまっております。
今回は無人店舗の1店舗のデータをまとめるにとどまったが、店舗増やし、移動販売などでもできるフローにしていきたい。
また、スプレットシート化 → ドライブへ投函 → Glide等で携帯端末で見れる もしくは LINEでメンバーにのみ配信
を最終目標としたいと感じました。
まだ、できることは少ないが少しづつ挑戦していきます。
最後まで見ていただきありがとうございます!!!
